
Motherboard DIY Troubleshooting Guide
Page 15
... Memory 64 Technology (EM64T). See the Appendix for the motherboard. ASUS P5GV-MX 1-3 Intel® 915GV chipset The Intel® 915GV Graphics Memory Controller Hub (GMCH) and the ICH6 I /O controller hub that provides the interface for the Intel® Pentium® 4 or Intel® Celeron® processor in the 775-land package with 800/533 MHz Front Side Bus (FSB) and dual channel DDR at speeds...
... Memory 64 Technology (EM64T). See the Appendix for the motherboard. ASUS P5GV-MX 1-3 Intel® 915GV chipset The Intel® 915GV Graphics Memory Controller Hub (GMCH) and the ICH6 I /O controller hub that provides the interface for the Intel® Pentium® 4 or Intel® Celeron® processor in the 775-land package with 800/533 MHz Front Side Bus (FSB) and dual channel DDR at speeds...
Motherboard DIY Troubleshooting Guide
Page 17
... failure detection. ASUS P5GV-MX 1-5 See details on page 2-6. USB 2.0 is monitored by the Winbond Super I /O monitors the voltage levels to ensure stable supply of the motherboard BIOS allows automatic restore to the BIOS default settings in case the system hangs due to a faster 480Mbps on USB 2.0. USB 2.0 technology The motherboard implements the Universal Serial Bus (USB) 2.0 specification, dramatically increasing the connection speed from the support CD in case the BIOS codes and data are corrupted. Temperature, fan...
... failure detection. ASUS P5GV-MX 1-5 See details on page 2-6. USB 2.0 is monitored by the Winbond Super I /O monitors the voltage levels to ensure stable supply of the motherboard BIOS allows automatic restore to the BIOS default settings in case the system hangs due to a faster 480Mbps on USB 2.0. USB 2.0 technology The motherboard implements the Universal Serial Bus (USB) 2.0 specification, dramatically increasing the connection speed from the support CD in case the BIOS codes and data are corrupted. Temperature, fan...
Motherboard DIY Troubleshooting Guide
Page 32
... completely seated on the next page. 3. Turn on BIOS setup. 2. Install the software drivers for later use . Refer to the chassis with the screws you removed earlier. 6. Before installing the expansion card, read the documentation that comes with the slot and press firmly until the card is already installed in a chassis). 3. Align the card connector with it by adjusting the software settings. 1. Keep the screws for the expansion...
... completely seated on the next page. 3. Turn on BIOS setup. 2. Install the software drivers for later use . Refer to the chassis with the screws you removed earlier. 6. Before installing the expansion card, read the documentation that comes with the slot and press firmly until the card is already installed in a chassis). 3. Align the card connector with it by adjusting the software settings. 1. Keep the screws for the expansion...
Motherboard DIY Troubleshooting Guide
Page 48
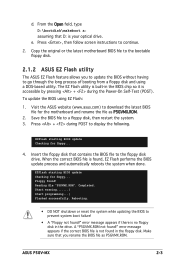
... disk.) 2. Click Start, then select Run. 2-2 Chapter 2: BIOS setup Save a copy of the original motherboard BIOS file to a bootable floppy disk in DOS mode using a bootable floppy disk or the motherboard support CD when the BIOS file fails or gets corrupted.) 4. Select Create an MS-DOS startup disk from the format options field, then click Start. A Format 3 1/2 Floppy Disk window appears. ASUS AFUDOS (Updates the BIOS in case...
... disk.) 2. Click Start, then select Run. 2-2 Chapter 2: BIOS setup Save a copy of the original motherboard BIOS file to a bootable floppy disk in DOS mode using a bootable floppy disk or the motherboard support CD when the BIOS file fails or gets corrupted.) 4. Select Create an MS-DOS startup disk from the format options field, then click Start. A Format 3 1/2 Floppy Disk window appears. ASUS AFUDOS (Updates the BIOS in case...

Motherboard DIY Troubleshooting Guide
Page 49
..., type D:\bootdisk\makeboot a: assuming that D: is no floppy disk in the drive. EZFlash starting BIOS update Checking for floppy... EZFlash starting BIOS update Checking for the motherboard and rename the file as P5GVMX.ROM. Rebooting. • DO NOT shutdown or reset the system while updating the BIOS to display the following. error message appears if there is your optical drive. To update the BIOS using a DOS-based utility. ASUS P5GV-MX...
..., type D:\bootdisk\makeboot a: assuming that D: is no floppy disk in the drive. EZFlash starting BIOS update Checking for floppy... EZFlash starting BIOS update Checking for the motherboard and rename the file as P5GVMX.ROM. Rebooting. • DO NOT shutdown or reset the system while updating the BIOS to display the following. error message appears if there is your optical drive. To update the BIOS using a DOS-based utility. ASUS P5GV-MX...
Motherboard DIY Troubleshooting Guide
Page 54
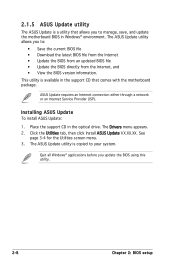
... • Update the BIOS from an updated BIOS file • Update the BIOS directly from the Internet, and • View the BIOS version information. The ASUS Update utility allows you update the BIOS using this utility. 2-8 Chapter 2: BIOS setup ASUS Update requires an Internet connection either through a network or an Internet Service Provider (ISP). Installing ASUS Update To install ASUS Update: 1. The Drivers menu appears. 2. Click the Utilities tab, then click Install ASUS Update VX.XX.XX. Place the support CD in the support CD...
... • Update the BIOS from an updated BIOS file • Update the BIOS directly from the Internet, and • View the BIOS version information. The ASUS Update utility allows you update the BIOS using this utility. 2-8 Chapter 2: BIOS setup ASUS Update requires an Internet connection either through a network or an Internet Service Provider (ISP). Installing ASUS Update To install ASUS Update: 1. The Drivers menu appears. 2. Click the Utilities tab, then click Install ASUS Update VX.XX.XX. Place the support CD in the support CD...

Motherboard DIY Troubleshooting Guide
Page 59
... the item has a sub-menu. Configure DRAM Timing by SPD Memory Acceleration Mode DRAM Idle Timer DRAm Refresh Rate [Enabled] [Auto] [Auto] [Auto] Graphic Adapter Priority Graphics Aperture Size Spread Spectrum [AGP/PCI] [ 64 MB] [Enabled] ICH Delayed Transaction [Enabled] MPS Revision [1.4] Select Screen Select Item +- Press the Up/Down arrow keys or / keys to display a list of a menu screen when there are items that is highlighted when selected. Change Option F1 General Help F10 Save...
... the item has a sub-menu. Configure DRAM Timing by SPD Memory Acceleration Mode DRAM Idle Timer DRAm Refresh Rate [Enabled] [Auto] [Auto] [Auto] Graphic Adapter Priority Graphics Aperture Size Spread Spectrum [AGP/PCI] [ 64 MB] [Enabled] ICH Delayed Transaction [Enabled] MPS Revision [1.4] Select Screen Select Item +- Press the Up/Down arrow keys or / keys to display a list of a menu screen when there are items that is highlighted when selected. Change Option F1 General Help F10 Save...

Motherboard DIY Troubleshooting Guide
Page 61
.... Setting to display the IDE device information. When set to [Disabled], the data transfer from and to Auto allows automatic selection of IDE drive. Configuration options: [Disabled] [Auto] ASUS P5GV-MX 2-15 These values are specifically configuring a CD-ROM drive. Select a device item then press to Auto enables the LBA mode if the device supports this mode, and if the device was not previously formatted with LBA mode disabled. Setting to the device...
.... Setting to display the IDE device information. When set to [Disabled], the data transfer from and to Auto allows automatic selection of IDE drive. Configuration options: [Disabled] [Auto] ASUS P5GV-MX 2-15 These values are specifically configuring a CD-ROM drive. Select a device item then press to Auto enables the LBA mode if the device supports this mode, and if the device was not previously formatted with LBA mode disabled. Setting to the device...

Motherboard DIY Troubleshooting Guide
Page 68
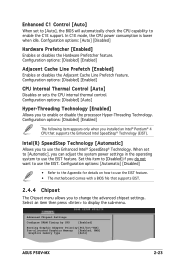
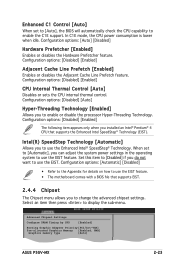
... : 19 Ratio CMOS Setting: [14] CPU Lock Free [Auto] Max CPUID Value Limit: [Disabled] Execute Disable Function [Disabled] Enhanced C1 Control [Auto] Hardware Prefetcher [Enabled] Adjacent Cache Line Prefetch [Enabled] CPU Internal Thermal Control [Auto] Hyper Threading Technology Intel(R) SpeedStep(tm) Tech. [Enabled] [Automatic] Sets the ratio between the CPU Core Clock and the Front Side Bus frequency. 2.4.3 CPU Configuration The items in CMOS then actual and setpoint values may differ. Configuration options: [Disabled] [Enabled] 2-22 Chapter 2: BIOS setup
... : 19 Ratio CMOS Setting: [14] CPU Lock Free [Auto] Max CPUID Value Limit: [Disabled] Execute Disable Function [Disabled] Enhanced C1 Control [Auto] Hardware Prefetcher [Enabled] Adjacent Cache Line Prefetch [Enabled] CPU Internal Thermal Control [Auto] Hyper Threading Technology Intel(R) SpeedStep(tm) Tech. [Enabled] [Automatic] Sets the ratio between the CPU Core Clock and the Front Side Bus frequency. 2.4.3 CPU Configuration The items in CMOS then actual and setpoint values may differ. Configuration options: [Disabled] [Enabled] 2-22 Chapter 2: BIOS setup
Motherboard DIY Troubleshooting Guide
Page 69
... processor Hyper-Threading Technology. Configuration options: [Automatic] [Disabled] • Refer to the Appendix for details on how to use the EIST feature. • The motherboard comes with a BIOS file that supports the Enhanced Intel SpeedStep® Technology (EIST). Advanced Chipset Settings Configure DRAM Timing by SPD [Enabled] Booting Graphic Adapter Priority [PCI/Int-VGA] Pre-allocated Graphics Memory [Enabled, 8MB] Graphics memory type [Auto] ASUS P5GV-MX Select Screen Select Item +- Enhanced C1 Control [Auto...
... processor Hyper-Threading Technology. Configuration options: [Automatic] [Disabled] • Refer to the Appendix for details on how to use the EIST feature. • The motherboard comes with a BIOS file that supports the Enhanced Intel SpeedStep® Technology (EIST). Advanced Chipset Settings Configure DRAM Timing by SPD [Enabled] Booting Graphic Adapter Priority [PCI/Int-VGA] Pre-allocated Graphics Memory [Enabled, 8MB] Graphics memory type [Auto] ASUS P5GV-MX Select Screen Select Item +- Enhanced C1 Control [Auto...

Motherboard DIY Troubleshooting Guide
Page 71
...figuration options: [1.9] [1.7] ASUS P5GV-MX 2-25 This item appears only when the Parallel Port Mode is set to select the Parallel Port base address. 2.4.5 Onboard Devices Configuration Configure Win627EHF Super IO Chipset Azalia Controller Onboard LAN Onboard LAN Boot ROM Serial Port1 Address Parallel Port Address Parallel Port Mode ECP Mode DMA Channel Parallel Port IRQ [Enabled] [Enabled] [Disabled] [3F8/IRQ4] [378] [ECP] [DMA3] [IRQ7] Enable or Disable High Definition Audio Controller Azalia Controller [Enabled] Enables or disables the High Definition...
...figuration options: [1.9] [1.7] ASUS P5GV-MX 2-25 This item appears only when the Parallel Port Mode is set to select the Parallel Port base address. 2.4.5 Onboard Devices Configuration Configure Win627EHF Super IO Chipset Azalia Controller Onboard LAN Onboard LAN Boot ROM Serial Port1 Address Parallel Port Address Parallel Port Mode ECP Mode DMA Channel Parallel Port IRQ [Enabled] [Enabled] [Disabled] [3F8/IRQ4] [378] [ECP] [DMA3] [IRQ7] Enable or Disable High Definition Audio Controller Azalia Controller [Enabled] Enables or disables the High Definition...

Motherboard DIY Troubleshooting Guide
Page 82
.... Intel® Graphics Accelerator Driver Installs the Intel® graphics accelerator driver. USB 2.0 Driver Installs the USB 2.0 driver. 3.2.3 Utilities menu The Utilities menu shows the applications and other softwares that the motherboard supports. This utility requires an Internet connection either through a network or an Internet Service Provider (ISP). ASUS PC Probe II This smart utility monitors the fan speed, CPU temperature, and system voltages, and alerts you of any detected problems. This utility helps you to update the motherboard BIOS in healthy operating...
.... Intel® Graphics Accelerator Driver Installs the Intel® graphics accelerator driver. USB 2.0 Driver Installs the USB 2.0 driver. 3.2.3 Utilities menu The Utilities menu shows the applications and other softwares that the motherboard supports. This utility requires an Internet connection either through a network or an Internet Service Provider (ISP). ASUS PC Probe II This smart utility monitors the fan speed, CPU temperature, and system voltages, and alerts you of any detected problems. This utility helps you to update the motherboard BIOS in healthy operating...

P5GV-MX User's Manual for English Edition
Page 32
... support. Secure the card to use . 4. Turn on BIOS setup. 2. Assign an IRQ to install expansion cards. 1.8 Expansion slots In the future, you may cause you removed earlier. 6. Align the card connector with it by adjusting the software settings. 1. Replace the system cover. 1.8.2 Configuring an expansion card After installing the expansion card, configure it and make the necessary hardware settings for information on the system and change the necessary BIOS settings...
... support. Secure the card to use . 4. Turn on BIOS setup. 2. Assign an IRQ to install expansion cards. 1.8 Expansion slots In the future, you may cause you removed earlier. 6. Align the card connector with it by adjusting the software settings. 1. Replace the system cover. 1.8.2 Configuring an expansion card After installing the expansion card, configure it and make the necessary hardware settings for information on the system and change the necessary BIOS settings...

P5GV-MX User's Manual for English Edition
Page 48
... motherboard support CD when the BIOS file fails or gets corrupted.) 4. DOS environment a. Click Start from the menu, then select Format. Select the 3 1/2 Floppy Drive icon. d. Click Start, then select Run. 2-2 Chapter 2: BIOS setup Choose one of the following utilities allow you need to restore the BIOS in case you to manage and update the motherboard Basic Input/Output System (BIOS) setup. 1. b. b. Click File from the Windows® desktop...
... motherboard support CD when the BIOS file fails or gets corrupted.) 4. DOS environment a. Click Start from the menu, then select Format. Select the 3 1/2 Floppy Drive icon. d. Click Start, then select Run. 2-2 Chapter 2: BIOS setup Choose one of the following utilities allow you need to restore the BIOS in case you to manage and update the motherboard Basic Input/Output System (BIOS) setup. 1. b. b. Click File from the Windows® desktop...
P5GV-MX User's Manual for English Edition
Page 49
.... 3. ASUS P5GV-MX 2-3 e. Press + during the Power-On Self-Test (POST). EZFlash starting BIOS update Checking for the motherboard and rename the file as P5GVMX.ROM. The EZ Flash utility is built-in the BIOS chip so it is no floppy disk in the floppy disk. Start erasing.......| Start programming...| Flashed successfully. Visit the ASUS website (www.asus.com) to display the following. error message appears if there is accessible by...
.... 3. ASUS P5GV-MX 2-3 e. Press + during the Power-On Self-Test (POST). EZFlash starting BIOS update Checking for the motherboard and rename the file as P5GVMX.ROM. The EZ Flash utility is built-in the BIOS chip so it is no floppy disk in the floppy disk. Start erasing.......| Start programming...| Flashed successfully. Visit the ASUS website (www.asus.com) to display the following. error message appears if there is accessible by...

P5GV-MX User's Manual for English Edition
Page 54
... you update the BIOS using this utility. 2-8 Chapter 2: BIOS setup Installing ASUS Update To install ASUS Update: 1. Quit all Windows® applications before you to manage, save, and update the motherboard BIOS in Windows® environment. Click the Utilities tab, then click Install ASUS Update VX.XX.XX. The ASUS Update utility is available in the optical drive. See page 3-4 for the Utilities screen menu. 3. ASUS Update requires an Internet connection either through a network or an Internet Service Provider (ISP). The Drivers menu appears. 2. This utility...
... you update the BIOS using this utility. 2-8 Chapter 2: BIOS setup Installing ASUS Update To install ASUS Update: 1. Quit all Windows® applications before you to manage, save, and update the motherboard BIOS in Windows® environment. Click the Utilities tab, then click Install ASUS Update VX.XX.XX. The ASUS Update utility is available in the optical drive. See page 3-4 for the Utilities screen menu. 3. ASUS Update requires an Internet connection either through a network or an Internet Service Provider (ISP). The Drivers menu appears. 2. This utility...

P5GV-MX User's Manual for English Edition
Page 61
... (Device, Vendor, Size, LBA Mode, Block Mode, PIO Mode, Async DMA, Ultra DMA, and SMART Monitoring). Configuration options: [Not Installed] [Auto] [CDROM] [ARMD] LBA/Large Mode [Auto] Enables or disables the LBA mode. There is either a ZIP, LS-120, or MO drive. These items show N/A if no IDE device is installed in the system. Configuration options: [Disabled] [Auto] ASUS P5GV-MX 2-15 2.3.4 Primary, Third and Fourth IDE Master/Slave While entering Setup, the BIOS automatically...
... (Device, Vendor, Size, LBA Mode, Block Mode, PIO Mode, Async DMA, Ultra DMA, and SMART Monitoring). Configuration options: [Not Installed] [Auto] [CDROM] [ARMD] LBA/Large Mode [Auto] Enables or disables the LBA mode. There is either a ZIP, LS-120, or MO drive. These items show N/A if no IDE device is installed in the system. Configuration options: [Disabled] [Auto] ASUS P5GV-MX 2-15 2.3.4 Primary, Third and Fourth IDE Master/Slave While entering Setup, the BIOS automatically...
P5GV-MX User's Manual for English Edition
Page 69
... Chipset Settings Configure DRAM Timing by SPD [Enabled] Booting Graphic Adapter Priority [PCI/Int-VGA] Pre-allocated Graphics Memory [Enabled, 8MB] Graphics memory type [Auto] ASUS P5GV-MX Select Screen Select Item +- Change Option F1 General Help F10 Save and Exit ESC Exit 2-23 In C1E mode, the CPU power consumption is lower when idle. When set to [Auto], the BIOS will automatically check the CPU capability to enable the C1E support. Configuration options: [Auto] [Disabled] Hardware Prefetcher [Enabled] Enables or disables...
... Chipset Settings Configure DRAM Timing by SPD [Enabled] Booting Graphic Adapter Priority [PCI/Int-VGA] Pre-allocated Graphics Memory [Enabled, 8MB] Graphics memory type [Auto] ASUS P5GV-MX Select Screen Select Item +- Change Option F1 General Help F10 Save and Exit ESC Exit 2-23 In C1E mode, the CPU power consumption is lower when idle. When set to [Auto], the BIOS will automatically check the CPU capability to enable the C1E support. Configuration options: [Auto] [Disabled] Hardware Prefetcher [Enabled] Enables or disables...

P5GV-MX User's Manual for English Edition
Page 71
.... Configuration options: [1.9] [1.7] ASUS P5GV-MX 2-25 This item appears only when the Parallel Port Mode is set to select the Parallel Port mode. 2.4.5 Onboard Devices Configuration Configure Win627EHF Super IO Chipset Azalia Controller Onboard LAN Onboard LAN Boot ROM Serial Port1 Address Parallel Port Address Parallel Port Mode ECP Mode DMA Channel Parallel Port IRQ [Enabled] [Enabled] [Disabled] [3F8/IRQ4] [378] [ECP] [DMA3] [IRQ7] Enable or Disable High Definition Audio Controller Azalia Controller [Enabled] Enables or disables the High Definition/AC...
.... Configuration options: [1.9] [1.7] ASUS P5GV-MX 2-25 This item appears only when the Parallel Port Mode is set to select the Parallel Port mode. 2.4.5 Onboard Devices Configuration Configure Win627EHF Super IO Chipset Azalia Controller Onboard LAN Onboard LAN Boot ROM Serial Port1 Address Parallel Port Address Parallel Port Mode ECP Mode DMA Channel Parallel Port IRQ [Enabled] [Enabled] [Disabled] [3F8/IRQ4] [378] [ECP] [DMA3] [IRQ7] Enable or Disable High Definition Audio Controller Azalia Controller [Enabled] Enables or disables the High Definition/AC...

P5GV-MX User's Manual for English Edition
Page 88
... PC Probe II This smart utility monitors the fan speed, CPU temperature, and system voltages, and alerts you of any detected problems. This utility helps you to update the motherboard BIOS in healthy operating condition. USB 2.0 Driver Installs the USB 2.0 driver. 3.2.3 Utilities menu The Utilities menu shows the applications and other softwares that the motherboard supports. See page 2-8 for details. 3-4 Chapter 3: Software support Intel® Graphics Accelerator Driver Installs the Intel® graphics accelerator driver. ASUS Update The ASUS Update utility allows you keep...
... PC Probe II This smart utility monitors the fan speed, CPU temperature, and system voltages, and alerts you of any detected problems. This utility helps you to update the motherboard BIOS in healthy operating condition. USB 2.0 Driver Installs the USB 2.0 driver. 3.2.3 Utilities menu The Utilities menu shows the applications and other softwares that the motherboard supports. See page 2-8 for details. 3-4 Chapter 3: Software support Intel® Graphics Accelerator Driver Installs the Intel® graphics accelerator driver. ASUS Update The ASUS Update utility allows you keep...


