
Motherboard Installation Guide
Page 86
...;tecte automatiquement les éléments de ce menu. AMIBIOS Version : 08.00.10 Build Date : 06/24/04 Processor Type Speed Count : Genuine Intel(R) CPU 3.20GHz : 2800 MHz : 1 System Memory Size : 1024MB Select Screen Select Item +- 4.3.7 System Information Ce menu vous donne un apperçu des spécifications gé...
...;tecte automatiquement les éléments de ce menu. AMIBIOS Version : 08.00.10 Build Date : 06/24/04 Processor Type Speed Count : Genuine Intel(R) CPU 3.20GHz : 2800 MHz : 1 System Memory Size : 1024MB Select Screen Select Item +- 4.3.7 System Information Ce menu vous donne un apperçu des spécifications gé...

P5AD2-E Deluxe English User's Manual
Page 3
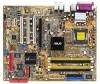
...viii Typography ix P5AD2-E Deluxe specifications summary x Chapter 1: Product introduction 1.1 Welcome 1-1 1.2 Package contents 1-1 1.3 Special features 1-2 1.3.1 Product highlights 1-2 1.3.2 ASUS AI Proactive features 1-5 1.3.3 Innovative ASUS features 1-6 Chapter 2: Hardware information 2.1 Before you proceed 2-1 2.2 Motherboard overview 2-2 2.2.1 Placement direction 2-2 2.2.2 Screw holes 2-2 2.2.3 ASUS Stack Cool 2-3 2.2.4 Motherboard layout 2-4 2.2.5 Layout contents 2-5 2.3 Central Processing Unit (CPU 2-7 2.3.1 Installing the CPU 2-7 2.3.2 Installing the CPU heatsink and...
...viii Typography ix P5AD2-E Deluxe specifications summary x Chapter 1: Product introduction 1.1 Welcome 1-1 1.2 Package contents 1-1 1.3 Special features 1-2 1.3.1 Product highlights 1-2 1.3.2 ASUS AI Proactive features 1-5 1.3.3 Innovative ASUS features 1-6 Chapter 2: Hardware information 2.1 Before you proceed 2-1 2.2 Motherboard overview 2-2 2.2.1 Placement direction 2-2 2.2.2 Screw holes 2-2 2.2.3 ASUS Stack Cool 2-3 2.2.4 Motherboard layout 2-4 2.2.5 Layout contents 2-5 2.3 Central Processing Unit (CPU 2-7 2.3.1 Installing the CPU 2-7 2.3.2 Installing the CPU heatsink and...

P5AD2-E Deluxe English User's Manual
Page 4
...3.3.2 Winbond Voice Editor 3-5 Chapter 4: BIOS setup 4.1 Managing and updating your BIOS 4-1 4.1.1 Creating a bootable floppy disk 4-1 4.1.2 AFUDOS utility 4-2 4.1.3 ASUS CrashFree BIOS 2 utility 4-5 4.1.4 ASUS EZ Flash utility 4-7 4.1.5 ASUS Update utility 4-8 4.2 BIOS setup program 4-11 4.2.1 BIOS menu screen 4-12 4.2.2 Menu bar 4-12 4.2.3 Navigation keys 4-12 4.2.4 Menu items 4-13 ... System Information 4-18 4.4 Advanced menu 4-19 4.4.1 JumperFree Configuration 4-19 4.4.2 LAN Cable Status 4-23 4.4.3 USB Configuration 4-24 4.4.4 CPU Configuration 4-25 4.4.5 Chipset 4-27 iv
...3.3.2 Winbond Voice Editor 3-5 Chapter 4: BIOS setup 4.1 Managing and updating your BIOS 4-1 4.1.1 Creating a bootable floppy disk 4-1 4.1.2 AFUDOS utility 4-2 4.1.3 ASUS CrashFree BIOS 2 utility 4-5 4.1.4 ASUS EZ Flash utility 4-7 4.1.5 ASUS Update utility 4-8 4.2 BIOS setup program 4-11 4.2.1 BIOS menu screen 4-12 4.2.2 Menu bar 4-12 4.2.3 Navigation keys 4-12 4.2.4 Menu items 4-13 ... System Information 4-18 4.4 Advanced menu 4-19 4.4.1 JumperFree Configuration 4-19 4.4.2 LAN Cable Status 4-23 4.4.3 USB Configuration 4-24 4.4.4 CPU Configuration 4-25 4.4.5 Chipset 4-27 iv
P5AD2-E Deluxe English User's Manual
Page 5
...CD 5-1 5.2.2 Drivers menu 5-2 5.2.3 Utilities menu 5-3 5.2.4 Manuals menu 5-5 5.2.5 Contact information 5-5 5.2.6 Other information 5-6 5.3 Software information 5-8 5.3.1 ASUS MyLogo2 5-8 5.3.2 AI NET2 5-10 5.3.3 C-Media 3D audio configuration 5-11 5.4 RAID configurations 5-16 5.4.1 Installing hard disks 5-17 5.4.2 Intel®...5.4.3 ITE® 8212F RAID configurations 5-23 5.5 Creating a RAID driver disk 5-29 Appendix: CPU features A.1 Intel® EM64T A-1 A.2 Enhanced Intel SpeedStep® Technology (EIST A-1 A.2.1 System requirements A-1 A.2.2 Using the EIST ...
...CD 5-1 5.2.2 Drivers menu 5-2 5.2.3 Utilities menu 5-3 5.2.4 Manuals menu 5-5 5.2.5 Contact information 5-5 5.2.6 Other information 5-6 5.3 Software information 5-8 5.3.1 ASUS MyLogo2 5-8 5.3.2 AI NET2 5-10 5.3.3 C-Media 3D audio configuration 5-11 5.4 RAID configurations 5-16 5.4.1 Installing hard disks 5-17 5.4.2 Intel®...5.4.3 ITE® 8212F RAID configurations 5-23 5.5 Creating a RAID driver disk 5-29 Appendix: CPU features A.1 Intel® EM64T A-1 A.2 Enhanced Intel SpeedStep® Technology (EIST A-1 A.2.1 System requirements A-1 A.2.2 Using the EIST ...

P5AD2-E Deluxe English User's Manual
Page 8
... package. Detailed descriptions of the BIOS parameters are not part of the switches, jumpers, and connectors on ASUS hardware and software products. ASUS websites The ASUS website provides updated information on the motherboard. • Chapter 3: Powering up This chapter describes the power...This chapter describes the features of the support CD that comes with the motherboard package. • Appendix: CPU features The Appendix describes the CPU features and technologies that you need when installing and configuring the motherboard. Refer to perform when installing system components...
... package. Detailed descriptions of the BIOS parameters are not part of the switches, jumpers, and connectors on ASUS hardware and software products. ASUS websites The ASUS website provides updated information on the motherboard. • Chapter 3: Powering up This chapter describes the power...This chapter describes the features of the support CD that comes with the motherboard package. • Appendix: CPU features The Appendix describes the CPU features and technologies that you need when installing and configuring the motherboard. Refer to perform when installing system components...

P5AD2-E Deluxe English User's Manual
Page 10
P5AD2-E Deluxe specifications summary CPU Chipset Front Side Bus Memory Expansion slots Storage High Definition Audio LAN USB IEEE 1394 Overclocking features LGA775 socket for Intel® Pentium® 4/Celeron ...)/DDR2-600 (FSB 800)/ DDR2-533 (FSB 1066/800) MHz memory modules Up to 8 USB 2.0 ports IEEE 1394a port (rear panel) IEEE 1394a connector (midboard) ASUS AI Overclocking ASUS NOS (Non-delay Overclocking System) ASUS C.P.R. (CPU Parameter Recall) Adjustable CPU, memory, and PCI Express voltages (continued on the next page) x
P5AD2-E Deluxe specifications summary CPU Chipset Front Side Bus Memory Expansion slots Storage High Definition Audio LAN USB IEEE 1394 Overclocking features LGA775 socket for Intel® Pentium® 4/Celeron ...)/DDR2-600 (FSB 800)/ DDR2-533 (FSB 1066/800) MHz memory modules Up to 8 USB 2.0 ports IEEE 1394a port (rear panel) IEEE 1394a connector (midboard) ASUS AI Overclocking ASUS NOS (Non-delay Overclocking System) ASUS C.P.R. (CPU Parameter Recall) Adjustable CPU, memory, and PCI Express voltages (continued on the next page) x

P5AD2-E Deluxe English User's Manual
Page 11
P5AD2-E Deluxe specifications summary Overclocking features (continuation) Special features BIOS features Rear panel Internal connectors Power Requirement Form Factor Stepless Frequency Selection (SFS) from 100 MHz up to 400 MHz at 1 MHz increment Adjustable FSB/DDR2 frequencies with fixed PCI/PCI-E frequencies ASUS Post Reporter™ ASUS Q-Fan2 ASUS CrashFree BIOS 2 ASUS Multi-language BIOS ASUS MyLogo2 ASUS... x GAME/MIDI port connector 1 x Serial port connector 2 x Chassis fan connectors CPU fan connector Power fan connector Chassis intrusion connector ATX power connectors (24-pin and 4-...
P5AD2-E Deluxe specifications summary Overclocking features (continuation) Special features BIOS features Rear panel Internal connectors Power Requirement Form Factor Stepless Frequency Selection (SFS) from 100 MHz up to 400 MHz at 1 MHz increment Adjustable FSB/DDR2 frequencies with fixed PCI/PCI-E frequencies ASUS Post Reporter™ ASUS Q-Fan2 ASUS CrashFree BIOS 2 ASUS Multi-language BIOS ASUS MyLogo2 ASUS... x GAME/MIDI port connector 1 x Serial port connector 2 x Chassis fan connectors CPU fan connector Power fan connector Chassis intrusion connector ATX power connectors (24-pin and 4-...

P5AD2-E Deluxe English User's Manual
Page 16
...interfaces. Enhanced Intel SpeedStep® Technology (EIST) The Enhanced Intel SpeedStep® Technology (EIST) intelligently manages the CPU resources by automatically adjusting the CPU voltage and core frequency depending on 64-bit operating systems and access larger amounts of your computer to 2-17 for ... DDR2 architecture doubles the bandwidth of system memory for faster and more efficient computing. See pages 2-14 to run on the CPU loading and system speed or power requirement. The MCH also provides the processor, dual-channel memory, and PCI Express interfaces. ...
...interfaces. Enhanced Intel SpeedStep® Technology (EIST) The Enhanced Intel SpeedStep® Technology (EIST) intelligently manages the CPU resources by automatically adjusting the CPU voltage and core frequency depending on 64-bit operating systems and access larger amounts of your computer to 2-17 for ... DDR2 architecture doubles the bandwidth of system memory for faster and more efficient computing. See pages 2-14 to run on the CPU loading and system speed or power requirement. The MCH also provides the processor, dual-channel memory, and PCI Express interfaces. ...

P5AD2-E Deluxe English User's Manual
Page 18
... camcorders, VCRs, printers, TVs, and digital cameras. Dolby® Digital Live™ The CMI9880 audio CODEC comes with USB 1.1. Temperature, fan, and voltage monitoring The CPU temperature is monitored by the ASIC (integrated in the Winbond Super I/O) to powerful audio and speaker systems. See page 2-24 for details.
... camcorders, VCRs, printers, TVs, and digital cameras. Dolby® Digital Live™ The CMI9880 audio CODEC comes with USB 1.1. Temperature, fan, and voltage monitoring The CPU temperature is monitored by the ASIC (integrated in the Winbond Super I/O) to powerful audio and speaker systems. See page 2-24 for details.

P5AD2-E Deluxe English User's Manual
Page 19
... details. Stack Cool™ is a specially designed PCB installed under the motherboard CPU socket that detects and reports Ethernet cable faults and shorts. With current processors supporting 1066/800 MHz FSB, DDR2-711/600 provides the fastest solution for details. ASUS P5AD2-E Deluxe 1-5 AI NET2 AI NET2 is a BIOS-based diagnostic tool that effectively...
... details. Stack Cool™ is a specially designed PCB installed under the motherboard CPU socket that detects and reports Ethernet cable faults and shorts. With current processors supporting 1066/800 MHz FSB, DDR2-711/600 provides the fastest solution for details. ASUS P5AD2-E Deluxe 1-5 AI NET2 AI NET2 is a BIOS-based diagnostic tool that effectively...

P5AD2-E Deluxe English User's Manual
Page 22
Chapter summary 2 2.1 Before you proceed 2-1 2.2 Motherboard overview 2-2 2.3 Central Processing Unit (CPU 2-7 2.4 System memory 2-14 2.5 Expansion slots 2-18 2.6 Jumpers 2-21 2.7 Connectors 2-23 ASUS P5AD2-E Deluxe
Chapter summary 2 2.1 Before you proceed 2-1 2.2 Motherboard overview 2-2 2.3 Central Processing Unit (CPU 2-7 2.4 System memory 2-14 2.5 Expansion slots 2-18 2.6 Jumpers 2-21 2.7 Connectors 2-23 ASUS P5AD2-E Deluxe

P5AD2-E Deluxe English User's Manual
Page 25
Stack Cool effectively lowers the motherboard temperature by as much as 10ºC. 2.2.3 ASUS Stack Cool The motherboard comes with the ASUS Stack Cool, an innovative thermal solution that provides supplementary cooling to conduct heat away from motherboard components. Motherboard holes (for the CPU fan and heatsink assembly pins) ASUS P5AD2-E Deluxe 2-3 Stack Cool is a mini-PCB installed underneath the motherboard CPU socket to the motherboard.
Stack Cool effectively lowers the motherboard temperature by as much as 10ºC. 2.2.3 ASUS Stack Cool The motherboard comes with the ASUS Stack Cool, an innovative thermal solution that provides supplementary cooling to conduct heat away from motherboard components. Motherboard holes (for the CPU fan and heatsink assembly pins) ASUS P5AD2-E Deluxe 2-3 Stack Cool is a mini-PCB installed underneath the motherboard CPU socket to the motherboard.

P5AD2-E Deluxe English User's Manual
Page 28
... (40-1 pin PRI_RAID1 [red], SEC_RAID1 [red]) 4. Optical drive audio connector (4-pin CD) 6. Front panel audio connector (10-1 pin AAFP) 7. USB connectors (10-1 pin USB56, USB78) 8. CPU, Chassis, and Power Fan connectors (3-pin CPU_FAN1, PWR_FAN1, CHA_FAN1, CHA_FAN2) 12. Serial ATA connectors (7-pin SATA1 [red], SATA2 [red], SATA3 [black], SATA4 [black) 5. Chassis intrusion...
... (40-1 pin PRI_RAID1 [red], SEC_RAID1 [red]) 4. Optical drive audio connector (4-pin CD) 6. Front panel audio connector (10-1 pin AAFP) 7. USB connectors (10-1 pin USB56, USB78) 8. CPU, Chassis, and Power Fan connectors (3-pin CPU_FAN1, PWR_FAN1, CHA_FAN1, CHA_FAN2) 12. Serial ATA connectors (7-pin SATA1 [red], SATA2 [red], SATA3 [black], SATA4 [black) 5. Chassis intrusion...

P5AD2-E Deluxe English User's Manual
Page 29
... the LGA775 socket. • The product warranty does not cover damage to the PnP cap/socket contacts/motherboard components. P5AD2-E DELUXE ASUS P5AD2-E Deluxe 2-7 ASUS will shoulder the cost of the PnP cap. 2.3.1 Installing the CPU To install a CPU: 1. ASUS will process Return Merchandise Authorization (RMA) requests only if the motherboard comes with a surface mount LGA775 socket designed for...
... the LGA775 socket. • The product warranty does not cover damage to the PnP cap/socket contacts/motherboard components. P5AD2-E DELUXE ASUS P5AD2-E Deluxe 2-7 ASUS will shoulder the cost of the PnP cap. 2.3.1 Installing the CPU To install a CPU: 1. ASUS will process Return Merchandise Authorization (RMA) requests only if the motherboard comes with a surface mount LGA775 socket designed for...

P5AD2-E Deluxe English User's Manual
Page 30
... tab A Load lever PnP cap B This side of the socket box should fit into the CPU notch. Press the load lever with your thumb (A), then move it to the left (B) until it is on the bottom-left corner of the arrow ... information Lift the load plate with your thumb and forefinger to a 100º angle (A), then push the PnP cap from the retention tab. Position the CPU over the socket, making sure that the gold triangle is released from the load plate window to the socket pins, do not remove the PnP...
... tab A Load lever PnP cap B This side of the socket box should fit into the CPU notch. Press the load lever with your thumb (A), then move it to the left (B) until it is on the bottom-left corner of the arrow ... information Lift the load plate with your thumb and forefinger to a 100º angle (A), then push the PnP cap from the retention tab. Position the CPU over the socket, making sure that the gold triangle is released from the load plate window to the socket pins, do not remove the PnP...

P5AD2-E Deluxe English User's Manual
Page 31
DO NOT force the CPU into the retention tab. The CPU fits in only one correct orientation. ASUS P5AD2-E Deluxe 2-9 Close the load plate (A), then A push the load lever (B) until it snaps into the socket to the Appendix for more information on the socket and damaging the CPU! 6. B The motherboard supports Intel® Pentium® 4 LGA775 processors with the Intel® Enhanced Memory 64 Technology (EM64T), Enhanced Intel SpeedStep® Technology (EIST), and Hyper-Threading Technology. Refer to prevent bending the connectors on these CPU features.
DO NOT force the CPU into the retention tab. The CPU fits in only one correct orientation. ASUS P5AD2-E Deluxe 2-9 Close the load plate (A), then A push the load lever (B) until it snaps into the socket to the Appendix for more information on the socket and damaging the CPU! 6. B The motherboard supports Intel® Pentium® 4 LGA775 processors with the Intel® Enhanced Memory 64 Technology (EM64T), Enhanced Intel SpeedStep® Technology (EIST), and Hyper-Threading Technology. Refer to prevent bending the connectors on these CPU features.

P5AD2-E Deluxe English User's Manual
Page 32
... assembly. Make sure that you have properly applied Thermal Interface Material to ensure optimum thermal condition and performance. • When you buy a CPU separately, make sure that you use only Intel®-certified multi-directional heatsink and fan. • Your Intel® Pentium® 4 LGA775... heatsink and fan assembly comes in a push-pin design and requires no tool to install. • If you purchased a separate CPU heatsink and fan assembly, make sure that you have installed the motherboard to orient each fastener with the narrow end of the groove Motherboard hole...
... assembly. Make sure that you have properly applied Thermal Interface Material to ensure optimum thermal condition and performance. • When you buy a CPU separately, make sure that you use only Intel®-certified multi-directional heatsink and fan. • Your Intel® Pentium® 4 LGA775... heatsink and fan assembly comes in a push-pin design and requires no tool to install. • If you purchased a separate CPU heatsink and fan assembly, make sure that you have installed the motherboard to orient each fastener with the narrow end of the groove Motherboard hole...

P5AD2-E Deluxe English User's Manual
Page 33
Connect the CPU fan cable to connect the CPU fan connector! ASUS P5AD2-E Deluxe 2-11 CPU_FAN1 P5AD2-E DELUXE GND CPU FAN PWR CPU FAN IN CPU FAN PWM P5AD2-E DELUXE CPU fan connector Do not forget to the connector on the motherboard labeled CPU_FAN1. Hardware monitoring errors can occur if you fail to secure the heatsink and fan B assembly in a diagonal sequence to plug this connector. Push down two fasteners at a time in place. A A A B B B A 3. 2.
Connect the CPU fan cable to connect the CPU fan connector! ASUS P5AD2-E Deluxe 2-11 CPU_FAN1 P5AD2-E DELUXE GND CPU FAN PWR CPU FAN IN CPU FAN PWM P5AD2-E DELUXE CPU fan connector Do not forget to the connector on the motherboard labeled CPU_FAN1. Hardware monitoring errors can occur if you fail to secure the heatsink and fan B assembly in a diagonal sequence to plug this connector. Push down two fasteners at a time in place. A A A B B B A 3. 2.

P5AD2-E Deluxe English User's Manual
Page 34
A B A B B A 4. 2.3.3 Uninstalling the CPU heatsink and fan To uninstall the CPU heatsink and fan: 1. Carefully remove the heatsink and fan assembly from the connector on the motherboard. 2. Disconnect the CPU fan cable from the motherboard. 2-12 Chapter 2: Hardware information Rotate each fastener counterclockwise. 3. Pull up two fasteners at a time in a diagonal sequence to disengage the heatsink and fan B assembly from the A motherboard.
A B A B B A 4. 2.3.3 Uninstalling the CPU heatsink and fan To uninstall the CPU heatsink and fan: 1. Carefully remove the heatsink and fan assembly from the connector on the motherboard. 2. Disconnect the CPU fan cable from the motherboard. 2-12 Chapter 2: Hardware information Rotate each fastener counterclockwise. 3. Pull up two fasteners at a time in a diagonal sequence to disengage the heatsink and fan B assembly from the A motherboard.

P5AD2-E Deluxe English User's Manual
Page 35
5. The narrow end of the groove should point outward after resetting. (The photo shows the groove shaded for emphasis.) Narrow end of the groove Refer to ensure correct orientation when reinstalling. ASUS P5AD2-E Deluxe 2-13 Rotate each fastener clockwise to the documentation in the boxed or stand-alone CPU fan package for detailed information on CPU fan installation.
5. The narrow end of the groove should point outward after resetting. (The photo shows the groove shaded for emphasis.) Narrow end of the groove Refer to ensure correct orientation when reinstalling. ASUS P5AD2-E Deluxe 2-13 Rotate each fastener clockwise to the documentation in the boxed or stand-alone CPU fan package for detailed information on CPU fan installation.


