
Motherboard DIY Troubleshooting Guide
Page 3
... information vi About this guide vii ASUS contact information viii P4VP-MX specifications summary ix Chapter 1: Product introduction 1.1 Welcome 1-2 1.2 Package contents 1-2 1.3 Special features 1-3 1.4 Motherboard components 1-4 1.5 Motherboard layout 1-7 1.6 Before you proceed 1-8 1.7 Motherboard installation 1-9 1.7.1 Placement direction 1-9 1.7.2 Screw holes 1-9 1.8 Central Processing Unit (CPU 1-10 1.8.1 Overview 1-10 1.8.2 Installing the CPU 1-11 1.9 System memory 1-12 1.9.1 Installing a DIMM 1-12 1.10 Expansion slots...
... information vi About this guide vii ASUS contact information viii P4VP-MX specifications summary ix Chapter 1: Product introduction 1.1 Welcome 1-2 1.2 Package contents 1-2 1.3 Special features 1-3 1.4 Motherboard components 1-4 1.5 Motherboard layout 1-7 1.6 Before you proceed 1-8 1.7 Motherboard installation 1-9 1.7.1 Placement direction 1-9 1.7.2 Screw holes 1-9 1.8 Central Processing Unit (CPU 1-10 1.8.1 Overview 1-10 1.8.2 Installing the CPU 1-11 1.9 System memory 1-12 1.9.1 Installing a DIMM 1-12 1.10 Expansion slots...

Motherboard DIY Troubleshooting Guide
Page 20
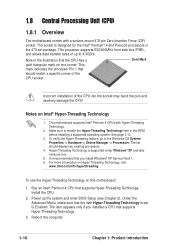
...and allows data transfer rates of the CPU into the socket may bend the pins and severely damage the CPU! Note in the BIOS before installing a supported operating system. See page 2-12. 3. The socket is set to enable the Hyper-Threading Technology item in the ...illustration that supports Hyper-Threading Technology. 3. Install the CPU. 2. Gold Mark Incorrect installation of up the system and enter BIOS Setup (see Chapter 2). It is supported under Windows® XP and later versions only. 5. To ...
...and allows data transfer rates of the CPU into the socket may bend the pins and severely damage the CPU! Note in the BIOS before installing a supported operating system. See page 2-12. 3. The socket is set to enable the Hyper-Threading Technology item in the ...illustration that supports Hyper-Threading Technology. 3. Install the CPU. 2. Gold Mark Incorrect installation of up the system and enter BIOS Setup (see Chapter 2). It is supported under Windows® XP and later versions only. 5. To ...

Motherboard DIY Troubleshooting Guide
Page 23
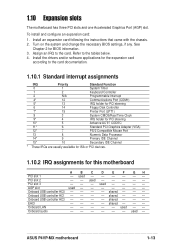
... to the card. used - - used - - - - - - ASUS P4VP-MX motherboard 1-13 To install and configure an expansion card: 1. used - shared - - - shared - - - shared - - - Onboard USB controller HC1 - - - - 1.10 Expansion slots The motherboard has three PCI slots and one Accelerated Graphics Port (AGP) slot. Turn on the system and change the necessary BIOS settings, if any. shared - - - EHCI...
... to the card. used - - used - - - - - - ASUS P4VP-MX motherboard 1-13 To install and configure an expansion card: 1. used - shared - - - shared - - - shared - - - Onboard USB controller HC1 - - - - 1.10 Expansion slots The motherboard has three PCI slots and one Accelerated Graphics Port (AGP) slot. Turn on the system and change the necessary BIOS settings, if any. shared - - - EHCI...

Motherboard DIY Troubleshooting Guide
Page 28
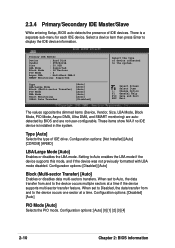
... connector on the UltraDMA133/100/66 cable is an interface for the jumper settings. If you install two hard disks, you connect the cables. 2. SEC_IDE PRI_IDE ® P4VP-MX NOTE: Orient the red markings on the UltraDMA cable connector. Front panel audio connector (10-1...UltraDMA133/100 master device. BIOS supports specific device bootup. Pin 20 on each IDE connector is recommended that allow convenient connection and control of audio devices. ® P4VP-MX AUDIO1 MIC2 MICPWR Line out_R NC Line out_L AGND +5VA BLINE_OUT_R BLINE_OUT_L P4VP-MX Front Panel Audio Connector...
... connector on the UltraDMA133/100/66 cable is an interface for the jumper settings. If you install two hard disks, you connect the cables. 2. SEC_IDE PRI_IDE ® P4VP-MX NOTE: Orient the red markings on the UltraDMA cable connector. Front panel audio connector (10-1...UltraDMA133/100 master device. BIOS supports specific device bootup. Pin 20 on each IDE connector is recommended that allow convenient connection and control of audio devices. ® P4VP-MX AUDIO1 MIC2 MICPWR Line out_R NC Line out_L AGND +5VA BLINE_OUT_R BLINE_OUT_L P4VP-MX Front Panel Audio Connector...

Motherboard DIY Troubleshooting Guide
Page 38
... on . Press during the Power-On Self Test (POST) to download the latest product and BIOS information. 2-6 Chapter 2: BIOS information Otherwise, POST continues with the opportunity to run this chapter are installing a motherboard, reconfiguring your system, or prompted to "Run Setup". You can also restart by ... using the provided utility described in section "2.1 Managing and updating your BIOS." Visit the ASUS website (www.asus.com) to enter the Setup utility. This requires you to reconfigure your system using the BIOS Setup program so that you may want to use the Setup program,...
... on . Press during the Power-On Self Test (POST) to download the latest product and BIOS information. 2-6 Chapter 2: BIOS information Otherwise, POST continues with the opportunity to run this chapter are installing a motherboard, reconfiguring your system, or prompted to "Run Setup". You can also restart by ... using the provided utility described in section "2.1 Managing and updating your BIOS." Visit the ASUS website (www.asus.com) to enter the Setup utility. This requires you to reconfigure your system using the BIOS Setup program so that you may want to use the Setup program,...

Motherboard DIY Troubleshooting Guide
Page 41
... ASUS P4VP-MX motherboard 2-9 Select Screen Select Item +- Change Field Tab Select Field F1 General Help F10 Save and Exit ESC Exit 2.3.1 System Time [xx:xx:xxxx] This item allows you to set the system time. 2.3.2 System Date [Day xx/xx/xxxx] This item allows you an overview of floppy drive installed. ... [11:10:19] [Thu 05/27/2003] [1.44M, 3.5 in] :[ST320413A] :[ASUS CD-S340] :[Not Detected] :[Not Detected] Use [ENTER], [TAB] or [SHIFT-TAB] to configure system time. 2.3 Main menu When you enter the BIOS Setup program, the Main menu screen appears giving you to set the system date...
... ASUS P4VP-MX motherboard 2-9 Select Screen Select Item +- Change Field Tab Select Field F1 General Help F10 Save and Exit ESC Exit 2.3.1 System Time [xx:xx:xxxx] This item allows you to set the system time. 2.3.2 System Date [Day xx/xx/xxxx] This item allows you an overview of floppy drive installed. ... [11:10:19] [Thu 05/27/2003] [1.44M, 3.5 in] :[ST320413A] :[ASUS CD-S340] :[Not Detected] :[Not Detected] Use [ENTER], [TAB] or [SHIFT-TAB] to configure system time. 2.3 Main menu When you enter the BIOS Setup program, the Main menu screen appears giving you to set the system date...

Motherboard DIY Troubleshooting Guide
Page 42
...the dimmed items (Device, Vendor, Size, LBA Mode, Block Mode, PIO Mode, Async DMA, Ultra DMA, and SMART monitoring) are autodetected by BIOS and are not user-configurable. Configuration options: [Disabled] [Auto] Block (Multi-sector Transfer) [Auto] Enables or disables data multi-sectors transfers. Configuration...and to the device occurs one sector at a time if the device supports multi-sector transfer feature. There is installed in the system. Configuration options: [Not Installed] [Auto] [CDROM] [ARMD] LBA/Large Mode [Auto] Enables or disables the LBA mode. Configuration options:...
...the dimmed items (Device, Vendor, Size, LBA Mode, Block Mode, PIO Mode, Async DMA, Ultra DMA, and SMART monitoring) are autodetected by BIOS and are not user-configurable. Configuration options: [Disabled] [Auto] Block (Multi-sector Transfer) [Auto] Enables or disables data multi-sectors transfers. Configuration...and to the device occurs one sector at a time if the device supports multi-sector transfer feature. There is installed in the system. Configuration options: [Not Installed] [Auto] [CDROM] [ARMD] LBA/Large Mode [Auto] Enables or disables the LBA mode. Configuration options:...

Motherboard DIY Troubleshooting Guide
Page 44
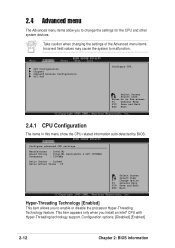
... The items in this menu show the CPU-related information auto-detected by BIOS. Configuration options: [Disabled] [Enabled] 2-12 Chapter 2: BIOS information Configure advanced CPU settings Manufacturer : Intel(R) Brand String : Intel(R) ...Pentium(R) 4 CPU 1500MHz Frequency : 1500MHz Ratio Status : Locked Ratio Actual Value : 15 Select Screen Select Item +- Change Option F1 General Help F10 Save and Exit ESC Exit Hyper-Threading Technology [Enabled] This item allows you install...
... The items in this menu show the CPU-related information auto-detected by BIOS. Configuration options: [Disabled] [Enabled] 2-12 Chapter 2: BIOS information Configure advanced CPU settings Manufacturer : Intel(R) Brand String : Intel(R) ...Pentium(R) 4 CPU 1500MHz Frequency : 1500MHz Ratio Status : Locked Ratio Actual Value : 15 Select Screen Select Item +- Change Option F1 General Help F10 Save and Exit ESC Exit Hyper-Threading Technology [Enabled] This item allows you install...
Motherboard DIY Troubleshooting Guide
Page 49
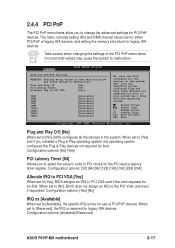
2.4.4 PCI PnP The PCI PnP menu items allow you installed a Plug & Play operating system, the operating system ... Plug and Play (PnP) devices not required for legacy ISA devices. Configuration options: [Available] [Reserved] ASUS P4VP-MX motherboard 2-17 Select Screen Select Item +- When set to [Reserved], the IRQ is free for use of... [Available] [Available] [Available] [Available] [Available] [Available] [Available] [Available] [Available] NO: Lets the BIOS configure all the devices in units of PCI/PnP devices. Take caution when changing the settings of the PCI PnP menu items...
2.4.4 PCI PnP The PCI PnP menu items allow you installed a Plug & Play operating system, the operating system ... Plug and Play (PnP) devices not required for legacy ISA devices. Configuration options: [Available] [Reserved] ASUS P4VP-MX motherboard 2-17 Select Screen Select Item +- When set to [Reserved], the IRQ is free for use of... [Available] [Available] [Available] [Available] [Available] [Available] [Available] [Available] [Available] NO: Lets the BIOS configure all the devices in units of PCI/PnP devices. Take caution when changing the settings of the PCI PnP menu items...

Motherboard DIY Troubleshooting Guide
Page 54
... has been disabled in the system. Configuration options: [xxxxx Drive] [Disabled] 2-22 Chapter 2: BIOS information Select an item then press Enter to change the system boot options. Change Option F1 General ...number of device items that appear on the screen depends on the the number of devices installed in the corresponding type menu. Select Screen Select Item Enter Go to Sub-screen F1 ...1st Boot Device 2nd Boot Device 3rd Boot Device [1st Floppy Drive] [PM-ST330620A] [SM-ASUS CD-S360] Specifies the boot sequence from the available devices. Select Screen Select Item +- Boot ...
... has been disabled in the system. Configuration options: [xxxxx Drive] [Disabled] 2-22 Chapter 2: BIOS information Select an item then press Enter to change the system boot options. Change Option F1 General ...number of device items that appear on the screen depends on the the number of devices installed in the corresponding type menu. Select Screen Select Item Enter Go to Sub-screen F1 ...1st Boot Device 2nd Boot Device 3rd Boot Device [1st Floppy Drive] [PM-ST330620A] [SM-ASUS CD-S360] Specifies the boot sequence from the available devices. Select Screen Select Item +- Boot ...
Motherboard DIY Troubleshooting Guide
Page 56
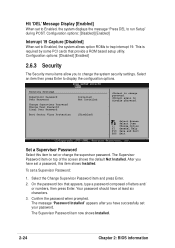
... User Password Clear User Password Boot Sector Virus Protection Installed Not Installed [Disabled] to change the system security settings. Select Screen Select Item +- The Supervisor Password item now shows Installed. 2-24 Chapter 2: BIOS information again to display the configuration options. On the...to disable password. Your password should have successfully set a Supervisor Password: 1. After you to change password. The message "Password Installed" appears after you have at least six characters. 3. The Supervisor Password item on top of letters and/ or numbers, ...
... User Password Clear User Password Boot Sector Virus Protection Installed Not Installed [Disabled] to change the system security settings. Select Screen Select Item +- The Supervisor Password item now shows Installed. 2-24 Chapter 2: BIOS information again to display the configuration options. On the...to disable password. Your password should have successfully set a Supervisor Password: 1. After you to change password. The message "Password Installed" appears after you have at least six characters. 3. The Supervisor Password item on top of letters and/ or numbers, ...
Motherboard DIY Troubleshooting Guide
Page 62
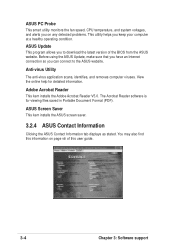
... speed, CPU temperature, and system voltages, and alerts you on page viii of the BIOS from the ASUS website. Anti-virus Utility The anti-virus application scans, identifies, and removes computer viruses. Adobe Acrobat Reader This item installs the Adobe Acrobat Reader V5.0. View the online help for viewing files saved in Portable...
... speed, CPU temperature, and system voltages, and alerts you on page viii of the BIOS from the ASUS website. Anti-virus Utility The anti-virus application scans, identifies, and removes computer viruses. Adobe Acrobat Reader This item installs the Adobe Acrobat Reader V5.0. View the online help for viewing files saved in Portable...
P4VP-MX user's manual English version E1538
Page 3
... information vi About this guide vii ASUS contact information viii P4VP-MX specifications summary ix Chapter 1: Product introduction 1.1 Welcome 1-2 1.2 Package contents 1-2 1.3 Special features 1-3 1.4 Motherboard components 1-4 1.5 Motherboard layout 1-7 1.6 Before you proceed 1-8 1.7 Motherboard installation 1-9 1.7.1 Placement direction 1-9 1.7.2 Screw holes 1-9 1.8 Central Processing Unit (CPU 1-10 1.8.1 Overview 1-10 1.8.2 Installing the CPU 1-11 1.9 System memory 1-12 1.9.1 Installing a DIMM 1-12 1.10 Expansion slots...
... information vi About this guide vii ASUS contact information viii P4VP-MX specifications summary ix Chapter 1: Product introduction 1.1 Welcome 1-2 1.2 Package contents 1-2 1.3 Special features 1-3 1.4 Motherboard components 1-4 1.5 Motherboard layout 1-7 1.6 Before you proceed 1-8 1.7 Motherboard installation 1-9 1.7.1 Placement direction 1-9 1.7.2 Screw holes 1-9 1.8 Central Processing Unit (CPU 1-10 1.8.1 Overview 1-10 1.8.2 Installing the CPU 1-11 1.9 System memory 1-12 1.9.1 Installing a DIMM 1-12 1.10 Expansion slots...
P4VP-MX user's manual English version E1538
Page 20
... XP Service Pack 1. 6. Note in the illustration that you installed a CPU that the item Hyper-Threading Technology is designed for the Intel® Pentium® 4 and Prescott processors in the BIOS before installing a supported operating system. This motherboard supports Intel® Pentium... 4 CPUs with a surface mount 478-pin Zero Insertion Force (ZIF) socket. Install the CPU. 2. 1.8 Central Processing Unit (CPU) 1.8.1 ...
... XP Service Pack 1. 6. Note in the illustration that you installed a CPU that the item Hyper-Threading Technology is designed for the Intel® Pentium® 4 and Prescott processors in the BIOS before installing a supported operating system. This motherboard supports Intel® Pentium... 4 CPUs with a surface mount 478-pin Zero Insertion Force (ZIF) socket. Install the CPU. 2. 1.8 Central Processing Unit (CPU) 1.8.1 ...
P4VP-MX user's manual English version E1538
Page 23
... Data Processor 14* 9 Primary IDE Channel 15* 10 Secondary IDE Channel * These IRQs are usually available for ISA or PCI devices. 1.10.2 IRQ assignments for BIOS information. 3. PCI slot 2 - - shared - - - shared - - - shared - - - used - - - - - Refer to the card. used - - used -...install and configure an expansion card: 1. Install an expansion card following the instructions that came with the chassis. 2. Turn on the system and change the necessary BIOS settings, if any. PCI slot 3 - - - Onboard USB controller HC1 - - - - EHCI - - - - ASUS P4VP-MX...
... Data Processor 14* 9 Primary IDE Channel 15* 10 Secondary IDE Channel * These IRQs are usually available for ISA or PCI devices. 1.10.2 IRQ assignments for BIOS information. 3. PCI slot 2 - - shared - - - shared - - - shared - - - used - - - - - Refer to the card. used - - used -...install and configure an expansion card: 1. Install an expansion card following the instructions that came with the chassis. 2. Turn on the system and change the necessary BIOS settings, if any. PCI slot 3 - - - Onboard USB controller HC1 - - - - EHCI - - - - ASUS P4VP-MX...

P4VP-MX user's manual English version E1538
Page 28
It is removed to be both master devices with two ribbon cables - If you install two hard disks, you have more than two UltraDMA133/100 devices, purchase another for the secondary IDE connector. 1. Pin 20 on the UltraDMA cable... MIC2 MICPWR Line out_R NC Line out_L AGND +5VA BLINE_OUT_R BLINE_OUT_L P4VP-MX Front Panel Audio Connector 1-18 Chapter 1: Product introduction If you must configure the second drive as a slave device by setting its jumper accordingly. BIOS supports specific device bootup. 3. IDE connectors (40-1 pin PRI_IDE, SEC_IDE) This connector supports the...
It is removed to be both master devices with two ribbon cables - If you install two hard disks, you have more than two UltraDMA133/100 devices, purchase another for the secondary IDE connector. 1. Pin 20 on the UltraDMA cable... MIC2 MICPWR Line out_R NC Line out_L AGND +5VA BLINE_OUT_R BLINE_OUT_L P4VP-MX Front Panel Audio Connector 1-18 Chapter 1: Product introduction If you must configure the second drive as a slave device by setting its jumper accordingly. BIOS supports specific device bootup. 3. IDE connectors (40-1 pin PRI_IDE, SEC_IDE) This connector supports the...

P4VP-MX user's manual English version E1538
Page 38
... motherboard stores the Setup utility. For example, you wish to enter Setup after changing any BIOS settings, load the default settings to ensure system stability. The firmware hub on the system ...you may want to "Run Setup". The Setup program is a menudriven program, which means you are installing a motherboard, reconfiguring your system, or prompted to enable the security password feature or change the configuration...system using this program. Visit the ASUS website (www.asus.com) to enter the Setup utility. This section explains how to reconfigure your screen.
... motherboard stores the Setup utility. For example, you wish to enter Setup after changing any BIOS settings, load the default settings to ensure system stability. The firmware hub on the system ...you may want to "Run Setup". The Setup program is a menudriven program, which means you are installing a motherboard, reconfiguring your system, or prompted to enable the security password feature or change the configuration...system using this program. Visit the ASUS website (www.asus.com) to enter the Setup utility. This section explains how to reconfigure your screen.

P4VP-MX user's manual English version E1538
Page 41
Refer to section "2.2.1 BIOS menu screen" for information on the menu screen items and how ... IDE Slave System Information [11:10:19] [Thu 05/27/2003] [1.44M, 3.5 in .] ASUS P4VP-MX motherboard 2-9 2.3 Main menu When you enter the BIOS Setup program, the Main menu screen appears giving you to set the system date. 2.3.3 Legacy Diskette ...Disabled] [360K, 5.25 in.] [1.2M , 5.25 in.] [720K , 3.5 in.] [1.44M, 3.5 in.] [2.88M, 3.5 in ] :[ST320413A] :[ASUS CD-S340] :[Not Detected] :[Not Detected] Use [ENTER], [TAB] or [SHIFT-TAB] to set the system time. 2.3.2 System Date [Day xx/xx...
Refer to section "2.2.1 BIOS menu screen" for information on the menu screen items and how ... IDE Slave System Information [11:10:19] [Thu 05/27/2003] [1.44M, 3.5 in .] ASUS P4VP-MX motherboard 2-9 2.3 Main menu When you enter the BIOS Setup program, the Main menu screen appears giving you to set the system date. 2.3.3 Legacy Diskette ...Disabled] [360K, 5.25 in.] [1.2M , 5.25 in.] [720K , 3.5 in.] [1.44M, 3.5 in.] [2.88M, 3.5 in ] :[ST320413A] :[ASUS CD-S340] :[Not Detected] :[Not Detected] Use [ENTER], [TAB] or [SHIFT-TAB] to set the system time. 2.3.2 System Date [Day xx/xx...
P4VP-MX user's manual English version E1538
Page 42
... Mode, Block Mode, PIO Mode, Async DMA, Ultra DMA, and SMART monitoring) are autodetected by BIOS and are not user-configurable. When set to Auto, the data transfer from and to the system. Configuration options: [Not Installed] [Auto] [CDROM] [ARMD] LBA/Large Mode [Auto] Enables or disables the LBA mode. Type [Auto...
... Mode, Block Mode, PIO Mode, Async DMA, Ultra DMA, and SMART monitoring) are autodetected by BIOS and are not user-configurable. When set to Auto, the data transfer from and to the system. Configuration options: [Not Installed] [Auto] [CDROM] [ARMD] LBA/Large Mode [Auto] Enables or disables the LBA mode. Type [Auto...
P4VP-MX user's manual English version E1538
Page 44
... General Help F10 Save and Exit ESC Exit 2.4.1 CPU Configuration The items in this menu show the CPU-related information auto-detected by BIOS. CPU Configuration Chipset Onboard Devices Configuration PCI PnP Configure CPU. This item appears only when you to change the settings for the CPU... and other system devices. Change Option F1 General Help F10 Save and Exit ESC Exit Hyper-Threading Technology [Enabled] This item allows you install an Intel® CPU with Hyper-Threading technology support. 2.4 Advanced menu The Advanced menu items allow you to enable or disable the processor...
... General Help F10 Save and Exit ESC Exit 2.4.1 CPU Configuration The items in this menu show the CPU-related information auto-detected by BIOS. CPU Configuration Chipset Onboard Devices Configuration PCI PnP Configure CPU. This item appears only when you to change the settings for the CPU... and other system devices. Change Option F1 General Help F10 Save and Exit ESC Exit Hyper-Threading Technology [Enabled] This item allows you install an Intel® CPU with Hyper-Threading technology support. 2.4 Advanced menu The Advanced menu items allow you to enable or disable the processor...


