
Motherboard DIY Troubleshooting Guide
Page 2
..., including the products and software described in the manual revision number. Product Name: ASUS P4T-EM Manual Revision: 1.00 E903 Release Date: November 2001 2 ASUS P4T-EM User's Manual For previous or updated manuals, BIOS, drivers, or product release information, contact ASUS at http://www.asus.com.tw or through any means, except documentation kept by the digit before...
..., including the products and software described in the manual revision number. Product Name: ASUS P4T-EM Manual Revision: 1.00 E903 Release Date: November 2001 2 ASUS P4T-EM User's Manual For previous or updated manuals, BIOS, drivers, or product release information, contact ASUS at http://www.asus.com.tw or through any means, except documentation kept by the digit before...
Motherboard DIY Troubleshooting Guide
Page 4
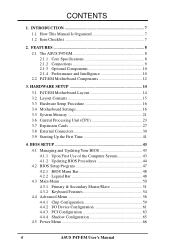
... System 43 4.1.2 Updating BIOS Procedures 44 4.2 BIOS Setup Program 47 4.2.1 BIOS Menu Bar 48 4.2.2 Legend Bar 48 4.3 Main Menu 50 4.3.1 Primary & Secondary Master/Slave 51 4.3.2 Keyboard Features 54 4.4 Advanced Menu 56 4.4.1 Chip Configuration 59 4.4.2 I/O Device Configuration 61 4.4.3 PCI Configuration 63 4.4.4 Shadow Configuration 65 4.5 Power Menu 66 4 ASUS P4T-EM User's Manual FEATURES 8 2.1 The ASUS P4T-EM 8 2.1.1 Core Specifications 8 2.1.2 Connections...
... System 43 4.1.2 Updating BIOS Procedures 44 4.2 BIOS Setup Program 47 4.2.1 BIOS Menu Bar 48 4.2.2 Legend Bar 48 4.3 Main Menu 50 4.3.1 Primary & Secondary Master/Slave 51 4.3.2 Keyboard Features 54 4.4 Advanced Menu 56 4.4.1 Chip Configuration 59 4.4.2 I/O Device Configuration 61 4.4.3 PCI Configuration 63 4.4.4 Shadow Configuration 65 4.5 Power Menu 66 4 ASUS P4T-EM User's Manual FEATURES 8 2.1 The ASUS P4T-EM 8 2.1.1 Core Specifications 8 2.1.2 Connections...
Motherboard DIY Troubleshooting Guide
Page 7
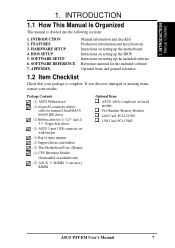
... following sections: 1. 1. INTRODUCTION 1.1 How This Manual Is Organized This manual is complete. Intructions on setting up the BIOS Intructions on motherboard) (2) ASUS C-RIMM Continuity RIMM Optional Items ASUS IrDA-compliant infrared module Two Rambus Memory Modules LAN Card: PCI-L3C920 1394 Card: PCI-1394E ASUS P4T-EM User's Manual 7 SOFTWARE SETUP 6. HARDWARE SETUP 4. INTRODUCTION Manual / Checklist 1.
... following sections: 1. 1. INTRODUCTION 1.1 How This Manual Is Organized This manual is complete. Intructions on setting up the BIOS Intructions on motherboard) (2) ASUS C-RIMM Continuity RIMM Optional Items ASUS IrDA-compliant infrared module Two Rambus Memory Modules LAN Card: PCI-L3C920 1394 Card: PCI-1394E ASUS P4T-EM User's Manual 7 SOFTWARE SETUP 6. HARDWARE SETUP 4. INTRODUCTION Manual / Checklist 1.

Motherboard DIY Troubleshooting Guide
Page 10
...% of 0.8GB/s, MCH dual channel Rambus DRAMs can be ready around the clock, yet satisfy all the energy saving standards. • Smart BIOS: 2Mbit firmware gives a new easy-to four analog line inputs, two stereo outputs, and one mono output channel, 3D stereo enhancement. •...so that you do not have to wait for a long time for virtually automatic setup. This function ensures the best performance and reliability. 10 ASUS P4T-EM User's Manual 2. When auto throttling is a new technology to normal level. ACPI provides more control and protection for full networking capability. 2.1.4...
...% of 0.8GB/s, MCH dual channel Rambus DRAMs can be ready around the clock, yet satisfy all the energy saving standards. • Smart BIOS: 2Mbit firmware gives a new easy-to four analog line inputs, two stereo outputs, and one mono output channel, 3D stereo enhancement. •...so that you do not have to wait for a long time for virtually automatic setup. This function ensures the best performance and reliability. 10 ASUS P4T-EM User's Manual 2. When auto throttling is a new technology to normal level. ACPI provides more control and protection for full networking capability. 2.1.4...

Motherboard DIY Troubleshooting Guide
Page 11
...motherboard components. The new PC 99 requirements for systems and components are monitored to ensure stable current to prevent possible application crashes. 2. ASUS P4T-EM User's Manual 11 FEATURES Performance 2. Regardless of major PC functions. • Fan Status Monitoring and Alarm: To prevent system overheat... on managing their limited resources more information) button. All the fans are used up can be enabled or disabled through BIOS setup to allow the computer to present enormous user interfaces and run large applications. Suggestions will warn the user before the...
...motherboard components. The new PC 99 requirements for systems and components are monitored to ensure stable current to prevent possible application crashes. 2. ASUS P4T-EM User's Manual 11 FEATURES Performance 2. Regardless of major PC functions. • Fan Status Monitoring and Alarm: To prevent system overheat... on managing their limited resources more information) button. All the fans are used up can be enabled or disabled through BIOS setup to allow the computer to present enormous user interfaces and run large applications. Suggestions will warn the user before the...

Motherboard DIY Troubleshooting Guide
Page 16
... the ATX power supply is recommended for this motherboard. Install memory modules 3. Configure the BIOS parameter settings 3.4 Motherboard Settings This section tells you plug in or remove the ATX power connector on the inside. 2. H/W SETUP Getting Started 16 ASUS P4T-EM User's Manual 3. Unplug your hands to a safely grounded object or to touch the...
... the ATX power supply is recommended for this motherboard. Install memory modules 3. Configure the BIOS parameter settings 3.4 Motherboard Settings This section tells you plug in or remove the ATX power connector on the inside. 2. H/W SETUP Getting Started 16 ASUS P4T-EM User's Manual 3. Unplug your hands to a safely grounded object or to touch the...
Motherboard DIY Troubleshooting Guide
Page 21
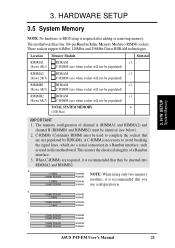
... RIMM) must be populated) TOTAL SYSTEM MEMORY = (2GB Max) IMPORTANT 1. HARDWARE SETUP 3.5 System Memory NOTE: No hardware or BIOS setup is recommended that you use when socket will not be identical (see below). 2. These sockets support 64Mbit, 128Mbit, and 256Mbit... 128MB RDRAM RIMMB2 C-RIMM RIMMB1 128MB RDRAM C-RIMM RIMMA2 RIMMA1 c. 128MB RDRAM RIMMB2 128MB RDRAM RIMMB1 128MB RDRAM 128MB RDRAM RIMMA2 RIMMA1 ASUS P4T-EM User's Manual 21 C-RIMM 128MB RDRAM C-RIMM 128MB RDRAM RIMMB2 RIMMB1 RIMMA2 RIMMA1 NOTE: When using only two memory modules, it is...
... RIMM) must be populated) TOTAL SYSTEM MEMORY = (2GB Max) IMPORTANT 1. HARDWARE SETUP 3.5 System Memory NOTE: No hardware or BIOS setup is recommended that you use when socket will not be identical (see below). 2. These sockets support 64Mbit, 128Mbit, and 256Mbit... 128MB RDRAM RIMMB2 C-RIMM RIMMB1 128MB RDRAM C-RIMM RIMMA2 RIMMA1 c. 128MB RDRAM RIMMB2 128MB RDRAM RIMMB1 128MB RDRAM 128MB RDRAM RIMMA2 RIMMA1 ASUS P4T-EM User's Manual 21 C-RIMM 128MB RDRAM C-RIMM 128MB RDRAM RIMMB2 RIMMB1 RIMMA2 RIMMA1 NOTE: When using only two memory modules, it is...
Motherboard DIY Troubleshooting Guide
Page 27
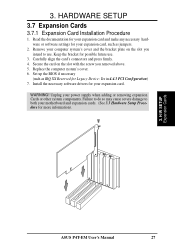
... 3.7 Expansion Cards 3.7.1 Expansion Card Installation Procedure 1. Carefully align the card's connectors and press firmly. 4. H/W SETUP Expansion Cards ASUS P4T-EM User's Manual 27 Secure the card on the slot you removed above. 5. Set up the BIOS if necessary (such as jumpers. 2. Failure to do so may cause severe damage to use . 3. Unplug your expansion...
... 3.7 Expansion Cards 3.7.1 Expansion Card Installation Procedure 1. Carefully align the card's connectors and press firmly. 4. H/W SETUP Expansion Cards ASUS P4T-EM User's Manual 27 Secure the card on the slot you removed above. 5. Set up the BIOS if necessary (such as jumpers. 2. Failure to do so may cause severe damage to use . 3. Unplug your expansion...

Motherboard DIY Troubleshooting Guide
Page 33
...primary IDE connector and another on the IDE ribbon cable to be connected to the motherboard's primary (recommended) or secondary IDE connector. P4T-EM ® P4T-EM IDE Connectors NOTE: Orient the red markings (usually zigzag) on a SCSI drive and select the boot disk through 4.6 Boot Menu....) and the black connector to your UltraDMA/100 master device. H/W SETUP Connectors ASUS P4T-EM User's Manual 33 It is removed to Slave mode. TIP: You may install one for the secondary IDE connector. BIOS now supports specific device bootup (see 4.6 Boot Menu). (Pin 20 is recommended...
...primary IDE connector and another on the IDE ribbon cable to be connected to the motherboard's primary (recommended) or secondary IDE connector. P4T-EM ® P4T-EM IDE Connectors NOTE: Orient the red markings (usually zigzag) on a SCSI drive and select the boot disk through 4.6 Boot Menu....) and the black connector to your UltraDMA/100 master device. H/W SETUP Connectors ASUS P4T-EM User's Manual 33 It is removed to Slave mode. TIP: You may install one for the secondary IDE connector. BIOS now supports specific device bootup (see 4.6 Boot Menu). (Pin 20 is recommended...

Motherboard DIY Troubleshooting Guide
Page 41
.... HARDWARE SETUP 3.9 Starting Up the First Time 1. Connect the power supply cord into a power outlet that all connections are running at a lower frequency ASUS P4T-EM User's Manual 41 The power LED on the back of the case. 6. While the tests are made, close the system case cover. 2. H/W SETUP...installed or detected Video card not found or video card memory bad CPU overheated System running , the BIOS will alarm beeps or additional messages will then run power-on test. Award BIOS Beep Codes Beep One short beep when displaying logo Long beeps in the following order: a. Your ...
.... HARDWARE SETUP 3.9 Starting Up the First Time 1. Connect the power supply cord into a power outlet that all connections are running at a lower frequency ASUS P4T-EM User's Manual 41 The power LED on the back of the case. 6. While the tests are made, close the system case cover. 2. H/W SETUP...installed or detected Video card not found or video card memory bad CPU overheated System running , the BIOS will alarm beeps or additional messages will then run power-on test. Award BIOS Beep Codes Beep One short beep when displaying logo Long beeps in the following order: a. Your ...

Motherboard DIY Troubleshooting Guide
Page 42
... press the ATX power switch after Windows shuts down. HARDWARE SETUP 7. During power-on, hold down the computer? H/W SETUP Powering Up 42 ASUS P4T-EM User's Manual 3. BIOS SETUP. * Powering Off your computer: You must first exit or shut down with ATX power supplies. 3. The power supply should turn off the... 4. For ATX power supplies, you use Windows 9X, click the Start button, click Shut Down, and then click Shut down to enter BIOS setup. If you can now safely turn off after exiting or shutting down your computer" will not appear when shutting down your operating system ...
... press the ATX power switch after Windows shuts down. HARDWARE SETUP 7. During power-on, hold down the computer? H/W SETUP Powering Up 42 ASUS P4T-EM User's Manual 3. BIOS SETUP. * Powering Off your computer: You must first exit or shut down with ATX power supplies. 3. The power supply should turn off the... 4. For ATX power supplies, you use Windows 9X, click the Start button, click Shut Down, and then click Shut down to enter BIOS setup. If you can now safely turn off after exiting or shutting down your computer" will not appear when shutting down your operating system ...

Motherboard DIY Troubleshooting Guide
Page 43
... not work with a Flash Memory Writer utility (AFLASH.EXE) to a bootable floppy disk in case you reboot using a floppy. 3. To determine the BIOS version of your motherboard, check the last four numbers of the code displayed on the motherboard. Type FORMAT A:/S at the DOS prompt to reinstall the...the ACPI BIOS and therefore, cannot be loaded when you save a copy of your screen during bootup. In DOS mode, type A:\AFLASH to the just created boot disk. If "unknown" is displayed after Flash Memory:, the memory chip is either not programmable or is your hard drive. ASUS A7A266 User's...
... not work with a Flash Memory Writer utility (AFLASH.EXE) to a bootable floppy disk in case you reboot using a floppy. 3. To determine the BIOS version of your motherboard, check the last four numbers of the code displayed on the motherboard. Type FORMAT A:/S at the DOS prompt to reinstall the...the ACPI BIOS and therefore, cannot be loaded when you save a copy of your screen during bootup. In DOS mode, type A:\AFLASH to the just created boot disk. If "unknown" is displayed after Flash Memory:, the memory chip is either not programmable or is your hard drive. ASUS A7A266 User's...

Motherboard DIY Troubleshooting Guide
Page 44
... Main Menu, type 2 and then press . BIOS SETUP Updating BIOS 44 ASUS P4T-EM User's Manual BIOS SETUP 5. The Update BIOS Including Boot Block and ESCD screen appears. 5. Type the filename of your new BIOS and the path, for example, A:\XXX-XX.XXX and then press . 4.1.2 Updating BIOS Procedures WARNING! Download an updated ASUS BIOS file from the Internet (WWW or...
... Main Menu, type 2 and then press . BIOS SETUP Updating BIOS 44 ASUS P4T-EM User's Manual BIOS SETUP 5. The Update BIOS Including Boot Block and ESCD screen appears. 5. Type the filename of your new BIOS and the path, for example, A:\XXX-XX.XXX and then press . 4.1.2 Updating BIOS Procedures WARNING! Download an updated ASUS BIOS file from the Internet (WWW or...

Motherboard DIY Troubleshooting Guide
Page 45
BIOS SETUP 6. The utility starts to start the update. 7. The boot block will be updated automatically only when necessary. ASUS P4T-EM User's Manual 45 When the programming is finished, Flashed Successfully will be displayed. 4. Yet if the update fails, your system from ... failure depending on whether the boot block is different", you may still press to update the BIOS. 4. When prompted to confirm the BIOS update, press Y to program the new BIOS information into the flash ROM. BIOS SETUP Updating BIOS NOTE: When you see the message "Boot Block is damaged or not.
BIOS SETUP 6. The utility starts to start the update. 7. The boot block will be updated automatically only when necessary. ASUS P4T-EM User's Manual 45 When the programming is finished, Flashed Successfully will be displayed. 4. Yet if the update fails, your system from ... failure depending on whether the boot block is different", you may still press to update the BIOS. 4. When prompted to confirm the BIOS update, press Y to program the new BIOS information into the flash ROM. BIOS SETUP Updating BIOS NOTE: When you see the message "Boot Block is damaged or not.

Motherboard DIY Troubleshooting Guide
Page 46
WARNING! If you saved to boot up . BIOS SETUP Updating BIOS 46 ASUS P4T-EM User's Manual 4. Just repeat the process, and if the problem still persists, update the original BIOS file you encounter problems while updating the new BIOS, DO NOT turn off your system since this happens, your system will need servicing. 4. Follow the onscreen instructions to successfully update a complete BIOS file, your system from booting up . If this might prevent your system may not be able to disk above. If the Flash Memory Writer utility was not able to continue. BIOS SETUP 8.
WARNING! If you saved to boot up . BIOS SETUP Updating BIOS 46 ASUS P4T-EM User's Manual 4. Just repeat the process, and if the problem still persists, update the original BIOS file you encounter problems while updating the new BIOS, DO NOT turn off your system since this happens, your system will need servicing. 4. Follow the onscreen instructions to successfully update a complete BIOS file, your system from booting up . If this might prevent your system may not be able to disk above. If the Flash Memory Writer utility was not able to continue. BIOS SETUP 8.

Motherboard DIY Troubleshooting Guide
Page 47
...want to enable the Security Password Feature or make changes to "Run Setup". To access the BIOS Setup program, press the key after the computer has run this utility. BIOS SETUP Program Information ASUS P4T-EM User's Manual 47 The utility is used if you still need to run through the various... sub-menus and make it as described in the future you may want to use the Setup program, at some time in 4.1 Managing and Updating Your BIOS. ...
...want to enable the Security Password Feature or make changes to "Run Setup". To access the BIOS Setup program, press the key after the computer has run this utility. BIOS SETUP Program Information ASUS P4T-EM User's Manual 47 The utility is used if you still need to run through the various... sub-menus and make it as described in the future you may want to use the Setup program, at some time in 4.1 Managing and Updating Your BIOS. ...

Motherboard DIY Troubleshooting Guide
Page 48
... notice a legend bar. POWER Use this menu to configure the default system device used to locate and load the Operating System. BIOS SETUP Menu Introduction 48 ASUS P4T-EM User's Manual BOOT Use this menu to its Setup Defaults Saves changes and exits Setup 4. To access the menu bar items,...through the various setup menus. 4. ADVANCED Use this menu to exit the current menu or specify how to the basic system configuration. BIOS SETUP 4.2.1 BIOS Menu Bar The top of the Setup screen you to the advanced features. EXIT Use this menu to enable and make changes to...
... notice a legend bar. POWER Use this menu to configure the default system device used to locate and load the Operating System. BIOS SETUP Menu Introduction 48 ASUS P4T-EM User's Manual BOOT Use this menu to its Setup Defaults Saves changes and exits Setup 4. To access the menu bar items,...through the various setup menus. 4. ADVANCED Use this menu to exit the current menu or specify how to the basic system configuration. BIOS SETUP 4.2.1 BIOS Menu Bar The top of the Setup screen you to the advanced features. EXIT Use this menu to enable and make changes to...

Motherboard DIY Troubleshooting Guide
Page 49
...to return to the last page. This screen can be called up from any of a help text for a field parameter. BIOS SETUP Menu Introduction ASUS P4T-EM User's Manual 49 Sub-Menu Note that explanations appear in the left view) appears to familiarize yourself with their corresponding functions. Take... of the fields, use the set default hot key . To call up and down arrow keys to the Item Specific Help window, the BIOS setup program also provides a General Help screen. If you would within a menu. 4. A sub-menu contains additional options for the currently highlighted...
...to return to the last page. This screen can be called up from any of a help text for a field parameter. BIOS SETUP Menu Introduction ASUS P4T-EM User's Manual 49 Sub-Menu Note that explanations appear in the left view) appears to familiarize yourself with their corresponding functions. Take... of the fields, use the set default hot key . To call up and down arrow keys to the Item Specific Help window, the BIOS setup program also provides a General Help screen. If you would within a menu. 4. A sub-menu contains additional options for the currently highlighted...

Motherboard DIY Troubleshooting Guide
Page 50
... are Hour: (00 to 23), Minute: (00 to 59), Second: (00 to 1.44MB) on a 3.5-inch diskette. The format is accessed, the following screen appears: 4. BIOS SETUP 4.3 Main Menu When the Setup program is month, day, year. Floppy 3 Mode support will allow reading and writing of floppy drives installed...move between the month, day, and year fields. 4. Use the or + keys to 31), Year: (100 year range). Configuration options: [Disabled] [Drive A] [Drive B] [Both] 50 ASUS P4T-EM User's Manual The format is required to the time that you specify (usually the current time).
... are Hour: (00 to 23), Minute: (00 to 59), Second: (00 to 1.44MB) on a 3.5-inch diskette. The format is accessed, the following screen appears: 4. BIOS SETUP 4.3 Main Menu When the Setup program is month, day, year. Floppy 3 Mode support will allow reading and writing of floppy drives installed...move between the month, day, and year fields. 4. Use the or + keys to 31), Year: (100 year range). Configuration options: [Disabled] [Drive A] [Drive B] [Both] 50 ASUS P4T-EM User's Manual The format is required to the time that you specify (usually the current time).

Motherboard DIY Troubleshooting Guide
Page 51
... an IDE hard disk drive. Type [Auto] Select [Auto] to disable IDE devices ASUS P4T-EM User's Manual 51 NOTE: After the IDE hard disk drive information has been entered into BIOS, new IDE hard disk drives must have the configuration information supplied by the manufacturer of ...the drive. If automatic detection fails, your hard disk drive may cause your BIOS or enter the IDE hard disk drive parameters manually. You can be partitioned (such as with FDISK). Other options for the remaining...
... an IDE hard disk drive. Type [Auto] Select [Auto] to disable IDE devices ASUS P4T-EM User's Manual 51 NOTE: After the IDE hard disk drive information has been entered into BIOS, new IDE hard disk drives must have the configuration information supplied by the manufacturer of ...the drive. If automatic detection fails, your hard disk drive may cause your BIOS or enter the IDE hard disk drive parameters manually. You can be partitioned (such as with FDISK). Other options for the remaining...


