
P4BGV-MX User Manual
Page 14
... I /O chipset. This connector connects the provided ribbon cable for a 360K/720K/1.44M/2.88M floppy disk drive, a PS/2 keyboard and mouse port, a multi-mode parallel port, a game port and two serial ports. 7 Floppy Disk connector. Both the primary(blue) and secondary(black) connectors are slotted to 2GB using non-ECC PC2100/1600 DDR SDRAM DIMMs with 533/400 MHz system bus that include hardware and system voltage monitoring among others. 1-4 Chapter 1: Motherboard Information The chipset supports a high-performance floppy disk controller...
... I /O chipset. This connector connects the provided ribbon cable for a 360K/720K/1.44M/2.88M floppy disk drive, a PS/2 keyboard and mouse port, a multi-mode parallel port, a game port and two serial ports. 7 Floppy Disk connector. Both the primary(blue) and secondary(black) connectors are slotted to 2GB using non-ECC PC2100/1600 DDR SDRAM DIMMs with 533/400 MHz system bus that include hardware and system voltage monitoring among others. 1-4 Chapter 1: Motherboard Information The chipset supports a high-performance floppy disk controller...
P4BGV-MX User Manual
Page 15
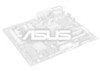
.... This port connects a VGA monitor. 23 Serial port. This port connects to your serial mouse and other audio sources. 19 Line Out jack. ASUS P4BGV-MX Motherboard 1-5 This Mic (pink) jack connects a microphone. 21 USB 2.0 ports. These two 4-pin Universal Serial Bus 2.0 (USB 2.0) ports are available for connecting USB devices such as a mouse and PDA. 22 Video port. 12 Audio/Modem CODEC. These 32-bit PCI 2.2 expansion slots support bus master PCI cards like SCSI and LAN cards with 133MB/s maximum output. 14 Single-Chip Fast Ethernet controller. The...
.... This port connects a VGA monitor. 23 Serial port. This port connects to your serial mouse and other audio sources. 19 Line Out jack. ASUS P4BGV-MX Motherboard 1-5 This Mic (pink) jack connects a microphone. 21 USB 2.0 ports. These two 4-pin Universal Serial Bus 2.0 (USB 2.0) ports are available for connecting USB devices such as a mouse and PDA. 22 Video port. 12 Audio/Modem CODEC. These 32-bit PCI 2.2 expansion slots support bus master PCI cards like SCSI and LAN cards with 133MB/s maximum output. 14 Single-Chip Fast Ethernet controller. The...

P4BGV-MX User Manual
Page 18
.... 1.9 Expansion slots The P4BGV-MX motherboard has three (3) expansion slots. 1.8 System memory The motherboard has two Double Data Rate (DDR) DIMM sockets that they support. 1.9.1 Configuring an expansion card After physically installing the expansion card, configure the card by adjusting the software settings. 1. A DDR DIMM is keyed with a notch so that it fits in only one direction. Assign an IRQ to the tables below. 3. Turn on BIOS setup. 2. Install the software drivers for information...
.... 1.9 Expansion slots The P4BGV-MX motherboard has three (3) expansion slots. 1.8 System memory The motherboard has two Double Data Rate (DDR) DIMM sockets that they support. 1.9.1 Configuring an expansion card After physically installing the expansion card, configure the card by adjusting the software settings. 1. A DDR DIMM is keyed with a notch so that it fits in only one direction. Assign an IRQ to the tables below. 3. Turn on BIOS setup. 2. Install the software drivers for information...
P4BGV-MX User Manual
Page 19
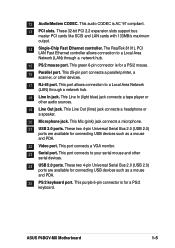
... Onboard VGA shared When using PCI cards on shared slots, ensure that the drivers support "Share IRQ" or that the cards do not need IRQ assignments. ASUS P4BGV-MX Motherboard 1-9 PCI slot 3 shared Onboard USB 1.1 controller 1 shared Onboard USB 1.1 controller 2 - - - 1.9.2 Standard Interrupt Assignments IRQ Standard Function 0 System Timer 1 Keyboard Controller 2 Programmable Interrupt Controller 3 Communications Port (COM2) 4 Communications Port (COM1) 5 IRQ Holder for PCI IRQ Steering 6 Standard Floppy Disk Controller 7 ECP Printer Port (LPT1) 8 System CMOS...
... Onboard VGA shared When using PCI cards on shared slots, ensure that the drivers support "Share IRQ" or that the cards do not need IRQ assignments. ASUS P4BGV-MX Motherboard 1-9 PCI slot 3 shared Onboard USB 1.1 controller 1 shared Onboard USB 1.1 controller 2 - - - 1.9.2 Standard Interrupt Assignments IRQ Standard Function 0 System Timer 1 Keyboard Controller 2 Programmable Interrupt Controller 3 Communications Port (COM2) 4 Communications Port (COM1) 5 IRQ Holder for PCI IRQ Steering 6 Standard Floppy Disk Controller 7 ECP Printer Port (LPT1) 8 System CMOS...
P4BGV-MX User Manual
Page 21
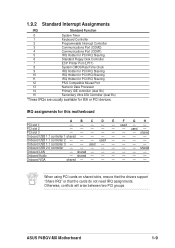
... unplug the power cord. 2. J1 P4BGV-MX P4BGV-MX Clear RTC RAM 12 23 Normal (Default) Clear CMOS 3. Hold down the key during the boot process and enter BIOS setup to wake up feature. This feature requires an ATX power supply that include system setup information such as system passwords, is powered by erasing the CMOS RTC RAM data. Remove the battery. 3. Re-install the battery. 5. P4BGV-MX KBPWR1 2 1 +5V 3 2 +5VSB (Default) P4BGV-MX Keyboard Power Setting ASUS P4BGV-MX Motherboard 1-11 Set this jumper to pins 2-3 (+5VSB) if you press a key on the...
... unplug the power cord. 2. J1 P4BGV-MX P4BGV-MX Clear RTC RAM 12 23 Normal (Default) Clear CMOS 3. Hold down the key during the boot process and enter BIOS setup to wake up feature. This feature requires an ATX power supply that include system setup information such as system passwords, is powered by erasing the CMOS RTC RAM data. Remove the battery. 3. Re-install the battery. 5. P4BGV-MX KBPWR1 2 1 +5V 3 2 +5VSB (Default) P4BGV-MX Keyboard Power Setting ASUS P4BGV-MX Motherboard 1-11 Set this jumper to pins 2-3 (+5VSB) if you press a key on the...

P4BGV-MX User Manual
Page 22
... IDE devices, use an 80-conductor IDE cable. If you install two hard disks, you connect the cables. BIOS supports specific device bootup. 1.11 Connectors This section describes and illustrates the connectors on the UltraDMA cable connector. If you connect non-UltraDMA100/66 devices to the hard disk documentation for the primary IDE connector and another UltraDMA100/66 cable. PIN 1 1-12 Chapter 1: Motherboard Information This prevents incorrect orientation when you must configure the second drive as a slave device by setting its jumper...
... IDE devices, use an 80-conductor IDE cable. If you install two hard disks, you connect the cables. BIOS supports specific device bootup. 1.11 Connectors This section describes and illustrates the connectors on the UltraDMA cable connector. If you connect non-UltraDMA100/66 devices to the hard disk documentation for the primary IDE connector and another UltraDMA100/66 cable. PIN 1 1-12 Chapter 1: Motherboard Information This prevents incorrect orientation when you must configure the second drive as a slave device by setting its jumper...

P4BGV-MX User Manual
Page 28
... 2-pin connector permits switching to the case-mounted reset switch for more than 4 seconds turns the system OFF. 1-18 Chapter 1: Motherboard Information 12. Keyboard Lock Speaker Power LED Connector +5 V PLED Keylock Ground +5V Ground Ground Speaker ExtSMI# Ground PWR Ground Reset Ground P4BGV-MX P4BGV-MX System Panel Connectors Reset SW SMI Lead ATX Power Switch* * Requires an ATX power supply. • System Power LED Lead (2-pin PLED) This 2-pin connector connects to the case-mounted speaker and allows you turn on the BIOS or OS settings. System panel connector (20-pin...
... 2-pin connector permits switching to the case-mounted reset switch for more than 4 seconds turns the system OFF. 1-18 Chapter 1: Motherboard Information 12. Keyboard Lock Speaker Power LED Connector +5 V PLED Keylock Ground +5V Ground Ground Speaker ExtSMI# Ground PWR Ground Reset Ground P4BGV-MX P4BGV-MX System Panel Connectors Reset SW SMI Lead ATX Power Switch* * Requires an ATX power supply. • System Power LED Lead (2-pin PLED) This 2-pin connector connects to the case-mounted speaker and allows you turn on the BIOS or OS settings. System panel connector (20-pin...
P4BGV-MX User Manual
Page 30
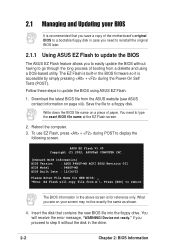
... BIOS Model : P4BGV-MX BIOS Built Date : 12/16/02 Please Enter File Name for reference only. Download the latest BIOS file from the ASUS website (see on a piece of booting from A:\, Press [ESC] to type the exact BIOS file name at the EZ Flash screen. 2. Device not ready." if you to update the BIOS using a DOS-based utility. The EZ Flash is built-in the above screen is accessible by simply pressing + during POST to a floppy disk...
... BIOS Model : P4BGV-MX BIOS Built Date : 12/16/02 Please Enter File Name for reference only. Download the latest BIOS file from the ASUS website (see on a piece of booting from A:\, Press [ESC] to type the exact BIOS file name at the EZ Flash screen. 2. Device not ready." if you to update the BIOS using a DOS-based utility. The EZ Flash is built-in the above screen is accessible by simply pressing + during POST to a floppy disk...
P4BGV-MX User Manual
Page 35
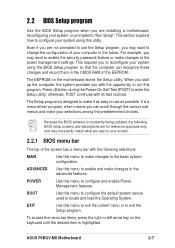
... you start up the computer, the system provides you with its test routines. ASUS P4BGV-MX Motherboard 2-7 For example, you may want to enable the security password feature or make changes to "Run Setup". It is highlighted. This section explains how to configure your system, or prompted to the power management settings. BOOT Use this menu to configure the default system device used to run this utility. 2.2 BIOS Setup program Use the BIOS Setup program...
... you start up the computer, the system provides you with its test routines. ASUS P4BGV-MX Motherboard 2-7 For example, you may want to enable the security password feature or make changes to "Run Setup". It is highlighted. This section explains how to configure your system, or prompted to the power management settings. BOOT Use this menu to configure the default system device used to run this utility. 2.2 BIOS Setup program Use the BIOS Setup program...
P4BGV-MX User Manual
Page 38
... .] Sets the type of floppy drive installed. The password is powered by erasing the CMOS Real Time Clock (RTC) RAM. The same dialog box as opposed to the configuration fields. The passwords control access to specify two different passwords: a Supervisor password and a User password. Passwords are not case sensitive, meaning, passwords typed in either uppercase or lowercase letters are ignored. Configuration options: [All Errors] [No Error] [All but Keyboard] [All but Disk] [All but Disk/Keyboard] 2-10 Chapter 2: BIOS Information The BIOS Setup...
... .] Sets the type of floppy drive installed. The password is powered by erasing the CMOS Real Time Clock (RTC) RAM. The same dialog box as opposed to the configuration fields. The passwords control access to specify two different passwords: a Supervisor password and a User password. Passwords are not case sensitive, meaning, passwords typed in either uppercase or lowercase letters are ignored. Configuration options: [All Errors] [No Error] [All but Keyboard] [All but Disk] [All but Disk/Keyboard] 2-10 Chapter 2: BIOS Information The BIOS Setup...
P4BGV-MX User Manual
Page 40
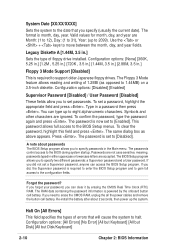
... BIOS based on this field, set the Type field to [User Type HDD] and the Translation Method field to [Manual]. for LS-120 compatible floppy disk drives [ZIP] - When the Main menu appears, the hard disk drive field displays the size for the hard disk drive that LBA Mode is necessary for cylinders, heads, or sectors. To make changes to this sub-menu, press the key to return to determine the correct value. for ZIP-compatible disk drives...
... BIOS based on this field, set the Type field to [User Type HDD] and the Translation Method field to [Manual]. for LS-120 compatible floppy disk drives [ZIP] - When the Main menu appears, the hard disk drive field displays the size for the hard disk drive that LBA Mode is necessary for cylinders, heads, or sectors. To make changes to this sub-menu, press the key to return to determine the correct value. for ZIP-compatible disk drives...
P4BGV-MX User Manual
Page 41
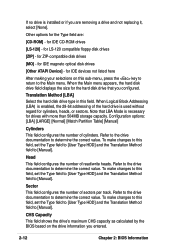
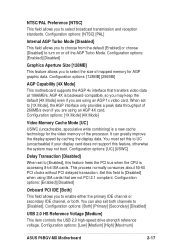
.... Configuration options: [0] [1] [2] [3] [4] [5] [Disabled] 2.3.2 Keyboard Features ASUS P4BGV-MX Motherboard 2-13 This parameter is automatically configured, the set value may decrease system performance. Configuration options: [0] [1] [2] [3] [4] Ultra DMA Mode [Disabled] Ultra DMA capability allows improved transfer speeds and data integrity for the drive. To make changes to this field, set it manually. Configuration options: [Disabled] [2 Sectors] [4 Sectors] [8 Sectors] [16 Sectors] [32 Sectors] [Maximum] SMART Monitoring [Disabled] This field allows you entered...
.... Configuration options: [0] [1] [2] [3] [4] [5] [Disabled] 2.3.2 Keyboard Features ASUS P4BGV-MX Motherboard 2-13 This parameter is automatically configured, the set value may decrease system performance. Configuration options: [0] [1] [2] [3] [4] Ultra DMA Mode [Disabled] Ultra DMA capability allows improved transfer speeds and data integrity for the drive. To make changes to this field, set it manually. Configuration options: [Disabled] [2 Sectors] [4 Sectors] [8 Sectors] [16 Sectors] [32 Sectors] [Maximum] SMART Monitoring [Disabled] This field allows you entered...
P4BGV-MX User Manual
Page 43
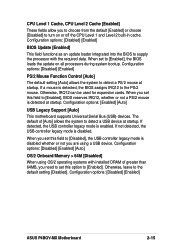
... to supply the processor with installed DRAM of [Auto] allows the system to the PS/2 mouse. Configuration options: [Enabled] [Auto] USB Legacy Support [Auto] This motherboard supports Universal Serial Bus (USB) devices. If detected, the USB controller legacy mode is disabled. Configuration options: [Disabled] [Enabled] [Auto] OS/2 Onboard Memory > 64M [Disabled] When using OS/2 operating systems with the required data. Configuration options: [Disabled] [Enabled] BIOS Update [Enabled] This field functions as an update loader integrated into the BIOS to the default setting [Disabled...
... to supply the processor with installed DRAM of [Auto] allows the system to the PS/2 mouse. Configuration options: [Enabled] [Auto] USB Legacy Support [Auto] This motherboard supports Universal Serial Bus (USB) devices. If detected, the USB controller legacy mode is disabled. Configuration options: [Disabled] [Enabled] [Auto] OS/2 Onboard Memory > 64M [Disabled] When using OS/2 operating systems with the required data. Configuration options: [Disabled] [Enabled] BIOS Update [Enabled] This field functions as an update loader integrated into the BIOS to the default setting [Disabled...
P4BGV-MX User Manual
Page 45
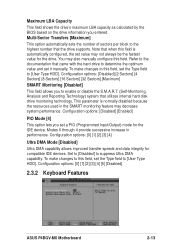
...) if your display card does not support this feature frees the PCI bus when the CPU is a new cache technology for AGP graphic data. Configuration options: [Both] [Primary] [Secondary] [Disabled] USB 2.0 HS Reference Voltage [Medium] This item controls the USB 2.0 high-speed drive strength reference voltage. When set to turn on or off the AGP Turbo Mode. You can greatly improve the display speed by caching the display data. Configuration options: [Low] [Medium] [High] [Maximum] ASUS P4BGV-MX Motherboard 2-17 Configuration options: [Enabled] [Disabled] Onboard PCI IDE [Both] This...
...) if your display card does not support this feature frees the PCI bus when the CPU is a new cache technology for AGP graphic data. Configuration options: [Both] [Primary] [Secondary] [Disabled] USB 2.0 HS Reference Voltage [Medium] This item controls the USB 2.0 high-speed drive strength reference voltage. When set to turn on or off the AGP Turbo Mode. You can greatly improve the display speed by caching the display data. Configuration options: [Low] [Medium] [High] [Maximum] ASUS P4BGV-MX Motherboard 2-17 Configuration options: [Enabled] [Disabled] Onboard PCI IDE [Both] This...

P4BGV-MX User Manual
Page 47
... game port. If you are using standard VGA cards, leave this field to [Enabled] corrects this problem. ASUS P4BGV-MX Motherboard 2-19 Setting this field to [Disabled]. Configuration options: [Disabled] [200H-207H] [208H-20FH] 2.4.3 PCI Configuration Slot 1, Slot 2, Slot 3 IRQ [Auto] These fields assign the IRQ for each field is [Auto], which utilizes auto-routing to detect whether you are conflicts with the onboard audio controller, set the appropriate field to the default setting [32] for each PCI slot. if no audio device is...
... game port. If you are using standard VGA cards, leave this field to [Enabled] corrects this problem. ASUS P4BGV-MX Motherboard 2-19 Setting this field to [Disabled]. Configuration options: [Disabled] [200H-207H] [208H-20FH] 2.4.3 PCI Configuration Slot 1, Slot 2, Slot 3 IRQ [Auto] These fields assign the IRQ for each field is [Auto], which utilizes auto-routing to detect whether you are conflicts with the onboard audio controller, set the appropriate field to the default setting [32] for each PCI slot. if no audio device is...

P4BGV-MX User Manual
Page 48
... by a legacy (non-PnP) ISA card. Configuration options: [Disabled] [Enabled] Onboard LAN Boot ROM [Disabled] This field allows you are NOT using the ISA Configuration Utility (ICU), and that this particular IRQ is being used by a legacy ISA card. Set the IRQ field to [Yes] if you install a legacy ISA card that you to activate. Configuration options: [Disabled] [3 Controllers] USB 2.0 Controller [Enabled] This field allows you wish to turn on or off the onboard LAN boot ROM.This item appears only when onboard LAN is enabled.
... by a legacy (non-PnP) ISA card. Configuration options: [Disabled] [Enabled] Onboard LAN Boot ROM [Disabled] This field allows you are NOT using the ISA Configuration Utility (ICU), and that this particular IRQ is being used by a legacy ISA card. Set the IRQ field to [Yes] if you install a legacy ISA card that you to activate. Configuration options: [Disabled] [3 Controllers] USB 2.0 Controller [Enabled] This field allows you wish to turn on or off the onboard LAN boot ROM.This item appears only when onboard LAN is enabled.

P4BGV-MX User Manual
Page 50
... the power supply should have a dual function where pressing less than 4 seconds powers off the system. Use this user-configurable field. Configuration options: [Blank Screen] [V/H SYNC+Blank] [DPMS Standby] [DPMS Suspend] [DPMS OFF] [DPMS Reduce ON] HDD Power Down [Disabled] Shuts down any IDE hard disk drives in the system after a period of the setting, holding the ATX switch for more than 4 seconds. [Suspend] allows the button to control the video display card if it supports...
... the power supply should have a dual function where pressing less than 4 seconds powers off the system. Use this user-configurable field. Configuration options: [Blank Screen] [V/H SYNC+Blank] [DPMS Standby] [DPMS Suspend] [DPMS OFF] [DPMS Reduce ON] HDD Power Down [Disabled] Shuts down any IDE hard disk drives in the system after a period of the setting, holding the ATX switch for more than 4 seconds. [Suspend] allows the button to control the video display card if it supports...

P4BGV-MX User Manual
Page 53
... select which the system uses to boot device on system power up and down arrow keys. Configuration options: [No] [Yes] Reset Configuration Data [No] Select [Yes], if you want to prevent reassigning of interrupt settings, keep the default setting [No]. Configuration options: [Disabled] [Enabled] ASUS P4BGV-MX Motherboard 2-25 Boot Sequence The Boot menu allows you to select four types of boot devices using the up . Configuration fields include Removable Devices, IDE Hard Drive, ATAPI CD-ROM, and Other Boot Device. Pressing [Enter] will show the product...
... select which the system uses to boot device on system power up and down arrow keys. Configuration options: [No] [Yes] Reset Configuration Data [No] Select [Yes], if you want to prevent reassigning of interrupt settings, keep the default setting [No]. Configuration options: [Disabled] [Enabled] ASUS P4BGV-MX Motherboard 2-25 Boot Sequence The Boot menu allows you to select four types of boot devices using the up . Configuration fields include Removable Devices, IDE Hard Drive, ATAPI CD-ROM, and Other Boot Device. Pressing [Enter] will show the product...

P4BGV-MX User Manual
Page 58
... system The P4BGV-MX motherboard supports Windows ME/2000/XP operating systems (OS). If the installation menu did not appear automatically, locate and doubleclick on your hardware. The contents of your screen. Visit the ASUS website for more information. 3.2 Support CD information The support CD that came with the motherboard contains useful software and several utility drivers that enhance the motherboard features. Because motherboard settings and hardware options vary, use the setup procedures...
... system The P4BGV-MX motherboard supports Windows ME/2000/XP operating systems (OS). If the installation menu did not appear automatically, locate and doubleclick on your hardware. The contents of your screen. Visit the ASUS website for more information. 3.2 Support CD information The support CD that came with the motherboard contains useful software and several utility drivers that enhance the motherboard features. Because motherboard settings and hardware options vary, use the setup procedures...

P4BGV-MX User Manual
Page 60
ASUS Update Installs utility to optimize 3D graphics output. 3.2.4 ASUS contact information 3-4 Chapter 3: Starting-Up Acrobat Reader This installs software for viewing files in Portable Document Format (PDF). ASUS Screen Saver This item installs the ASUS screen saver. E-Color 3Deep This item installs application to download and update motherboard BIOS. ASUS PC Probe Install utility that can monitor Fan, Speed, Voltage, and CPU temperature. Microsoft DirectX 8.1 Driver This item installs the Microsoft DirectX V8.1 driver. PC-CILLIN This item installs the Trend PC-cillin 2002...
ASUS Update Installs utility to optimize 3D graphics output. 3.2.4 ASUS contact information 3-4 Chapter 3: Starting-Up Acrobat Reader This installs software for viewing files in Portable Document Format (PDF). ASUS Screen Saver This item installs the ASUS screen saver. E-Color 3Deep This item installs application to download and update motherboard BIOS. ASUS PC Probe Install utility that can monitor Fan, Speed, Voltage, and CPU temperature. Microsoft DirectX 8.1 Driver This item installs the Microsoft DirectX V8.1 driver. PC-CILLIN This item installs the Trend PC-cillin 2002...


