User Manual
Page 3
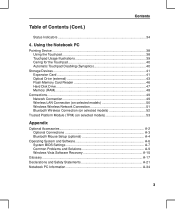
... Network Connection 51 Bluetooth Wireless Connection (on selected models 52 Trusted Platform Module (TPM) (on selected models 53 Appendix Optional Accessories A-2 Optional Connections A-3 Bluetooth Mouse Setup (optional A-4 Operating System and Software A-6 System BIOS Settings A-7 Common Problems and Solutions A-9 Windows Vista Software Recovery A-15 Glossary A-17 Declarations and Safety Statements A-21 Notebook...
... Network Connection 51 Bluetooth Wireless Connection (on selected models 52 Trusted Platform Module (TPM) (on selected models 53 Appendix Optional Accessories A-2 Optional Connections A-3 Bluetooth Mouse Setup (optional A-4 Operating System and Software A-6 System BIOS Settings A-7 Common Problems and Solutions A-9 Windows Vista Software Recovery A-15 Glossary A-17 Declarations and Safety Statements A-21 Notebook...
User Manual
Page 16
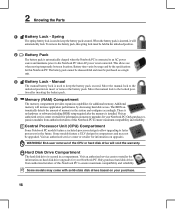
... to the unlocked position to the Notebook PC when AC power is inserted, it will automatically lock. There is no hardware or software (including BIOS) setup required after inserting the battery pack. 4 Memory (RAM) Compartment The memory compartment provides expansion capabilities for compactness and may come with solid-state disk drives...
... to the unlocked position to the Notebook PC when AC power is inserted, it will automatically lock. There is no hardware or software (including BIOS) setup required after inserting the battery pack. 4 Memory (RAM) Compartment The memory compartment provides expansion capabilities for compactness and may come with solid-state disk drives...
User Manual
Page 25
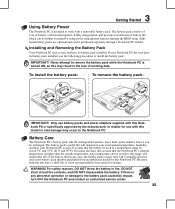
... ON, as this range will eventually decrease and a new battery pack must also take into account that the battery be purchased separately through the BIOS setup. Additional battery packs are optional and can be further extended by the manufacturer or retailer for storing. It is ideal that the Notebook PC's internal...
... ON, as this range will eventually decrease and a new battery pack must also take into account that the battery be purchased separately through the BIOS setup. Additional battery packs are optional and can be further extended by the manufacturer or retailer for storing. It is ideal that the Notebook PC's internal...
User Manual
Page 26
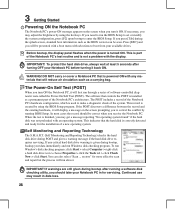
... drive requires servicing. If you may adjust the brightness by running a software disk checking utility, you to correct the conflict by using the BIOS Setup program. IMPORTANT! DO NOT carry or cover a Notebook PC that is powered ON with selections to make a diagnostic check of the Notebook PC's... and the existing hardware, it will display a message on the screen when you receive the Notebook PC. If you will first run the BIOS Setup to set or modify the system configuration, press [F2] upon bootup to run through a series of the Notebook PC's architecture. This is used...
... drive requires servicing. If you may adjust the brightness by running a software disk checking utility, you to correct the conflict by using the BIOS Setup program. IMPORTANT! DO NOT carry or cover a Notebook PC that is powered ON with selections to make a diagnostic check of the Notebook PC's... and the existing hardware, it will display a message on the screen when you receive the Notebook PC. If you will first run the BIOS Setup to set or modify the system configuration, press [F2] upon bootup to run through a series of the Notebook PC's architecture. This is used...
User Manual
Page 29
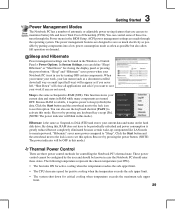
... pressing the power button. (NOTE: The power indicator will reappear as Suspend-to-Disk (STD) and stores your current data and status in the BIOS Setup. Recover by turning OFF certain components. "Sleep" and "Hibernate" saves power when your last status (such as a document scrolled down for controlling the Notebook PC...
... pressing the power button. (NOTE: The power indicator will reappear as Suspend-to-Disk (STD) and stores your current data and status in the BIOS Setup. Recover by turning OFF certain components. "Sleep" and "Hibernate" saves power when your last status (such as a document scrolled down for controlling the Notebook PC...
User Manual
Page 30
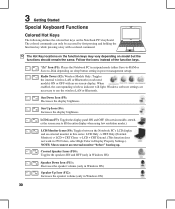
... OS) Speaker Down Icon (F11): Decreases the speaker volume (only in Windows OS) Speaker Up Icon (F12): Increases the speaker volume (only in power management setup). "Zz" Icon (F1): Places the Notebook PC in suspend mode (either Save-to-RAM or Save-to-Disk depending on sleep button setting in Windows...
... OS) Speaker Down Icon (F11): Decreases the speaker volume (only in Windows OS) Speaker Up Icon (F12): Increases the speaker volume (only in power management setup). "Zz" Icon (F1): Places the Notebook PC in suspend mode (either Save-to-RAM or Save-to-Disk depending on sleep button setting in Windows...

User Manual
Page 48
... the system and configures CMOS accordingly during the POST (Power-On-Self-Test) process. This is installed. There is no hardware or software (including BIOS) setup required after the memory is only an example. WARNING! Installing a Memory Card: Removing a Memory Card: 33 (This is only an example.) 48 (This is only...
... the system and configures CMOS accordingly during the POST (Power-On-Self-Test) process. This is installed. There is no hardware or software (including BIOS) setup required after the memory is only an example. WARNING! Installing a Memory Card: Removing a Memory Card: 33 (This is only an example.) 48 (This is only...
User Manual
Page 53
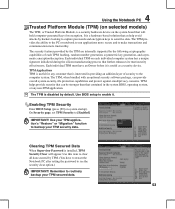
...for encryption. TPM helps provide security that can provide overall system security, file protection capabilities and protect against email/privacy concerns. Use BIOS setup to see the security clear option.) IMPORTANT! Use your TPM application's "Restore" or "Migration" function to sensitive data. The security ... enable it is a hardware-based solution that further enhances its trust/security effectiveness. Enabling TPM Security Enter BIOS Setup (press [F2] on each TPM: hashing, random number generation, asymmetric key generation, and asymmetric encryption/decryption.
...for encryption. TPM helps provide security that can provide overall system security, file protection capabilities and protect against email/privacy concerns. Use BIOS setup to see the security clear option.) IMPORTANT! Use your TPM application's "Restore" or "Migration" function to sensitive data. The security ... enable it is a hardware-based solution that further enhances its trust/security effectiveness. Enabling TPM Security Enter BIOS Setup (press [F2] on each TPM: hashing, random number generation, asymmetric key generation, and asymmetric encryption/decryption.
User Manual
Page 54
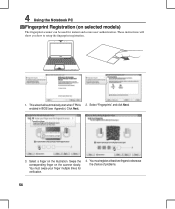
... (on the scanner slowly. Select a finger on the illustration. These instructions will automatically start when TPM is 2. You must register at least two fingers to setup the fingerprint registration. 1. enabled in BIOS (see Appendix).
... (on the scanner slowly. Select a finger on the illustration. These instructions will automatically start when TPM is 2. You must register at least two fingers to setup the fingerprint registration. 1. enabled in BIOS (see Appendix).

User Manual
Page 60
... Device on the taskbar and select either the Wireless LAN + Bluetooth or just the Bluetooth. 3. Or Launch Bluetooth Devices from this screen. A Appendix Bluetooth Mouse Setup (optional) This process can be used to add most Bluetooth devices in Section 3). 2. A-4 4. Press [FN F2] repeatedly until Bluetooth ON or WLAN & Bluetooth ON is...
... Device on the taskbar and select either the Wireless LAN + Bluetooth or just the Bluetooth. 3. Or Launch Bluetooth Devices from this screen. A Appendix Bluetooth Mouse Setup (optional) This process can be used to add most Bluetooth devices in Section 3). 2. A-4 4. Press [FN F2] repeatedly until Bluetooth ON or WLAN & Bluetooth ON is...
User Manual
Page 61
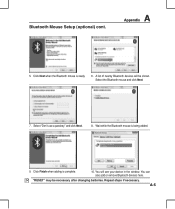
A list of nearby Bluetooth devices will see your device in the window. Click Finish when adding is ready. 6. You can also add or remove Bluetooth devices here. Repeat steps if necessary. "RESET" may be shown. Click Next when the Bluetooth mouse is complete. 10. A Appendix 5. A-5 You will be necessary after changing batteries. Select the Bluetooth mouse and click Next. 7. Bluetooth Mouse Setup (optional) cont. Select "Don't use a passkey" and click Next. 8. Wait while the Bluetooth mouse is being added. 9.
A list of nearby Bluetooth devices will see your device in the window. Click Finish when adding is ready. 6. You can also add or remove Bluetooth devices here. Repeat steps if necessary. "RESET" may be shown. Click Next when the Bluetooth mouse is complete. 10. A Appendix 5. A-5 You will be necessary after changing batteries. Select the Bluetooth mouse and click Next. 7. Bluetooth Mouse Setup (optional) cont. Select "Don't use a passkey" and click Next. 8. Wait while the Bluetooth mouse is being added. 9.

User Manual
Page 64
You must then save changes to keep your configuration settings, you must save changes before exiting the BIOS setup utility. Save Changes If you want to have in the BIOS setup utility. If you want to ask for a password during bootup (Always) or only when entering the BIOS setup utility (Setup). A Appendix System BIOS Settings (cont.) Password Check User Access Level Select whether to restore default settings, choose Load Manufacture Defaults. A-8 Select the level of access to allow the "User Password" to keep the manufacture default settings.
You must then save changes to keep your configuration settings, you must save changes before exiting the BIOS setup utility. Save Changes If you want to have in the BIOS setup utility. If you want to ask for a password during bootup (Always) or only when entering the BIOS setup utility (Setup). A Appendix System BIOS Settings (cont.) Password Check User Access Level Select whether to restore default settings, choose Load Manufacture Defaults. A-8 Select the level of access to allow the "User Password" to keep the manufacture default settings.
User Manual
Page 68
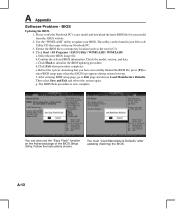
... that you have successfully flashed the BIOS file, press [F2] to update your BIOS. g. Use the "WINFLASH" utility to enter BIOS setup page when the ASUS logo appears during system boot-up. b. BIOS Updating the BIOS. 1. Check the model, version, and data. Assuming that came with your... file for your Notebook PC. 3. The utility can also use the "Easy Flash" function on the Advanced page of the BIOS Setup Utility. Click Start | All Programs | ASUS Utility | WINFLASH | WINFLASH a. c. Then select Save and Exit and reboot the system again. f. A-12 The BIOS flash procedure...
... that you have successfully flashed the BIOS file, press [F2] to update your BIOS. g. Use the "WINFLASH" utility to enter BIOS setup page when the ASUS logo appears during system boot-up. b. BIOS Updating the BIOS. 1. Check the model, version, and data. Assuming that came with your... file for your Notebook PC. 3. The utility can also use the "Easy Flash" function on the Advanced page of the BIOS Setup Utility. Click Start | All Programs | ASUS Utility | WINFLASH | WINFLASH a. c. Then select Save and Exit and reboot the system again. f. A-12 The BIOS flash procedure...
User Manual
Page 71
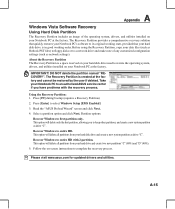
...your Notebook PC at the factory. The Recovery Partition is in good working order. Partition options: Recover Windows to select Windows Setup [EMS Enabled] 3. This option will delete all partitions from your hard disk drive is created at the factory and cannot be... to complete the recovery process. The Recovery Partition provides a comprehensive recovery solution that quickly restores your Notebook PC's software to an authorized ASUS service center if you to restore the operating system, drivers, and utilities installed on your hard drive and create two new partitions "C" ...
...your Notebook PC at the factory. The Recovery Partition is in good working order. Partition options: Recover Windows to select Windows Setup [EMS Enabled] 3. This option will delete all partitions from your hard disk drive is created at the factory and cannot be... to complete the recovery process. The Recovery Partition provides a comprehensive recovery solution that quickly restores your Notebook PC's software to an authorized ASUS service center if you to restore the operating system, drivers, and utilities installed on your hard drive and create two new partitions "C" ...
User Manual
Page 73
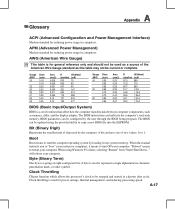
... 60.7 850 51.7 1.0 A 44.6 1.16 A 38.9 1.32 A 34.1 1.51 A 30.2 1.70 A BIOS (Basic Input/Output System) BIOS is used by the user through the BIOS Setup program. will reboot your computer. A byte is used as a source of eight contiguous bits. Glossary A Appendix ACPI (Advanced Configuration and Power Management Interface) Modern standard...
... 60.7 850 51.7 1.0 A 44.6 1.16 A 38.9 1.32 A 34.1 1.51 A 30.2 1.70 A BIOS (Basic Input/Output System) BIOS is used by the user through the BIOS Setup program. will reboot your computer. A byte is used as a source of eight contiguous bits. Glossary A Appendix ACPI (Advanced Configuration and Power Management Interface) Modern standard...
User Manual
Page 76
... eliminated. In STD mode, the Notebook PC will hold computer-generated keys for a specified amount of your PC can help avoid attacks by the BIOS Setup. The TPM provides the ability to the PC or Notebook PC to run applications more trustworthy. If connecting two computers together without having to install...
... eliminated. In STD mode, the Notebook PC will hold computer-generated keys for a specified amount of your PC can help avoid attacks by the BIOS Setup. The TPM provides the ability to the PC or Notebook PC to run applications more trustworthy. If connecting two computers together without having to install...

