User Guide
Page 3
Table of contents Notices iv Safety information v Care & Cleaning vi Chapter 1: Product introduction 1.1 Welcome 1-1 1.2 Package contents 1-1 1.3 Monitor introduction 1-2 1.3.1 Front of the LCD monitor 1-2 1.3.2 Rear of the LCD monitor 1-3 Chapter 2: Setup 2.1 Connecting the cables 2-1 2.2 Turning the monitor on 2-1 2.3 Adjusting the monitor 2-2 2.4 Detaching the arm/stand (for VESA wall mount 2-3 Chapter 3: General Instruction 3.1 OSD (On-Screen Display) menu 3-1 3.1.1 How to...
Table of contents Notices iv Safety information v Care & Cleaning vi Chapter 1: Product introduction 1.1 Welcome 1-1 1.2 Package contents 1-1 1.3 Monitor introduction 1-2 1.3.1 Front of the LCD monitor 1-2 1.3.2 Rear of the LCD monitor 1-3 Chapter 2: Setup 2.1 Connecting the cables 2-1 2.2 Turning the monitor on 2-1 2.3 Adjusting the monitor 2-2 2.4 Detaching the arm/stand (for VESA wall mount 2-3 Chapter 3: General Instruction 3.1 OSD (On-Screen Display) menu 3-1 3.1.1 How to...
User Guide
Page 5
... damage due to fix it by yourself. Overloading can result in serious physical injury. • If the power supply is provided. • The monitor should be used for ventilation. If you detect any kind into the slots on the back or top of the cabinet are not sure of...• Before using the product, make sure all the documentation that came with the package. • To prevent fire or shock hazard, never expose the monitor to rain or moisture. • Never try to power surges. • Never push objects or spill liquid of time. Safety information • Before setting...
... damage due to fix it by yourself. Overloading can result in serious physical injury. • If the power supply is provided. • The monitor should be used for ventilation. If you detect any kind into the slots on the back or top of the cabinet are not sure of...• Before using the product, make sure all the documentation that came with the package. • To prevent fire or shock hazard, never expose the monitor to rain or moisture. • Never try to power surges. • Never push objects or spill liquid of time. Safety information • Before setting...
User Guide
Page 6
...cord. Stubborn stains may be removed with a cloth dampened with a lint-free, non-abrasive cloth. The following symptoms are normal with the LCD. Turn off and unplug the power cord. C A U T I O N : Information to prevent damage to the components when trying ...to complete a task. Follow the correct lifting techniques when positioning the monitor. Clean the monitor surface with mild cleaner. • Avoid using a cleaner containing alcohol or acetone. Conventions used in completing a task. N O T E : Tips ...
...cord. Stubborn stains may be removed with a cloth dampened with a lint-free, non-abrasive cloth. The following symptoms are normal with the LCD. Turn off and unplug the power cord. C A U T I O N : Information to prevent damage to the components when trying ...to complete a task. Follow the correct lifting techniques when positioning the monitor. Clean the monitor surface with mild cleaner. • Avoid using a cleaner containing alcohol or acetone. Conventions used in completing a task. N O T E : Tips ...
User Guide
Page 9
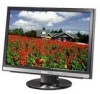
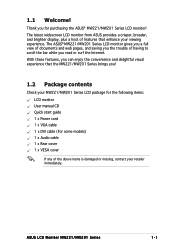
... saving you the trouble of having to scroll the bar while you ! 1.2 Package contents Check your MW221/MW201 Series LCD package for purchasing the ASUS® MW221/MW201 Series LCD monitor! The latest widescreen LCD monitor from ASUS provides a crisper, broader, and brighter display, plus a host of the above items is damaged or missing, contact your viewing...
... saving you the trouble of having to scroll the bar while you ! 1.2 Package contents Check your MW221/MW201 Series LCD package for purchasing the ASUS® MW221/MW201 Series LCD monitor! The latest widescreen LCD monitor from ASUS provides a crisper, broader, and brighter display, plus a host of the above items is damaged or missing, contact your viewing...
User Guide
Page 10
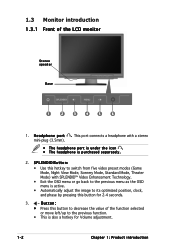
Button: • Press this button for Volume adjustment. 1-2 Chapter 1: Product introduction 1.3 Monitor introduction 1.3.1 Front of the function selected or move left/up to the previous function. • This is also a hotkey for 2-4 seconds. 3. S P L E N D I D B u t t o n : • Use this hotkey ... separately. 2. This port connects a headphone with SPLENDID™ Video Enhancement Technology. • Exit the OSD menu or go back to decrease the value of the LCD monitor Stereo speaker Base 1 2 3 4 5 6 1. H e a d p h o n e p o r t .
Button: • Press this button for Volume adjustment. 1-2 Chapter 1: Product introduction 1.3 Monitor introduction 1.3.1 Front of the function selected or move left/up to the previous function. • This is also a hotkey for 2-4 seconds. 3. S P L E N D I D B u t t o n : • Use this hotkey ... separately. 2. This port connects a headphone with SPLENDID™ Video Enhancement Technology. • Exit the OSD menu or go back to decrease the value of the LCD monitor Stereo speaker Base 1 2 3 4 5 6 1. H e a d p h o n e p o r t .
User Guide
Page 11
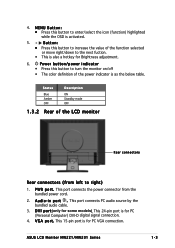
... ON Standby mode OFF 1.3.2 Rear of the function selected or move right/down to increase the value of the LCD monitor Rear connectors Rear connectors (from the bundled power cord. 2. P W R p o r t . This port connects the power connector ...from left to turn the monitor on/off • The color definition of the power indicator is also a hotkey for PC (Personal Computer) DVI-D digital signal connection. 4. D V I p o r t(only for PC VGA connection. ASUS LCD Monitor MW221/MW201 Series 1-3 Button: • Press this button to right) 1....
... ON Standby mode OFF 1.3.2 Rear of the function selected or move right/down to increase the value of the LCD monitor Rear connectors Rear connectors (from the bundled power cord. 2. P W R p o r t . This port connects the power connector ...from left to turn the monitor on/off • The color definition of the power indicator is also a hotkey for PC (Personal Computer) DVI-D digital signal connection. 4. D V I p o r t(only for PC VGA connection. ASUS LCD Monitor MW221/MW201 Series 1-3 Button: • Press this button to right) 1....
User Guide
Page 13
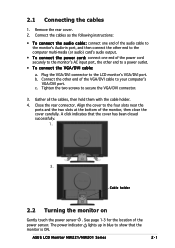
...cables, then hold them with the cable holder. 4. Tighten the two screws to your computer's VGA/DVI port. Close the rear connector. ASUS LCD Monitor MW221/MW201 Series 2-1 Connect the cables as the following instructions: • To connect the audio cable: connect one end of the audio cable... to the monitor's Audio-in blue to the LCD monitor's VGA/DVI port. b. Align the cover to a power outlet. • To connect the VGA/DVI cable: a. The power...
...cables, then hold them with the cable holder. 4. Tighten the two screws to your computer's VGA/DVI port. Close the rear connector. ASUS LCD Monitor MW221/MW201 Series 2-1 Connect the cables as the following instructions: • To connect the audio cable: connect one end of the audio cable... to the monitor's Audio-in blue to the LCD monitor's VGA/DVI port. b. Align the cover to a power outlet. • To connect the VGA/DVI cable: a. The power...
User Guide
Page 14
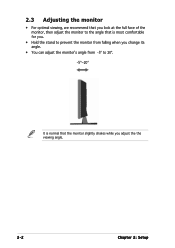
2.3 Adjusting the monitor • For optimal viewing, we recommend that you look at the full face of the monitor, then adjust the monitor to the angle that is most comfortable for you. • Hold the stand to prevent the monitor from falling when you change its angle. • You can adjust the monitor's angle from -5º to 20º. -5º~20º It is normal that the monitor slightly shakes while you adjust the the viewing angle. 2-2 Chapter 2: Setup
2.3 Adjusting the monitor • For optimal viewing, we recommend that you look at the full face of the monitor, then adjust the monitor to the angle that is most comfortable for you. • Hold the stand to prevent the monitor from falling when you change its angle. • You can adjust the monitor's angle from -5º to 20º. -5º~20º It is normal that the monitor slightly shakes while you adjust the the viewing angle. 2-2 Chapter 2: Setup
User Guide
Page 15
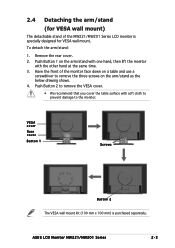
...as the below drawing shows. 4. Push Button 2 to the monitor. ASUS LCD Monitor MW221/MW201 Series 2-3 VESA cover Rear cover Button 1 Screws Button 2 The VESA wall mount kit (100 mm x 100 mm) is specially designed for VESA wall mount) The detachable stand of the monitor face down on a table and use a screwdriver to remove the... cover the table surface with the other hand at the same time. 3. Remove the rear cover. 2. Have the front of the MW221/MW201 Series LCD monitor is purchased separately. 2.4 Detaching the arm/stand (for VESA wall mount. To detach the arm/stand: 1.
...as the below drawing shows. 4. Push Button 2 to the monitor. ASUS LCD Monitor MW221/MW201 Series 2-3 VESA cover Rear cover Button 1 Screws Button 2 The VESA wall mount kit (100 mm x 100 mm) is specially designed for VESA wall mount) The detachable stand of the monitor face down on a table and use a screwdriver to remove the... cover the table surface with the other hand at the same time. 3. Remove the rear cover. 2. Have the front of the MW221/MW201 Series LCD monitor is purchased separately. 2.4 Detaching the arm/stand (for VESA wall mount. To detach the arm/stand: 1.
User Guide
Page 17
...; Game Mode: advance for game use with SPLENDID™ Video Enhancement. • Night View Mode: advance for dark-display use with SPLENDID™ Video Enhancement. ASUS LCD Monitor MW221/MW201 Series 3-1 Press and to navigate through the sub-menu functions. Highlight and activate the desired function by pressing the MENU button. 3. Press and...
...; Game Mode: advance for game use with SPLENDID™ Video Enhancement. • Night View Mode: advance for dark-display use with SPLENDID™ Video Enhancement. ASUS LCD Monitor MW221/MW201 Series 3-1 Press and to navigate through the sub-menu functions. Highlight and activate the desired function by pressing the MENU button. 3. Press and...
User Guide
Page 19
... to 100. ASUS LCD Monitor MW221/MW201 Series 3-3 S y s t e m S e t u p Allow you to adjust the system. • V o l u m e : the adjusting range is from 10 to 120. • Language: there are eleven languages for your selection, including English, German, Italian, French, Dutch, Spanish, Russian, Traditional Chinese, Simplified Chinese, Japanese, and Korean. • Information: shows the monitor information. •...
... to 100. ASUS LCD Monitor MW221/MW201 Series 3-3 S y s t e m S e t u p Allow you to adjust the system. • V o l u m e : the adjusting range is from 10 to 120. • Language: there are eleven languages for your selection, including English, German, Italian, French, Dutch, Spanish, Russian, Traditional Chinese, Simplified Chinese, Japanese, and Korean. • Information: shows the monitor information. •...
User Guide
Page 20
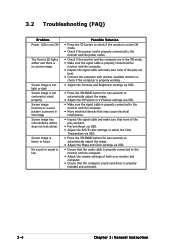
...the computer. • Inspect the signal cable and make sure none of the pins are bent. • Connect the computer with another available monitor to check if the computer is properly working. • Adjust the Contrast and Brightness settings via OSD. • Press the SPLENDID button for ... adjust the image. • Adjust the H-Position or V-Position settings via OSD. • Make sure the signal cable is properly connected to the monitor and the computer. • Move electrical devices that may cause electrical interference. • Inspect the signal cable and make sure that none of the ...
...the computer. • Inspect the signal cable and make sure none of the pins are bent. • Connect the computer with another available monitor to check if the computer is properly working. • Adjust the Contrast and Brightness settings via OSD. • Press the SPLENDID button for ... adjust the image. • Adjust the H-Position or V-Position settings via OSD. • Make sure the signal cable is properly connected to the monitor and the computer. • Move electrical devices that may cause electrical interference. • Inspect the signal cable and make sure that none of the ...
User Guide
Page 21
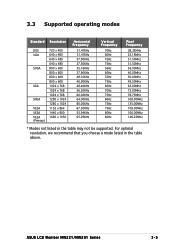
For optimal resolution, we recommend that you choose a mode listed in the table may not be supported. ASUS LCD Monitor MW221/MW201 Series 3-5 3.3 Supported operating modes Standard Resolution DOS VGA SVGA XGA SXGA VESA VESA VESA (Primary) 720 x 400 640 x 480 640 x 480 640 x 480 ...
For optimal resolution, we recommend that you choose a mode listed in the table may not be supported. ASUS LCD Monitor MW221/MW201 Series 3-5 3.3 Supported operating modes Standard Resolution DOS VGA SVGA XGA SXGA VESA VESA VESA (Primary) 720 x 400 640 x 480 640 x 480 640 x 480 ...


