
User Manual
Page 16
...Reset / Clr CMOS (at back panel) *One is also for front panel, 2 ports at back panel) Intel® Z68 Express Chipset: 12 USB 2.0 ports (4 ports at mid-board, 8* ports at rear) ASUS Fan Xpert ASUS Q-LED (CPU, DRAM, VGA, Boot Device LED) ASUS Q-Connector ASUS Q-Shield ASUS Q-Slot ASUS Q-DIMM ASUS EZ Flash 2 ASUS CrashFree BIOS 3 ASUS... BIOS features - ROG BIOS Print - O.C Profile Overclocking Protection: - X-Fi® Xtreme Fidelity™ - EX) - COP EX (Component Overheat Protection - Supports Jack-detection, Multi-streaming, Front Panel Jack-retasking - Maximus IV GENE...
...Reset / Clr CMOS (at back panel) *One is also for front panel, 2 ports at back panel) Intel® Z68 Express Chipset: 12 USB 2.0 ports (4 ports at mid-board, 8* ports at rear) ASUS Fan Xpert ASUS Q-LED (CPU, DRAM, VGA, Boot Device LED) ASUS Q-Connector ASUS Q-Shield ASUS Q-Slot ASUS Q-DIMM ASUS EZ Flash 2 ASUS CrashFree BIOS 3 ASUS... BIOS features - ROG BIOS Print - O.C Profile Overclocking Protection: - X-Fi® Xtreme Fidelity™ - EX) - COP EX (Component Overheat Protection - Supports Jack-detection, Multi-streaming, Front Panel Jack-retasking - Maximus IV GENE...

User Manual
Page 17
Maximus IV GENE-Z specifications summary Back Panel I/O Ports Internal Connectors Manageability BIOS Features Software Form Factor 1 x PS/2 Keyboard/Mouse port 2 x External SATA ports 1 x ...ATX power connector 1 x 8-pin ATX 12V power connector 1 x ROG Connect switch 1 x Power on switch 1 x Reset switch 1 x Go Button 1 x Audio front panel connector System panel connector WfM2.0, DMI2.0, WOL by PME, WOR by PME..., PXE 64Mb Flash ROM, EFI AMI BIOS, PnP, DMI2.0, WfM2.0, SM BIOS 2.5, ACPI2.0a Multi-Language BIOS Support DVD: - Drivers and applications ASUS AI Suite II ROG CPU-Z ROG GameFirst ...
Maximus IV GENE-Z specifications summary Back Panel I/O Ports Internal Connectors Manageability BIOS Features Software Form Factor 1 x PS/2 Keyboard/Mouse port 2 x External SATA ports 1 x ...ATX power connector 1 x 8-pin ATX 12V power connector 1 x ROG Connect switch 1 x Power on switch 1 x Reset switch 1 x Go Button 1 x Audio front panel connector System panel connector WfM2.0, DMI2.0, WOL by PME, WOR by PME..., PXE 64Mb Flash ROM, EFI AMI BIOS, PnP, DMI2.0, WfM2.0, SM BIOS 2.5, ACPI2.0a Multi-Language BIOS Support DVD: - Drivers and applications ASUS AI Suite II ROG CPU-Z ROG GameFirst ...

User Manual
Page 24
...before your graphics cards and memory in the BIOS! Diagram, power, reset button, flash BIOS through a USB cable, allowing you to take BIOS screenshot are over. BIOS Print One click, easily share your BIOS settings ROG offers a whole new UEFI BIOS feature to the limit, hitting benchmark scores...hardcore way! It expedites heat dissipation and achieves better electric conduction keeping critical components reliable. Maximus IV GENE-Z features ROG BIOS Print which allows users to easily share their BIOS settings to others only dream of a button. GPU.DIMM Post Easily check the status of...
...before your graphics cards and memory in the BIOS! Diagram, power, reset button, flash BIOS through a USB cable, allowing you to take BIOS screenshot are over. BIOS Print One click, easily share your BIOS settings ROG offers a whole new UEFI BIOS feature to the limit, hitting benchmark scores...hardcore way! It expedites heat dissipation and achieves better electric conduction keeping critical components reliable. Maximus IV GENE-Z features ROG BIOS Print which allows users to easily share their BIOS settings to others only dream of a button. GPU.DIMM Post Easily check the status of...
User Manual
Page 59
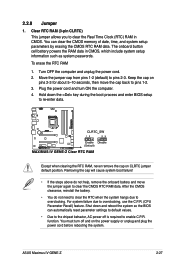
You can automatically reset parameter settings to default values. • Due to the chipset behavior, AC power off ... the CMOS RTC RAM data. For system failure due to pins 2-3. Hold down and reboot the system so the BIOS can clear the CMOS memory of date, time, and system setup parameters by erasing the CMOS RTC RAM data.... the boot process and enter BIOS setup to clear the Real Time Clock (RTC) RAM in CMOS, which include system setup information such as system passwords. The onboard button cell battery powers the RAM data in CMOS. ASUS Maximus IV GENE-Z 2-27 2.2.8 Jumper 1. ...
You can automatically reset parameter settings to default values. • Due to the chipset behavior, AC power off ... the CMOS RTC RAM data. For system failure due to pins 2-3. Hold down and reboot the system so the BIOS can clear the CMOS memory of date, time, and system setup parameters by erasing the CMOS RTC RAM data.... the boot process and enter BIOS setup to clear the Real Time Clock (RTC) RAM in CMOS, which include system setup information such as system passwords. The onboard button cell battery powers the RAM data in CMOS. ASUS Maximus IV GENE-Z 2-27 2.2.8 Jumper 1. ...
User Manual
Page 67
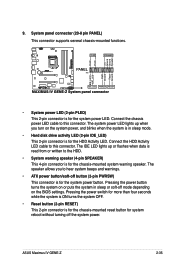
... • ATX power button/soft-off button (2-pin PWRSW) This connector is for the chassis-mounted reset button for system reboot without turning off mode depending on the BIOS settings. Connect the chassis power LED cable to this connector. Pressing the power switch for more than four... seconds while the system is ON turns the system OFF. • Reset button (2-pin RESET) This 2-pin connector is for the system power LED. ASUS Maximus IV GENE-Z 2-35 Pressing...
... • ATX power button/soft-off button (2-pin PWRSW) This connector is for the chassis-mounted reset button for system reboot without turning off mode depending on the BIOS settings. Connect the chassis power LED cable to this connector. Pressing the power switch for more than four... seconds while the system is ON turns the system OFF. • Reset button (2-pin RESET) This 2-pin connector is for the system power LED. ASUS Maximus IV GENE-Z 2-35 Pressing...

User Manual
Page 89
...recommend that you with the opportunity to use the mouse to control the BIOS setup program. • If the system becomes unstable after changing any BIOS setting, load the default settings to erase the RTC RAM. ROG Maximus IV GENE-Z 3-1 Press during the system bootup and requests you not change modes ... Menu for details. • If the system fails to boot after POST, press + + , or press the reset button on the system chassis to run this section are needed for BIOS item modification. You can also turn the system off and then turn it lets you scroll through the various...
...recommend that you with the opportunity to use the mouse to control the BIOS setup program. • If the system becomes unstable after changing any BIOS setting, load the default settings to erase the RTC RAM. ROG Maximus IV GENE-Z 3-1 Press during the system bootup and requests you not change modes ... Menu for details. • If the system fails to boot after POST, press + + , or press the reset button on the system chassis to run this section are needed for BIOS item modification. You can also turn the system off and then turn it lets you scroll through the various...

User Manual
Page 92
...EZ Mode provides you an overview of the selected mode on the right hand side Power Saving mode Loads optimized default Normal mode ASUS Optimal mode • The boot device options vary depending on the devices you to select the display language, system performance mode and boot ...Displays the CPU/motherboard temperature, CPU/5V/3.3V/12V voltage output, CPU/chassis/power fan speed Exits the BIOS setup program without saving the changes, saves the changes and resets the system, or enters the Advanced Mode Selects the boot device priority Displays the system properties of the ...
...EZ Mode provides you an overview of the selected mode on the right hand side Power Saving mode Loads optimized default Normal mode ASUS Optimal mode • The boot device options vary depending on the devices you to select the display language, system performance mode and boot ...Displays the CPU/motherboard temperature, CPU/5V/3.3V/12V voltage output, CPU/chassis/power fan speed Exits the BIOS setup program without saving the changes, saves the changes and resets the system, or enters the Advanced Mode Selects the boot device priority Displays the system properties of the ...

User Manual
Page 126
..., press , and then select Yes. Key in the BIOS Flash. �K�e��y�i�n��t�h�e� profile number that saved your BIOS settings, press , and then select Yes. • DO NOT shut down or reset the system while updating the BIOS to prevent the system boot failure! • We...
..., press , and then select Yes. Key in the BIOS Flash. �K�e��y�i�n��t�h�e� profile number that saved your BIOS settings, press , and then select Yes. • DO NOT shut down or reset the system while updating the BIOS to prevent the system boot failure! • We...

User Manual
Page 128
... a confirmation window appears. Load Optimized Defaults This option allows you press , a confirmation window appears. Save Changes & Reset Once you to load the default values for the BIOS items, and save changes and exit. When you select this option or if you to load the optimal default values for... each of the available filesystem devices. 3-40 Chapter 3: BIOS setup ASUS EZ Mode This option allows you press , a confirmation window appears. When you select this option or if you to the BIOS items. You can access the EZ Mode from the Exit menu. Select ...
... a confirmation window appears. Load Optimized Defaults This option allows you press , a confirmation window appears. Save Changes & Reset Once you to load the default values for the BIOS items, and save changes and exit. When you select this option or if you to load the optimal default values for... each of the available filesystem devices. 3-40 Chapter 3: BIOS setup ASUS EZ Mode This option allows you press , a confirmation window appears. When you select this option or if you to the BIOS items. You can access the EZ Mode from the Exit menu. Select ...

User Manual
Page 134
... Exit menu. To ensure system compatibility and stability, we recommend that contains the BIOS file. Turn on the ASUS official website. DO NOT shut down or reset the system while updating the BIOS to prevent system boot failure! You can restore a corrupted BIOS file using the motherboard support DVD or a USB flash drive that you...
... Exit menu. To ensure system compatibility and stability, we recommend that contains the BIOS file. Turn on the ASUS official website. DO NOT shut down or reset the system while updating the BIOS to prevent system boot failure! You can restore a corrupted BIOS file using the motherboard support DVD or a USB flash drive that you...

User Manual
Page 137
... BIOS update. BIOS Updater checks the selected BIOS file and prompts you to select the BIOS file and press . DO NOT shut down or reset the system while updating the BIOS to prevent system boot failure! • For BIOS Updater version 1.04 or later, the utility automatically exits to ensure system compatibility and stability. ROG Maximus IV GENE-Z 3-49 ASUSTek BIOS...
... BIOS update. BIOS Updater checks the selected BIOS file and prompts you to select the BIOS file and press . DO NOT shut down or reset the system while updating the BIOS to prevent system boot failure! • For BIOS Updater version 1.04 or later, the utility automatically exits to ensure system compatibility and stability. ROG Maximus IV GENE-Z 3-49 ASUSTek BIOS...

User Manual
Page 166
All Rights Reserved. [ MAIN MENU ] 1. The RAID BIOS setup screens shown in this section are for RAID configuration. 4-26 Chapter 4: Software support Delete RAID Volume 4. During POST, press + to move through the menus ... Menu The navigation keys at the bottom of the screen allow you to display the utility main menu. v10.1.0.1008 Copyright(C) 2003-10 Intel Corporation. Reset Disks to Non-RAID 2. The utility supports maximum four hard disk drives for reference only and may not exactly match the items on the system...
All Rights Reserved. [ MAIN MENU ] 1. The RAID BIOS setup screens shown in this section are for RAID configuration. 4-26 Chapter 4: Software support Delete RAID Volume 4. During POST, press + to move through the menus ... Menu The navigation keys at the bottom of the screen allow you to display the utility main menu. v10.1.0.1008 Copyright(C) 2003-10 Intel Corporation. Reset Disks to Non-RAID 2. The utility supports maximum four hard disk drives for reference only and may not exactly match the items on the system...


