User Manual
Page 4
Contents 1.11 Software support 1-28 1.11.1 Installing an operating system 1-28 1.11.2 Support DVD information 1-28 Chapter 2: BIOS information 2.1 Managing and updating your BIOS 2-1 2.1.1 ASUS Update 2-1 2.1.2 ASUS EZ Flash 2 2-2 2.1.3 ASUS CrashFree BIOS 3 2-3 2.2 BIOS setup program 2-4 2.2.1 BIOS menu screen 2-5 2.2.2 Menu bar 2-5 2.2.3 Navigation keys 2-5 2.2.4 Menu items 2-6 2.2.5 Submenu items 2-6 2.2.6 Configuration fields 2-6 2.2.7 Pop-up window 2-6 2.2.8 Scroll bar 2-6 2.2.9 General help 2-6 2.3 Main menu 2-7 2.3.1 System Time...
Contents 1.11 Software support 1-28 1.11.1 Installing an operating system 1-28 1.11.2 Support DVD information 1-28 Chapter 2: BIOS information 2.1 Managing and updating your BIOS 2-1 2.1.1 ASUS Update 2-1 2.1.2 ASUS EZ Flash 2 2-2 2.1.3 ASUS CrashFree BIOS 3 2-3 2.2 BIOS setup program 2-4 2.2.1 BIOS menu screen 2-5 2.2.2 Menu bar 2-5 2.2.3 Navigation keys 2-5 2.2.4 Menu items 2-6 2.2.5 Submenu items 2-6 2.2.6 Configuration fields 2-6 2.2.7 Pop-up window 2-6 2.2.8 Scroll bar 2-6 2.2.9 General help 2-6 2.3 Main menu 2-7 2.3.1 System Time...
User Manual
Page 8
... a task. NOTE: Tips and additional information to complete a task. ASUS websites The ASUS website provides updated information on ASUS hardware and software products. Refer to emphasize a word or a phrase. Used to the ASUS contact information. 2. Example: ++ viii Where to complete a task. ... sign (+). About this manual. Detailed descriptions of the motherboard and the new technology it supports. • Chapter 2: BIOS information This chapter tells how to complete a task. CAUTION: Information to prevent damage to the components when trying to change system...
... a task. NOTE: Tips and additional information to complete a task. ASUS websites The ASUS website provides updated information on ASUS hardware and software products. Refer to emphasize a word or a phrase. Used to the ASUS contact information. 2. Example: ++ viii Where to complete a task. ... sign (+). About this manual. Detailed descriptions of the motherboard and the new technology it supports. • Chapter 2: BIOS information This chapter tells how to complete a task. CAUTION: Information to prevent damage to the components when trying to change system...
User Manual
Page 10
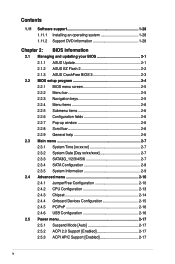
M5A78L-M/USB3 specifications summary USB ASUS unique features Back panel I/O ports Internal I/O connectors BIOS Accessories Support DVD Form factor AMD® SB710 chipset: - 10 x USB 2.0/1.1 ports (6 ports at the mid-board, 4 ports at the back panel) Asmedia USB 3.0 controller: - 2 x USB 3.0 ports (blue, at the back panel) Core Unlocker ASUS EPU ASUS Turbo Key ASUS Anti-Surge protection ASUS... Q-Fan ASUS AI Charger ASUS CrashFree BIOS 3 ASUS EZ Flash 2 ASUS MyLogo 2 ASUS C.P.R. (CPU Parameter Recall) 1...
M5A78L-M/USB3 specifications summary USB ASUS unique features Back panel I/O ports Internal I/O connectors BIOS Accessories Support DVD Form factor AMD® SB710 chipset: - 10 x USB 2.0/1.1 ports (6 ports at the mid-board, 4 ports at the back panel) Asmedia USB 3.0 controller: - 2 x USB 3.0 ports (blue, at the back panel) Core Unlocker ASUS EPU ASUS Turbo Key ASUS Anti-Surge protection ASUS... Q-Fan ASUS AI Charger ASUS CrashFree BIOS 3 ASUS EZ Flash 2 ASUS MyLogo 2 ASUS C.P.R. (CPU Parameter Recall) 1...
User Manual
Page 13
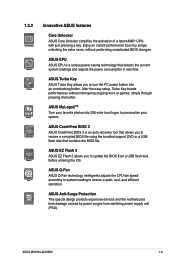
... Key ASUS Turbo Key allows you to personalize your favorite photos into an overclocking button. ASUS Q-Fan ASUS Q-Fan technology intelligently adjusts the CPU fan speed according to system loading to ensure a quiet, cool, and efficient operation. Enjoy an instant performance boost by power surges from a USB flash disk before entering the OS. ASUS M5A78L-M/USB3 1-3
... Key ASUS Turbo Key allows you to personalize your favorite photos into an overclocking button. ASUS Q-Fan ASUS Q-Fan technology intelligently adjusts the CPU fan speed according to system loading to ensure a quiet, cool, and efficient operation. Enjoy an instant performance boost by power surges from a USB flash disk before entering the OS. ASUS M5A78L-M/USB3 1-3

User Manual
Page 14
...Union´s Energy-related Products (ErP) ready, and ErP requires products to meet certain energy efficiency requirements in line with ASUS vision of creating environment-friendly and energy-efficient products through product design and innovation to reduce carbon footprint of the product and... thus mitigate environmental impacts. 1-4 Chapter 1: Product introduction C.P.R. Simply shut down and reboot the system, and the BIOS automatically restores the CPU parameters to energy consumptions. ErP ready The motherboard is in regards to their default settings. C.P.R. (CPU Parameter ...
...Union´s Energy-related Products (ErP) ready, and ErP requires products to meet certain energy efficiency requirements in line with ASUS vision of creating environment-friendly and energy-efficient products through product design and innovation to reduce carbon footprint of the product and... thus mitigate environmental impacts. 1-4 Chapter 1: Product introduction C.P.R. Simply shut down and reboot the system, and the BIOS automatically restores the CPU parameters to energy consumptions. ErP ready The motherboard is in regards to their default settings. C.P.R. (CPU Parameter ...
User Manual
Page 28
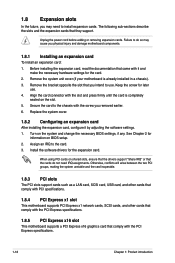
...expansion card After installing the expansion card, configure it and make the necessary hardware settings for information on the system and change the necessary BIOS settings, if any. Keep the screw for the expansion card. Align the card connector with the PCI Express specifications. 1-18 Chapter ...do not need to use . 4. Remove the bracket opposite the slot that they support. Install the software drivers for later use . Turn on BIOS setup. 2. See Chapter 2 for the card. 2. The following sub‑sections describe the slots and the expansion cards that you intend to ...
...expansion card After installing the expansion card, configure it and make the necessary hardware settings for information on the system and change the necessary BIOS settings, if any. Keep the screw for the expansion card. Align the card connector with the PCI Express specifications. 1-18 Chapter ...do not need to use . 4. Remove the bracket opposite the slot that they support. Install the software drivers for later use . Turn on BIOS setup. 2. See Chapter 2 for the card. 2. The following sub‑sections describe the slots and the expansion cards that you intend to ...
User Manual
Page 29
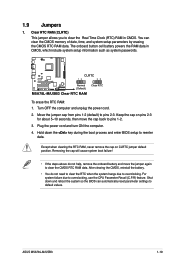
ASUS M5A78L-M/USB3 1-19 You can automatically reset parameter settings to pins 1-2. 3. After clearing the CMOS, reinstall...and turn ON the computer. 4. For system failure due to overclocking. Hold down and reboot the system so the BIOS can clear the CMOS memory of date, time, and system setup parameters by erasing the CMOS RTC RAM data....Move the jumper cap from pins 1-2 (default) to reenter data. Shut down the key during the boot process and enter BIOS setup to pins 2-3. Except when clearing the RTC RAM, never remove the cap on pins 2-3 for about 5~10 seconds...
ASUS M5A78L-M/USB3 1-19 You can automatically reset parameter settings to pins 1-2. 3. After clearing the CMOS, reinstall...and turn ON the computer. 4. For system failure due to overclocking. Hold down and reboot the system so the BIOS can clear the CMOS memory of date, time, and system setup parameters by erasing the CMOS RTC RAM data....Move the jumper cap from pins 1-2 (default) to reenter data. Shut down the key during the boot process and enter BIOS setup to pins 2-3. Except when clearing the RTC RAM, never remove the cap on pins 2-3 for about 5~10 seconds...
User Manual
Page 32
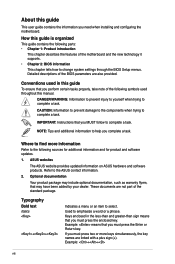
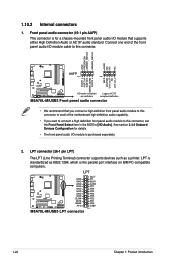
... audio I /O module cable to this connector, set the Front Panel Select item in the BIOS to this connector. LPT M5A78L-M/USB3 GND GND GND GND GND GND GND GND SLIN# INIT# ERR# AFD M5A78L-M/USB3 LPT connector SLCT PE BUSY ACK# PD7 PD6 PD5 PD4 PD3 PD2 PD1 PD0 STB# PIN...AAFP PIN 1 PIN 1 MIC2 MICPWR Line out_R NC Line out_L PORT1 L PORT1 R PORT2 R SENSE_SEND PORT2 L M5A78L-M/USB3 HD-audio-compliant Legacy AC'97 pin definition compliant definition M5A78L-M/USB3 Front panel audio connector • We recommend that supports either High Definition Audio or AC`97 audio standard. 1.10.2...
... audio I /O module cable to this connector, set the Front Panel Select item in the BIOS to this connector. LPT M5A78L-M/USB3 GND GND GND GND GND GND GND GND SLIN# INIT# ERR# AFD M5A78L-M/USB3 LPT connector SLCT PE BUSY ACK# PD7 PD6 PD5 PD4 PD3 PD2 PD1 PD0 STB# PIN...AAFP PIN 1 PIN 1 MIC2 MICPWR Line out_R NC Line out_L PORT1 L PORT1 R PORT2 R SENSE_SEND PORT2 L M5A78L-M/USB3 HD-audio-compliant Legacy AC'97 pin definition compliant definition M5A78L-M/USB3 Front panel audio connector • We recommend that supports either High Definition Audio or AC`97 audio standard. 1.10.2...
User Manual
Page 34
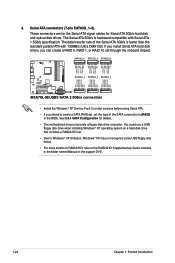
.... The data transfer rate of the SATA connectors to the RAID/AHCI Supplementary Guide included in the folder named Manual in the BIOS. SATA3G_4 SATA3G_5 SATA3G_6 SATA3G_1 SATA3G_2 SATA3G_3 M5A78L-M/USB3 M5A78L-M/USB3 SATA 3.0Gb/s connectors • Install the Windows® XP Service Pack 3 or later versions before using Serial ATA. • If you can...
.... The data transfer rate of the SATA connectors to the RAID/AHCI Supplementary Guide included in the folder named Manual in the BIOS. SATA3G_4 SATA3G_5 SATA3G_6 SATA3G_1 SATA3G_2 SATA3G_3 M5A78L-M/USB3 M5A78L-M/USB3 SATA 3.0Gb/s connectors • Install the Windows® XP Service Pack 3 or later versions before using Serial ATA. • If you can...
User Manual
Page 39
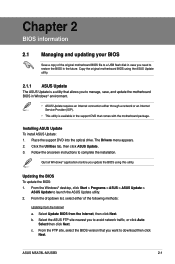
... site nearest you want to download then click Next. Click the Utilities tab, then click ASUS Update. 3. From the Windows® desktop, click Start > Programs > ASUS > ASUS Update > ASUS Update to complete the installation. ASUS M5A78L-M/USB3 2-1 Copy the original motherboard BIOS using this utility. Place the support DVD into the optical drive. Quit all Windows® applications...
... site nearest you want to download then click Next. Click the Utilities tab, then click ASUS Update. 3. From the Windows® desktop, click Start > Programs > ASUS > ASUS Update > ASUS Update to complete the installation. ASUS M5A78L-M/USB3 2-1 Copy the original motherboard BIOS using this utility. Place the support DVD into the optical drive. Quit all Windows® applications...
User Manual
Page 40
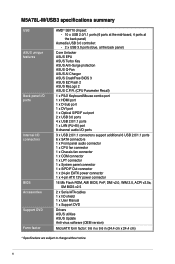
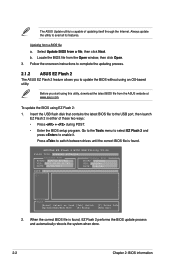
...Updating from a file, then click Next. Select Update BIOS from a BIOS file a. Locate the BIOS file from the ASUS website at www.asus.com. b. ASUSTek EZ Flash 2 BIOS ROM Utility V3.44 FLASH TYPE: WINBOND W25X/Q16 Current ROM BOARD: M5A78L-M/USB3 VER: 0201 (H:01 B:14) DATE: 04/02... updating itself through the Internet. The ASUS Update utility is capable of these two ways: • Press + during POST. • Enter the BIOS setup program. Follow the onscreen instructions to complete the updating process. 2.1.2 ASUS EZ Flash 2 The ASUS EZ Flash 2 feature allows you start...
...Updating from a file, then click Next. Select Update BIOS from a BIOS file a. Locate the BIOS file from the ASUS website at www.asus.com. b. ASUSTek EZ Flash 2 BIOS ROM Utility V3.44 FLASH TYPE: WINBOND W25X/Q16 Current ROM BOARD: M5A78L-M/USB3 VER: 0201 (H:01 B:14) DATE: 04/02... updating itself through the Internet. The ASUS Update utility is capable of these two ways: • Press + during POST. • Enter the BIOS setup program. Follow the onscreen instructions to complete the updating process. 2.1.2 ASUS EZ Flash 2 The ASUS EZ Flash 2 feature allows you start...
User Manual
Page 41
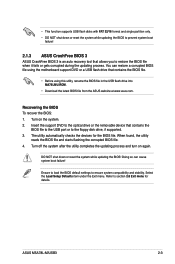
... drive, if supported. 3. When found, the utility reads the BIOS file and starts flashing the corrupted BIOS file. 4. Ensure to load the BIOS default settings to section 2.8 Exit menu for the BIOS file. ASUS M5A78L-M/USB3 2-3 Refer to ensure system compatibility and stability. Recovering the BIOS To recover the BIOS: 1. Select the Load Setup Defaults item under the Exit...
... drive, if supported. 3. When found, the utility reads the BIOS file and starts flashing the corrupted BIOS file. 4. Ensure to load the BIOS default settings to section 2.8 Exit menu for the BIOS file. ASUS M5A78L-M/USB3 2-3 Refer to ensure system compatibility and stability. Recovering the BIOS To recover the BIOS: 1. Select the Load Setup Defaults item under the Exit...

User Manual
Page 42
... at startup To enter BIOS Setup at www.asus.com to download the latest BIOS file for reference only. See section 2.8 Exit Menu. • The BIOS setup screens in using the first two options. Do this motherboard. 2-4 Chapter 2: BIOS information Using the power button, reset button, or the ++ keys to...keys and brief online help to guide you failed to enter BIOS Setup using the BIOS Setup program. If you always shut down the system properly from a running operating system can cause damage to your screen. • Visit the ASUS website at startup: • Press during the Power-On ...
... at startup To enter BIOS Setup at www.asus.com to download the latest BIOS file for reference only. See section 2.8 Exit Menu. • The BIOS setup screens in using the first two options. Do this motherboard. 2-4 Chapter 2: BIOS information Using the power button, reset button, or the ++ keys to...keys and brief online help to guide you failed to enter BIOS Setup using the BIOS Setup program. If you always shut down the system properly from a running operating system can cause damage to your screen. • Visit the ASUS website at startup: • Press during the Power-On ...

User Manual
Page 43
... (C)Copyright 1985-2011, American Megatrends, Inc. Use the navigation keys to select a field. 2.2.1 BIOS menu screen Menu items Menu bar Configuration fields Main Advanced M5A78L-M/USB3 BIOS Setup Power Boot Tools Exit Main Settings System Time [16:34:30] System Date [Tue 01/11...the navigation keys differ from one screen to configure system Time. Use [+] or [-] to another. Select Screen Select Item +- ASUS M5A78L-M/USB3 2-5 Some of a menu screen are the navigation keys for special functions Exit For selecting the exit options and loading default settings....
... (C)Copyright 1985-2011, American Megatrends, Inc. Use the navigation keys to select a field. 2.2.1 BIOS menu screen Menu items Menu bar Configuration fields Main Advanced M5A78L-M/USB3 BIOS Setup Power Boot Tools Exit Main Settings System Time [16:34:30] System Date [Tue 01/11...the navigation keys differ from one screen to configure system Time. Use [+] or [-] to another. Select Screen Select Item +- ASUS M5A78L-M/USB3 2-5 Some of a menu screen are the navigation keys for special functions Exit For selecting the exit options and loading default settings....

User Manual
Page 44
...press . 2.2.6 Configuration fields These fields show the values for the menu items. If an item is highlighted when selected. Main Advanced M5A78L-M/USB3 BIOS Setup Power Boot Tools Exit Power Settings Suspend Mode ACPI 2.0 Support ACPI APIC support APM Configuration HW Monitor Configuration Anti Surge Support [...an item that is a brief description of the field opposite the item. To change the value of the selected item. 2-6 Chapter 2: BIOS information Use [+] or [-] to select a field. Change Option F1 General Help F10 Save and Exit ESC Exit v02.61 (C)Copyright 1985-...
...press . 2.2.6 Configuration fields These fields show the values for the menu items. If an item is highlighted when selected. Main Advanced M5A78L-M/USB3 BIOS Setup Power Boot Tools Exit Power Settings Suspend Mode ACPI 2.0 Support ACPI APIC support APM Configuration HW Monitor Configuration Anti Surge Support [...an item that is a brief description of the field opposite the item. To change the value of the selected item. 2-6 Chapter 2: BIOS information Use [+] or [-] to select a field. Change Option F1 General Help F10 Save and Exit ESC Exit v02.61 (C)Copyright 1985-...
User Manual
Page 45
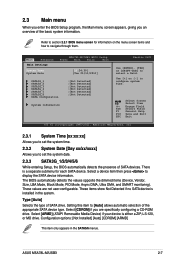
...2.3 Main menu When you enter the BIOS Setup program, the Main menu screen appears, giving you to set the system time. 2.3.2 System Date [Day xx/xx/xxxx] Allows you an overview of the basic system information. Select Screen Select Item +- ASUS M5A78L-M/USB3 2-7 Use [+] or [-] to display... and how to set the system date. 2.3.3 SATA3G_1/2/3/4/5/6 While entering Setup, the BIOS automatically detects the presence of SATA devices. Refer to select a field. Main Advanced Main Settings M5A78L-M/USB3 BIOS Setup Power Boot Tools Exit System Time [16:34:30] System Date [Tue 01...
...2.3 Main menu When you enter the BIOS Setup program, the Main menu screen appears, giving you to set the system time. 2.3.2 System Date [Day xx/xx/xxxx] Allows you an overview of the basic system information. Select Screen Select Item +- ASUS M5A78L-M/USB3 2-7 Use [+] or [-] to display... and how to set the system date. 2.3.3 SATA3G_1/2/3/4/5/6 While entering Setup, the BIOS automatically detects the presence of SATA devices. Refer to select a field. Main Advanced Main Settings M5A78L-M/USB3 BIOS Setup Power Boot Tools Exit System Time [16:34:30] System Date [Tue 01...
User Manual
Page 46
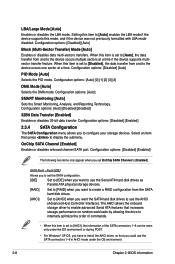
... on random workloads by allowing the drive to internally optimize the order of the SATA connectors 1-6 can be seen only under the OS environment. 2-8 Chapter 2: BIOS information Port4 [IDE] Allows you to display the submenu. The AHCI allows the onboard storage driver to enable advanced Serial ATA features that you set...
... on random workloads by allowing the drive to internally optimize the order of the SATA connectors 1-6 can be seen only under the OS environment. 2-8 Chapter 2: BIOS information Port4 [IDE] Allows you to display the submenu. The AHCI allows the onboard storage driver to enable advanced Serial ATA features that you set...
User Manual
Page 47
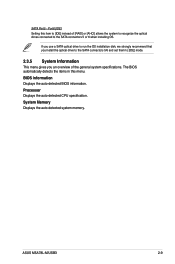
ASUS M5A78L-M/USB3 2-9 BIOS information Displays the auto-detected BIOS information. If you use a SATA optical drive to run the OS installation disk, we strongly recommend that you install the optical dirve to the SATA ...] allows the system to recognize the optical dirves connected to [IDE] instead of the general system specifications. Processor Displays the auto-detected CPU specification. The BIOS automatically detects the items in this item to the SATA connectors 5 or 6 when installing OS. System Memory Displays the auto-detected system memory. SATA Port5...
ASUS M5A78L-M/USB3 2-9 BIOS information Displays the auto-detected BIOS information. If you use a SATA optical drive to run the OS installation disk, we strongly recommend that you install the optical dirve to the SATA ...] allows the system to recognize the optical dirves connected to [IDE] instead of the general system specifications. Processor Displays the auto-detected CPU specification. The BIOS automatically detects the items in this item to the SATA connectors 5 or 6 when installing OS. System Memory Displays the auto-detected system memory. SATA Port5...
User Manual
Page 48
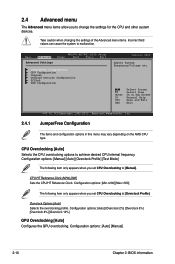
... Screen General Help Save and Exit Exit 2.4.1 v02.61 (C)Copyright 1985-2011, American Megatrends, Inc. Main Advanced Advanced Settings M5A78L-M/USB3 BIOS Setup Power Boot Tools Exit JumperFree Configuration CPU Configuration Chipset Onboard Devices Configuration PCIPnP USB Configuration Version 0201 Adjust System Frequency/Voltage ...550] The following item only appears when you set CPU Overclocking to [Manual]. Configuration options: [Auto] [Manual] 2-10 Chapter 2: BIOS information 2.4 Advanced menu The Advanced menu items allow you to achieve desired CPU internal frequency.
... Screen General Help Save and Exit Exit 2.4.1 v02.61 (C)Copyright 1985-2011, American Megatrends, Inc. Main Advanced Advanced Settings M5A78L-M/USB3 BIOS Setup Power Boot Tools Exit JumperFree Configuration CPU Configuration Chipset Onboard Devices Configuration PCIPnP USB Configuration Version 0201 Adjust System Frequency/Voltage ...550] The following item only appears when you set CPU Overclocking to [Manual]. Configuration options: [Auto] [Manual] 2-10 Chapter 2: BIOS information 2.4 Advanced menu The Advanced menu items allow you to achieve desired CPU internal frequency.

User Manual
Page 50
The values range from 1.3500V to adjust the value. 2-12 Chapter 2: BIOS information Use the / keys to 2.3000V with a 0.0100V increment. The following items vary depending on the DIMMs you set Memory Clock Mode to [Manual]. Configuration ...
The values range from 1.3500V to adjust the value. 2-12 Chapter 2: BIOS information Use the / keys to 2.3000V with a 0.0100V increment. The following items vary depending on the DIMMs you set Memory Clock Mode to [Manual]. Configuration ...


