
User Guide
Page 3
Contents Contents...iii Notices...v Safety information vi About this guide vi M4N78 PRO specifications summary viii Chapter 1 Product introduction 1.1 Welcome 1-1 1.2 Package contents 1-1 1.3 Special features 1-1 1.4 Before you proceed 1-3 1.5 Motherboard overview 1-4 1.5.1 Placement direction 1-4 1.5.2 Screw holes 1-4 1.5.3 Motherboard layout 1-5 1.5.4 Layout contents 1-5 1.6 Central Processing Unit (CPU 1-6 1.6.1 Installing... 1-26 1.11.2 Support DVD information 1-26 Chapter 2 BIOS setup 2.1 Managing and updating your BIOS 2-1 2.2 BIOS setup program 2-6 iii
Contents Contents...iii Notices...v Safety information vi About this guide vi M4N78 PRO specifications summary viii Chapter 1 Product introduction 1.1 Welcome 1-1 1.2 Package contents 1-1 1.3 Special features 1-1 1.4 Before you proceed 1-3 1.5 Motherboard overview 1-4 1.5.1 Placement direction 1-4 1.5.2 Screw holes 1-4 1.5.3 Motherboard layout 1-5 1.5.4 Layout contents 1-5 1.6 Central Processing Unit (CPU 1-6 1.6.1 Installing... 1-26 1.11.2 Support DVD information 1-26 Chapter 2 BIOS setup 2.1 Managing and updating your BIOS 2-1 2.2 BIOS setup program 2-6 iii

User Guide
Page 6
... power supply is organized This guide contains the following parts: • Chapter 1: Product introduction This chapter describes the features of the BIOS parameters are also provided. Do not place the product in your dealer immediately. • To avoid short circuits, keep paper clips,... the power cables for the devices are unplugged before the signal cables are not damaged. If you need when installing and configuring the motherboard. These devices could interrupt the grounding circuit. • Ensure that came with the product, contact a qualified service technician or your ...
... power supply is organized This guide contains the following parts: • Chapter 1: Product introduction This chapter describes the features of the BIOS parameters are also provided. Do not place the product in your dealer immediately. • To avoid short circuits, keep paper clips,... the power cables for the devices are unplugged before the signal cables are not damaged. If you need when installing and configuring the motherboard. These devices could interrupt the grounding circuit. • Ensure that came with the product, contact a qualified service technician or your ...
User Guide
Page 9
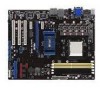
...65533;n�g��a�n�d� Front Panel Jack-Retasking - ASUS Noise Filtering ASUS Power Solution: - ASUS Noise Filtering ASUS EZ DIY - ASUS CrashFree BIOS 2 - AI Overclocking (Intelligent CPU Frequency Tuner) - vDIMM: ...' operation lifespan at 1MHz increment Overclocking protection: - ASUS C.P.R. (CPU Parameter Recall) (continued on SATA_1/2/3/4 connectors) - ASUS Q-Connector - M4N78 PRO specifications summary Storage High Definition Audio ASUS Unique Features Special Features ASUS Exclusive Overclocking Features NVIDIA GeForce 8300 - 1 x Ultra...
...65533;n�g��a�n�d� Front Panel Jack-Retasking - ASUS Noise Filtering ASUS Power Solution: - ASUS Noise Filtering ASUS EZ DIY - ASUS CrashFree BIOS 2 - AI Overclocking (Intelligent CPU Frequency Tuner) - vDIMM: ...' operation lifespan at 1MHz increment Overclocking protection: - ASUS C.P.R. (CPU Parameter Recall) (continued on SATA_1/2/3/4 connectors) - ASUS Q-Connector - M4N78 PRO specifications summary Storage High Definition Audio ASUS Unique Features Special Features ASUS Exclusive Overclocking Features NVIDIA GeForce 8300 - 1 x Ultra...
User Guide
Page 10
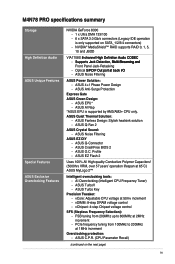
M4N78 PRO specifications summary Rear panel I/O ports Internal I/O connectors BIOS features Support DVD contents Form factor 1 x PS/2 keyboard port (purple) 1 x PS/2 mouse port (green) 1 x S/PDIF Out (Optical) 1 x HDMI Out 1 x D-Sub 1 x DVI 1 x LAN (RJ... Intrusion connector 1 x CD audio in 1 x 24-pin ATX Power connector 1 x 4-pin ATX 12V Power connector 1 x System Panel (Q-Connector) 8 Mb Flash ROM, AMI BIOS, PnP, DMI 2.0, WfM2.0, SM BIOS 2.5, ACPI 2.0, ASUS EZ Flash 2 Drivers Express Gate ASUS PC Probe II ASUS Update Anti-Virus Utility (OEM version) ATX form factor: 12 in x 9.6 in (30.5 cm x...
M4N78 PRO specifications summary Rear panel I/O ports Internal I/O connectors BIOS features Support DVD contents Form factor 1 x PS/2 keyboard port (purple) 1 x PS/2 mouse port (green) 1 x S/PDIF Out (Optical) 1 x HDMI Out 1 x D-Sub 1 x DVI 1 x LAN (RJ... Intrusion connector 1 x CD audio in 1 x 24-pin ATX Power connector 1 x 4-pin ATX 12V Power connector 1 x System Panel (Q-Connector) 8 Mb Flash ROM, AMI BIOS, PnP, DMI 2.0, WfM2.0, SM BIOS 2.5, ACPI 2.0, ASUS EZ Flash 2 Drivers Express Gate ASUS PC Probe II ASUS Update Anti-Virus Utility (OEM version) ATX form factor: 12 in x 9.6 in (30.5 cm x...
User Guide
Page 20
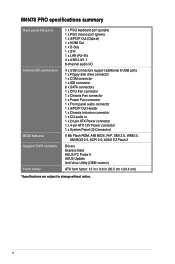
...GEIL GEIL GEIL GEIL GEIL GEIL Part No. M4N78 PRO Motherboard Qualified Vendors Lists (QVL) DDR2-1066MHz capability ...Bios) A* B* C* • •• 4-4-4-12 • •• • 4-4-4-12 1.9~2.1V • 5 • 5 • 4 • 5 • • 4 • 5-5-5-15 • 4 • 5 • 4 • 5 • 5 • 5 • 5 • 4 • 5 • 4 • 5 • 4 • 5 • 5 • 5 • 4 • 5 • 4 • 5 • 4 • 5 • 1-10 ASUS M4N78 PRO...
...GEIL GEIL GEIL GEIL GEIL GEIL Part No. M4N78 PRO Motherboard Qualified Vendors Lists (QVL) DDR2-1066MHz capability ...Bios) A* B* C* • •• 4-4-4-12 • •• • 4-4-4-12 1.9~2.1V • 5 • 5 • 4 • 5 • • 4 • 5-5-5-15 • 4 • 5 • 4 • 5 • 5 • 5 • 5 • 4 • 5 • 4 • 5 • 4 • 5 • 5 • 5 • 4 • 5 • 4 • 5 • 4 • 5 • 1-10 ASUS M4N78 PRO...

User Guide
Page 21
... SLZ2128M8-JGE 28V0H8 M2Y1G64TU88D5B-AC 0828.GS M2Y1G64TU8HB0B-25C M2Y2G64TU8HD5B-AC 0826.SG MDT 512MB TMS51B264C081-805EP D48001GP3-63BJU D48002GP0-73BCU M2GVD6G3H3160Q1E52 Timing Dimm Voltage (Bios) 5 5 DIMM socket support (Optional) A* B* C ••• ••• 6 ••• ••• ••• •• 5 ••• 4 •...
... SLZ2128M8-JGE 28V0H8 M2Y1G64TU88D5B-AC 0828.GS M2Y1G64TU8HB0B-25C M2Y2G64TU8HD5B-AC 0826.SG MDT 512MB TMS51B264C081-805EP D48001GP3-63BJU D48002GP0-73BCU M2GVD6G3H3160Q1E52 Timing Dimm Voltage (Bios) 5 5 DIMM socket support (Optional) A* B* C ••• ••• 6 ••• ••• ••• •• 5 ••• 4 •...

User Guide
Page 22
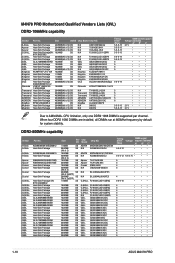
...51280-3SP0717A 1024MB U2S12D30YP-6E 1024MB U2S24D30TP-6E 2048MB SS/DS Chip Brand Chip NO. Visit the ASUS website for the latest QVL. 1-12 ASUS M4N78 PRO Size A-Data A-Data Apacer Apacer Apacer Apacer Apacer Corsair G.SKILL G.SKILL GEIL GEIL Kingmax Kingmax ...Package 1024MB D2 64M8CCF 0815 C7173S 2048MB (Kit of Dual-channel memory configuration. DDR2-667MHz capability Vendor Part No. DS ADATA M2OAD5G314170Q1C58 Timing Dimm (Bios) DIMM socket Voltage support (Optional) A• * B• * C• * DS ADATA M2OAD5H3J4170I1C53 ••• SS Apacer AU ...
...51280-3SP0717A 1024MB U2S12D30YP-6E 1024MB U2S24D30TP-6E 2048MB SS/DS Chip Brand Chip NO. Visit the ASUS website for the latest QVL. 1-12 ASUS M4N78 PRO Size A-Data A-Data Apacer Apacer Apacer Apacer Apacer Corsair G.SKILL G.SKILL GEIL GEIL Kingmax Kingmax ...Package 1024MB D2 64M8CCF 0815 C7173S 2048MB (Kit of Dual-channel memory configuration. DDR2-667MHz capability Vendor Part No. DS ADATA M2OAD5G314170Q1C58 Timing Dimm (Bios) DIMM socket Voltage support (Optional) A• * B• * C• * DS ADATA M2OAD5H3J4170I1C53 ••• SS Apacer AU ...
User Guide
Page 24
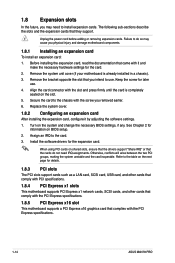
...ASUS M4N78 PRO The following sub‑sections describe the slots and the expansion cards that you intend to do not need to the table on shared slots, ensure that the drivers support "Share IRQ" or that complies with the screw you removed earlier. 6. Remove the system unit cover (if your motherboard... is completely seated on the system and change the necessary BIOS settings, if any. See Chapter 2 for the expansion card. Install the software drivers for information on...
...ASUS M4N78 PRO The following sub‑sections describe the slots and the expansion cards that you intend to do not need to the table on shared slots, ensure that the drivers support "Share IRQ" or that complies with the screw you removed earlier. 6. Remove the system unit cover (if your motherboard... is completely seated on the system and change the necessary BIOS settings, if any. See Chapter 2 for the expansion card. Install the software drivers for information on...
User Guide
Page 25
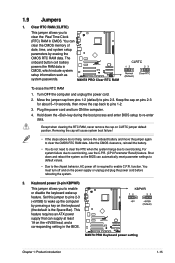
...system hangs due to enable or disable the keyboard wake-up the computer by erasing the CMOS RTC RAM data. function. This feature requires an ATX power supply that can automatically reset parameter settings to default values. • Due to the chipset behavior, AC power off and on the +5VSB... on pins 2-3 for about 5~10 seconds, then move the jumper again to re-enter data. Shut down the key during the boot process and enter BIOS setup to clear the CMOS RTC RAM data. Chapter 1: Product introduction 1-15 Move the jumper cap from pins 1-2 (default) to overclocking, use the C.P.R. (...
...system hangs due to enable or disable the keyboard wake-up the computer by erasing the CMOS RTC RAM data. function. This feature requires an ATX power supply that can automatically reset parameter settings to default values. • Due to the chipset behavior, AC power off and on the +5VSB... on pins 2-3 for about 5~10 seconds, then move the jumper again to re-enter data. Shut down the key during the boot process and enter BIOS setup to clear the CMOS RTC RAM data. Chapter 1: Product introduction 1-15 Move the jumper cap from pins 1-2 (default) to overclocking, use the C.P.R. (...

User Guide
Page 28
... out port and the HDMI cable, you follow the system requirements in the NVIDIA Control Panel appears only when you to exit. CPU DIMM BIOS setup Playback software Suggested list AMD® Athlon 64 x2 5000+ DDR2 800MHz 2GB Frame Buffer Size--256MB or higher CyberLink® PowerDVD ...HDTV compliance resolution such as a CD-ROM, TV tuner, or MPEG card. 1-18 ASUS M4N78 PRO Use the scroll bar to resize the desktop to use an HDCP compliant monitor. Click OK to receive stereo audio input from the motherboard support DVD. 2. To resize your HDTV desktop: 1. Under Video & Television, select...
... out port and the HDMI cable, you follow the system requirements in the NVIDIA Control Panel appears only when you to exit. CPU DIMM BIOS setup Playback software Suggested list AMD® Athlon 64 x2 5000+ DDR2 800MHz 2GB Frame Buffer Size--256MB or higher CyberLink® PowerDVD ...HDTV compliance resolution such as a CD-ROM, TV tuner, or MPEG card. 1-18 ASUS M4N78 PRO Use the scroll bar to resize the desktop to use an HDCP compliant monitor. Click OK to receive stereo audio input from the motherboard support DVD. 2. To resize your HDTV desktop: 1. Under Video & Television, select...
User Guide
Page 32
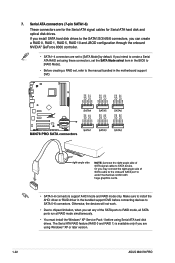
...ATA connectors (7-pin SATA1-6) These connectors are using these connectors, set the SATA Mode select item in the BIOS to [RAID Mode]. • Before creating a RAID set to SATA 5-6 connectors. If you install SATA... connectors, you set any of the SATA ports to install the AHCI driver or RAID driver in the motherboard support DVD. • SATA 5-6 connectors support AHCI mode and RAID mode only. 7. Otherwise, the ...RAID set using Windows® XP or later version. 1-22 ASUS M4N78 PRO If you are for the Serial ATA signal cables for Serial ATA hard disk and optical disk drives....
...ATA connectors (7-pin SATA1-6) These connectors are using these connectors, set the SATA Mode select item in the BIOS to [RAID Mode]. • Before creating a RAID set to SATA 5-6 connectors. If you install SATA... connectors, you set any of the SATA ports to install the AHCI driver or RAID driver in the motherboard support DVD. • SATA 5-6 connectors support AHCI mode and RAID mode only. 7. Otherwise, the ...RAID set using Windows® XP or later version. 1-22 ASUS M4N78 PRO If you are for the Serial ATA signal cables for Serial ATA hard disk and optical disk drives....
User Guide
Page 33
... the HDD Activity LED cable to the HDD. • Power/Soft-off the system power. 9. The IDE LED lights up when you turn on the BIOS settings.
... the HDD Activity LED cable to the HDD. • Power/Soft-off the system power. 9. The IDE LED lights up when you turn on the BIOS settings.
User Guide
Page 35
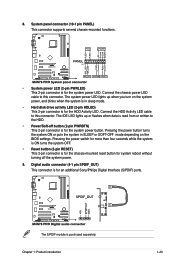
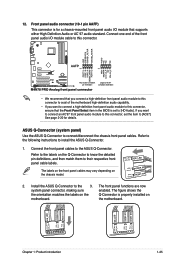
... end of the front panel audio I /O module that the Front Panel Select item in the BIOS is properly installed on the chassis model. Refer to the labels on the Q-Connector to know ...the detailed pin definitions, and then match them to install the ASUS Q-Connector. 1. The front panel functions are now system panel connector, making sure enabled. See page... set to [HD Audio]. The labels on the front panel cables may vary depending on motherboard. Refer to the following instructions to their respective front panel cable labels. The figure shows ...
... end of the front panel audio I /O module that the Front Panel Select item in the BIOS is properly installed on the chassis model. Refer to the labels on the Q-Connector to know ...the detailed pin definitions, and then match them to install the ASUS Q-Connector. 1. The front panel functions are now system panel connector, making sure enabled. See page... set to [HD Audio]. The labels on the front panel cables may vary depending on motherboard. Refer to the following instructions to their respective front panel cable labels. The figure shows ...

User Guide
Page 37
...Drive then click Format to the bootable floppy disk. d. Copy the original or the latest motherboard BIOS file to display the Format 3 1/2 Floppy dialog box. c. Copy the original motherboard BIOS using the ASUS Update or AFUDOS utilities. Creating a bootable floppy disk To create a bootable floppy disk ...1. Insert a formatted, high density 1.44MB floppy disk to restore the BIOS in the future. At the DOS prompt, type ...
...Drive then click Format to the bootable floppy disk. d. Copy the original or the latest motherboard BIOS file to display the Format 3 1/2 Floppy dialog box. c. Copy the original motherboard BIOS using the ASUS Update or AFUDOS utilities. Creating a bootable floppy disk To create a bootable floppy disk ...1. Insert a formatted, high density 1.44MB floppy disk to restore the BIOS in the future. At the DOS prompt, type ...
User Guide
Page 38
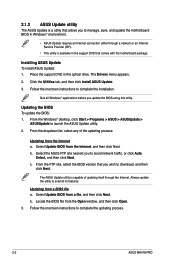
... site nearest you to complete the updating process. 2-2 ASUS M4N78 PRO Locate the BIOS file from the Open window, and then click Open. 3. 2.1.2 ASUS Update utility The ASUS Update is a utility that allows you to manage, save, and update the motherboard BIOS in Windows® environment. • ASUS Update requires an Internet connection either through a network or an Internet...
... site nearest you to complete the updating process. 2-2 ASUS M4N78 PRO Locate the BIOS file from the Open window, and then click Open. 3. 2.1.2 ASUS Update utility The ASUS Update is a utility that allows you to manage, save, and update the motherboard BIOS in Windows® environment. • ASUS Update requires an Internet connection either through a network or an Internet...

User Guide
Page 39
... 2. Download the latest BIOS file from the ASUS website at www.asus.com. Insert the floppy/USB flash disk that contains the latest BIOS file to use a bootable floppy disk or a DOS‑based utility. a. When the correct BIOS file is found , EZ Flash 2 performs the BIOS update process and automatically ...program. Go to the Tools menu to select EZ Flash 2 and press to display the following: ASUSTek EZ Flash 2 BIOS ROM Utility V3.34 FLASH TYPE: MXIC 25L8005 Current ROM BOARD: M4N78 PRO VER: 0203 DATE: 12/12/2008 Update ROM BOARD: Unknown VER: Unknown DATE: Unknown PATH: A:\ A: Note [...
... 2. Download the latest BIOS file from the ASUS website at www.asus.com. Insert the floppy/USB flash disk that contains the latest BIOS file to use a bootable floppy disk or a DOS‑based utility. a. When the correct BIOS file is found , EZ Flash 2 performs the BIOS update process and automatically ...program. Go to the Tools menu to select EZ Flash 2 and press to display the following: ASUSTek EZ Flash 2 BIOS ROM Utility V3.34 FLASH TYPE: MXIC 25L8005 Current ROM BOARD: M4N78 PRO VER: 0203 DATE: 12/12/2008 Update ROM BOARD: Unknown VER: Unknown DATE: Unknown PATH: A:\ A: Note [...

User Guide
Page 40
...Ensure that contains the AFUDOS utility and the latest BIOS file. • Obtain the AFUDOS utility (afudos.exe) from the bundled support DVD and the latest BIOS file from the hard disk drive. 2-4 ASUS M4N78 PRO Reboot the system from the ASUS website at www.asus.com. • We recommend that you can ...use as shown. The actual BIOS screen displays may not be the same as backup when...
...Ensure that contains the AFUDOS utility and the latest BIOS file. • Obtain the AFUDOS utility (afudos.exe) from the bundled support DVD and the latest BIOS file from the hard disk drive. 2-4 ASUS M4N78 PRO Reboot the system from the ASUS website at www.asus.com. • We recommend that you can ...use as shown. The actual BIOS screen displays may not be the same as backup when...

User Guide
Page 41
... may be older than the BIOS file published on again. 5. Insert the motherboard support DVD to the optical drive, or the floppy disk containing the BIOS file to load default BIOS values. Turn off the system after the utility completes the updating process and power on the ASUS official website. Chapter 2: BIOS setup 2-5 Turn on the...
... may be older than the BIOS file published on again. 5. Insert the motherboard support DVD to the optical drive, or the floppy disk containing the BIOS file to load default BIOS values. Turn off the system after the utility completes the updating process and power on the ASUS official website. Chapter 2: BIOS setup 2-5 Turn on the...
User Guide
Page 42
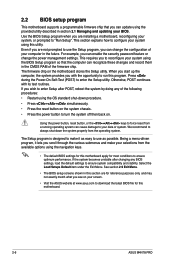
... performance. Select the Load Setups Default item under the Exit Menu. See section 2.9 Exit Menu. • The BIOS setup screens shown in this motherboard. 2-6 ASUS M4N78 PRO This section explains how to configure your computer in the future. For example, you can enable the security password feature...test routines. The Setup program is designed to make it lets you are installing a motherboard, reconfiguring your screen. • Visit the ASUS website at www.asus.com to download the latest BIOS file for most conditions to "Run Setup". Even if you scroll through the various...
... performance. Select the Load Setups Default item under the Exit Menu. See section 2.9 Exit Menu. • The BIOS setup screens shown in this motherboard. 2-6 ASUS M4N78 PRO This section explains how to configure your computer in the future. For example, you can enable the security password feature...test routines. The Setup program is designed to make it lets you are installing a motherboard, reconfiguring your screen. • Visit the ASUS website at www.asus.com to download the latest BIOS file for most conditions to "Run Setup". Even if you scroll through the various...

User Guide
Page 43
... or left arrow key on your screen. • Visit the ASUS website at www.asus.com to download the latest BIOS information. 2.2.1 BIOS menu screen Menu items Menu bar Configuration fields General help BIOS SETUP UTILITY Main Ai Tweaker Advanced Power Boot Tools Exit System Time...chapter are for reference purposes only, and may not exactly match what you see on the keyboard until the desired item is highlighted. • The BIOS setup screens shown in .] [English] :[Not Detected] :[Not Detected] :[Not Detected] :[Not Detected] :[Not Detected] :[Not Detected] Use [...
... or left arrow key on your screen. • Visit the ASUS website at www.asus.com to download the latest BIOS information. 2.2.1 BIOS menu screen Menu items Menu bar Configuration fields General help BIOS SETUP UTILITY Main Ai Tweaker Advanced Power Boot Tools Exit System Time...chapter are for reference purposes only, and may not exactly match what you see on the keyboard until the desired item is highlighted. • The BIOS setup screens shown in .] [English] :[Not Detected] :[Not Detected] :[Not Detected] :[Not Detected] :[Not Detected] :[Not Detected] Use [...


