
User Guide
Page 1
M4N78 PRO Motherboard
M4N78 PRO Motherboard

User Guide
Page 3
Contents Contents...iii Notices...v Safety information vi About this guide vi M4N78 PRO specifications summary viii Chapter 1 Product introduction 1.1 Welcome 1-1 1.2 Package contents 1-1 1.3 Special features 1-1 1.4 Before you proceed 1-3 1.5 Motherboard overview 1-4 1.5.1 Placement direction 1-4 1.5.2 Screw holes 1-4 1.5.3 Motherboard layout 1-5 1.5.4 Layout contents 1-5 1.6 Central Processing Unit (CPU 1-6 1.6.1 Installing the CPU 1-6 1.6.2 Installing the heatsink and fan 1-7 1.7 System memory 1-9 1.7.1 Overview 1-9 1.7.2 Memory configurations 1-9 1.7.3 ...
Contents Contents...iii Notices...v Safety information vi About this guide vi M4N78 PRO specifications summary viii Chapter 1 Product introduction 1.1 Welcome 1-1 1.2 Package contents 1-1 1.3 Special features 1-1 1.4 Before you proceed 1-3 1.5 Motherboard overview 1-4 1.5.1 Placement direction 1-4 1.5.2 Screw holes 1-4 1.5.3 Motherboard layout 1-5 1.5.4 Layout contents 1-5 1.6 Central Processing Unit (CPU 1-6 1.6.1 Installing the CPU 1-6 1.6.2 Installing the heatsink and fan 1-7 1.7 System memory 1-9 1.7.1 Overview 1-9 1.7.2 Memory configurations 1-9 1.7.3 ...
User Guide
Page 5
... wheeled bin indicates that to enable proper reuse of the FCC Rules. However, there is encouraged to try to radio communications. DO NOT throw the motherboard in a residential installation. This product has been designed to which the receiver is subject to the following measures: • Reorient or relocate the receiving antenna...
... wheeled bin indicates that to enable proper reuse of the FCC Rules. However, there is encouraged to try to radio communications. DO NOT throw the motherboard in a residential installation. This product has been designed to which the receiver is subject to the following measures: • Reorient or relocate the receiving antenna...

User Guide
Page 6
... that your power supply is set to change system settings through the BIOS Setup menus. Operation safety • Before installing the motherboard and adding devices on a stable surface. • If you are not damaged. If you need when installing and configuring the...Avoid dust, humidity, and temperature extremes. Do not place the product in your retailer. If you are not sure about the voltage of the motherboard and the new technology it by yourself. If possible, disconnect all power cables from the existing system before using , contact your retailer. Detailed descriptions...
... that your power supply is set to change system settings through the BIOS Setup menus. Operation safety • Before installing the motherboard and adding devices on a stable surface. • If you are not damaged. If you need when installing and configuring the...Avoid dust, humidity, and temperature extremes. Do not place the product in your retailer. If you are not sure about the voltage of the motherboard and the new technology it by yourself. If possible, disconnect all power cables from the existing system before using , contact your retailer. Detailed descriptions...
User Guide
Page 11
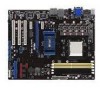
..., data transfer rate up to 5200MT/s via HyperTransort™ 3.0 based system bus. The motherboard delivers a host of ASUS quality motherboards! Chapter 1 Product introduction 1.1 Welcome! It features dualchannel DDR2 1066 memory support and accelerates data... features and latest technologies, making it , check the items in your motherboard package for buying an ASUS® M4N78 PRO motherboard! Before you for the following items. Motherboard Cables Accessories Application DVD Documentations ASUS M4N78 PRO motherboard 2 x Serial ATA cable 1x Ultra DMA 133/100/66 cable 1...
..., data transfer rate up to 5200MT/s via HyperTransort™ 3.0 based system bus. The motherboard delivers a host of ASUS quality motherboards! Chapter 1 Product introduction 1.1 Welcome! It features dualchannel DDR2 1066 memory support and accelerates data... features and latest technologies, making it , check the items in your motherboard package for buying an ASUS® M4N78 PRO motherboard! Before you for the following items. Motherboard Cables Accessories Application DVD Documentations ASUS M4N78 PRO motherboard 2 x Serial ATA cable 1x Ultra DMA 133/100/66 cable 1...
User Guide
Page 12
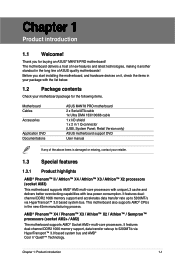
... experience. Dual channel DDR2 1066 support This motherboard supports DDR2 1066, which provides faster data transfer rate and more information. 1.3.2 Innovative ASUS features ASUS 4+1 Phase Power Design Unleashes ultimate memory performances with this series motherboard GPUs. NVIDIA® H��y�b&#... is a unique hybrid multi-GPU technology built upon NVIDIA. ASUS M4N78 PRO also features an extra 1 phase power dedicated to the OS environment, simply click the mouse or press a key. 1-2 ASUS M4N78 PRO To wake the system and return to integrated memory/HT controller...
... experience. Dual channel DDR2 1066 support This motherboard supports DDR2 1066, which provides faster data transfer rate and more information. 1.3.2 Innovative ASUS features ASUS 4+1 Phase Power Design Unleashes ultimate memory performances with this series motherboard GPUs. NVIDIA® H��y�b&#... is a unique hybrid multi-GPU technology built upon NVIDIA. ASUS M4N78 PRO also features an extra 1 phase power dedicated to the OS environment, simply click the mouse or press a key. 1-2 ASUS M4N78 PRO To wake the system and return to integrated memory/HT controller...

User Guide
Page 13
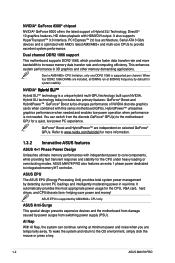
... of real-time O.C.-now a reality with just a few clicks away. settings in OS. ASUS Turbo Key ASUS Turbo Key allows the user to instant fun! It's a unique motherboard built-in different scenarios. This easy O.C. You can boost performances without entering Windows at anytime!...your house. tool allows you uninstall any motherboard component. ASUS EZ O.C. Moreover, the ASUS OC Profiles in soft-off the ATX power supply and detach its user-friendly interface makes overclock with the ASUS TurboV. Onboard LED The motherboard comes with a standby power LED that ...
... of real-time O.C.-now a reality with just a few clicks away. settings in OS. ASUS Turbo Key ASUS Turbo Key allows the user to instant fun! It's a unique motherboard built-in different scenarios. This easy O.C. You can boost performances without entering Windows at anytime!...your house. tool allows you uninstall any motherboard component. ASUS EZ O.C. Moreover, the ASUS OC Profiles in soft-off the ATX power supply and detach its user-friendly interface makes overclock with the ASUS TurboV. Onboard LED The motherboard comes with a standby power LED that ...
User Guide
Page 14
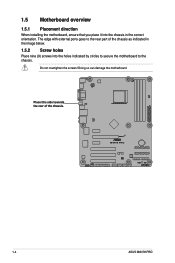
Place this side towards the rear of the chassis as indicated in the image below. 1.5.2 Screw holes Place nine (9) screws into the chassis in the correct orientation. Do not overtighten the screws! Doing so can damage the motherboard. The edge with external ports goes to the chassis. 1.5 Motherboard overview 1.5.1 Placement direction When installing the motherboard, ensure that you place it into the holes indicated by circles to secure the motherboard to the rear part of the chassis. 1-4 ASUS M4N78 PRO
Place this side towards the rear of the chassis as indicated in the image below. 1.5.2 Screw holes Place nine (9) screws into the chassis in the correct orientation. Do not overtighten the screws! Doing so can damage the motherboard. The edge with external ports goes to the chassis. 1.5 Motherboard overview 1.5.1 Placement direction When installing the motherboard, ensure that you place it into the holes indicated by circles to secure the motherboard to the rear part of the chassis. 1-4 ASUS M4N78 PRO

User Guide
Page 15
...) 2. Floppy disk drive connector (34-1 pin FLOPPY) 15. Digital audio connector (4-1 pin SPDIF_OUT) 16. Optical drive audio in connector (4-pin CD) 17. 1.5.3 Motherboard layout 1.5.4 Layout contents Connectors/Jumpers/Slots 1. ATX power connectors (24-pin EATXPWR, 4-pin ATX12V) 3. DDR2 DIMM slots 6. Chassis intrusion connector (4-1 pin CHASSIS) 12. Serial port connector (10-1 pin COM1...
...) 2. Floppy disk drive connector (34-1 pin FLOPPY) 15. Digital audio connector (4-1 pin SPDIF_OUT) 16. Optical drive audio in connector (4-pin CD) 17. 1.5.3 Motherboard layout 1.5.4 Layout contents Connectors/Jumpers/Slots 1. ATX power connectors (24-pin EATXPWR, 4-pin ATX12V) 3. DDR2 DIMM slots 6. Chassis intrusion connector (4-1 pin CHASSIS) 12. Serial port connector (10-1 pin COM1...

User Guide
Page 16
...; angle, otherwise the CPU will not fit in place. Do not install an Opteron™ processor on the motherboard. 2. Socket lever Ensure that the CPU corner with the gold triangle matches the socket corner with a small triangle. ...angle. Press the lever sideways to prevent bending the pins and damaging the CPU! 1.6 Central Processing Unit (CPU) The motherboard comes with AMD® Opteron™ processors. Position the CPU above the socket such that the socket lever is not .... 3. The CPU fits only in one correct orientation. Small triangle Gold triangle 1-6 ASUS M4N78 PRO
...; angle, otherwise the CPU will not fit in place. Do not install an Opteron™ processor on the motherboard. 2. Socket lever Ensure that the CPU corner with the gold triangle matches the socket corner with a small triangle. ...angle. Press the lever sideways to prevent bending the pins and damaging the CPU! 1.6 Central Processing Unit (CPU) The motherboard comes with AMD® Opteron™ processors. Position the CPU above the socket such that the socket lever is not .... 3. The CPU fits only in one correct orientation. Small triangle Gold triangle 1-6 ASUS M4N78 PRO

User Guide
Page 17
... the installed CPU, making sure that the heatsink fits properly on the retention module base. • The retention module base is already installed on the motherboard. Install a CPU heatsink and fan following the instructions that it is in place, push down the socket lever to the CPU heatsink or CPU before... the CPU fan cable to indicate that came with the heatsink package. The lever clicks on the side tab to the CPU_FAN connector on the motherboard upon purchase. • You do not have to remove the retention module base when installing the CPU or installing other...
... the installed CPU, making sure that the heatsink fits properly on the retention module base. • The retention module base is already installed on the motherboard. Install a CPU heatsink and fan following the instructions that it is in place, push down the socket lever to the CPU heatsink or CPU before... the CPU fan cable to indicate that came with the heatsink package. The lever clicks on the side tab to the CPU_FAN connector on the motherboard upon purchase. • You do not have to remove the retention module base when installing the CPU or installing other...

User Guide
Page 18
... latter. 2. Ensure that the retention bracket is in place. Push down the retention bracket lock on the motherboard labeled CPU_FAN. Hardware monitoring errors can occur if you cannot snap the retention bracket in this connector. 1-8 ASUS M4N78 PRO If the instructions in place. 4. A clicking sound denotes that the fan and heatsink assembly perfectly fits...
... latter. 2. Ensure that the retention bracket is in place. Push down the retention bracket lock on the motherboard labeled CPU_FAN. Hardware monitoring errors can occur if you cannot snap the retention bracket in this connector. 1-8 ASUS M4N78 PRO If the instructions in place. 4. A clicking sound denotes that the fan and heatsink assembly perfectly fits...

User Guide
Page 19
...effective use of memory, we recommend that you install a 64-bit Windows OS when having 4GB or more memory installed on the motherboard. • This motherboard does not support DIMMs made up of the DDR2 DIMM sockets: Channel Channel A Channel B Sockets DIMM_A1 and DIMM_A2 DIMM_B1 and DIMM_B2... cooling system to prevent installation on 32-bit Windows OS, when you obtain memory modules from the higher-sized channel is dependent on the motherboard, the actual usable memory for single-channel operation. • Always install DIMMs with two Double Data Rate 2 (DDR2) Dual Inline Memory...
...effective use of memory, we recommend that you install a 64-bit Windows OS when having 4GB or more memory installed on the motherboard. • This motherboard does not support DIMMs made up of the DDR2 DIMM sockets: Channel Channel A Channel B Sockets DIMM_A1 and DIMM_A2 DIMM_B1 and DIMM_B2... cooling system to prevent installation on 32-bit Windows OS, when you obtain memory modules from the higher-sized channel is dependent on the motherboard, the actual usable memory for single-channel operation. • Always install DIMMs with two Double Data Rate 2 (DDR2) Dual Inline Memory...
User Guide
Page 20
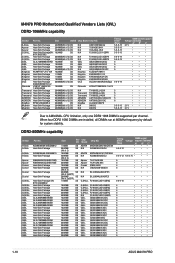
...G.SKILL G.SKILL GEIL GEIL GEIL GEIL GEIL GEIL GEIL GEIL GEIL GEIL GEIL GEIL GEIL GEIL GEIL GEIL Part No. M4N78 PRO Motherboard Qualified Vendors Lists (QVL) DDR2-1066MHz capability Vendor A-Data Part No. Heat-Sink Package Size SS/DS Chip Brand...; 5 • 5 • 5 • 5 • 4 • 5 • 4 • 5 • 4 • 5 • 5 • 5 • 4 • 5 • 4 • 5 • 4 • 5 • 1-10 ASUS M4N78 PRO When four DDR2 1066 DIMMs are installed, all DIMMs run at 800Mhz frequency by default for system stability.
...G.SKILL G.SKILL GEIL GEIL GEIL GEIL GEIL GEIL GEIL GEIL GEIL GEIL GEIL GEIL GEIL GEIL GEIL GEIL Part No. M4N78 PRO Motherboard Qualified Vendors Lists (QVL) DDR2-1066MHz capability Vendor A-Data Part No. Heat-Sink Package Size SS/DS Chip Brand...; 5 • 5 • 5 • 5 • 4 • 5 • 4 • 5 • 4 • 5 • 5 • 5 • 4 • 5 • 4 • 5 • 4 • 5 • 1-10 ASUS M4N78 PRO When four DDR2 1066 DIMMs are installed, all DIMMs run at 800Mhz frequency by default for system stability.

User Guide
Page 23
... with extra force. 2. Failure to do so can cause severe damage to avoid damaging the DIMM. 3. Firmly insert the DIMM into a socket to both the motherboard and the components. 1.
... with extra force. 2. Failure to do so can cause severe damage to avoid damaging the DIMM. 3. Firmly insert the DIMM into a socket to both the motherboard and the components. 1.
User Guide
Page 24
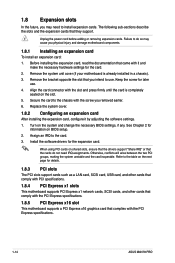
... cards that comply with the PCI Express specifications. 1.8.5 PCI Express x16 slot This motherboard supports a PCI Express x16 graphics card that came with the PCI Express specifications. 1-14 ASUS M4N78 PRO Unplug the power cord before adding or removing expansion cards. Secure the card to ...and make the necessary hardware settings for later use . 1.8 Expansion slots In the future, you may cause you physical injury and damage motherboard components. 1.8.1 Installing an expansion card To install an expansion card: 1. Remove the bracket opposite the slot that you intend to the card...
... cards that comply with the PCI Express specifications. 1.8.5 PCI Express x16 slot This motherboard supports a PCI Express x16 graphics card that came with the PCI Express specifications. 1-14 ASUS M4N78 PRO Unplug the power cord before adding or removing expansion cards. Secure the card to ...and make the necessary hardware settings for later use . 1.8 Expansion slots In the future, you may cause you physical injury and damage motherboard components. 1.8.1 Installing an expansion card To install an expansion card: 1. Remove the bracket opposite the slot that you intend to the card...

User Guide
Page 28
... CD) This connector allows you to fit your HDTV desktop: 1. Use the scroll bar to resize the desktop to receive stereo audio input from the motherboard support DVD. 2. • Playback of HD DVD and Blu-Ray Discs For better playback quality, we suggest that you follow the system requirements in the... or image is not filling the entire display area while using an HDTV compliance resolution such as a CD-ROM, TV tuner, or MPEG card. 1-18 ASUS M4N78 PRO Troubleshooting on your HDTV screen. Click OK to use an HDCP compliant monitor.
... CD) This connector allows you to fit your HDTV desktop: 1. Use the scroll bar to resize the desktop to receive stereo audio input from the motherboard support DVD. 2. • Playback of HD DVD and Blu-Ray Discs For better playback quality, we suggest that you follow the system requirements in the... or image is not filling the entire display area while using an HDTV compliance resolution such as a CD-ROM, TV tuner, or MPEG card. 1-18 ASUS M4N78 PRO Troubleshooting on your HDTV screen. Click OK to use an HDCP compliant monitor.

User Guide
Page 29
... a chassis intrusion event. The signal is for a chassis-mounted intrusion detection sensor or switch. Only the CPU_FAN and CHA_FAN1 connectors support the ASUS Q FAN 2 feature. 3. Connect the fan cables to the fan connectors on the fan connectors. Connect one end of the chassis intrusion ...connectors support cooling fans of 350mA~740mA (8.88W max.) or a total of the connector. Insufficient air flow inside the system may damage the motherboard components. These are shorted with a jumper cap. The chassis intrusion sensor or switch sends a high-level signal to this connector when a ...
... a chassis intrusion event. The signal is for a chassis-mounted intrusion detection sensor or switch. Only the CPU_FAN and CHA_FAN1 connectors support the ASUS Q FAN 2 feature. 3. Connect the fan cables to the fan connectors on the fan connectors. Connect one end of the chassis intrusion ...connectors support cooling fans of 350mA~740mA (8.88W max.) or a total of the connector. Insufficient air flow inside the system may damage the motherboard components. These are shorted with a jumper cap. The chassis intrusion sensor or switch sends a high-level signal to this connector when a ...

User Guide
Page 31
... is for Ultra DMA 133/100/66 IDE devices. There are three connectors on the Ultra DMA cable connector. Connect the blue connector to the motherboard's IDE connector, then select one of device(s) - Master Slave Master Slave Cable connector Black Black Gray Black or gray • Pin 20 on the IDE...
... is for Ultra DMA 133/100/66 IDE devices. There are three connectors on the Ultra DMA cable connector. Connect the blue connector to the motherboard's IDE connector, then select one of device(s) - Master Slave Master Slave Cable connector Black Black Gray Black or gray • Pin 20 on the IDE...
User Guide
Page 32
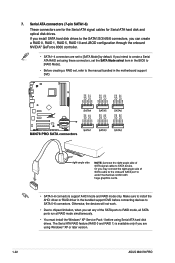
...XP Service Pack 1 before connecting devices to the manual bundled in the bundled support DVD before using Windows® XP or later version. 1-22 ASUS M4N78 PRO Serial ATA connectors (7-pin SATA1-6) These connectors are set , refer to SATA 5-6 connectors. If you install SATA hard disk drives to the SATA1...SATA Mode select item in the BIOS to [RAID Mode]. • Before creating a RAID set to install the AHCI driver or RAID driver in the motherboard support DVD. • SATA 5-6 connectors support AHCI mode and RAID mode only. Make sure to [SATA Mode] by default. 7. If you can ...
...XP Service Pack 1 before connecting devices to the manual bundled in the bundled support DVD before using Windows® XP or later version. 1-22 ASUS M4N78 PRO Serial ATA connectors (7-pin SATA1-6) These connectors are set , refer to SATA 5-6 connectors. If you install SATA hard disk drives to the SATA1...SATA Mode select item in the BIOS to [RAID Mode]. • Before creating a RAID set to install the AHCI driver or RAID driver in the motherboard support DVD. • SATA 5-6 connectors support AHCI mode and RAID mode only. Make sure to [SATA Mode] by default. 7. If you can ...


