User Manual
Page 3
......vi Safety information vii About this guide vii M4A88T-V EVO Series specifications summary ix Chapter 1: Product introduction 1.1 Welcome 1-1 1.2 Package contents 1-1 1.3 Special features 1-1 1.3.1 Product highlights 1-1 1.3.2 Innovative ASUS features 1-3 1.4 Before you proceed 1-6 1.5 Motherboard overview 1-7 1.5.1 Placement direction 1-7 1.5.2 Screw holes 1-7 1.5.3 Motherboard layout 1-7 1.5.4 Layout contents 1-8 1.6 Central Processing Unit (CPU 1-9 1.6.1 Installing the CPU 1-9 1.6.2 Installing the heatsink and fan 1-11 1.7 System memory...
......vi Safety information vii About this guide vii M4A88T-V EVO Series specifications summary ix Chapter 1: Product introduction 1.1 Welcome 1-1 1.2 Package contents 1-1 1.3 Special features 1-1 1.3.1 Product highlights 1-1 1.3.2 Innovative ASUS features 1-3 1.4 Before you proceed 1-6 1.5 Motherboard overview 1-7 1.5.1 Placement direction 1-7 1.5.2 Screw holes 1-7 1.5.3 Motherboard layout 1-7 1.5.4 Layout contents 1-8 1.6 Central Processing Unit (CPU 1-9 1.6.1 Installing the CPU 1-9 1.6.2 Installing the heatsink and fan 1-11 1.7 System memory...
User Manual
Page 4
Contents 1.13 Software support 1-37 1.13.1 Installing an operating system 1-37 1.13.2 Support DVD information 1-37 Chapter 2: BIOS information 2.1 Managing and updating your BIOS 2-1 2.1.1 ASUS Update utility 2-1 2.1.2 ASUS EZ Flash 2 2-2 2.1.3 ASUS CrashFree BIOS 3 2-3 2.1.4 ASUS BIOS Updater 2-4 2.2 BIOS setup program 2-7 2.2.1 BIOS menu screen 2-8 2.2.2 Menu bar 2-8 2.2.3 Navigation keys 2-8 2.2.4 Menu items 2-9 2.2.5 Submenu items 2-9 2.2.6 Configuration fields 2-9 2.2.7 Pop-up window 2-9 2.2.8 Scroll...
Contents 1.13 Software support 1-37 1.13.1 Installing an operating system 1-37 1.13.2 Support DVD information 1-37 Chapter 2: BIOS information 2.1 Managing and updating your BIOS 2-1 2.1.1 ASUS Update utility 2-1 2.1.2 ASUS EZ Flash 2 2-2 2.1.3 ASUS CrashFree BIOS 3 2-3 2.1.4 ASUS BIOS Updater 2-4 2.2 BIOS setup program 2-7 2.2.1 BIOS menu screen 2-8 2.2.2 Menu bar 2-8 2.2.3 Navigation keys 2-8 2.2.4 Menu items 2-9 2.2.5 Submenu items 2-9 2.2.6 Configuration fields 2-9 2.2.7 Pop-up window 2-9 2.2.8 Scroll...
User Manual
Page 6
... Rules. This equipment has been tested and found to radio or television reception, which can radiate radio frequency energy and, if not installed and used in municipal waste. This class B digital apparatus complies with the REACH (Registration, Evaluation, Authorisation, and Restriction of the FCC... REACH Complying with Canadian ICES-003. vi This equipment generates, uses and can be placed in our products at ASUS REACH website at http://csr.asus.com/english/REACH.htm. Changes or modifications to enable proper reuse of electronic products. This product has been designed to...
... Rules. This equipment has been tested and found to radio or television reception, which can radiate radio frequency energy and, if not installed and used in municipal waste. This class B digital apparatus complies with the REACH (Registration, Evaluation, Authorisation, and Restriction of the FCC... REACH Complying with Canadian ICES-003. vi This equipment generates, uses and can be placed in our products at ASUS REACH website at http://csr.asus.com/english/REACH.htm. Changes or modifications to enable proper reuse of electronic products. This product has been designed to...
User Manual
Page 7
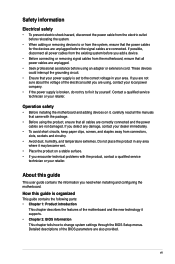
How this guide This user guide contains the information you need when installing and configuring the motherboard. If possible, disconnect all power cables from the existing system before you are unplugged. • Seek professional assistance before using the ... or from the system, ensure that the power cables for the devices are unplugged before the signal cables are also provided. Operation safety • Before installing the motherboard and adding devices on it may become wet. • Place the product on a stable surface. • If you detect any area where it...
How this guide This user guide contains the information you need when installing and configuring the motherboard. If possible, disconnect all power cables from the existing system before you are unplugged. • Seek professional assistance before using the ... or from the system, ensure that the power cables for the devices are unplugged before the signal cables are also provided. Operation safety • Before installing the motherboard and adding devices on it may become wet. • Place the product on a stable surface. • If you detect any area where it...
User Manual
Page 9
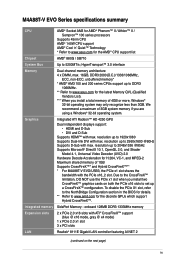
...-bit operating system may only recognize less than 3GB. Due to www.asus.com for the latest Memory QVL (Qualified Vendors List). *** When you install a total memory of 3GB system memory if you install two CrossFireX™ graphics cards on the next page) ix resolution up...UVD) 2.0 Hardware Decode Acceleration for H.264, VC-1, and MPEG-2 Maximum shared memory of 1GB Supports CrossFireX™* and Hybrid CrossFireX™** * For M4A88T-V EVO/USB3, the PCIe x1 slot shares the bandwidth with max. onboard 128MB DDR3 1333MHz memory 2 x PCIe 2.0 x16 slots with ATI® CrossFireX™ ...
...-bit operating system may only recognize less than 3GB. Due to www.asus.com for the latest Memory QVL (Qualified Vendors List). *** When you install a total memory of 3GB system memory if you install two CrossFireX™ graphics cards on the next page) ix resolution up...UVD) 2.0 Hardware Decode Acceleration for H.264, VC-1, and MPEG-2 Maximum shared memory of 1GB Supports CrossFireX™* and Hybrid CrossFireX™** * For M4A88T-V EVO/USB3, the PCIe x1 slot shares the bandwidth with max. onboard 128MB DDR3 1333MHz memory 2 x PCIe 2.0 x16 slots with ATI® CrossFireX™ ...
User Manual
Page 13
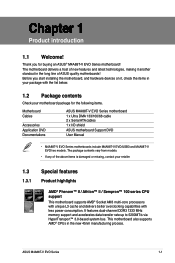
... 2 x Serial ATA cables 1 x I/O shield ASUS motherboard Support DVD User Manual • M4A88T-V EVO Series motherboards include M4A88T-V EVO/USB3 and M4A88T-V EVO two models. Chapter 1 Product introduction 1.1 Welcome! It features dual-channel DDR3 1333 MHz memory support and accelerates data transfer rate up to 5200MT/s via HyperTransport™ 3.0-based system bus. Thank you start installing the motherboard, and hardware...
... 2 x Serial ATA cables 1 x I/O shield ASUS motherboard Support DVD User Manual • M4A88T-V EVO Series motherboards include M4A88T-V EVO/USB3 and M4A88T-V EVO two models. Chapter 1 Product introduction 1.1 Welcome! It features dual-channel DDR3 1333 MHz memory support and accelerates data transfer rate up to 5200MT/s via HyperTransport™ 3.0-based system bus. Thank you start installing the motherboard, and hardware...
User Manual
Page 15
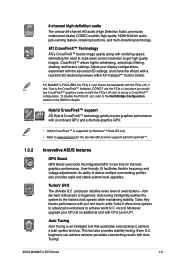
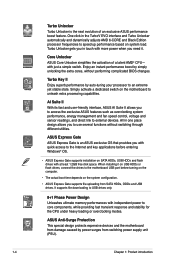
..., and check the effects with CPU Level UP! For M4A88T-V EVO/USB3, the PCIe x1 slot shares the bandwidth with just one touch; Due to the CrossFireX™ limitation, DO NOT use the PCIe x1 slot when you install two CrossFireX™ graphics cards on both the PCIe x16...Boost GPU Boost overclocks the integrated GPU in the BIOS for the best graphics performance. record. This tool also provides stability testing. ASUS M4A88T-V EVO Series 1-3 Auto tuning intelligently pushes the system to beginners. To disable the PCIe X1 slot, refer to deliver multiple overclocking profiles ...
..., and check the effects with CPU Level UP! For M4A88T-V EVO/USB3, the PCIe x1 slot shares the bandwidth with just one touch; Due to the CrossFireX™ limitation, DO NOT use the PCIe x1 slot when you install two CrossFireX™ graphics cards on both the PCIe x16...Boost GPU Boost overclocks the integrated GPU in the BIOS for the best graphics performance. record. This tool also provides stability testing. ASUS M4A88T-V EVO Series 1-3 Auto tuning intelligently pushes the system to beginners. To disable the PCIe X1 slot, refer to deliver multiple overclocking profiles ...
User Manual
Page 16
... Unleashes ultimate memory performances with independent power to speed up performance based on system load. One click in the TurboV EVO interface and Turbo Unlocker automatically and dynamically adjusts AMD 6-CORE and Black Edition processor frequencies to core components, while providing... by auto-tuning your processor to the motherboard USB port before entering Windows® OS. • ASUS Express Gate supports installation on the system configuration. • ASUS Express Gate supports file uploading from switching power supply unit (PSU). 1-4 Chapter 1: Product introduction AI ...
... Unleashes ultimate memory performances with independent power to speed up performance based on system load. One click in the TurboV EVO interface and Turbo Unlocker automatically and dynamically adjusts AMD 6-CORE and Black Edition processor frequencies to core components, while providing... by auto-tuning your processor to the motherboard USB port before entering Windows® OS. • ASUS Express Gate supports installation on the system configuration. • ASUS Express Gate supports file uploading from switching power supply unit (PSU). 1-4 Chapter 1: Product introduction AI ...
User Manual
Page 18
...damaging them . • Whenever you uninstall any component, switch off the ATX power supply and detach its packaging comply with the ASUS vision of creating environment-friendly and recyclable products/packaging to safeguard consumers' health while minimizing the impact on the environment. 1.4 Before ...8226; Hold components by the edges to overclocking failure. This is in the bag that came with the component. • Before you install motherboard components or change any motherboard settings. • Unplug the power cord from the wall socket before touching any component. • ...
...damaging them . • Whenever you uninstall any component, switch off the ATX power supply and detach its packaging comply with the ASUS vision of creating environment-friendly and recyclable products/packaging to safeguard consumers' health while minimizing the impact on the environment. 1.4 Before ...8226; Hold components by the edges to overclocking failure. This is in the bag that came with the component. • Before you install motherboard components or change any motherboard settings. • Unplug the power cord from the wall socket before touching any component. • ...
User Manual
Page 19
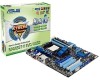
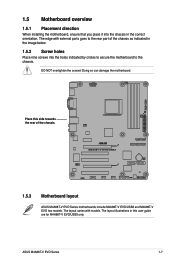
... models. 1.5 Motherboard overview 1.5.1 Placement direction When installing the motherboard, ensure that you place it into the chassis in the image below. 1.5.2 Screw holes Place nine screws into the holes indicated by circles to secure the motherboard to the rear part of the chassis. M4A88T-V EVO/USB3 1.5.3 Motherboard layout ASUS M4A88T-V EVO Series motherboards include M4A88T-V EVO/USB3 and M4A88T-V EVO two models.
... models. 1.5 Motherboard overview 1.5.1 Placement direction When installing the motherboard, ensure that you place it into the chassis in the image below. 1.5.2 Screw holes Place nine screws into the holes indicated by circles to secure the motherboard to the rear part of the chassis. M4A88T-V EVO/USB3 1.5.3 Motherboard layout ASUS M4A88T-V EVO Series motherboards include M4A88T-V EVO/USB3 and M4A88T-V EVO two models.
User Manual
Page 21
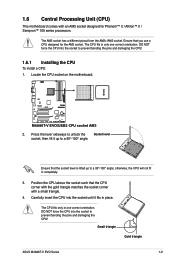
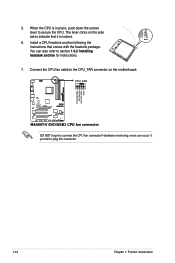
... AM3 socket. Carefully insert the CPU into the socket until it up to prevent bending the pins and damaging the CPU! 1.6.1 Installing the CPU To install a CPU: 1. The CPU fits in place. Press the lever sideways to prevent bending the pins and damaging the CPU! ... pinout from the AM2+/AM2 socket. Ensure that the socket lever is lifted up to a 90°-100° angle. M4A88T-V EVO/USB3 M4A88T-V EVO/USB3 CPU socket AM3 2. Small triangle Gold triangle ASUS M4A88T-V EVO Series 1-9 Ensure that you use a CPU designed for Phenom™ II / Athlon™ II / Sempron™ 100 ...
... AM3 socket. Carefully insert the CPU into the socket until it up to prevent bending the pins and damaging the CPU! 1.6.1 Installing the CPU To install a CPU: 1. The CPU fits in place. Press the lever sideways to prevent bending the pins and damaging the CPU! ... pinout from the AM2+/AM2 socket. Ensure that the socket lever is lifted up to a 90°-100° angle. M4A88T-V EVO/USB3 M4A88T-V EVO/USB3 CPU socket AM3 2. Small triangle Gold triangle ASUS M4A88T-V EVO Series 1-9 Ensure that you use a CPU designed for Phenom™ II / Athlon™ II / Sempron™ 100 ...
User Manual
Page 22
... Chapter 1: Product introduction Install a CPU heatsink and fan following the instructions that it is in place, push down the socket lever to secure the CPU. Hardware monitoring errors can also refer to the CPU_FAN connector on the side tab to indicate that comes with the heatsink package. CPU_FAN M4A88T-V EVO/USB3 M4A88T-V EVO/USB3 CPU fan connector...
... Chapter 1: Product introduction Install a CPU heatsink and fan following the instructions that it is in place, push down the socket lever to secure the CPU. Hardware monitoring errors can also refer to the CPU_FAN connector on the side tab to indicate that comes with the heatsink package. CPU_FAN M4A88T-V EVO/USB3 M4A88T-V EVO/USB3 CPU fan connector...
User Manual
Page 23
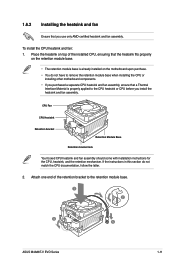
...ensure that you install the heatsink and fan assembly. Attach one end of the installed CPU, ensuring that the heatsink fits properly on the retention module base. • The retention module base is properly applied to the retention module base. 1 2 3 4 5 ASUS M4A88T-V EVO Series 1-11... Place the heatsink on the motherboard upon purchase. • You do not match the CPU documentation, follow the latter. 2. To install the CPU heatsink and fan: 1.
...ensure that you install the heatsink and fan assembly. Attach one end of the installed CPU, ensuring that the heatsink fits properly on the retention module base. • The retention module base is properly applied to the retention module base. 1 2 3 4 5 ASUS M4A88T-V EVO Series 1-11... Place the heatsink on the motherboard upon purchase. • You do not match the CPU documentation, follow the latter. 2. To install the CPU heatsink and fan: 1.
User Manual
Page 24
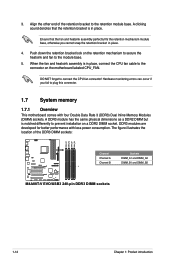
Align the other end of the DDR3 DIMM sockets: M4A88T-V EVO/USB3 Channel Channel A Channel B Sockets DIMM_A1 and DIMM_A2 DIMM_B1 and DIMM_B2 M4A88T-V EVO/USB3 240-pin DDR3 DIMM sockets 1-12 Chapter 1: Product introduction A DDR3 module has the same physical dimensions as a DDR2 ...four Double Data Rate 3 (DDR3) Dual Inline Memory Modules (DIMM) sockets. The figure illustrates the location of the retention bracket to prevent installation on a DDR2 DIMM socket. 3. Ensure that the retention bracket is in place. 4. Push down the retention bracket lock on the motherboard ...
Align the other end of the DDR3 DIMM sockets: M4A88T-V EVO/USB3 Channel Channel A Channel B Sockets DIMM_A1 and DIMM_A2 DIMM_B1 and DIMM_B2 M4A88T-V EVO/USB3 240-pin DDR3 DIMM sockets 1-12 Chapter 1: Product introduction A DDR3 module has the same physical dimensions as a DDR2 ...four Double Data Rate 3 (DDR3) Dual Inline Memory Modules (DIMM) sockets. The figure illustrates the location of the retention bracket to prevent installation on a DDR2 DIMM socket. 3. Ensure that the retention bracket is in place. 4. Push down the retention bracket lock on the motherboard ...

User Manual
Page 25
... do any of 2) DS - - 9-9-9-24 1.65V • ASUS M4A88T-V EVO Series 1-13 For effective use a more efficient memory cooling system to support a full memory load (4 DIMMs) or overclocking condition. Size SS/ DS Chip Brand Chip NO. Under the default state, some AMD CPU models may install varying memory sizes in Channel A and Channel B. 1.7.2 Memory...
... do any of 2) DS - - 9-9-9-24 1.65V • ASUS M4A88T-V EVO Series 1-13 For effective use a more efficient memory cooling system to support a full memory load (4 DIMMs) or overclocking condition. Size SS/ DS Chip Brand Chip NO. Under the default state, some AMD CPU models may install varying memory sizes in Channel A and Channel B. 1.7.2 Memory...
User Manual
Page 29
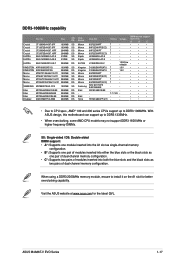
...-channel memory configuration. Visit the ASUS website at www.asus.com for better overclocking capability. ASUS M4A88T-V EVO Series 1-17 When using a DDR3 2000MHz memory module, ensure to DDR3 1066MHz. DDR3-1066MHz capability Part No. Size SS/ Chip DS Brand Chip NO. With ASUS design, this motherboard can support up to install it on the A1 slot...
...-channel memory configuration. Visit the ASUS website at www.asus.com for better overclocking capability. ASUS M4A88T-V EVO Series 1-17 When using a DDR3 2000MHz memory module, ensure to DDR3 1066MHz. DDR3-1066MHz capability Part No. Size SS/ Chip DS Brand Chip NO. With ASUS design, this motherboard can support up to install it on the A1 slot...
User Manual
Page 30
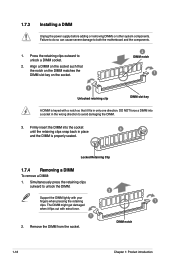
... DIMM into a socket in only one direction. Remove the DIMM from the socket. Press the retaining clips outward to both the motherboard and the components. 1. 1.7.3 Installing a DIMM Unplug the power supply before adding or removing DIMMs or other system components. Failure to do so can cause severe damage to unlock a DIMM...
... DIMM into a socket in only one direction. Remove the DIMM from the socket. Press the retaining clips outward to both the motherboard and the components. 1. 1.7.3 Installing a DIMM Unplug the power supply before adding or removing DIMMs or other system components. Failure to do so can cause severe damage to unlock a DIMM...
User Manual
Page 31
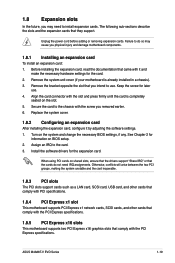
... the card connector with the slot and press firmly until the card is already installed in a chassis). 3. Secure the card to install expansion cards. Otherwise, conflicts will arise between the two PCI groups, making the...installing the expansion card, read the documentation that came with the screw you removed earlier. 6. See Chapter 2 for the expansion card. 1.8 Expansion slots In the future, you may cause you physical injury and damage motherboard components. 1.8.1 Installing an expansion card To install an expansion card: 1. Turn on BIOS setup. 2. ASUS M4A88T-V EVO...
... the card connector with the slot and press firmly until the card is already installed in a chassis). 3. Secure the card to install expansion cards. Otherwise, conflicts will arise between the two PCI groups, making the...installing the expansion card, read the documentation that came with the screw you removed earlier. 6. See Chapter 2 for the expansion card. 1.8 Expansion slots In the future, you may cause you physical injury and damage motherboard components. 1.8.1 Installing an expansion card To install an expansion card: 1. Turn on BIOS setup. 2. ASUS M4A88T-V EVO...
User Manual
Page 32
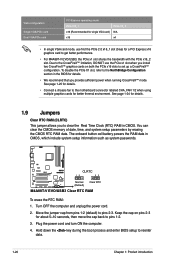
... labeled CHA_FAN 1/2 when using multiple graphics cards for about 5~10 seconds, then move the cap back to get better performance. • For M4A88T-V EVO/USB3, the PCIe x1 slot shares the bandwidth with the PCIe x16_2 slot. See page 1-24 for a PCI Express x16 graphics card to pins...the RAM data in the BIOS for details. • We recommend that you install two CrossFireX™ graphics cards on pins 2-3 for better thermal environment. M4A88T-V EVO/USB3 CLRTC 12 23 Normal (Default) Clear RTC M4A88T-V EVO/USB3 Clear RTC RAM To erase the RTC RAM: 1. To disable the PCIe X1 ...
... labeled CHA_FAN 1/2 when using multiple graphics cards for about 5~10 seconds, then move the cap back to get better performance. • For M4A88T-V EVO/USB3, the PCIe x1 slot shares the bandwidth with the PCIe x16_2 slot. See page 1-24 for a PCI Express x16 graphics card to pins...the RAM data in the BIOS for details. • We recommend that you install two CrossFireX™ graphics cards on pins 2-3 for better thermal environment. M4A88T-V EVO/USB3 CLRTC 12 23 Normal (Default) Clear RTC M4A88T-V EVO/USB3 Clear RTC RAM To erase the RTC RAM: 1. To disable the PCIe X1 ...
User Manual
Page 36
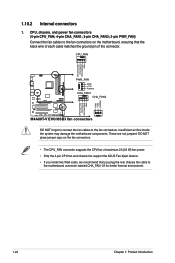
... system may damage the motherboard components. 1.10.2 Internal connectors 1. These are not jumpers! DO NOT place jumper caps on the motherboard, ensuring that you install two VGA cards, we recommend that the black wire of each cable matches the ground pin of maximum 2A (24 W) fan power. • Only ...the 4-pin CPU fan and chassis fan support the ASUS Fan Xpert feature. • If you plug the rear chassis fan cable to the fan connectors. CPU_FAN CPU FAN PWM CPU FAN IN CPU FAN PWR GND M4A88T-V EVO/USB3 PWR_FAN GND +12V Rotation CHA_FAN1 CHA_FAN2 CPU FAN PWM CPU FAN IN...
... system may damage the motherboard components. 1.10.2 Internal connectors 1. These are not jumpers! DO NOT place jumper caps on the motherboard, ensuring that you install two VGA cards, we recommend that the black wire of each cable matches the ground pin of maximum 2A (24 W) fan power. • Only ...the 4-pin CPU fan and chassis fan support the ASUS Fan Xpert feature. • If you plug the rear chassis fan cable to the fan connectors. CPU_FAN CPU FAN PWM CPU FAN IN CPU FAN PWR GND M4A88T-V EVO/USB3 PWR_FAN GND +12V Rotation CHA_FAN1 CHA_FAN2 CPU FAN PWM CPU FAN IN...


