User Manual
Page 13
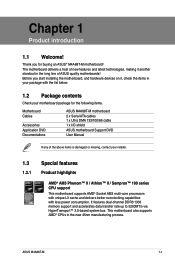
... less power consumption. Before you for the following items. Motherboard Cables Accessories Application DVD Documentations ASUS M4A88T-M motherboard 2 x Serial ATA cables 1 x Ultra DMA 133/100/66 cable 1 x I/O shield ASUS motherboard Support DVD User Manual If any of new features and latest technologies, making it ,...the items in your package with the list below. 1.2 Package contents Check your motherboard package for buying an ASUS® M4A88T-M motherboard! Thank you start installing the motherboard, and hardware devices on it another standout in the new 45nm manufacturing process...
... less power consumption. Before you for the following items. Motherboard Cables Accessories Application DVD Documentations ASUS M4A88T-M motherboard 2 x Serial ATA cables 1 x Ultra DMA 133/100/66 cable 1 x I/O shield ASUS motherboard Support DVD User Manual If any of new features and latest technologies, making it ,...the items in your package with the list below. 1.2 Package contents Check your motherboard package for buying an ASUS® M4A88T-M motherboard! Thank you start installing the motherboard, and hardware devices on it another standout in the new 45nm manufacturing process...
User Manual
Page 15
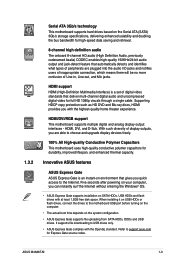
... 1.2GB free disk space. Refer to the Internet. ASUS M4A88T-M 1-3 Supporting HDCP copy protection such as HD DVD and Blu-ray discs, HDMI provides you can instantly surf the Internet without entering the Windows® OS. • ASUS Express Gate supports installation on SATA HDDs, USB HDDs ...drives. HDMI, DVI, and D-Sub. When installing it on USB HDDs or flash drives, connect the drives to USB drives only. • ASUS Express Gate complies with the OpenGL standard. 1.3.2 Serial ATA 3Gb/s technology This motherboard supports hard drives based on the Serial ATA (SATA) 3Gb/s ...
... 1.2GB free disk space. Refer to the Internet. ASUS M4A88T-M 1-3 Supporting HDCP copy protection such as HD DVD and Blu-ray discs, HDMI provides you can instantly surf the Internet without entering the Windows® OS. • ASUS Express Gate supports installation on SATA HDDs, USB HDDs ...drives. HDMI, DVI, and D-Sub. When installing it on USB HDDs or flash drives, connect the drives to USB drives only. • ASUS Express Gate complies with the OpenGL standard. 1.3.2 Serial ATA 3Gb/s technology This motherboard supports hard drives based on the Serial ATA (SATA) 3Gb/s ...
User Manual
Page 17
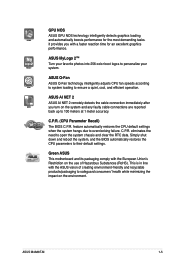
... loading and automatically boosts performance for an excellent graphics performance. ASUS Q-Fan ASUS Q-Fan technology intelligently adjusts CPU fan speeds according to system loading to overclocking failure. ASUS AI NET 2 ASUS AI NET 2 remotely detects the cable connection immediately after you... the BIOS automatically restores the CPU parameters to personalize your system. ASUS M4A88T-M 1-5 C.P.R. Green ASUS This motherboard and its packaging comply with a faster reaction time for the most demanding tasks. ASUS MyLogo 2™ Turn your favorite photos into 256-color boot logos...
... loading and automatically boosts performance for an excellent graphics performance. ASUS Q-Fan ASUS Q-Fan technology intelligently adjusts CPU fan speeds according to system loading to overclocking failure. ASUS AI NET 2 ASUS AI NET 2 remotely detects the cable connection immediately after you... the BIOS automatically restores the CPU parameters to personalize your system. ASUS M4A88T-M 1-5 C.P.R. Green ASUS This motherboard and its packaging comply with a faster reaction time for the most demanding tasks. ASUS MyLogo 2™ Turn your favorite photos into 256-color boot logos...
User Manual
Page 19
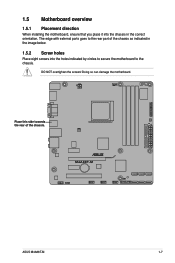
M4A88T-M ASUS M4A88T-M 1-7 Doing so can damage the motherboard. Place this side towards the rear of the chassis as indicated in the image below. 1.5.2 Screw holes Place eight screws into the chassis in the correct orientation. The edge with external ports goes to the rear part of the chassis. DO NOT overtighten the screws! 1.5 Motherboard overview 1.5.1 Placement direction When installing the motherboard, ensure that you place it into the holes indicated by circles to secure the motherboard to the chassis.
M4A88T-M ASUS M4A88T-M 1-7 Doing so can damage the motherboard. Place this side towards the rear of the chassis as indicated in the image below. 1.5.2 Screw holes Place eight screws into the chassis in the correct orientation. The edge with external ports goes to the rear part of the chassis. DO NOT overtighten the screws! 1.5 Motherboard overview 1.5.1 Placement direction When installing the motherboard, ensure that you place it into the holes indicated by circles to secure the motherboard to the chassis.
User Manual
Page 21
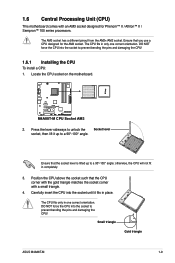
M4A88T-M M4A88T-M CPU Socket AM3 2. otherwise, the CPU will not fit in one correct orientation. Press the lever sideways to unlock the Socket lever socket, then lift ... force the CPU into the socket to prevent bending the pins and damaging the CPU! The CPU fits only in completely. 3. Small triangle Gold triangle ASUS M4A88T-M 1-9 1.6 Central Processing Unit (CPU) This motherboard comes with a small triangle. 4. Position the CPU above the socket such that you use a CPU designed for Phenom™...
M4A88T-M M4A88T-M CPU Socket AM3 2. otherwise, the CPU will not fit in one correct orientation. Press the lever sideways to unlock the Socket lever socket, then lift ... force the CPU into the socket to prevent bending the pins and damaging the CPU! The CPU fits only in completely. 3. Small triangle Gold triangle ASUS M4A88T-M 1-9 1.6 Central Processing Unit (CPU) This motherboard comes with a small triangle. 4. Position the CPU above the socket such that you use a CPU designed for Phenom™...
User Manual
Page 23
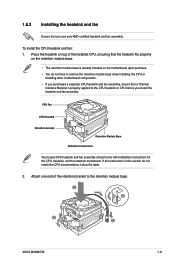
... that a Thermal Interface Material is already installed on the retention module base. • The retention module base is properly applied to the retention module base. 1 2 3 4 5 ASUS M4A88T-M 1-11 Place the heatsink on top of the retention bracket to the CPU heatsink or CPU before you use only AMD-certified heatsink and fan...
... that a Thermal Interface Material is already installed on the retention module base. • The retention module base is properly applied to the retention module base. 1 2 3 4 5 ASUS M4A88T-M 1-11 Place the heatsink on top of the retention bracket to the CPU heatsink or CPU before you use only AMD-certified heatsink and fan...
User Manual
Page 25
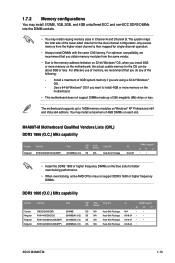
...each slot. For effective use of memory, we recommend that you install 4GB or more memory on the blue slots for the dual-channel configuration. M4A88T-M Motherboard Qualified Vendors Lists (QVL) DDR3 1866 (O.C.) MHz capability Vendor Part No. CL DIMM support DS Brand A* B* C* CM3X2G1800C8D 2048MB DS ... No. Kingston KHX14900D3K3/3GX(XMP) Size SS/ DS Chip Brand Chip NO. 3072MB(kit of 2) DS N/A Heat-Sink Package 8-8-8-24 • ASUS M4A88T-M 1-13 For optimum compatibility, we recommend that you are using a 32-bit Windows® OS. - Use a 64-bit Windows® OS...
...each slot. For effective use of memory, we recommend that you install 4GB or more memory on the blue slots for the dual-channel configuration. M4A88T-M Motherboard Qualified Vendors Lists (QVL) DDR3 1866 (O.C.) MHz capability Vendor Part No. CL DIMM support DS Brand A* B* C* CM3X2G1800C8D 2048MB DS ... No. Kingston KHX14900D3K3/3GX(XMP) Size SS/ DS Chip Brand Chip NO. 3072MB(kit of 2) DS N/A Heat-Sink Package 8-8-8-24 • ASUS M4A88T-M 1-13 For optimum compatibility, we recommend that you are using a 32-bit Windows® OS. - Use a 64-bit Windows® OS...

User Manual
Page 27
...; 8-8-8-24 • • • N/A • • • N/A • • N/A • N/A • N/A • 9 • • • N/A • • 7-7-7-20 • • • 8-8-8-24 • • • ASUS M4A88T-M 1-15 DDR3 1333 MHz capability Vendor GEIL GEIL GEIL Kingston Kingston Micron Micron Micron Micron OCZ OCZ Samsung SAMSUNG Part No. DDR3-1333 CL9-9-9-24...
...; 8-8-8-24 • • • N/A • • • N/A • • N/A • N/A • N/A • 9 • • • N/A • • 7-7-7-20 • • • 8-8-8-24 • • • ASUS M4A88T-M 1-15 DDR3 1333 MHz capability Vendor GEIL GEIL GEIL Kingston Kingston Micron Micron Micron Micron OCZ OCZ Samsung SAMSUNG Part No. DDR3-1333 CL9-9-9-24...
User Manual
Page 29
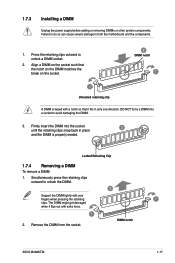
... removing DIMMs or other system components. Firmly insert the DIMM into a socket to unlock the DIMM. 2 Support the DIMM lightly with extra force. 1 2. DIMM notch ASUS M4A88T-M 1-17
... removing DIMMs or other system components. Firmly insert the DIMM into a socket to unlock the DIMM. 2 Support the DIMM lightly with extra force. 1 2. DIMM notch ASUS M4A88T-M 1-17
User Manual
Page 31
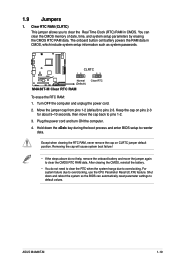
... steps above do not need to clear the RTC when the system hangs due to overclocking, use the CPU Parameter Recall (C.P.R) feature. ASUS M4A88T-M 1-19 CLRTC 12 23 M4A88T-M Normal (Default) M4A88T-M Clear RTC RAM Clear RTC To erase the RTC RAM: 1. Hold down and reboot the system so the BIOS can clear the...
... steps above do not need to clear the RTC when the system hangs due to overclocking, use the CPU Parameter Recall (C.P.R) feature. ASUS M4A88T-M 1-19 CLRTC 12 23 M4A88T-M Normal (Default) M4A88T-M Clear RTC RAM Clear RTC To erase the RTC RAM: 1. Hold down and reboot the system so the BIOS can clear the...
User Manual
Page 33
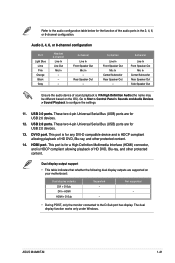
... USB 2.0 devices. 13. DVI-D port. Dual display output support • This table indicates that whether the following dual display outputs are for USB 2.0 devices. 12. ASUS M4A88T-M 1-21 USB 2.0 ports. HDMI port. USB 2.0 ports. These two 4-pin Universal Serial Bus (USB) ports are supported on the OS). Rear Speaker Out - 6-channel Line...
... USB 2.0 devices. 13. DVI-D port. Dual display output support • This table indicates that whether the following dual display outputs are for USB 2.0 devices. 12. ASUS M4A88T-M 1-21 USB 2.0 ports. HDMI port. USB 2.0 ports. These two 4-pin Universal Serial Bus (USB) ports are supported on the OS). Rear Speaker Out - 6-channel Line...
User Manual
Page 35
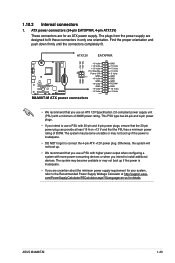
... system with 20-pin and 4-pin power plugs, ensure that the 20-pin power plug can provide at http://support.asus. The system may become unstable or may not boot up if the power is inadequate. • If you intend...8209;compliant power supply unit (PSU) with a minimum of 300W. ATX12V EATXPWR +12V DC +12V DC M4A88T-M GND GND +3 Volts +12 Volts +12 Volts +5V Standby Power OK PIN 1 GND +5 Volts GND +5 Volts GND +3 Volts +3... PSU with more power-consuming devices or when you intend to install additional devices. 1.10.2 Internal connectors 1. ASUS M4A88T-M 1-23
... system with 20-pin and 4-pin power plugs, ensure that the 20-pin power plug can provide at http://support.asus. The system may become unstable or may not boot up if the power is inadequate. • If you intend...8209;compliant power supply unit (PSU) with a minimum of 300W. ATX12V EATXPWR +12V DC +12V DC M4A88T-M GND GND +3 Volts +12 Volts +12 Volts +5V Standby Power OK PIN 1 GND +5 Volts GND +5 Volts GND +3 Volts +3... PSU with more power-consuming devices or when you intend to install additional devices. 1.10.2 Internal connectors 1. ASUS M4A88T-M 1-23

User Manual
Page 37
... GND GND RSATA_RXN3 RSATA_RXP3 GND RSATA_TXN3 RSATA_TXP3 GND SATA1 SATA2 SATA3 GND RSATA_RXN1 RSATA_RXP1 GND RSATA_TXN1 RSATA_TXP1 GND GND RSATA_RXN2 RSATA_RXP2 GND RSATA_TXN2 RSATA_TXP2 GND M4A88T-M M4A88T-M SATA connectors • Install the Windows® XP Service Pack 1 or later versions before using Serial ATA. • If you can create RAID 0, RAID 1, RAID...® XP operating system on RAID/AHCI, refer to the RAID/AHCI Supplementary Guide included in the folder named Manual in the BIOS to [RAID]. 3. ASUS M4A88T-M 1-25
... GND GND RSATA_RXN3 RSATA_RXP3 GND RSATA_TXN3 RSATA_TXP3 GND SATA1 SATA2 SATA3 GND RSATA_RXN1 RSATA_RXP1 GND RSATA_TXN1 RSATA_TXP1 GND GND RSATA_RXN2 RSATA_RXP2 GND RSATA_TXN2 RSATA_TXP2 GND M4A88T-M M4A88T-M SATA connectors • Install the Windows® XP Service Pack 1 or later versions before using Serial ATA. • If you can create RAID 0, RAID 1, RAID...® XP operating system on RAID/AHCI, refer to the RAID/AHCI Supplementary Guide included in the folder named Manual in the BIOS to [RAID]. 3. ASUS M4A88T-M 1-25
User Manual
Page 39
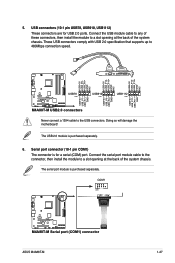
... PIN 1 USB910 PIN 1 USB1112 PIN 1 USB+5V USB_P9USB_P9+ GND USB+5V USB_P7USB_P7+ GND M4A88T-M USB2.0 connectors Never connect a 1394 cable to 480Mbps connection speed. COM1 PIN 1 M4A88T-M M4A88T-M Serial port (COM1) connector ASUS M4A88T-M 1-27 The USB 2.0 module is purchased separately. The serial port module is purchased separately. 6. 5. Serial port connector (10-1 pin COM1) The...
... PIN 1 USB910 PIN 1 USB1112 PIN 1 USB+5V USB_P9USB_P9+ GND USB+5V USB_P7USB_P7+ GND M4A88T-M USB2.0 connectors Never connect a 1394 cable to 480Mbps connection speed. COM1 PIN 1 M4A88T-M M4A88T-M Serial port (COM1) connector ASUS M4A88T-M 1-27 The USB 2.0 module is purchased separately. The serial port module is purchased separately. 6. 5. Serial port connector (10-1 pin COM1) The...
User Manual
Page 41
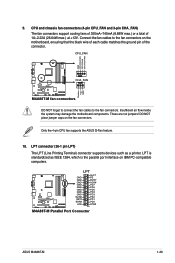
... components. Only the 4-pin CPU fan supports the ASUS Q-Fan feature. 10. M4A88T-M LPT GND GND GND GND GND GND GND GND SLIN# INIT# ERR# AFD SLCT PE BUSY ACK# PD7 PD6 PD5 PD4 PD3 PD2 PD1 PD0 STB# PIN 1 M4A88T-M Parallel Port Connector ASUS M4A88T-M 1-29 Connect the fan cables to the fan... connectors. CPU_FAN GND CPU FAN PWR CPU FAN IN CPU FAN PWM M4A88T-M CHA_FAN Rotation +12V GND M4A88T-M fan connectors DO NOT forget to connect the fan cables to the...
... components. Only the 4-pin CPU fan supports the ASUS Q-Fan feature. 10. M4A88T-M LPT GND GND GND GND GND GND GND GND SLIN# INIT# ERR# AFD SLCT PE BUSY ACK# PD7 PD6 PD5 PD4 PD3 PD2 PD1 PD0 STB# PIN 1 M4A88T-M Parallel Port Connector ASUS M4A88T-M 1-29 Connect the fan cables to the fan... connectors. CPU_FAN GND CPU FAN PWR CPU FAN IN CPU FAN PWM M4A88T-M CHA_FAN Rotation +12V GND M4A88T-M fan connectors DO NOT forget to connect the fan cables to the...
User Manual
Page 43
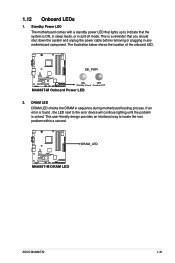
... in soft-off mode. The illustration below shows the location of the onboard LED. If an error is solved. M4A88T-M M4A88T-M DRAM LED DRAM_LED ASUS M4A88T-M 1-31 SB_PWR M4A88T-M ON OFF Standby Power Powered Off M4A88T-M Onboard Power LED 2. This user-friendly design provides an intuitional way to the error device will continue lighting until the...
... in soft-off mode. The illustration below shows the location of the onboard LED. If an error is solved. M4A88T-M M4A88T-M DRAM LED DRAM_LED ASUS M4A88T-M 1-31 SB_PWR M4A88T-M ON OFF Standby Power Powered Off M4A88T-M Onboard Power LED 2. This user-friendly design provides an intuitional way to the error device will continue lighting until the...
User Manual
Page 45
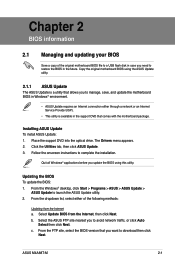
...Managing and updating your BIOS Save a copy of the following methods: Updating from the Internet, then click Next. Installing ASUS Update To install ASUS Update: 1. Select Update BIOS from the Internet a. Place the support DVD into the optical drive. From the dropdown ...you to restore the BIOS in the support DVD that you update the BIOS using the ASUS Update utility. 2.1.1 ASUS Update The ASUS Update is available in the future. ASUS M4A88T-M 2-1 From the Windows® desktop, click Start > Programs > ASUS > ASUS Update > ASUS Update to download then click Next.
...Managing and updating your BIOS Save a copy of the following methods: Updating from the Internet, then click Next. Installing ASUS Update To install ASUS Update: 1. Select Update BIOS from the Internet a. Place the support DVD into the optical drive. From the dropdown ...you to restore the BIOS in the support DVD that you update the BIOS using the ASUS Update utility. 2.1.1 ASUS Update The ASUS Update is available in the future. ASUS M4A88T-M 2-1 From the Windows® desktop, click Start > Programs > ASUS > ASUS Update > ASUS Update to download then click Next.
User Manual
Page 47
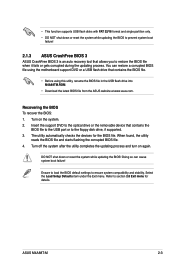
...BIOS file. 4. DO NOT shut down or reset the system while updating the BIOS to prevent system boot failure! 2.1.3 ASUS CrashFree BIOS 3 ASUS CrashFree BIOS 3 is an auto recovery tool that contains the BIOS file. • Before using this utility, rename ...the BIOS file in the USB flash drive into M4A88TM.ROM. • Download the latest BIOS file from the ASUS website at www.asus.com. Turn off the system after the utility completes the updating process and turn on the system. 2. Doing so... only. • DO NOT shut down or reset the system while updating the BIOS! ASUS M4A88T-M 2-3
...BIOS file. 4. DO NOT shut down or reset the system while updating the BIOS to prevent system boot failure! 2.1.3 ASUS CrashFree BIOS 3 ASUS CrashFree BIOS 3 is an auto recovery tool that contains the BIOS file. • Before using this utility, rename ...the BIOS file in the USB flash drive into M4A88TM.ROM. • Download the latest BIOS file from the ASUS website at www.asus.com. Turn off the system after the utility completes the updating process and turn on the system. 2. Doing so... only. • DO NOT shut down or reset the system while updating the BIOS! ASUS M4A88T-M 2-3
User Manual
Page 49
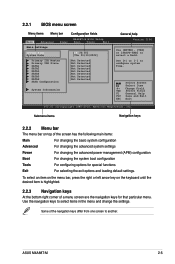
...options for that particular menu. Use the navigation keys to another. 2.2.1 BIOS menu screen Menu items Menu bar Configuration fields Main Advanced M4A88T-M BIOS Setup Power Boot Tools Exit Main Settings System Time [19:34:30] System Date [Thu 01/10/2002] Primary IDE ...Detected] :[Not Detected] System Information General help Version 2106 Use [ENTER], [TAB] or [SHIFT-TAB] to configure system Time. Select Screen Select Item +- ASUS M4A88T-M 2-5 Use [+] or [-] to select a field. To select an item on the menu bar, press the right or left arrow key on top of...
...options for that particular menu. Use the navigation keys to another. 2.2.1 BIOS menu screen Menu items Menu bar Configuration fields Main Advanced M4A88T-M BIOS Setup Power Boot Tools Exit Main Settings System Time [19:34:30] System Date [Thu 01/10/2002] Primary IDE ...Detected] :[Not Detected] System Information General help Version 2106 Use [ENTER], [TAB] or [SHIFT-TAB] to configure system Time. Select Screen Select Item +- ASUS M4A88T-M 2-5 Use [+] or [-] to select a field. To select an item on the menu bar, press the right or left arrow key on top of...
User Manual
Page 51
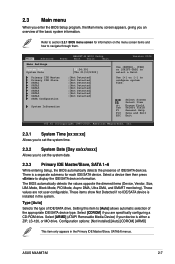
... MO drive. Select [ARMD] (ATAPI Removable Media Device) if your device is installed in the Primary IDE Master/Slave, SATA5/6 menus. ASUS M4A88T-M 2-7 Use [+] or [-] to select a field. Main Advanced M4A88T-M BIOS Setup Power Boot Tools Exit Main Settings System Time [19:34:30] System Date [Thu 01/10/2002] Primary IDE Master...
... MO drive. Select [ARMD] (ATAPI Removable Media Device) if your device is installed in the Primary IDE Master/Slave, SATA5/6 menus. ASUS M4A88T-M 2-7 Use [+] or [-] to select a field. Main Advanced M4A88T-M BIOS Setup Power Boot Tools Exit Main Settings System Time [19:34:30] System Date [Thu 01/10/2002] Primary IDE Master...


