
User Manual
Page 5
... ASUS TurboV 4-8 4.3.7 ASUS Turbo Key 4-9 4.3.8 ASUS Express Gate 4-10 4.3.9 VIA® High Definition Audio utility 4-11 4.4 RAID configurations 4-12 4.4.1 RAID definitions 4-12 4.4.2 Installing Serial ATA hard disks 4-13 4.4.3 Setting the RAID item in BIOS 4-13 4.4.4 AMD® Option ROM Utility 4-13 4.5 Creating a RAID driver disk 4-17 4.5.1 Creating a RAID driver disk without entering the OS 4-17 4.5.2 Creating a RAID driver disk in Windows 4-17 4.5.3 Installing the RAID driver during Windows® OS installation....... 4-17 4.5.4 Using a USB floppy disk drive...
... ASUS TurboV 4-8 4.3.7 ASUS Turbo Key 4-9 4.3.8 ASUS Express Gate 4-10 4.3.9 VIA® High Definition Audio utility 4-11 4.4 RAID configurations 4-12 4.4.1 RAID definitions 4-12 4.4.2 Installing Serial ATA hard disks 4-13 4.4.3 Setting the RAID item in BIOS 4-13 4.4.4 AMD® Option ROM Utility 4-13 4.5 Creating a RAID driver disk 4-17 4.5.1 Creating a RAID driver disk without entering the OS 4-17 4.5.2 Creating a RAID driver disk in Windows 4-17 4.5.3 Installing the RAID driver during Windows® OS installation....... 4-17 4.5.4 Using a USB floppy disk drive...
User Manual
Page 13
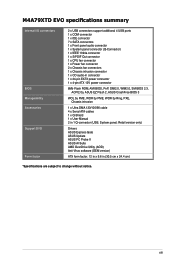
M4A79XTD EVO specifications summary Internal I/O connectors BIOS Manageability Accessories Support DVD Form factor 2 x USB connectors support additional 4 USB ports 1 x COM connector 1 x IDE connector 7 x SATA connectors 1 x Front panel audio connector 1 x System panel connector (Q-Connector) 1 x IEEE 1394a connector 1 x S/PDIF Out connector 1 x CPU fan connector 1 x Power fan connector 2 x Chassis fan connectors 1 x Chassis intrusion connector 1 x CD audio-in connector 1 x 24-pin EATX power connector 1 x 4-pin ATX 12V power connector 8Mb Flash ROM, AMI BIOS, PnP, DMI2.0, WfM2.0, SM BIOS ...
M4A79XTD EVO specifications summary Internal I/O connectors BIOS Manageability Accessories Support DVD Form factor 2 x USB connectors support additional 4 USB ports 1 x COM connector 1 x IDE connector 7 x SATA connectors 1 x Front panel audio connector 1 x System panel connector (Q-Connector) 1 x IEEE 1394a connector 1 x S/PDIF Out connector 1 x CPU fan connector 1 x Power fan connector 2 x Chassis fan connectors 1 x Chassis intrusion connector 1 x CD audio-in connector 1 x 24-pin EATX power connector 1 x 4-pin ATX 12V power connector 8Mb Flash ROM, AMI BIOS, PnP, DMI2.0, WfM2.0, SM BIOS ...

User Manual
Page 40
.... Ensure that your system functions well under high voltage settings. 2-20 Chapter 2: Hardware information CPU overvoltage setting (3-pin OV_CPU) This jumper allows you to pins 1-2 when you install a new CPU and have not booted for more information about the CPU overvoltage setting. • DO NOT set the OV_CPU jumper to enable or disable the advanced CPU overvoltage setting in 3.5 Advanced menu first to work stably under the highest BIOS voltage setting before you change the jumper setting.
.... Ensure that your system functions well under high voltage settings. 2-20 Chapter 2: Hardware information CPU overvoltage setting (3-pin OV_CPU) This jumper allows you to pins 1-2 when you install a new CPU and have not booted for more information about the CPU overvoltage setting. • DO NOT set the OV_CPU jumper to enable or disable the advanced CPU overvoltage setting in 3.5 Advanced menu first to work stably under the highest BIOS voltage setting before you change the jumper setting.

User Manual
Page 57
... boot. ASUS M4A79XTD EVO 3-1 Carefully follow the instructions of the BIOS may result in the motherboard CMOS. Refer to download the latest BIOS file for details on system stability, compatibility, or performance. If there is potentially risky. ASUS EZ Flash 2: Updates the BIOS using the current version of BIOS, DO NOT manually update the BIOS. Copy the original motherboard BIOS using the motherboard support DVD or a USB flash drive when the BIOS file fails or gets corrupted. ASUS CrashFree BIOS 3: Restores the BIOS using the ASUS Update utility. However, BIOS updating...
... boot. ASUS M4A79XTD EVO 3-1 Carefully follow the instructions of the BIOS may result in the motherboard CMOS. Refer to download the latest BIOS file for details on system stability, compatibility, or performance. If there is potentially risky. ASUS EZ Flash 2: Updates the BIOS using the current version of BIOS, DO NOT manually update the BIOS. Copy the original motherboard BIOS using the motherboard support DVD or a USB flash drive when the BIOS file fails or gets corrupted. ASUS CrashFree BIOS 3: Restores the BIOS using the ASUS Update utility. However, BIOS updating...

User Manual
Page 58
... BIOS through a network or an Internet Service Provider (ISP). Installing ASUS Update To install ASUS Update: 1. The ASUS Update utility allows you update the BIOS using this utility. Place the support DVD in Windows® environment. Updating the BIOS through the Internet Quit all Windows® applications before you to: • Save the current BIOS file • Download the latest BIOS file from the Internet • Update the BIOS from an updated BIOS file • Update the BIOS directly from the drop‑down menu...
... BIOS through a network or an Internet Service Provider (ISP). Installing ASUS Update To install ASUS Update: 1. The ASUS Update utility allows you update the BIOS using this utility. Place the support DVD in Windows® environment. Updating the BIOS through the Internet Quit all Windows® applications before you to: • Save the current BIOS file • Download the latest BIOS file from the Internet • Update the BIOS from an updated BIOS file • Update the BIOS directly from the drop‑down menu...

User Manual
Page 60
... function can support devices such as a USB flash drive with FAT 32/16 format and single partition only. • DO NOT shut down or reset the system while updating the BIOS to use a bootable floppy disk or an OS‑based utility. Ensure to load the BIOS default settings to display the following. • Enter the BIOS setup program. Chapter 3 3-4 Chapter 3: BIOS setup Select the Load Setup Defaults item under the Exit menu. Insert the USB flash drive that...
... function can support devices such as a USB flash drive with FAT 32/16 format and single partition only. • DO NOT shut down or reset the system while updating the BIOS to use a bootable floppy disk or an OS‑based utility. Ensure to load the BIOS default settings to display the following. • Enter the BIOS setup program. Chapter 3 3-4 Chapter 3: BIOS setup Select the Load Setup Defaults item under the Exit menu. Insert the USB flash drive that...
User Manual
Page 61
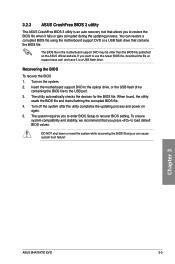
... 3 ASUS M4A79XTD EVO 3-5 Insert the motherboard support DVD to the optical drive, or the USB flash drive containing the BIOS file to the USB port. 3. Turn off the system after the utility completes the updating process and power on again. 5. To ensure system compatibility and stability, we recommend that allows you to restore the BIOS file when it to recover BIOS setting. 3.2.3 ASUS CrashFree BIOS 3 utility The ASUS CrashFree BIOS 3 utility is an auto recovery tool that you press to load default BIOS...
... 3 ASUS M4A79XTD EVO 3-5 Insert the motherboard support DVD to the optical drive, or the USB flash drive containing the BIOS file to the USB port. 3. Turn off the system after the utility completes the updating process and power on again. 5. To ensure system compatibility and stability, we recommend that allows you to restore the BIOS file when it to recover BIOS setting. 3.2.3 ASUS CrashFree BIOS 3 utility The ASUS CrashFree BIOS 3 utility is an auto recovery tool that you press to load default BIOS...

User Manual
Page 66
... SATA hard disk drives to create a RAID configuration from the hard disk into a single 32-bit double word transfer to use SATA connectors 1-6 in AHCI mode under OS. Set to [RAID] when you want to use of the PCI bus as Parallel ATA physical storage devices. Main BIOS SETUP UTILITY Storage Configuration OnChip SATA channel [Enabled] OnChip SATA Type [IDE] Options Disabled Enabled OnChip SATA Channel [Enabled] [Enabled] Enables the onboard channel SATA port. [Disabled] Disables the onboard channel SATA port. This makes more efficient use the AHCI (Advanced Host Controller...
... SATA hard disk drives to create a RAID configuration from the hard disk into a single 32-bit double word transfer to use SATA connectors 1-6 in AHCI mode under OS. Set to [RAID] when you want to use of the PCI bus as Parallel ATA physical storage devices. Main BIOS SETUP UTILITY Storage Configuration OnChip SATA channel [Enabled] OnChip SATA Type [IDE] Options Disabled Enabled OnChip SATA Channel [Enabled] [Enabled] Enables the onboard channel SATA port. [Disabled] Disables the onboard channel SATA port. This makes more efficient use the AHCI (Advanced Host Controller...
User Manual
Page 67
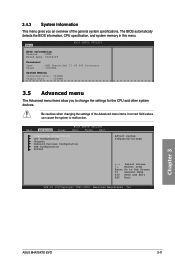
... General Help F10 Save and Exit ESC Exit v02.61 (C)Copyright 1985-2009, American Megatrends, Inc. Main Advanced Power BIOS SETUP UTILITY Boot Tools Exit JumperFree Configuration CPU Configuration Chipset Onboard Devices Configuration USB Configuration PCIPnP Adjust system frequency/voltage ←→ Select Screen ↑↓ Select Item Enter Go to malfunction. Be cautious when changing the settings of the general system specifications. The BIOS automatically detects the BIOS information, CPU specification, and system memory in this menu.
... General Help F10 Save and Exit ESC Exit v02.61 (C)Copyright 1985-2009, American Megatrends, Inc. Main Advanced Power BIOS SETUP UTILITY Boot Tools Exit JumperFree Configuration CPU Configuration Chipset Onboard Devices Configuration USB Configuration PCIPnP Adjust system frequency/voltage ←→ Select Screen ↑↓ Select Item Enter Go to malfunction. Be cautious when changing the settings of the general system specifications. The BIOS automatically detects the BIOS information, CPU specification, and system memory in this menu.

User Manual
Page 68
.... Loads the optimal settings for stability when overclocking. Allows you installed. PCIE Frequency [100] Use the and keys to achieve the desired CPU internal frequency. Main Advanced Power BIOS SETUP UTILITY Boot Tools Exit Configure System Frequency/Voltage Ai Overclock Tuner [Auto] CPU Ratio and Voltage: CPU Ratio CPU Over Voltage VDDNB Over Voltage [Auto] [Auto] [Auto] HT Connector Info HT Link Speed HT Link Width HT Voltage [Auto] [Auto] [Auto] Memory Timming and Voltage: DRAM Frequency [Auto] DDR3 Memory Profile [Disabled] DRAM Voltage [Auto] DRAM...
.... Loads the optimal settings for stability when overclocking. Allows you installed. PCIE Frequency [100] Use the and keys to achieve the desired CPU internal frequency. Main Advanced Power BIOS SETUP UTILITY Boot Tools Exit Configure System Frequency/Voltage Ai Overclock Tuner [Auto] CPU Ratio and Voltage: CPU Ratio CPU Over Voltage VDDNB Over Voltage [Auto] [Auto] [Auto] HT Connector Info HT Link Speed HT Link Width HT Voltage [Auto] [Auto] [Auto] Memory Timming and Voltage: DRAM Frequency [Auto] DDR3 Memory Profile [Disabled] DRAM Voltage [Auto] DRAM...

User Manual
Page 72
... Secure Virtual Machine mode. [Enabled] Enables the AMD Secure Virtual Machine mode. Chapter 3 3-16 Chapter 3: BIOS setup Advanced CPU Configuration BIOS SETUP UTILITY AMD Phenom(tm) II X4 945 Processor Revision: C2 Cache L1: 512KB Cache L2: 2048KB Cache L3: 6MB Speed : 3000MHz, NB Clk: 2000MHz Able to Change Freq. : Yes uCode Patch Level : 0x1000086 GART Error Reporting Microcode Updation Secure Virtual Machine Mode Cool'n'Quiet ACPI SRAT Table C1E Support Advanced Clock Calibration [Disabled] [Enabled] [Enabled] [Disabled] [Enabled] [Enabled] [Disabled] This option...
... Secure Virtual Machine mode. [Enabled] Enables the AMD Secure Virtual Machine mode. Chapter 3 3-16 Chapter 3: BIOS setup Advanced CPU Configuration BIOS SETUP UTILITY AMD Phenom(tm) II X4 945 Processor Revision: C2 Cache L1: 512KB Cache L2: 2048KB Cache L3: 6MB Speed : 3000MHz, NB Clk: 2000MHz Able to Change Freq. : Yes uCode Patch Level : 0x1000086 GART Error Reporting Microcode Updation Secure Virtual Machine Mode Cool'n'Quiet ACPI SRAT Table C1E Support Advanced Clock Calibration [Disabled] [Enabled] [Enabled] [Disabled] [Enabled] [Enabled] [Disabled] This option...

User Manual
Page 76
USB Support [Enabled] [Enabled] Enables the USB Host Controllers. [Disabled] Disables the controllers. If detected, the USB controller legacy mode is detected, the item shows None. Advanced Advanced PCI/PnP Settings BIOS SETUP UTILITY WARNING: Setting wrong values in the system. Plug And Play O/S [No] NO: lets the BIOS configure all the devices in the system. Chapter 3 3-20 Chapter 3: BIOS setup If no USB device is detected, the legacy USB support is disabled. [Enabled] Enables the support for boot. [No] When set USB Support to malfunction. USB 2.0 Controller [...
USB Support [Enabled] [Enabled] Enables the USB Host Controllers. [Disabled] Disables the controllers. If detected, the USB controller legacy mode is detected, the item shows None. Advanced Advanced PCI/PnP Settings BIOS SETUP UTILITY WARNING: Setting wrong values in the system. Plug And Play O/S [No] NO: lets the BIOS configure all the devices in the system. Chapter 3 3-20 Chapter 3: BIOS setup If no USB device is detected, the legacy USB support is disabled. [Enabled] Enables the support for boot. [No] When set USB Support to malfunction. USB 2.0 Controller [...

User Manual
Page 81
.... Boot Settings Configuration Security A virtual floppy disk drive (Floppy Drive B: ) may appear when you to change the system boot options. Select an item then press to Sub Screen F1 General Help F10 Save and Exit ESC Exit v02.61 (C)Copyright 1985-2009, American Megatrends, Inc. 3.7.1 Boot Device Priority Boot Device Priority 1st Boot Device 2nd Boot Device 3rd Boot Device BIOS SETUP UTILITY Boot [Removable Dev.] [Hard Drive] [ATAPI DVD-ROM] 1st ~ xxth Boot Device [Removable] These items specify the boot device priority sequence from the available devices. 3.7 Boot menu...
.... Boot Settings Configuration Security A virtual floppy disk drive (Floppy Drive B: ) may appear when you to change the system boot options. Select an item then press to Sub Screen F1 General Help F10 Save and Exit ESC Exit v02.61 (C)Copyright 1985-2009, American Megatrends, Inc. 3.7.1 Boot Device Priority Boot Device Priority 1st Boot Device 2nd Boot Device 3rd Boot Device BIOS SETUP UTILITY Boot [Removable Dev.] [Hard Drive] [ATAPI DVD-ROM] 1st ~ xxth Boot Device [Removable] These items specify the boot device priority sequence from the available devices. 3.7 Boot menu...

User Manual
Page 83
...clear clear it by erasing the CMOS Real Time Clock (RTC) RAM. Chapter 3 ASUS M4A79XTD EVO 3-27 again to change other items appear to allow you to selected fields, such as in the Setup utility. After you set a Supervisor Password: 1. 3.7.3 Security The Security menu items allow you to disable password. Select an item then press to change password. BIOS SETUP UTILITY Boot Security Settings Supervisor Password User Password : Not Installed : Not Installed Change Supervisor Password Change User Passward to display the configuration options. Change Supervisor Password...
...clear clear it by erasing the CMOS Real Time Clock (RTC) RAM. Chapter 3 ASUS M4A79XTD EVO 3-27 again to change other items appear to allow you to selected fields, such as in the Setup utility. After you set a Supervisor Password: 1. 3.7.3 Security The Security menu items allow you to disable password. Select an item then press to change password. BIOS SETUP UTILITY Boot Security Settings Supervisor Password User Password : Not Installed : Not Installed Change Supervisor Password Change User Passward to display the configuration options. Change Supervisor Password...

User Manual
Page 85
... the utility to display the submenu. 3.8 Tools menu The Tools menu items allow you to configure options for details. ASUSTek EZ Flash 2 BIOS ROM Utility V3.36 FLASH TYPE: MXIC 25L8005 Current ROM BOARD: M4A79XTD-EVO VER: 0202 (H:00 B:01) DATE: 06/22/2009 Update ROM BOARD: Unknown VER: Unknown DATE: Unknown PATH: A:\ A: Note [Enter] Select or Load [Up/Down/Home/End] Move [Tab] Switch [B] Backup [V] Drive Info [Esc] Exit 3.8.2 Express Gate [Auto] Allows...
... the utility to display the submenu. 3.8 Tools menu The Tools menu items allow you to configure options for details. ASUSTek EZ Flash 2 BIOS ROM Utility V3.36 FLASH TYPE: MXIC 25L8005 Current ROM BOARD: M4A79XTD-EVO VER: 0202 (H:00 B:01) DATE: 06/22/2009 Update ROM BOARD: Unknown VER: Unknown DATE: Unknown PATH: A:\ A: Note [Enter] Select or Load [Up/Down/Home/End] Move [Tab] Switch [B] Backup [V] Drive Info [Esc] Exit 3.8.2 Express Gate [Auto] Allows...
User Manual
Page 89
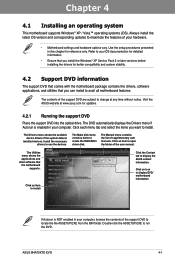
... supplementary user manuals. Click an item to install Click the Contact tab to create the RAID/AHCI driver disk. The Make disk menu contains items to display the ASUS contact information. Click an item to avail all motherboard features. The Manual menu contains the list of the user manual. ASUS M4A79XTD EVO 4-1 The DVD automatically displays the Drivers menu if Autorun is NOT enabled in your computer. Double-click the ASSETUP.EXE to use the devices...
... supplementary user manuals. Click an item to install Click the Contact tab to create the RAID/AHCI driver disk. The Make disk menu contains items to display the ASUS contact information. Click an item to avail all motherboard features. The Manual menu contains the list of the user manual. ASUS M4A79XTD EVO 4-1 The DVD automatically displays the Drivers menu if Autorun is NOT enabled in your computer. Double-click the ASSETUP.EXE to use the devices...

User Manual
Page 98
... USB drives and downloading to USB drives only. • ASUS Express Gate supports installation on environment that gives you quick access to the motherboard USB port before use. • ASUS Express Gate supports SATA devices in the • Express Gate complies with at the Express Gate menu where you power on the computer. • Your monitor must support the screen resolution of 1024 x 768, or ASUS Express Gate will be skipped during POST. • See the software manual in the bundled motherboard support DVD...
... USB drives and downloading to USB drives only. • ASUS Express Gate supports installation on environment that gives you quick access to the motherboard USB port before use. • ASUS Express Gate supports SATA devices in the • Express Gate complies with at the Express Gate menu where you power on the computer. • Your monitor must support the screen resolution of 1024 x 768, or ASUS Express Gate will be skipped during POST. • See the software manual in the bundled motherboard support DVD...

User Manual
Page 101
...Keys Available ] Press 1..4 to display the utility main menu. Connect the SATA signal cables. 3. Connect a SATA power cable to Chapter 3 for a RAID configuration: 1. Boot up your changes, and then exit the BIOS Setup. 4.4.2 Installing Serial ATA hard disks The motherboard supports Serial ATA hard disk drives. Enter the BIOS Setup during POST. 2. During POST, press + to Select Option [ESC] Exit ASUS M4A79XTD EVO 4-13 To do this: 1. Due to RAID mode, all SATA ports run at RAID mode together. 4.4.4 AMD® Option ROM Utility® To enter the AMD® Option ROM...
...Keys Available ] Press 1..4 to display the utility main menu. Connect the SATA signal cables. 3. Connect a SATA power cable to Chapter 3 for a RAID configuration: 1. Boot up your changes, and then exit the BIOS Setup. 4.4.2 Installing Serial ATA hard disks The motherboard supports Serial ATA hard disk drives. Enter the BIOS Setup during POST. 2. During POST, press + to Select Option [ESC] Exit ASUS M4A79XTD EVO 4-13 To do this: 1. Due to RAID mode, all SATA ports run at RAID mode together. 4.4.4 AMD® Option ROM Utility® To enter the AMD® Option ROM...
User Manual
Page 105
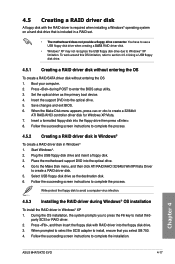
... USB floppy disk drive as the primary boot device. 4. party SCSI or RAID driver. 2. Press , and then insert the floppy disk with the RAID driver is required when installing a Windows® operating system on a hard disk drive that you to press the F6 key to complete the installation. Press during Windows® OS installation To install the RAID driver in a RAID set. • The motherboard does not provide a floppy drive connector. Save changes and exit BIOS. 6. Follow the succeeding screen instructions to enter the BIOS setup utility. 3. Chapter 4 ASUS M4A79XTD...
... USB floppy disk drive as the primary boot device. 4. party SCSI or RAID driver. 2. Press , and then insert the floppy disk with the RAID driver is required when installing a Windows® operating system on a hard disk drive that you to press the F6 key to complete the installation. Press during Windows® OS installation To install the RAID driver in a RAID set. • The motherboard does not provide a floppy drive connector. Save changes and exit BIOS. 6. Follow the succeeding screen instructions to enter the BIOS setup utility. 3. Chapter 4 ASUS M4A79XTD...

User Manual
Page 106
From the Universal Serial Bus controllers, right-click xxxxxx USB Floppy, and then select Properties from a floppy disk during the OS installation. The name of the USB floppy disk drive varies with RAID driver into the floppy disk drive. 2. Click Details tab. Follow the succeeding screen instructions to complete the installation. 4.5.4 Using a USB floppy disk drive Due to OS limitation, Windows® XP may not recognize the USB floppy disk drive when you install the RAID driver from the pop-up window. Right-click My...
From the Universal Serial Bus controllers, right-click xxxxxx USB Floppy, and then select Properties from a floppy disk during the OS installation. The name of the USB floppy disk drive varies with RAID driver into the floppy disk drive. 2. Click Details tab. Follow the succeeding screen instructions to complete the installation. 4.5.4 Using a USB floppy disk drive Due to OS limitation, Windows® XP may not recognize the USB floppy disk drive when you install the RAID driver from the pop-up window. Right-click My...


