
User Manual
Page 1
Motherboard
Motherboard

User Manual
Page 1
M4A78-EM Motherboard
M4A78-EM Motherboard

User Manual
Page 3
Contents Notices...vi Safety information vii About this guide vii M4A78-EM specifications summary ix Chapter 1: Product introduction 1.1 Welcome 1-1 1.2 Package contents 1-1 1.3 Special features 1-1 1.3.1 Product highlights 1-1 1.3.2 Innovative ASUS features 1-3 1.4 Before you proceed 1-5 1.5 Motherboard overview 1-6 1.5.1 Placement direction 1-6 1.5.2 Screw holes 1-6 1.5.3 Motherboard layout 1-7 1.5.4 Layout contents 1-7 1.6 Central Processing Unit (CPU 1-8 1.6.1 Installing the CPU 1-8 1.6.2 Installing the heatsink and fan 1-10 1.7 System memory...
Contents Notices...vi Safety information vii About this guide vii M4A78-EM specifications summary ix Chapter 1: Product introduction 1.1 Welcome 1-1 1.2 Package contents 1-1 1.3 Special features 1-1 1.3.1 Product highlights 1-1 1.3.2 Innovative ASUS features 1-3 1.4 Before you proceed 1-5 1.5 Motherboard overview 1-6 1.5.1 Placement direction 1-6 1.5.2 Screw holes 1-6 1.5.3 Motherboard layout 1-7 1.5.4 Layout contents 1-7 1.6 Central Processing Unit (CPU 1-8 1.6.1 Installing the CPU 1-8 1.6.2 Installing the heatsink and fan 1-10 1.7 System memory...
User Manual
Page 6
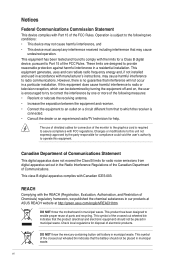
...digital apparatus set out in accordance with the REACH (Registration, Evaluation, Authorisation, and Restriction of Communications. DO NOT throw the motherboard in municipal waste. DO NOT throw the mercury-containing button cell battery in municipal waste. vi Changes or modifications to this equipment... no guarantee that may cause harmful interference to provide reasonable protection against harmful interference in our products at ASUS REACH website at http://green.asus.com/english/REACH.htm. This equipment has been tested and found to comply with FCC regulations. Canadian ...
...digital apparatus set out in accordance with the REACH (Registration, Evaluation, Authorisation, and Restriction of Communications. DO NOT throw the motherboard in municipal waste. DO NOT throw the mercury-containing button cell battery in municipal waste. vi Changes or modifications to this equipment... no guarantee that may cause harmful interference to provide reasonable protection against harmful interference in our products at ASUS REACH website at http://green.asus.com/english/REACH.htm. This equipment has been tested and found to comply with FCC regulations. Canadian ...
User Manual
Page 7
...information you are connected. If you are not sure about the voltage of the electrical outlet you need when installing and configuring the motherboard. Safety information Electrical safety • To prevent electric shock hazard, disconnect the power cable from the electric outlet before relocating the...qualified service technician or your dealer immediately. • To avoid short circuits, keep paper clips, screws, and staples away from the motherboard, ensure that all the manuals that the power cables for the devices are unplugged before the signal cables are using an adapter or...
...information you are connected. If you are not sure about the voltage of the electrical outlet you need when installing and configuring the motherboard. Safety information Electrical safety • To prevent electric shock hazard, disconnect the power cable from the electric outlet before relocating the...qualified service technician or your dealer immediately. • To avoid short circuits, keep paper clips, screws, and staples away from the motherboard, ensure that all the manuals that the power cables for the devices are unplugged before the signal cables are using an adapter or...
User Manual
Page 13
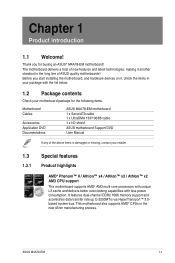
... another standout in the long line of ASUS quality motherboards! Before you for the following items. Motherboard Cables Accessories Application DVD Documentations ASUS M4A78-EM motherboard 1 x Serial ATA cable 1 x UltraDMA 133/100/66 cable 1 x I/O shield ASUS motherboard Support DVD User Manual If any of ...new features and latest technologies, making it , check the items in the new 45nm manufacturing process. ASUS M4A78-EM 1-1 The motherboard delivers a host of the above items is damaged or missing, contact your retailer. 1.3 1.3.1 Special features Product highlights...
... another standout in the long line of ASUS quality motherboards! Before you for the following items. Motherboard Cables Accessories Application DVD Documentations ASUS M4A78-EM motherboard 1 x Serial ATA cable 1 x UltraDMA 133/100/66 cable 1 x I/O shield ASUS motherboard Support DVD User Manual If any of ...new features and latest technologies, making it , check the items in the new 45nm manufacturing process. ASUS M4A78-EM 1-1 The motherboard delivers a host of the above items is damaged or missing, contact your retailer. 1.3 1.3.1 Special features Product highlights...
User Manual
Page 14
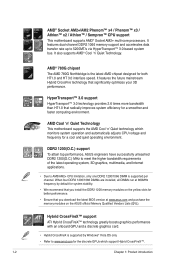
...system operation and automatically adjusts CPU voltage and frequency for a cool and quiet operating environment. AMD Cool 'n' Quiet Technology This motherboard supports the AMD Cool 'n' Quiet technology which support Hybrid CrossFireX™. 1-2 Chapter 1: Product introduction When four DDR2 1200/1066... your 3D performance. It also supports AMD® Cool 'n' Quiet Technology. DDR2 1200(O.C.) support To attain top performance, ASUS engineers have successfully unleashed DDR2 1200(O.C.) MHz to meet the higher bandwidth requirements of the latest operating system, 3D graphics, multimedia...
...system operation and automatically adjusts CPU voltage and frequency for a cool and quiet operating environment. AMD Cool 'n' Quiet Technology This motherboard supports the AMD Cool 'n' Quiet technology which support Hybrid CrossFireX™. 1-2 Chapter 1: Product introduction When four DDR2 1200/1066... your 3D performance. It also supports AMD® Cool 'n' Quiet Technology. DDR2 1200(O.C.) support To attain top performance, ASUS engineers have successfully unleashed DDR2 1200(O.C.) MHz to meet the higher bandwidth requirements of the latest operating system, 3D graphics, multimedia...
User Manual
Page 15
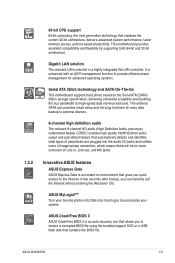
...systems. Serial ATA 3Gb/s technology and SATA-On-The-Go This motherboard supports hard drives based on environment that automatically detects and identifies what types of Line-in, Line-out, and Mic jacks. ASUS M4A78-EM 1-3 Gigabit LAN solution The onboard LAN controller is an auto-...recovery tool that allows you can instantly surf the Internet without entering the Windows® OS. ASUS CrashFree BIOS 3 ASUS CrashFree BIOS 3 is a highly integrated Gb LAN ...
...systems. Serial ATA 3Gb/s technology and SATA-On-The-Go This motherboard supports hard drives based on environment that automatically detects and identifies what types of Line-in, Line-out, and Mic jacks. ASUS M4A78-EM 1-3 Gigabit LAN solution The onboard LAN controller is an auto-...recovery tool that allows you can instantly surf the Internet without entering the Windows® OS. ASUS CrashFree BIOS 3 ASUS CrashFree BIOS 3 is a highly integrated Gb LAN ...

User Manual
Page 16
...automatically restores the CPU default settings when the system hangs due to open the system chassis and clear the RTC data. C.P.R. ASUS AI Nap With AI Nap, the system can keep running at 1 meter accuracy. This is a unique power saving technology that... technology intelligently adjusts CPU fan speeds according to system loading to their default settings. 1-4 Chapter 1: Product introduction Green ASUS This motherboard and its packaging comply with the ASUS vision of Hazardous Substances (RoHS). C.P.R. (CPU Parameter Recall) The BIOS C.P.R. Simply shut down and reboot the system, and...
...automatically restores the CPU default settings when the system hangs due to open the system chassis and clear the RTC data. C.P.R. ASUS AI Nap With AI Nap, the system can keep running at 1 meter accuracy. This is a unique power saving technology that... technology intelligently adjusts CPU fan speeds according to system loading to their default settings. 1-4 Chapter 1: Product introduction Green ASUS This motherboard and its packaging comply with the ASUS vision of Hazardous Substances (RoHS). C.P.R. (CPU Parameter Recall) The BIOS C.P.R. Simply shut down and reboot the system, and...
User Manual
Page 17
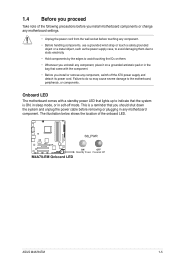
.... • Hold components by the edges to the motherboard, peripherals, or components. Onboard LED The motherboard comes with the component. • Before you install or remove any component, switch off mode. ASUS M4A78-EM 1-5 The illustration below shows the location of the following... precautions before you install motherboard components or change any motherboard settings. • Unplug the power cord from the wall socket before removing or plugging in soft-off the ATX power supply ...
.... • Hold components by the edges to the motherboard, peripherals, or components. Onboard LED The motherboard comes with the component. • Before you install or remove any component, switch off mode. ASUS M4A78-EM 1-5 The illustration below shows the location of the following... precautions before you install motherboard components or change any motherboard settings. • Unplug the power cord from the wall socket before removing or plugging in soft-off the ATX power supply ...
User Manual
Page 18
Place this side towards the rear of the chassis as indicated in the image below. 1.5.2 Screw holes Place eight screws into the chassis in the correct orientation. Doing so can damage the motherboard. The edge with external ports goes to the chassis. 1.5 Motherboard overview 1.5.1 Placement direction When installing the motherboard, ensure that you place it into the holes indicated by circles to secure the motherboard to the rear part of the chassis. 1-6 Chapter 1: Product introduction DO NOT overtighten the screws!
Place this side towards the rear of the chassis as indicated in the image below. 1.5.2 Screw holes Place eight screws into the chassis in the correct orientation. Doing so can damage the motherboard. The edge with external ports goes to the chassis. 1.5 Motherboard overview 1.5.1 Placement direction When installing the motherboard, ensure that you place it into the holes indicated by circles to secure the motherboard to the rear part of the chassis. 1-6 Chapter 1: Product introduction DO NOT overtighten the screws!
User Manual
Page 19
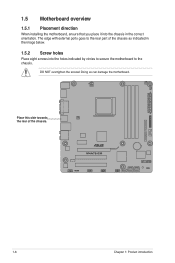
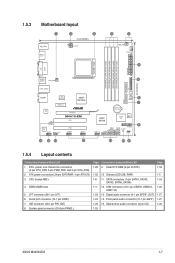
...23 13. 1.5.3 Motherboard layout 1.5.4 Layout contents Connectors/Jumpers/Slots/LED 1. CPU, power, and chassis fan connectors (4-pin CPU_FAN, 3-pin PWR_FAN, and 3-pin CHA_FAN) 2. Optical drive audio connector (4-pin CD) 1-25 Page 1-18 1-5 1-24 1-26 1-27 1-27 1-26 ASUS M4A78-EM 1-7 DDR2 DIMM ...slots 5. System panel connector (20-8 pin PANEL) Page Connectors/Jumpers/Slots/LED 1-28 9. LPT connector (26-1 pin LPT) 6. SATA connectors (7-pin SATA1, SATA2, SATA3, SATA5, SATA6) 1-11 12. ATX power connectors (24-pin EATXPWR,...
...23 13. 1.5.3 Motherboard layout 1.5.4 Layout contents Connectors/Jumpers/Slots/LED 1. CPU, power, and chassis fan connectors (4-pin CPU_FAN, 3-pin PWR_FAN, and 3-pin CHA_FAN) 2. Optical drive audio connector (4-pin CD) 1-25 Page 1-18 1-5 1-24 1-26 1-27 1-27 1-26 ASUS M4A78-EM 1-7 DDR2 DIMM ...slots 5. System panel connector (20-8 pin PANEL) Page Connectors/Jumpers/Slots/LED 1-28 9. LPT connector (26-1 pin LPT) 6. SATA connectors (7-pin SATA1, SATA2, SATA3, SATA5, SATA6) 1-11 12. ATX power connectors (24-pin EATXPWR,...

User Manual
Page 20
Locate the CPU socket on the motherboard. 2. Carefully insert the CPU into the socket to a 90°-100° angle. The CPU fits only in completely. 3. Use a CPU that the CPU corner ... in place. DO NOT force the CPU into the socket until it up to a 90°-100° angle; Right 1.6 Central Processing Unit (CPU) This motherboard comes with a small triangle. 4. Position the CPU above the socket such that is lifted up to prevent bending the pins and damaging the CPU! Small...
Locate the CPU socket on the motherboard. 2. Carefully insert the CPU into the socket to a 90°-100° angle. The CPU fits only in completely. 3. Use a CPU that the CPU corner ... in place. DO NOT force the CPU into the socket until it up to a 90°-100° angle; Right 1.6 Central Processing Unit (CPU) This motherboard comes with a small triangle. 4. Position the CPU above the socket such that is lifted up to prevent bending the pins and damaging the CPU! Small...

User Manual
Page 21
Hardware monitoring errors can also refer to plug this connector. You can occur if you fail to section 1.6.2 Installing heatsink and fan for instructions. 7. ASUS M4A78-EM 1-9 Connect the CPU fan cable to connect the CPU fan connector! Install a CPU heatsink and fan following the instructions that it is in place, push down the socket lever to secure the CPU. When the CPU is locked. 6. DO NOT forget to the CPU_FAN connector on the side tab to indicate that comes with the heatsink package. The lever clicks on the motherboard. 5.
Hardware monitoring errors can also refer to plug this connector. You can occur if you fail to section 1.6.2 Installing heatsink and fan for instructions. 7. ASUS M4A78-EM 1-9 Connect the CPU fan cable to connect the CPU fan connector! Install a CPU heatsink and fan following the instructions that it is in place, push down the socket lever to secure the CPU. When the CPU is locked. 6. DO NOT forget to the CPU_FAN connector on the side tab to indicate that comes with the heatsink package. The lever clicks on the motherboard. 5.
User Manual
Page 22
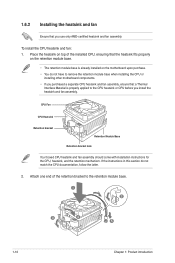
... mechanism. If the instructions in this section do not have to remove the retention module base when installing the CPU or installing other motherboard components. • If you purchased a separate CPU heatsink and fan assembly, ensure that you install the heatsink and fan assembly. ...1.6.2 Installing the heatsink and fan Ensure that a Thermal Interface Material is already installed on the motherboard upon purchase. • You do not match the CPU documentation, follow the latter. 2. Place the heatsink on the retention module base. ...
... mechanism. If the instructions in this section do not have to remove the retention module base when installing the CPU or installing other motherboard components. • If you purchased a separate CPU heatsink and fan assembly, ensure that you install the heatsink and fan assembly. ...1.6.2 Installing the heatsink and fan Ensure that a Thermal Interface Material is already installed on the motherboard upon purchase. • You do not match the CPU documentation, follow the latter. 2. Place the heatsink on the retention module base. ...

User Manual
Page 23
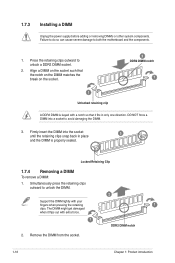
... to prevent installation on a DDR DIMM socket. Push down the retention bracket lock on the motherboard labeled CPU_FAN. DDR2 DIMMs are notched differently to plug this connector. 1.7 System memory 1.7.1 Overview The motherboard comes with four Double Data Rate 2 (DDR2) Dual Inline Memory Modules (DIMM) sockets. ...! Align the other end of the DDR2 DIMM sockets: Channel Channel A Channel B Sockets DIMM_A1 and DIMM_A2 DIMM_B1 and DIMM_B2 ASUS M4A78-EM 1-11 A DDR2 module has the same physical dimensions as a DDR DIMM but has a 240-pin footprint compared to the retention module base...
... to prevent installation on a DDR DIMM socket. Push down the retention bracket lock on the motherboard labeled CPU_FAN. DDR2 DIMMs are notched differently to plug this connector. 1.7 System memory 1.7.1 Overview The motherboard comes with four Double Data Rate 2 (DDR2) Dual Inline Memory Modules (DIMM) sockets. ...! Align the other end of the DDR2 DIMM sockets: Channel Channel A Channel B Sockets DIMM_A1 and DIMM_A2 DIMM_B1 and DIMM_B2 ASUS M4A78-EM 1-11 A DDR2 module has the same physical dimensions as a DDR DIMM but has a 240-pin footprint compared to the retention module base...

User Manual
Page 24
...if you install 4GB or more memory on the motherboard. • This motherboard does not support DIMMs made up to install 4GB or more memory on the motherboard, the actual usable memory for better performance. M4A78-EM Motherboard Qualified Vendors Lists (QVL) DDR2-1200(O.C.)MHz ...65533;g�a��3�2�-�b�it�W��i�n�d�o�w��s® OS. - The motherboard supports up of 256 megabits (Mb) chips or less. DDR2-1066MHz capability Size Vendor Part No. 4096MB(Kit of 2) ...
...if you install 4GB or more memory on the motherboard. • This motherboard does not support DIMMs made up to install 4GB or more memory on the motherboard, the actual usable memory for better performance. M4A78-EM Motherboard Qualified Vendors Lists (QVL) DDR2-1200(O.C.)MHz ...65533;g�a��3�2�-�b�it�W��i�n�d�o�w��s® OS. - The motherboard supports up of 256 megabits (Mb) chips or less. DDR2-1066MHz capability Size Vendor Part No. 4096MB(Kit of 2) ...
User Manual
Page 28
... with extra force. 1 DDR2 DIMM notch 2. Simultaneously press the retaining clips outward to avoid damaging the DIMM. 3. Press the retaining clips outward to both the motherboard and the components. 1. The DIMM might get damaged when it fits in place 3 and the DIMM is keyed with a notch so that it flips out...
... with extra force. 1 DDR2 DIMM notch 2. Simultaneously press the retaining clips outward to avoid damaging the DIMM. 3. Press the retaining clips outward to both the motherboard and the components. 1. The DIMM might get damaged when it fits in place 3 and the DIMM is keyed with a notch so that it flips out...
User Manual
Page 29
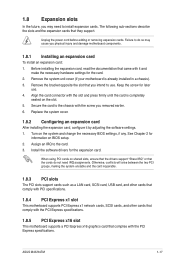
... software settings. 1. Assign an IRQ to the chassis with the PCI Express specifications. When using PCI cards on BIOS setup. 2. ASUS M4A78-EM 1-17 Remove the bracket opposite the slot that they support. Otherwise, conflicts will arise between the two PCI groups, making the system...and make the necessary hardware settings for later use . 1.8 Expansion slots In the future, you may cause you physical injury and damage motherboard components. 1.8.1 Installing an expansion card To install an expansion card: 1. Unplug the power cord before adding or removing expansion cards. Failure...
... software settings. 1. Assign an IRQ to the chassis with the PCI Express specifications. When using PCI cards on BIOS setup. 2. ASUS M4A78-EM 1-17 Remove the bracket opposite the slot that they support. Otherwise, conflicts will arise between the two PCI groups, making the system...and make the necessary hardware settings for later use . 1.8 Expansion slots In the future, you may cause you physical injury and damage motherboard components. 1.8.1 Installing an expansion card To install an expansion card: 1. Unplug the power cord before adding or removing expansion cards. Failure...

User Manual
Page 32
... the following dual display outputs are for any DVI-D compatible device and is Realtek High Definition Audio (the name may be different based on your motherboard: Dual display outputs DVI + D-Sub DVI + HDMI HDMI + D-Sub Supported • • Not supported • • During POST, only the monitor connected to [AHCI]. The...
... the following dual display outputs are for any DVI-D compatible device and is Realtek High Definition Audio (the name may be different based on your motherboard: Dual display outputs DVI + D-Sub DVI + HDMI HDMI + D-Sub Supported • • Not supported • • During POST, only the monitor connected to [AHCI]. The...


