
User Manual
Page 15
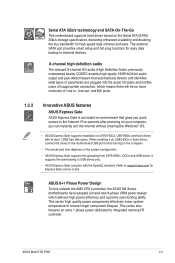
...8226; The actual boot time depends on environment that automatically detects and identifies what types of peripherals are plugged into the audio I/O jacks and notifies users of inappropriate connection, which delivers high power efficiency and supreme overclocking ability. ASUS 8+1 Phase Power Design...drives with the OpenGL standard. This series' high quality power components effectively lower system temperature to integrated memory/HT controller. ASUS M4A77TD PRO 1-3 When installing it on USB HDDs or flash drives, connect the drives to the Internet. The external SATA port provides...
...8226; The actual boot time depends on environment that automatically detects and identifies what types of peripherals are plugged into the audio I/O jacks and notifies users of inappropriate connection, which delivers high power efficiency and supreme overclocking ability. ASUS 8+1 Phase Power Design...drives with the OpenGL standard. This series' high quality power components effectively lower system temperature to integrated memory/HT controller. ASUS M4A77TD PRO 1-3 When installing it on USB HDDs or flash drives, connect the drives to the Internet. The external SATA port provides...
User Manual
Page 16
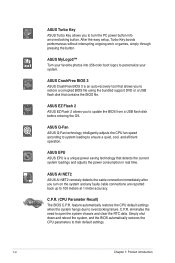
...™ Turn your favorite photos into an overclocking button. ASUS EPU ASUS EPU is an auto-recovery tool that allows you to overclocking failure. ASUS AI NET2 ASUS AI NET2 remotely detects the cable connection immediately after you turn the PC power button into 256-color boot logos to 100 meters at 1 meter accuracy. C.P.R. Simply...
...™ Turn your favorite photos into an overclocking button. ASUS EPU ASUS EPU is an auto-recovery tool that allows you to overclocking failure. ASUS AI NET2 ASUS AI NET2 remotely detects the cable connection immediately after you turn the PC power button into 256-color boot logos to 100 meters at 1 meter accuracy. C.P.R. Simply...

User Manual
Page 30
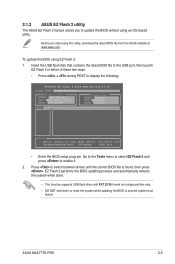
M4A77TD PRO CLRTC 12 23 Normal (Default) M4A77TD PRO Clear RTC RAM Clear RTC To erase the RTC RAM:... 1. Keep the cap on CLRTC jumper default position. After clearing the CMOS, reinstall the battery. • You do not help, remove the onboard battery and move the cap back to pins 2-3. Shut down the key during the boot...Product introduction Turn OFF the computer and unplug the power cord. 2. Removing the cap will cause system boot failure! • If the steps above do not need to clear the RTC when the system hangs...
M4A77TD PRO CLRTC 12 23 Normal (Default) M4A77TD PRO Clear RTC RAM Clear RTC To erase the RTC RAM:... 1. Keep the cap on CLRTC jumper default position. After clearing the CMOS, reinstall the battery. • You do not help, remove the onboard battery and move the cap back to pins 2-3. Shut down the key during the boot...Product introduction Turn OFF the computer and unplug the power cord. 2. Removing the cap will cause system boot failure! • If the steps above do not need to clear the RTC when the system hangs...

User Manual
Page 33
... or may not boot up if the power is inadequate. • DO NOT forget to fit these connectors in only one orientation. ATX power connectors (24-pin EATXPWR, 4-pin ATX12V) These connectors are designed to connect the 4-pin ATX +12V power plug. ASUS M4A77TD PRO 1-21 Otherwise, ...the system will not boot up if the power is inadequate. • If you are uncertain about the minimum power supply requirement for your system,...
... or may not boot up if the power is inadequate. • DO NOT forget to fit these connectors in only one orientation. ATX power connectors (24-pin EATXPWR, 4-pin ATX12V) These connectors are designed to connect the 4-pin ATX +12V power plug. ASUS M4A77TD PRO 1-21 Otherwise, ...the system will not boot up if the power is inadequate. • If you are uncertain about the minimum power supply requirement for your system,...
User Manual
Page 43
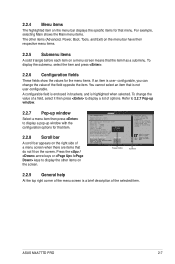
... BIOS file to the USB port, then launch EZ Flash 2 in either of these two ways: • Press + during POST to prevent system boot failure! EZ Flash 2 performs the BIOS updating process and automatically reboots the system when done. • This function supports USB flash disks with FAT...2 and press to switch between drives until the correct BIOS file is found, then press . ASUS M4A77TD PRO 2-3 To update the BIOS using this utility, download the latest BIOS file from the ASUS website at www.asus.com. Press to enable it. 2. Before you to update the BIOS without using an OS&#...
... BIOS file to the USB port, then launch EZ Flash 2 in either of these two ways: • Press + during POST to prevent system boot failure! EZ Flash 2 performs the BIOS updating process and automatically reboots the system when done. • This function supports USB flash disks with FAT...2 and press to switch between drives until the correct BIOS file is found, then press . ASUS M4A77TD PRO 2-3 To update the BIOS using this utility, download the latest BIOS file from the ASUS website at www.asus.com. Press to enable it. 2. Before you to update the BIOS without using an OS&#...

User Manual
Page 44
...the motherboard support DVD or a USB flash disk that allows you to the optical drive or USB port. You can cause system boot failure! Insert the support DVD or the USB flash disk containing the BIOS file to restore the BIOS file when it and ...CD-ROM... Completed. Otherwise, the utility will not function. Starting BIOS recovery... Bad BIOS checksum. Starting BIOS recovery... Start programming... 3. 2.1.3 ASUS CrashFree BIOS 3 utility The ASUS CrashFree BIOS 3 is found ! Checking for the BIOS file. Recovering the BIOS To recover the BIOS: 1. CD-ROM found , the utility...
...the motherboard support DVD or a USB flash disk that allows you to the optical drive or USB port. You can cause system boot failure! Insert the support DVD or the USB flash disk containing the BIOS file to restore the BIOS file when it and ...CD-ROM... Completed. Otherwise, the utility will not function. Starting BIOS recovery... Bad BIOS checksum. Starting BIOS recovery... Start programming... 3. 2.1.3 ASUS CrashFree BIOS 3 utility The ASUS CrashFree BIOS 3 is found ! Checking for the BIOS file. Recovering the BIOS To recover the BIOS: 1. CD-ROM found , the utility...

User Manual
Page 46
...basic system configuration Advanced For changing the advanced system settings Power For changing the advanced power management (APM) configuration Boot For changing the system boot configuration Tools For configuring options for that particular menu. To select an item on the menu bar, press the... and loading default settings. 2.2.1 BIOS menu screen Menu items Menu bar Configuration fields General help Main Advanced Main Settings BIOS SETUP UTILITY Power Boot Tools Exit System Time [19:34:30] System Date [Tue 11/19/2007] Use [ENTER], [TAB] or [SHIFT-TAB] to...
...basic system configuration Advanced For changing the advanced system settings Power For changing the advanced power management (APM) configuration Boot For changing the system boot configuration Tools For configuring options for that particular menu. To select an item on the menu bar, press the... and loading default settings. 2.2.1 BIOS menu screen Menu items Menu bar Configuration fields General help Main Advanced Main Settings BIOS SETUP UTILITY Power Boot Tools Exit System Time [19:34:30] System Date [Tue 11/19/2007] Use [ENTER], [TAB] or [SHIFT-TAB] to...
User Manual
Page 47
...invalid ratio is not user-configurable. configurable, you can change the value of a field, select it then press to display the other items (Advanced, Power, Boot, Tools, and Exit) on the menu bar have their respective menu items. 2.2.5 Submenu items A solid triangle before each item on a menu screen means that... scroll bar appears on the screen. Refer to 2.2.7 Pop-up window. 2.2.7 Pop-up window Scroll bar 2.2.9 General help At the top right corner of options. ASUS M4A77TD PRO 2-7 A configurable field is enclosed in CMOS then actual and setpoint values may differ.
...invalid ratio is not user-configurable. configurable, you can change the value of a field, select it then press to display the other items (Advanced, Power, Boot, Tools, and Exit) on the menu bar have their respective menu items. 2.2.5 Submenu items A solid triangle before each item on a menu screen means that... scroll bar appears on the screen. Refer to 2.2.7 Pop-up window. 2.2.7 Pop-up window Scroll bar 2.2.9 General help At the top right corner of options. ASUS M4A77TD PRO 2-7 A configurable field is enclosed in CMOS then actual and setpoint values may differ.

User Manual
Page 48
... While entering Setup, the BIOS automatically detects the presence of IDE/SATA devices. Select Screen Select Item +- Main Advanced Main Settings BIOS SETUP UTILITY Power Boot Tools Exit System Time [19:34:30] System Date [Tue 11/19/2007] Primary IDE Master Primary IDE Slave SATA1 SATA2 SATA3 ESATA SATA5 SATA6...
... While entering Setup, the BIOS automatically detects the presence of IDE/SATA devices. Select Screen Select Item +- Main Advanced Main Settings BIOS SETUP UTILITY Power Boot Tools Exit System Time [19:34:30] System Date [Tue 11/19/2007] Primary IDE Master Primary IDE Slave SATA1 SATA2 SATA3 ESATA SATA5 SATA6...

User Manual
Page 50
...], [Max.=150] The following items only appear when you set Ai Overclock Tuner to adjust the ratio. Main Advanced Advanced Settings Power BIOS SETUP UTILITY Boot Tools Exit JumperFree Configuration CPU Configuration Chipset Onboard Devices Configuration PCIPnP USB Configuration Adjust System Frequency/Voltage etc. Use and to [Overclock Profile]. The valid...
...], [Max.=150] The following items only appear when you set Ai Overclock Tuner to adjust the ratio. Main Advanced Advanced Settings Power BIOS SETUP UTILITY Boot Tools Exit JumperFree Configuration CPU Configuration Chipset Onboard Devices Configuration PCIPnP USB Configuration Adjust System Frequency/Voltage etc. Use and to [Overclock Profile]. The valid...

User Manual
Page 54
...if you install a Plug and Play operating system, the operating system configures the Plug and Play devices not required for boot. The menu includes setting IRQ and DMA channel resources for either PCI/PnP or legacy ISA devices, and setting the ...Disabled] Front Panel Select [HD Audio] Configuration options: [HD Audio] [AC97] OnBoard LAN Controller [Enabled] Configuration options: [Enabled] [Disabled] OnBoard LAN Boot ROM [Disabled] Configuration options: [Disabled] [Enabled] 2.4.5 PCIPnP The PCI PnP menu items allow you to select the Parallel Port mode. Configuration options: [Normal...
...if you install a Plug and Play operating system, the operating system configures the Plug and Play devices not required for boot. The menu includes setting IRQ and DMA channel resources for either PCI/PnP or legacy ISA devices, and setting the ...Disabled] Front Panel Select [HD Audio] Configuration options: [HD Audio] [AC97] OnBoard LAN Controller [Enabled] Configuration options: [Enabled] [Disabled] OnBoard LAN Boot ROM [Disabled] Configuration options: [Disabled] [Enabled] 2.4.5 PCIPnP The PCI PnP menu items allow you to select the Parallel Port mode. Configuration options: [Normal...

User Manual
Page 56
... Monitor Configuration Select Screen Select Item +- Configuration options: [Disabled] [Enabled] 2.5.4 APM Configuration Restore on after an AC power loss. Main Advanced Power BIOS SETUP UTILITY Boot Tools Exit Power Settings Suspend Mode [Auto] ACPI 2.0 Support [Disabled] ACPI APIC support [Enabled] Select the ACPI state used for system suspend. Configuration options: [S1...
... Monitor Configuration Select Screen Select Item +- Configuration options: [Disabled] [Enabled] 2.5.4 APM Configuration Restore on after an AC power loss. Main Advanced Power BIOS SETUP UTILITY Boot Tools Exit Power Settings Suspend Mode [Auto] ACPI 2.0 Support [Disabled] ACPI APIC support [Enabled] Select the ACPI state used for system suspend. Configuration options: [S1...

User Manual
Page 58
...Disabled] [Enabled] Full Screen Logo [Enabled] This allows you to use the ASUS MyLogo2™ feature. When this item is set the CD-ROM drive as the first boot device. Select Screen Select Item Enter Go to enable or disable the full ... American Megatrends, Inc. 2.6.1 Boot Device Priority 1st ~ xxth Boot Device These items specify the boot device priority sequence from the available devices. Main Advanced Power BIOS SETUP UTILITY Boot Tools Exit Boot Settings Boot Device Priority Boot Settings Configuration Security Specifies the Boot Device Priority sequence. Configuration options:...
...Disabled] [Enabled] Full Screen Logo [Enabled] This allows you to use the ASUS MyLogo2™ feature. When this item is set the CD-ROM drive as the first boot device. Select Screen Select Item Enter Go to enable or disable the full ... American Megatrends, Inc. 2.6.1 Boot Device Priority 1st ~ xxth Boot Device These items specify the boot device priority sequence from the available devices. Main Advanced Power BIOS SETUP UTILITY Boot Tools Exit Boot Settings Boot Device Priority Boot Settings Configuration Security Specifies the Boot Device Priority sequence. Configuration options:...

User Manual
Page 60
...2-20 Chapter 2: BIOS information The message "Password Installed" appears after you set to [Always], BIOS checks for user password both when accessing Setup and booting the system. When you to configure options for special functions. Use the left/right arrow key to select between [Yes] or [No], then press ... Password: 1. On the password box that appears, type a password composed of the screen shows the default Not Installed. Main Advanced Power BIOS SETUP UTILITY Boot Tools Exit ASUS EZ Flash 2 Express Gate Enter OS Timer Reset User Data [Enabled] [10 Seconds] [No] Press ENTER to run...
...2-20 Chapter 2: BIOS information The message "Password Installed" appears after you set to [Always], BIOS checks for user password both when accessing Setup and booting the system. When you to configure options for special functions. Use the left/right arrow key to select between [Yes] or [No], then press ... Password: 1. On the password box that appears, type a password composed of the screen shows the default Not Installed. Main Advanced Power BIOS SETUP UTILITY Boot Tools Exit ASUS EZ Flash 2 Express Gate Enter OS Timer Reset User Data [Enabled] [10 Seconds] [No] Press ENTER to run...

User Manual
Page 62
... Save and Exit Exit & Save Changes ESC Exit Once you are finished making your changes to the BIOS items. Main Advanced BIOS SETUP UTILITY Power Boot Tools Exit Exit Options Exit & Save Changes Exit & Discard Changes Discard Changes Load Setup Defaults Exit system setup after saving the changes. Pressing does not...
... Save and Exit Exit & Save Changes ESC Exit Once you are finished making your changes to the BIOS items. Main Advanced BIOS SETUP UTILITY Power Boot Tools Exit Exit Options Exit & Save Changes Exit & Discard Changes Discard Changes Load Setup Defaults Exit system setup after saving the changes. Pressing does not...


