User Manual
Page 9
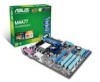
... technologies Supports up to www.asus.com for the AMD® CPU support list. ASUS EZ Flash 2 ASUS AI NET2 ASUS Turbo Key ASUS MyLogo 2 ASUS EPU-4 Engine ASUS Express Gate (continued on the next page) ix Blu-ray disc audio layer Content Protection - Optical S/PDIF out port at the back panel) Realtek® RTL8112L PCIe Gigabit LAN controller ASUS Quiet Thermal Solution: - M4A77 specifications summary CPU Chipset Front Side Bus Memory Expansion slots Storage Audio USB LAN ASUS unique features AMD® AM3/AM2+/AM2; ASUS Q-Fan ASUS...
... technologies Supports up to www.asus.com for the AMD® CPU support list. ASUS EZ Flash 2 ASUS AI NET2 ASUS Turbo Key ASUS MyLogo 2 ASUS EPU-4 Engine ASUS Express Gate (continued on the next page) ix Blu-ray disc audio layer Content Protection - Optical S/PDIF out port at the back panel) Realtek® RTL8112L PCIe Gigabit LAN controller ASUS Quiet Thermal Solution: - M4A77 specifications summary CPU Chipset Front Side Bus Memory Expansion slots Storage Audio USB LAN ASUS unique features AMD® AM3/AM2+/AM2; ASUS Q-Fan ASUS...
User Manual
Page 13
...; ASUS Express Gate supports file uploading from SATA HDDs, ODDs and USB drives. 1.3.2 Serial ATA 3Gb/s technology This motherboard supports hard drives based on the Serial ATA (SATA) 3Gb/s storage specifications, delivering enhanced salability and doubling the bus bandwidth for high-speed data saving and retrieval. 8-channel high definition audio The onboard 8-channel HD audio (High Definition Audio, previously codenamed Azalia) CODEC enables high-quality 192KHz/24-bit audio output and jack-detect feature that automatically detects and identifies what types of peripherals are plugged...
...; ASUS Express Gate supports file uploading from SATA HDDs, ODDs and USB drives. 1.3.2 Serial ATA 3Gb/s technology This motherboard supports hard drives based on the Serial ATA (SATA) 3Gb/s storage specifications, delivering enhanced salability and doubling the bus bandwidth for high-speed data saving and retrieval. 8-channel high definition audio The onboard 8-channel HD audio (High Definition Audio, previously codenamed Azalia) CODEC enables high-quality 192KHz/24-bit audio output and jack-detect feature that automatically detects and identifies what types of peripherals are plugged...
User Manual
Page 14
... consumers' health while minimizing the impact on the use of creating environment-friendly and recyclable products/packaging to personalize your favorite photos into an overclocking button. ASUS Turbo Key ASUS Turbo Key allows you to update the BIOS from a USB flash disk before entering the OS. ASUS Q-Fan ASUS Q-Fan technology intelligently adjusts CPU fan speeds according to system loading to open the system chassis and clear the RTC data. eliminates the need to...
... consumers' health while minimizing the impact on the use of creating environment-friendly and recyclable products/packaging to personalize your favorite photos into an overclocking button. ASUS Turbo Key ASUS Turbo Key allows you to update the BIOS from a USB flash disk before entering the OS. ASUS Q-Fan ASUS Q-Fan technology intelligently adjusts CPU fan speeds according to system loading to open the system chassis and clear the RTC data. eliminates the need to...
User Manual
Page 17
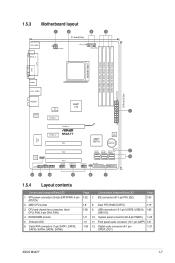
...28 1-11 1-5 1-24 Connectors/Jumpers/Slots/LED 7. IDE connector (40-1 pin PRI_IDE) Page 1-23 8. DDR2 DIMM sockets 5. USB connectors (10-1 pin USB78, USB910, 1-26 USB1112) 10. System panel connector (20-8 pin PANEL) 1-25 11. Clear RTC RAM (CLRTC) 1-19 9. Digital audio connector (4-1 pin 1-27 SPDIF_OUT) ASUS M4A77 1-7 ATX power connectors (24-pin EATXPWR, 4-pin ATX12V) 2. CPU and chassis fan connectors (4-pin CPU_FAN, 3-pin CHA_FAN) 4. Onboard LED 6. AMD CPU socket 3. Front panel audio connector (10-1 pin AAFP) 1-27 12. 1.5.3 Motherboard layout 1 2 3 4 21.4cm...
...28 1-11 1-5 1-24 Connectors/Jumpers/Slots/LED 7. IDE connector (40-1 pin PRI_IDE) Page 1-23 8. DDR2 DIMM sockets 5. USB connectors (10-1 pin USB78, USB910, 1-26 USB1112) 10. System panel connector (20-8 pin PANEL) 1-25 11. Clear RTC RAM (CLRTC) 1-19 9. Digital audio connector (4-1 pin 1-27 SPDIF_OUT) ASUS M4A77 1-7 ATX power connectors (24-pin EATXPWR, 4-pin ATX12V) 2. CPU and chassis fan connectors (4-pin CPU_FAN, 3-pin CHA_FAN) 4. Onboard LED 6. AMD CPU socket 3. Front panel audio connector (10-1 pin AAFP) 1-27 12. 1.5.3 Motherboard layout 1 2 3 4 21.4cm...
User Manual
Page 28
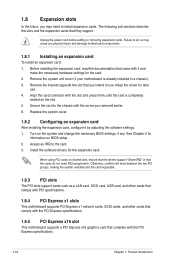
... the expansion card. Turn on BIOS setup. 2. Before installing the expansion card, read the documentation that they support. Failure to do not need to the card. 3. Align the card connector with the screw you removed earlier. 6. Replace the system cover. 1.8.2 Configuring an expansion card After installing the expansion card, configure it and make the necessary hardware settings for later use . Install the software drivers for information on the system and change the necessary BIOS settings, if...
... the expansion card. Turn on BIOS setup. 2. Before installing the expansion card, read the documentation that they support. Failure to do not need to the card. 3. Align the card connector with the screw you removed earlier. 6. Replace the system cover. 1.8.2 Configuring an expansion card After installing the expansion card, configure it and make the necessary hardware settings for later use . Install the software drivers for information on the system and change the necessary BIOS settings, if...
User Manual
Page 37
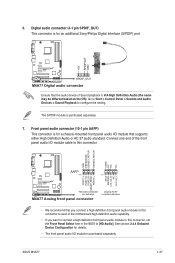
...) port. +5V SPDIFOUT GND M4A77 SPDIF_OUT M4A77 Digital audio connector Ensure that supports either High Definition Audio or AC`97 audio standard. See section 2.4.4 Onboard Device Configuration for details. • The front panel audio I /O module that the audio device of the motherboard high-definition audio capability. • If you want to connect a high definition front panel audio module to [HD Audio]. 6. ASUS M4A77 1-27 Go to Start > Control Panel > Sounds and Audio Devices > Sound Playback to avail of Sound playback is for a chassis-mounted front panel audio...
...) port. +5V SPDIFOUT GND M4A77 SPDIF_OUT M4A77 Digital audio connector Ensure that supports either High Definition Audio or AC`97 audio standard. See section 2.4.4 Onboard Device Configuration for details. • The front panel audio I /O module that the audio device of the motherboard high-definition audio capability. • If you want to connect a high definition front panel audio module to [HD Audio]. 6. ASUS M4A77 1-27 Go to Start > Control Panel > Sounds and Audio Devices > Sound Playback to avail of Sound playback is for a chassis-mounted front panel audio...
User Manual
Page 39
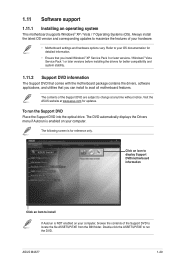
...; Motherboard settings and hardware options vary. The following screen is NOT enabled on your OS documentation for detailed information. • Ensure that you install Windows® XP Service Pack 3 or later versions / Windows® Vista Service Pack 1 or later versions before installing the drivers for better compatibility and system stability. 1.11.2 Support DVD information The Support DVD that comes with the motherboard package contains the drivers, software applications, and utilities that you can install...
...; Motherboard settings and hardware options vary. The following screen is NOT enabled on your OS documentation for detailed information. • Ensure that you install Windows® XP Service Pack 3 or later versions / Windows® Vista Service Pack 1 or later versions before installing the drivers for better compatibility and system stability. 1.11.2 Support DVD information The Support DVD that comes with the motherboard package contains the drivers, software applications, and utilities that you can install...
User Manual
Page 41
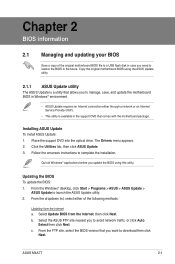
... update the motherboard BIOS in Windows® environment. • ASUS Update requires an Internet connection either of the original motherboard BIOS file to download then click Next. Select the ASUS FTP site nearest you update the BIOS using the ASUS Update utility. 2.1.1 ASUS Update utility The ASUS Update is available in the support DVD that you need to restore the BIOS in case you want to a USB flash disk in the future. Installing ASUS Update To install ASUS Update: 1. Place the support DVD into the optical drive. Click the Utilities...
... update the motherboard BIOS in Windows® environment. • ASUS Update requires an Internet connection either of the original motherboard BIOS file to download then click Next. Select the ASUS FTP site nearest you update the BIOS using the ASUS Update utility. 2.1.1 ASUS Update utility The ASUS Update is available in the support DVD that you need to restore the BIOS in case you want to a USB flash disk in the future. Installing ASUS Update To install ASUS Update: 1. Place the support DVD into the optical drive. Click the Utilities...
User Manual
Page 42
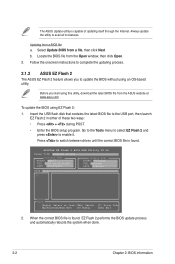
...] Switch [Up/Down/Home/End] Move [B] Backup [V] Drive Info [ESC] Exit 2. Select Update BIOS from the Open window, then click Open. 3. The ASUS Update utility is capable of these two ways: • Press + during POST. • Enter the BIOS setup program. To update the BIOS using this utility, download the latest BIOS file from a BIOS file a. Always update the utility to enable it. Updating from the ASUS website at www.asus.com. Follow the onscreen instructions to the USB port...
...] Switch [Up/Down/Home/End] Move [B] Backup [V] Drive Info [ESC] Exit 2. Select Update BIOS from the Open window, then click Open. 3. The ASUS Update utility is capable of these two ways: • Press + during POST. • Enter the BIOS setup program. To update the BIOS using this utility, download the latest BIOS file from a BIOS file a. Always update the utility to enable it. Updating from the ASUS website at www.asus.com. Follow the onscreen instructions to the USB port...
User Manual
Page 43
... the floppy connector, prepare a USB flash disk before using this utility. The utility automatically checks the devices for details. • This function supports USB flash disks with motherboard models. Download the latest BIOS file from the ASUS website at www.asus.com. • The removable devices that contains the updated BIOS file. • Before using this utility, rename the BIOS file in the removable device into M4A77.ROM. • The BIOS file in the support DVD may not be the latest version. Select the Load Setup Defaults item under the Exit menu.
... the floppy connector, prepare a USB flash disk before using this utility. The utility automatically checks the devices for details. • This function supports USB flash disks with motherboard models. Download the latest BIOS file from the ASUS website at www.asus.com. • The removable devices that contains the updated BIOS file. • Before using this utility, rename the BIOS file in the removable device into M4A77.ROM. • The BIOS file in the support DVD may not be the latest version. Select the Load Setup Defaults item under the Exit menu.
User Manual
Page 46
... / keys to display a list of a menu screen when there are items that do not fit on the screen. A configurable field is enclosed in brackets, and is user- Refer to 2.2.7 Pop-up window. 2.2.7 Pop-up window Select a menu item then press to Change Freq.: Yes Enabled uCode Patch Level: 0x1 GART Error Reporting [Disabled] Microcode Updation [Enabled] Secure Virtual Machine Mode [Disabled] Cool 'n' Quiet [Enalbed] C1E Configuration [Disabled] Advanced Clock Calibration [Disabled] This option should remain disabled...
... / keys to display a list of a menu screen when there are items that do not fit on the screen. A configurable field is enclosed in brackets, and is user- Refer to 2.2.7 Pop-up window. 2.2.7 Pop-up window Select a menu item then press to Change Freq.: Yes Enabled uCode Patch Level: 0x1 GART Error Reporting [Disabled] Microcode Updation [Enabled] Secure Virtual Machine Mode [Disabled] Cool 'n' Quiet [Enalbed] C1E Configuration [Disabled] Advanced Clock Calibration [Disabled] This option should remain disabled...
User Manual
Page 48
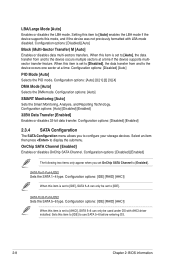
...Monitoring [Auto] Sets the Smart Monitoring, Analysis, and Reporting Technology. Select an item then press to use SATA 5~6 before entering OS. 2-8 Chapter 2: BIOS information Configuration options: [Disabled] [Enabled] The following two items only appear when you to [AHCI], SATA 5~6 can only be used under OS with LBA mode disabled. Setting this item is set to configure your storage devices. SATA Port5-Port6 [IDE] Sets the SATA 5~6 type. SATA Port1-Port4 [IDE] Sets the SATA 1~4 type. Sets this mode, and if the device was not previously formatted with AHCI driver installed...
...Monitoring [Auto] Sets the Smart Monitoring, Analysis, and Reporting Technology. Select an item then press to use SATA 5~6 before entering OS. 2-8 Chapter 2: BIOS information Configuration options: [Disabled] [Enabled] The following two items only appear when you to [AHCI], SATA 5~6 can only be used under OS with LBA mode disabled. Setting this item is set to configure your storage devices. SATA Port5-Port6 [IDE] Sets the SATA 5~6 type. SATA Port1-Port4 [IDE] Sets the SATA 1~4 type. Sets this mode, and if the device was not previously formatted with AHCI driver installed...
User Manual
Page 49
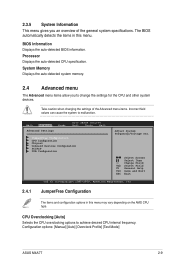
... menu may vary depending on the AMD CPU type. Main Advanced Advanced Settings Power BIOS SETUP UTILITY Boot Tools Exit JumperFree Configuration CPU Configuration Chipset Onboard Devices Configuration PCIPnP USB Configuration Adjust System Frequency/Voltage etc. System Memory Displays the auto-detected system memory. 2.4 Advanced menu The Advanced menu items allow you an overview of the Advanced menu items. Incorrect field values can cause the system to malfunction. CPU Overclocking [Auto] Selects the CPU overclocking options to achieve desired CPU internal frequency. The BIOS...
... menu may vary depending on the AMD CPU type. Main Advanced Advanced Settings Power BIOS SETUP UTILITY Boot Tools Exit JumperFree Configuration CPU Configuration Chipset Onboard Devices Configuration PCIPnP USB Configuration Adjust System Frequency/Voltage etc. System Memory Displays the auto-detected system memory. 2.4 Advanced menu The Advanced menu items allow you an overview of the Advanced menu items. Incorrect field values can cause the system to malfunction. CPU Overclocking [Auto] Selects the CPU overclocking options to achieve desired CPU internal frequency. The BIOS...
User Manual
Page 50
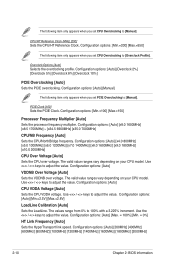
... Clock [100] Sets the PCIE Clock. Configuration options: [Min.=100] [Max.=150] Processor Frequency Multiplier [Auto] Sets the processor frequency multiplier. Configuration options: [Auto] CPU VDDA Voltage [Auto] Sets the CPU VDDA voltage. Configuration options: [Min.=200] [Max.=550] The following item only appears when you set PCIE Overclocking to [Manual]. Configuration options: [Auto] [x8.0 1600MHz] [x8.5 1700MHz] ~ [x34.5 6900MHz] [x35.0 7000MHz] CPU/NB Frequency [Auto] Sets the CPU/NorthBridge frequency. Use / keys to [Overclock Profile]. Configuration options: [Auto] [Max...
... Clock [100] Sets the PCIE Clock. Configuration options: [Min.=100] [Max.=150] Processor Frequency Multiplier [Auto] Sets the processor frequency multiplier. Configuration options: [Auto] CPU VDDA Voltage [Auto] Sets the CPU VDDA voltage. Configuration options: [Min.=200] [Max.=550] The following item only appears when you set PCIE Overclocking to [Manual]. Configuration options: [Auto] [x8.0 1600MHz] [x8.5 1700MHz] ~ [x34.5 6900MHz] [x35.0 7000MHz] CPU/NB Frequency [Auto] Sets the CPU/NorthBridge frequency. Use / keys to [Overclock Profile]. Configuration options: [Auto] [Max...
User Manual
Page 52
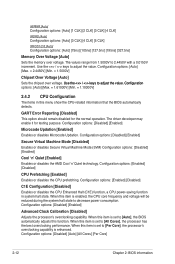
.... Configuration options: [Disabled] [Enabled] Secure Virtual Machine Mode [Disabled] Enables or disables Secure Virtual Machine Mode (SVM) Configuration options: [Disabled] [Enabled] Cool 'n' Quiet [Enabled] Enables or disables the AMD Cool 'n' Quiet technology. When this function. Configuration options: [Enabled] [Disabled] CPU Prefetching [Enabled] Enables or disables the CPU prefetching. Configuration options: [Disabled] [Enabled] Microcode Updation [Enabled] Enables or disables Microcode Updation. Use the / keys to [Auto], the BIOS automatically adjusts this item is set...
.... Configuration options: [Disabled] [Enabled] Secure Virtual Machine Mode [Disabled] Enables or disables Secure Virtual Machine Mode (SVM) Configuration options: [Disabled] [Enabled] Cool 'n' Quiet [Enabled] Enables or disables the AMD Cool 'n' Quiet technology. When this function. Configuration options: [Enabled] [Disabled] CPU Prefetching [Enabled] Enables or disables the CPU prefetching. Configuration options: [Disabled] [Enabled] Microcode Updation [Enabled] Enables or disables Microcode Updation. Use the / keys to [Auto], the BIOS automatically adjusts this item is set...

User Manual
Page 53
... PCIe x16_2 or PCIe x1 slot PCI: primary display adapter on the PCI slot ASUS M4A77 2-13 Configuration options: [Disabled] [Address bits 6] [Address bits 12] [XOR of Address bits [20:16, 6]] [XOR of Address bit] Allows you to enable the channel memory interleaving. Configuration options: [Disabled] [Enabled] DCT Unganged Mode [Always] Enables or disables the unganged DRAM mode (64-bit width). Configuration options: [Auto] [Always] Power Down Enable [Disabled] Enables or disables the DDR power down mode. Configuration options: [Disabled] [Basic] [Good] [Super] [Max] [User] Primary Display...
... PCIe x16_2 or PCIe x1 slot PCI: primary display adapter on the PCI slot ASUS M4A77 2-13 Configuration options: [Disabled] [Address bits 6] [Address bits 12] [XOR of Address bits [20:16, 6]] [XOR of Address bit] Allows you to enable the channel memory interleaving. Configuration options: [Disabled] [Enabled] DCT Unganged Mode [Always] Enables or disables the unganged DRAM mode (64-bit width). Configuration options: [Auto] [Always] Power Down Enable [Disabled] Enables or disables the DDR power down mode. Configuration options: [Disabled] [Basic] [Good] [Super] [Max] [User] Primary Display...

User Manual
Page 54
... 2: BIOS information When this item is set to change the advanced settings for legacy ISA devices. Take caution when changing the settings of the PCI PnP menu items. Incorrect field values can cause the system to select the Parallel Port IRQ. Configuration options: [Disabled] [Enabled] Front Panel Select [HD Audio] Selects the front panel type. Configuration options: [Disabled] [Enabled] OnBoard LAN Boot ROM [Disabled] Enables or disables the Onboard LAN Boot ROM. Configuration options: [AC97] [HD Audio] OnBoard LAN Controller [Enabled] Enables or disables the onboard LAN controller...
... 2: BIOS information When this item is set to change the advanced settings for legacy ISA devices. Take caution when changing the settings of the PCI PnP menu items. Incorrect field values can cause the system to select the Parallel Port IRQ. Configuration options: [Disabled] [Enabled] Front Panel Select [HD Audio] Selects the front panel type. Configuration options: [Disabled] [Enabled] OnBoard LAN Boot ROM [Disabled] Enables or disables the Onboard LAN Boot ROM. Configuration options: [AC97] [HD Audio] OnBoard LAN Controller [Enabled] Enables or disables the onboard LAN controller...

User Manual
Page 55
... USB flash drives and USB hard drives. If no USB device is detected, the legacy USB support is detected, the item shows None. Configuration options: [Disabled] [Enabled] Legacy USB Support [Auto] Enables or disables support for the USB storage device to detect the presence of USB devices at startup. Configuration options: [Disabled] [Enabled] USB 2.0 Controller [Enabled] Enables or disables the USB 2.0 controller. Setting this menu allows you to display the configuration options. Configuration options: [Auto] [Floppy] [Forced FDD] [Hard Disk] [CDROM] ASUS M4A77 2-15 Configuration...
... USB flash drives and USB hard drives. If no USB device is detected, the legacy USB support is detected, the item shows None. Configuration options: [Disabled] [Enabled] Legacy USB Support [Auto] Enables or disables support for the USB storage device to detect the presence of USB devices at startup. Configuration options: [Disabled] [Enabled] USB 2.0 Controller [Enabled] Enables or disables the USB 2.0 controller. Setting this menu allows you to display the configuration options. Configuration options: [Auto] [Floppy] [Forced FDD] [Hard Disk] [CDROM] ASUS M4A77 2-15 Configuration...

User Manual
Page 56
... power loss. Configuration options: [Disabled] [Enabled] 2.5.3 ACPI APIC Support [Enabled] Enables or disables the Advanced Configuration and Power Interface (ACPI) support in the RSDT pointer list. 2.5 Power menu The Power menu items allow you to display the configuration options. When this item set to [Power On], the system goes on AC Power Loss [Power Off] When this item set to generate a wake event. Main Advanced Power Settings Power BIOS SETUP UTILITY Boot Tools Exit Suspend Mode [Auto] ACPI 2.0 Support [Enabled] ACPI APIC support [Enabled] APM Configuration...
... power loss. Configuration options: [Disabled] [Enabled] 2.5.3 ACPI APIC Support [Enabled] Enables or disables the Advanced Configuration and Power Interface (ACPI) support in the RSDT pointer list. 2.5 Power menu The Power menu items allow you to display the configuration options. When this item set to [Power On], the system goes on AC Power Loss [Power Off] When this item set to generate a wake event. Main Advanced Power Settings Power BIOS SETUP UTILITY Boot Tools Exit Suspend Mode [Auto] ACPI 2.0 Support [Enabled] ACPI APIC support [Enabled] APM Configuration...

User Manual
Page 58
... 2: BIOS information When this item to [Enabled] to use the ASUS MyLogo2™ feature. Main Advanced Power Boot Settings Boot Device Priority BIOS SETUP UTILITY Boot Tools Exit Boot Settings Configuration Security Specifies the Boot Device Priority sequence. Configuration options: [Disabled] [Enabled] Set this item is set the CD-ROM drive as the first boot device. 2.6 Boot menu The Boot menu items allow you set to [Disabled], BIOS performs all the POST items. Configuration options: [Disabled] [Enabled] Full Screen Logo [Enabled] Enables or disables the full screen logo display...
... 2: BIOS information When this item to [Enabled] to use the ASUS MyLogo2™ feature. Main Advanced Power Boot Settings Boot Device Priority BIOS SETUP UTILITY Boot Tools Exit Boot Settings Configuration Security Specifies the Boot Device Priority sequence. Configuration options: [Disabled] [Enabled] Set this item is set the CD-ROM drive as the first boot device. 2.6 Boot menu The Boot menu items allow you set to [Disabled], BIOS performs all the POST items. Configuration options: [Disabled] [Enabled] Full Screen Logo [Enabled] Enables or disables the full screen logo display...


