User Manual
Page 23
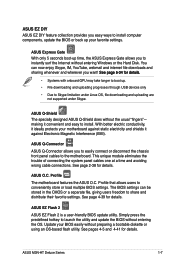
... electric conductivity, it ideally protects your favorite settings. ASUS O.C. Profile The motherboard features the ASUS O.C. ASUS EZ Flash 2 ASUS EZ Flash 2 is a user-friendly BIOS update utility. Simply press the predefined hotkey to launch the utility and update the BIOS without preparing a bootable diskette or using an OS-based flash utility. ASUS M3N-HT Deluxe Series 1-7 making it against static electricity and...
... electric conductivity, it ideally protects your favorite settings. ASUS O.C. Profile The motherboard features the ASUS O.C. ASUS EZ Flash 2 ASUS EZ Flash 2 is a user-friendly BIOS update utility. Simply press the predefined hotkey to launch the utility and update the BIOS without preparing a bootable diskette or using an OS-based flash utility. ASUS M3N-HT Deluxe Series 1-7 making it against static electricity and...
User Manual
Page 50
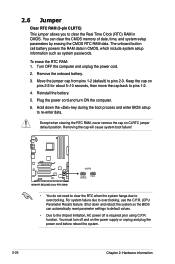
... and enter BIOS setup to pins 1-2. 4. You must turn ON the computer. 6. The onboard button cell battery powers the RAM data in CMOS. Turn OFF the computer and unplug the power cord. 2. Plug the power cord and turn off is required prior using C.P.R. M3N-HT DELUXE M3N-HT DELUXE Clear RTC ... will cause system boot failure! 2.6 Jumper Clear RTC RAM (3-pin CLRTC) This jumper allows you to pins 2-3. You can automatically reset parameter settings to default values. • Due to the chipset limitation, AC power off and on the power supply or unplug and plug the power cord...
... and enter BIOS setup to pins 1-2. 4. You must turn ON the computer. 6. The onboard button cell battery powers the RAM data in CMOS. Turn OFF the computer and unplug the power cord. 2. Plug the power cord and turn off is required prior using C.P.R. M3N-HT DELUXE M3N-HT DELUXE Clear RTC ... will cause system boot failure! 2.6 Jumper Clear RTC RAM (3-pin CLRTC) This jumper allows you to pins 2-3. You can automatically reset parameter settings to default values. • Due to the chipset limitation, AC power off and on the power supply or unplug and plug the power cord...
User Manual
Page 56
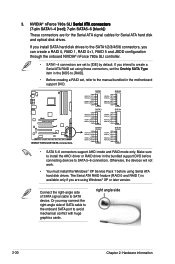
... RAID set , refer to SATA 5-6 connectors. Connect the right-angle side of SATA cable to the onboard SATA port to SATA device. right angle side 2-30 Chapter 2: Hardware information M3N-HT DELUXE M3N-HT DELUXE SATA connectors...red]; 7-pin SATA5-6 [black]) These connectors are set to the SATA1/2/3/4/5/6 connectors, you are using these connectors, set the Onchip SATA Type item in the motherboard support DVD. 3. Make sure to install the ... devices to the manual bundled in the BIOS to [RAID]. • Before creating a RAID set using Windows® XP or later version.
... RAID set , refer to SATA 5-6 connectors. Connect the right-angle side of SATA cable to the onboard SATA port to SATA device. right angle side 2-30 Chapter 2: Hardware information M3N-HT DELUXE M3N-HT DELUXE SATA connectors...red]; 7-pin SATA5-6 [black]) These connectors are set to the SATA1/2/3/4/5/6 connectors, you are using these connectors, set the Onchip SATA Type item in the motherboard support DVD. 3. Make sure to install the ... devices to the manual bundled in the BIOS to [RAID]. • Before creating a RAID set using Windows® XP or later version.

User Manual
Page 62
...-compliant pin definition M3N-HT DELUXE Analog front panel connector Legacy AC'97 compliant definition • We recommend that supports either HD Audio or legacy AC`97 audio standard. if you want to connect an AC'97 front panel audio module to this connector, set the item to...I/O module cable to this connector, set to [AC97]. Front panel audio connector (10-1 pin AAFP) This connector is set the Front Panel Support Type item in the BIOS setup to this connector. Chapter 2: Hardware information Connect one end of the motherboard's high-definition audio capability. •...
...-compliant pin definition M3N-HT DELUXE Analog front panel connector Legacy AC'97 compliant definition • We recommend that supports either HD Audio or legacy AC`97 audio standard. if you want to connect an AC'97 front panel audio module to this connector, set the item to...I/O module cable to this connector, set to [AC97]. Front panel audio connector (10-1 pin AAFP) This connector is set the Front Panel Support Type item in the BIOS setup to this connector. Chapter 2: Hardware information Connect one end of the motherboard's high-definition audio capability. •...
User Manual
Page 64
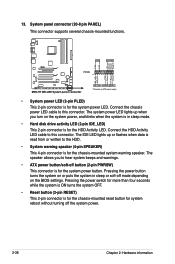
... speaker (4-pin SPEAKER) This 4-pin connector is for the system power button. The speaker allows you turn on the BIOS settings. PWR Ground Reset Ground M3N-HT DELUXE System panel connector IDE_LED PWRSW RESET * Requires an ATX power supply • System power LED (2-pin PLED) This 2-pin connector is for the chassis-mounted system warning speaker...
... speaker (4-pin SPEAKER) This 4-pin connector is for the system power button. The speaker allows you turn on the BIOS settings. PWR Ground Reset Ground M3N-HT DELUXE System panel connector IDE_LED PWRSW RESET * Requires an ATX power supply • System power LED (2-pin PLED) This 2-pin connector is for the chassis-mounted system warning speaker...
User Manual
Page 69
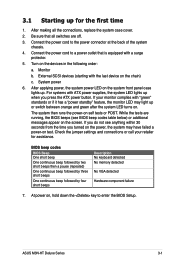
...system power LED on the devices in the following order: a. While the tests are off. 3. Check the jumper settings and connections or call your monitor complies with ATX power supplies, the system LED lights up when you turned on the power, the system may light up or switch... continuous beep followed by four short beeps Description No keyboard detected No memory detected No VGA detected Hardware component failure 7. ASUS M3N-HT Deluxe Series 3-1 If you do not see BIOS beep codes table below) or additional messages appear on , hold down the key to a power outlet that is equipped...
...system power LED on the devices in the following order: a. While the tests are off. 3. Check the jumper settings and connections or call your monitor complies with ATX power supplies, the system LED lights up when you turned on the power, the system may light up or switch... continuous beep followed by four short beeps Description No keyboard detected No memory detected No VGA detected Hardware component failure 7. ASUS M3N-HT Deluxe Series 3-1 If you do not see BIOS beep codes table below) or additional messages appear on , hold down the key to a power outlet that is equipped...
User Manual
Page 81
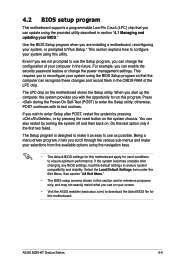
You can update using the navigation keys. • The default BIOS settings for most conditions to ensure optimum performance. ASUS M3N-HT Deluxe Series 4-9 The LPC chip on your system, or prompted to run this motherboard apply for this program. Press during the Power-On Self-Test (POST) to use as easy to configure your system using this...
You can update using the navigation keys. • The default BIOS settings for most conditions to ensure optimum performance. ASUS M3N-HT Deluxe Series 4-9 The LPC chip on your system, or prompted to run this motherboard apply for this program. Press during the Power-On Self-Test (POST) to use as easy to configure your system using this...

User Manual
Page 85
... program, the Main menu screen appears, giving you to choose the BIOS language version from the options. Refer to section "4.2.1 BIOS menu screen" for information on the menu screen items and how to set the system date. 4.3.3 Language [English] Allows you an overview of floppy ...drive installed. Main Phoenix-AwardBIOS CMOS Setup Utility Advanced Power Boot Tools Exit System Time System Date Language 15 : 30 : 36 Sat, Oct 26 2007 [English] Legacy Diskette A: [1.44M, 3.5 in .] ASUS M3N-HT Deluxe Series...
... program, the Main menu screen appears, giving you to choose the BIOS language version from the options. Refer to section "4.2.1 BIOS menu screen" for information on the menu screen items and how to set the system date. 4.3.3 Language [English] Allows you an overview of floppy ...drive installed. Main Phoenix-AwardBIOS CMOS Setup Utility Advanced Power Boot Tools Exit System Time System Date Language 15 : 30 : 36 Sat, Oct 26 2007 [English] Legacy Diskette A: [1.44M, 3.5 in .] ASUS M3N-HT Deluxe Series...
User Manual
Page 87
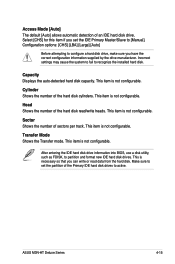
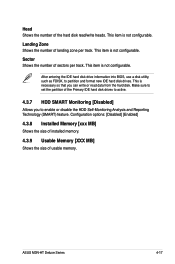
... Shows the Transfer mode. After entering the IDE hard disk drive information into BIOS, use a disk utility, such as FDISK, to active. Make sure to set the IDE Primary Master/Slave to configure a hard disk drive, make sure you.... This item is necessary so that you have the correct configuration information supplied by the drive manufacturer. Incorrect settings may cause the system to fail to recognize the installed hard disk. This is not configurable. Head Shows ... data from the hard disk. Capacity Displays the auto-detected hard disk capacity. ASUS M3N-HT Deluxe Series 4-15
... Shows the Transfer mode. After entering the IDE hard disk drive information into BIOS, use a disk utility, such as FDISK, to active. Make sure to set the IDE Primary Master/Slave to configure a hard disk drive, make sure you.... This item is necessary so that you have the correct configuration information supplied by the drive manufacturer. Incorrect settings may cause the system to fail to recognize the installed hard disk. This is not configurable. Head Shows ... data from the hard disk. Capacity Displays the auto-detected hard disk capacity. ASUS M3N-HT Deluxe Series 4-15
User Manual
Page 89
... drives. After entering the IDE hard disk drive information into BIOS, use a disk utility, such as FDISK, to enable or disable the HDD Self-Monitoring Analysis and Reporting Technology (SMART) feature. ASUS M3N-HT Deluxe Series 4-17 This item is not configurable. Make sure to set the partition of the Primary IDE hard disk drives to...
... drives. After entering the IDE hard disk drive information into BIOS, use a disk utility, such as FDISK, to enable or disable the HDD Self-Monitoring Analysis and Reporting Technology (SMART) feature. ASUS M3N-HT Deluxe Series 4-17 This item is not configurable. Make sure to set the partition of the Primary IDE hard disk drives to...
User Manual
Page 101
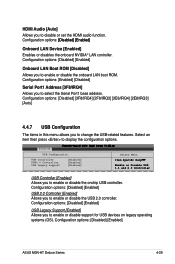
...Onboard LAN Boot ROM [Disabled] Allows you to disable or set the HDMI audio function. Configuration options: [Disabled] [Enabled] USB 2.0... Controller [Enabled] Allows you to enable or disable the USB 2.0 controller. Select an item then press to enable or disable support for USB devices on legacy operating systems (OS). Advanced Phoenix-Award BIOS... USB-related features. Configuration options: [Disabled] [Enabled] ASUS M3N-HT Deluxe Series 4-29 Configuration options: �[D��is�...
...Onboard LAN Boot ROM [Disabled] Allows you to disable or set the HDMI audio function. Configuration options: [Disabled] [Enabled] USB 2.0... Controller [Enabled] Allows you to enable or disable the USB 2.0 controller. Select an item then press to enable or disable support for USB devices on legacy operating systems (OS). Advanced Phoenix-Award BIOS... USB-related features. Configuration options: [Disabled] [Enabled] ASUS M3N-HT Deluxe Series 4-29 Configuration options: �[D��is�...

User Manual
Page 109
... Disk/Key] 4.6.6 Security Phoenix-Award BIOS CMOS Setup Utility Boot Security Supervisor Password User Password Password Check Clear Clear [Setup] Select Menu Item Specific Help Supervisor Password User Password These fields allow you to set passwords: To set to [Enabled] if you want to use the ASUS MyLogo 3 feature. ASUS M3N-HT Deluxe Series 4-37 Configuration options: [Disabled...
... Disk/Key] 4.6.6 Security Phoenix-Award BIOS CMOS Setup Utility Boot Security Supervisor Password User Password Password Check Clear Clear [Setup] Select Menu Item Specific Help Supervisor Password User Password These fields allow you to set passwords: To set to [Enabled] if you want to use the ASUS MyLogo 3 feature. ASUS M3N-HT Deluxe Series 4-37 Configuration options: [Disabled...

User Manual
Page 111
.... ASUS M3N-HT Deluxe Series 4-39 Phoenix-Award BIOS CMOS Setup Utility Main Advanced Power Boot Tools Exit ASUS O.C. Load BIOS Profile Phoenix-Award BIOS CMOS Setup Utility Tools Load BIOS Profile Select Menu Load from Profile 1 Load from Profile 2 Load from File Item Specific Help Load BIOS Profile from Profile 1/2 Allows you to load the previous BIOS settings saved in the BIOS...
.... ASUS M3N-HT Deluxe Series 4-39 Phoenix-Award BIOS CMOS Setup Utility Main Advanced Power Boot Tools Exit ASUS O.C. Load BIOS Profile Phoenix-Award BIOS CMOS Setup Utility Tools Load BIOS Profile Select Menu Load from Profile 1 Load from Profile 2 Load from File Item Specific Help Load BIOS Profile from Profile 1/2 Allows you to load the previous BIOS settings saved in the BIOS...
User Manual
Page 127
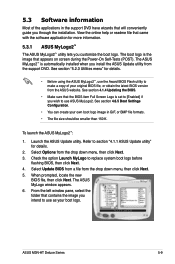
... wizards that appears on screen during the Power‑On Self-Tests (POST). ASUS M3N-HT Deluxe Series 5-9 The ASUS MyLogo2™ is automatically installed when you intend to use the Award BIOS Flash utility to [Enabled] if you customize the boot logo. Refer to replace...Utilities menu" for details. 2. To launch the ASUS MyLogo2™: 1. See section 4.6.5 Boot Settings Configuration. • You can create your boot logo. When prompted, locate the new BIOS file, then click Next. Launch the ASUS Update utility. Select Update BIOS from a file from the drop down menu, then...
... wizards that appears on screen during the Power‑On Self-Tests (POST). ASUS M3N-HT Deluxe Series 5-9 The ASUS MyLogo2™ is automatically installed when you intend to use the Award BIOS Flash utility to [Enabled] if you customize the boot logo. Refer to replace...Utilities menu" for details. 2. To launch the ASUS MyLogo2™: 1. See section 4.6.5 Boot Settings Configuration. • You can create your boot logo. When prompted, locate the new BIOS file, then click Next. Launch the ASUS Update utility. Select Update BIOS from a file from the drop down menu, then...
User Manual
Page 129
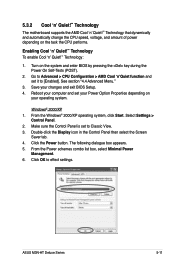
...Power Management. 6. Reboot your computer and set your Power Option Properties depending on your changes and exit BIOS Setup. 4. From the Windows® 2000/XP operating system, click Start. 5.3.2 Cool 'n' Quiet!™ Technology The motherboard supports the AMD Cool 'n' Quiet!™... is set it to [Enabled]. Select Settings > Control Panel. 2. Go to Advanced > CPU Configuration > AMD Cool 'n'Quiet function and set to effect settings. Click OK to Classic View. 3. Double-click the Display icon in the Control Panel then select the Screen Saver tab. 4. ASUS M3N-HT Deluxe Series ...
...Power Management. 6. Reboot your computer and set your Power Option Properties depending on your changes and exit BIOS Setup. 4. From the Windows® 2000/XP operating system, click Start. 5.3.2 Cool 'n' Quiet!™ Technology The motherboard supports the AMD Cool 'n' Quiet!™... is set it to [Enabled]. Select Settings > Control Panel. 2. Go to Advanced > CPU Configuration > AMD Cool 'n'Quiet function and set to effect settings. Click OK to Classic View. 3. Double-click the Display icon in the Control Panel then select the Screen Saver tab. 4. ASUS M3N-HT Deluxe Series ...

User Manual
Page 161
... RAID setup. • For detailed descriptions on your motherboard Support DVD. • When using Windows® XP operating system, make sure to install the Windows® XP Service Pack 2 or later versions�. The RAID BIOS setup screens shown in your screen. NVIDIA RAID Utility ...Oct 5 2004 - These keys allow you to the "NVIDIA® RAID User Guide" found in this section are the navigation keys. ASUS M3N-HT Deluxe Series 5-43 Boot up your NVRAID settings after the CMOS is...
... RAID setup. • For detailed descriptions on your motherboard Support DVD. • When using Windows® XP operating system, make sure to install the Windows® XP Service Pack 2 or later versions�. The RAID BIOS setup screens shown in your screen. NVIDIA RAID Utility ...Oct 5 2004 - These keys allow you to the "NVIDIA® RAID User Guide" found in this section are the navigation keys. ASUS M3N-HT Deluxe Series 5-43 Boot up your NVRAID settings after the CMOS is...
User Manual
Page 167
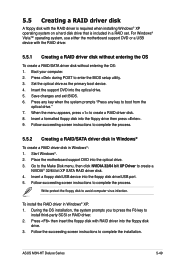
... To create a RAID driver disk in Windows®: 1. Boot your computer. 2. Set the optical drive as the primary boot device. 4. Place the motherboard support DVD into the floppy drive then press . 9. Follow succeeding screen instructions to ...from the optical drive." 7. Save changes and exit BIOS. 6. Insert a formatted floppy disk into the optical drive. 3. For Windows® Vista™ operating system, use either the motherboard support DVD or a USB device with RAID driver... screen instructions to complete the installation. ASUS M3N-HT Deluxe Series 5-49
... To create a RAID driver disk in Windows®: 1. Boot your computer. 2. Set the optical drive as the primary boot device. 4. Place the motherboard support DVD into the floppy drive then press . 9. Follow succeeding screen instructions to ...from the optical drive." 7. Save changes and exit BIOS. 6. Insert a formatted floppy disk into the optical drive. 3. For Windows® Vista™ operating system, use either the motherboard support DVD or a USB device with RAID driver... screen instructions to complete the installation. ASUS M3N-HT Deluxe Series 5-49


