User Manual
Page 6
...12 ASUS Express Gate 5-34 5.4 RAID configurations 5-41 5.4.1 RAID definitions 5-41 5.4.2 NVIDIA® RAID configurations 5-42 5.5 Creating a RAID driver disk 5-49 5.5.1 Creating a RAID driver disk without entering the OS.... 5-49 5.5.2 Creating a RAID/SATA driver disk in Windows 5-49 Chapter 6: NVIDIA® SLI™ technology support 6.1 Overview 6-1 Requirements 6-1 6.2 Graphics card setup 6-2 6.2.1 Installing three SLI-ready graphics cards 6-2 6.2.2 Installing two SLI-ready graphics cards 6-5 6.2.3 Installing the device drivers 6-6 6.2.4 Enabling the NVIDIA® SLI™...
...12 ASUS Express Gate 5-34 5.4 RAID configurations 5-41 5.4.1 RAID definitions 5-41 5.4.2 NVIDIA® RAID configurations 5-42 5.5 Creating a RAID driver disk 5-49 5.5.1 Creating a RAID driver disk without entering the OS.... 5-49 5.5.2 Creating a RAID/SATA driver disk in Windows 5-49 Chapter 6: NVIDIA® SLI™ technology support 6.1 Overview 6-1 Requirements 6-1 6.2 Graphics card setup 6-2 6.2.1 Installing three SLI-ready graphics cards 6-2 6.2.2 Installing two SLI-ready graphics cards 6-5 6.2.3 Installing the device drivers 6-6 6.2.4 Enabling the NVIDIA® SLI™...
User Manual
Page 17
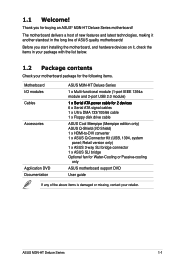
... 6 x Serial ATA signal cables 1 x Ultra DMA 133/100/66 cable 1 x Floppy disk drive cable Accessories ASUS Cool Mempipe (Mempipe edition only) ASUS Q-Shield (I/O Shield) 1 x HDMI-to-DVI converter 1 x ASUS Q-Connector Kit (USB, 1394, system panel; Retail version only) 1 x ASUS 3-way SLI bridge connector 1 x ASUS SLI bridge Optional fan for buying an ASUS® M3N-HT Deluxe Series motherboard! Before you for Water-Cooling or Passive-cooling only Application DVD ASUS motherboard support DVD Documentation User guide If any of ASUS quality motherboards! ASUS M3N-HT Deluxe...
... 6 x Serial ATA signal cables 1 x Ultra DMA 133/100/66 cable 1 x Floppy disk drive cable Accessories ASUS Cool Mempipe (Mempipe edition only) ASUS Q-Shield (I/O Shield) 1 x HDMI-to-DVI converter 1 x ASUS Q-Connector Kit (USB, 1394, system panel; Retail version only) 1 x ASUS 3-way SLI bridge connector 1 x ASUS SLI bridge Optional fan for buying an ASUS® M3N-HT Deluxe Series motherboard! Before you for Water-Cooling or Passive-cooling only Application DVD ASUS motherboard support DVD Documentation User guide If any of ASUS quality motherboards! ASUS M3N-HT Deluxe...
User Manual
Page 27
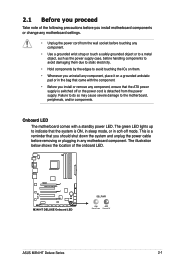
... motherboard settings. • Unplug the power cord from the wall socket before touching any component. • Use a grounded wrist strap or touch a safely grounded object or to a metal object, such as the power supply case, before removing or plugging in soft‑off or the power cord is ON, in sleep mode, or in any component, ensure that the system is detached from the power supply. M3N-HT DELUXE M3N-HT DELUXE Onboard LED...
... motherboard settings. • Unplug the power cord from the wall socket before touching any component. • Use a grounded wrist strap or touch a safely grounded object or to a metal object, such as the power supply case, before removing or plugging in soft‑off or the power cord is ON, in sleep mode, or in any component, ensure that the system is detached from the power supply. M3N-HT DELUXE M3N-HT DELUXE Onboard LED...

User Manual
Page 39
... Populated Populated DIMM_B2 (black) - - - Recommended Memory Configurations Mode Single-Channel DIMM_A1 (yellow) - Populated Sockets DIMM_A2 (black) DIMM_B1 (yellow) - ASUS M3N-HT Deluxe Series 2-13 Populated - - The system maps the total size of 128 Mb chips. This limitation appears on Windows® XP/Vista 32-bit operation system which does not support Physical Address Extension (PAE). • If you install four 1 GB memory modules, the system may only...
... Populated Populated DIMM_B2 (black) - - - Recommended Memory Configurations Mode Single-Channel DIMM_A1 (yellow) - Populated Sockets DIMM_A2 (black) DIMM_B1 (yellow) - ASUS M3N-HT Deluxe Series 2-13 Populated - - The system maps the total size of 128 Mb chips. This limitation appears on Windows® XP/Vista 32-bit operation system which does not support Physical Address Extension (PAE). • If you install four 1 GB memory modules, the system may only...
User Manual
Page 46
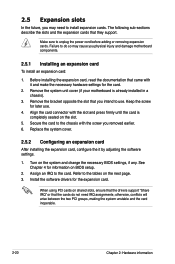
... (if your motherboard is completely seated on BIOS setup. 2. Assign an IRQ to unplug the power cord before adding or removing expansion cards. otherwise, conflicts will arise between the two PCI groups, making the system unstable and the card inoperable. 2-20 Chapter 2: Hardware information Failure to the chassis with the slot and press firmly until the card is already installed in a chassis). 3. Turn on the...
... (if your motherboard is completely seated on BIOS setup. 2. Assign an IRQ to unplug the power cord before adding or removing expansion cards. otherwise, conflicts will arise between the two PCI groups, making the system unstable and the card inoperable. 2-20 Chapter 2: Hardware information Failure to the chassis with the slot and press firmly until the card is already installed in a chassis). 3. Turn on the...
User Manual
Page 49
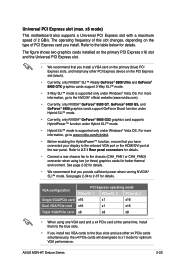
... SLI™ mode is supported only under Windows® Vista OS. VGA configuration PCI Express operating mode PCIex16_1 PCIex16_2 PCIex16_3 Single VGA/PCIe card x16 x1 x16 Dual VGA/PCIe card x16 x1 x16 Triple VGA/PCIe card x8 x8 x8 • When using two (or three) graphics cards for details. The operating frequency of this slot changes, depending on the primary PCI Express x16 slot and the Universal PCI Express slot. • We recommend that you have connected your display to the onboard VGA port...
... SLI™ mode is supported only under Windows® Vista OS. VGA configuration PCI Express operating mode PCIex16_1 PCIex16_2 PCIex16_3 Single VGA/PCIe card x16 x1 x16 Dual VGA/PCIe card x16 x1 x16 Triple VGA/PCIe card x8 x8 x8 • When using two (or three) graphics cards for details. The operating frequency of this slot changes, depending on the primary PCI Express x16 slot and the Universal PCI Express slot. • We recommend that you have connected your display to the onboard VGA port...
User Manual
Page 55
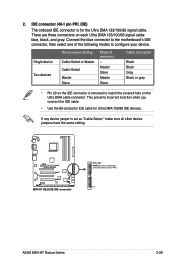
... modes to the motherboard's IDE connector, then select one of device(s) - M3N-HT DELUXE M3N-HT DELUXE IDE connector PRI_IDE NOTE:Orient the red markings on the IDE ribbon cable to match the covered hole on the Ultra DMA cable connector. If any device jumper is for Ultra DMA 100/66 IDE devices. There are three connectors on the IDE connector is removed to PIN 1. Connect the blue connector to configure your device. PIN1 ASUS M3N-HT Deluxe Series 2-29 IDE connector (40-1 pin PRI_IDE) The onboard IDE connector is set as "Cable...
... modes to the motherboard's IDE connector, then select one of device(s) - M3N-HT DELUXE M3N-HT DELUXE IDE connector PRI_IDE NOTE:Orient the red markings on the IDE ribbon cable to match the covered hole on the Ultra DMA cable connector. If any device jumper is for Ultra DMA 100/66 IDE devices. There are three connectors on the IDE connector is removed to PIN 1. Connect the blue connector to configure your device. PIN1 ASUS M3N-HT Deluxe Series 2-29 IDE connector (40-1 pin PRI_IDE) The onboard IDE connector is set as "Cable...
User Manual
Page 56
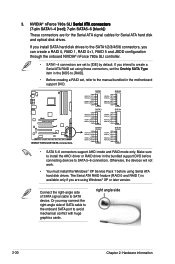
... a RAID 0, RAID 1, RAID 0+1, RAID 5 and JBOD configuration through the onboard NVIDIA® nForce 780a SLI controller. • SATA1-4 connectors are set to ��rs� (7-pin SATA1-4 [red]; 7-pin SATA5-6 [black]) These connectors are using these connectors, set , refer to avoid mechanical conflict with huge graphics cards. If you install SATA hard disk drives to the SATA1/2/3/4/5/6 connectors, you intend to install the AHCI driver or RAID driver in the bundled support DVD before using Serial ATA hard disk drives. The Serial ATA RAID feature (RAID 0 and RAID 1) is...
... a RAID 0, RAID 1, RAID 0+1, RAID 5 and JBOD configuration through the onboard NVIDIA® nForce 780a SLI controller. • SATA1-4 connectors are set to ��rs� (7-pin SATA1-4 [red]; 7-pin SATA5-6 [black]) These connectors are using these connectors, set , refer to avoid mechanical conflict with huge graphics cards. If you install SATA hard disk drives to the SATA1/2/3/4/5/6 connectors, you intend to install the AHCI driver or RAID driver in the bundled support DVD before using Serial ATA hard disk drives. The Serial ATA RAID feature (RAID 0 and RAID 1) is...

User Manual
Page 57
... GND PIN 1 PIN 1 TPA2+ GND TPB2+ +12V TPA2+ GND TPB2+ +12V M3N-HT DELUXE IEEE 1394 connectors Never connect a USB cable to the USB connectors. Connect the IEEE 1394a module cable to one of the connectors, then install the module to the 1394 connector onboard if your chassis supports front panel USB ports. 5. Connect the USB module cable to any of these connectors, then install the module to 480 Mbps connection speed. These USB connectors comply with USB 2.0 specification that supports up to a slot opening...
... GND PIN 1 PIN 1 TPA2+ GND TPB2+ +12V TPA2+ GND TPB2+ +12V M3N-HT DELUXE IEEE 1394 connectors Never connect a USB cable to the USB connectors. Connect the IEEE 1394a module cable to one of the connectors, then install the module to the 1394 connector onboard if your chassis supports front panel USB ports. 5. Connect the USB module cable to any of these connectors, then install the module to 480 Mbps connection speed. These USB connectors comply with USB 2.0 specification that supports up to a slot opening...
User Manual
Page 73
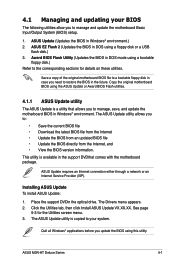
.... ASUS Update requires an Internet connection either through a network or an Internet Service Provider (ISP). Click the Utilities tab, then click Install ASUS Update VX.XX.XX. Place the support DVDin the optical drive. Quit all Windows® applications before you to the corresponding sections for the Utilities screen menu. 3. ASUS Update (Updates the BIOS in DOS mode using a floppy disk or a USB flash disk.) 3. The ASUS Update utility allows you to manage, save, and update the motherboard BIOS in DOS using a bootable floppy disk...
.... ASUS Update requires an Internet connection either through a network or an Internet Service Provider (ISP). Click the Utilities tab, then click Install ASUS Update VX.XX.XX. Place the support DVDin the optical drive. Quit all Windows® applications before you to the corresponding sections for the Utilities screen menu. 3. ASUS Update (Updates the BIOS in DOS mode using a floppy disk or a USB flash disk.) 3. The ASUS Update utility allows you to manage, save, and update the motherboard BIOS in DOS using a bootable floppy disk...
User Manual
Page 100
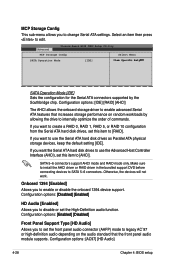
... HD Audio [Enabled] Allows you to change Serial ATA settings. Configuration options: [AC97] [HD Audio] 4-28 Chapter 4: BIOS setup Advanced Phoenix-Award BIOS CMOS Setup Utility MCP Storage Config Select Menu SATA Operation Mode [IDE] Item Specific Help SATA Operation Mode [IDE] Sets the configuration for the Serial ATA connectors supported by allowing the drive to internally optimize the order of commands. If you want to create a RAID 0, RAID 1, RAID 5, or RAID 10 configuration from the Serial ATA hard disk drives, set this item to [AHCI]. Otherwise, the devices will not work...
... HD Audio [Enabled] Allows you to change Serial ATA settings. Configuration options: [AC97] [HD Audio] 4-28 Chapter 4: BIOS setup Advanced Phoenix-Award BIOS CMOS Setup Utility MCP Storage Config Select Menu SATA Operation Mode [IDE] Item Specific Help SATA Operation Mode [IDE] Sets the configuration for the Serial ATA connectors supported by allowing the drive to internally optimize the order of commands. If you want to create a RAID 0, RAID 1, RAID 5, or RAID 10 configuration from the Serial ATA hard disk drives, set this item to [AHCI]. Otherwise, the devices will not work...
User Manual
Page 101
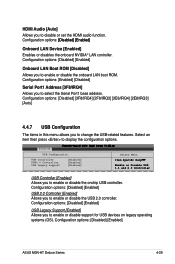
... items in this menu allows you to disable or set the HDMI audio function. Configuration options: [Disabled] [Enabled] ASUS M3N-HT Deluxe Series 4-29 HDMI Audio [Auto] Allows you to change the USB-related features. Advanced Phoenix-Award BIOS CMOS Setup Utility USB Configuration Select Menu USB Controller USB2.0 Controller USB Legacy support [Enabled] [Enabled] [Enabled] Item Specific Help Enable or Disable USB 1.1 and 2.0 Controller USB Controller [Enabled] Allows you to select the Serial Port1 base address. Configuration options: [Enabled] [Disabled] Serial Port1 Address [3F8...
... items in this menu allows you to disable or set the HDMI audio function. Configuration options: [Disabled] [Enabled] ASUS M3N-HT Deluxe Series 4-29 HDMI Audio [Auto] Allows you to change the USB-related features. Advanced Phoenix-Award BIOS CMOS Setup Utility USB Configuration Select Menu USB Controller USB2.0 Controller USB Legacy support [Enabled] [Enabled] [Enabled] Item Specific Help Enable or Disable USB 1.1 and 2.0 Controller USB Controller [Enabled] Allows you to select the Serial Port1 base address. Configuration options: [Enabled] [Disabled] Serial Port1 Address [3F8...
User Manual
Page 102
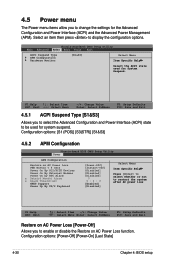
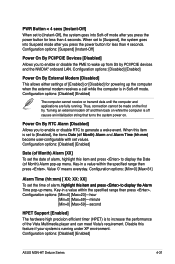
... disable the Restore on AC Power Loss function. Configuration options: [S1 (POS)] [S3(STR)] [S1&S3] 4.5.2 APM Configuration Phoenix-Award BIOS CMOS Setup Utility Power APM Configuration Restore on AC Power Loss PWR Button < 4 secs Power On By PCI/PCIE Devices Power On By External Modems Power On by RTC Alarm x Date(of Month) Alarm x Alarm Time(hh:mm) HPET Support Power Up By PS/2 Keyboard [Power-Off] [Instant-Off] [Disabled] [Disabled] [Disabled] 0 0 : 0 : 0 [Enabled] [Disabled] Select Menu Item Specific Help Press [Enter...
... disable the Restore on AC Power Loss function. Configuration options: [S1 (POS)] [S3(STR)] [S1&S3] 4.5.2 APM Configuration Phoenix-Award BIOS CMOS Setup Utility Power APM Configuration Restore on AC Power Loss PWR Button < 4 secs Power On By PCI/PCIE Devices Power On By External Modems Power On by RTC Alarm x Date(of Month) Alarm x Alarm Time(hh:mm) HPET Support Power Up By PS/2 Keyboard [Power-Off] [Instant-Off] [Disabled] [Disabled] [Disabled] 0 0 : 0 : 0 [Enabled] [Disabled] Select Menu Item Specific Help Press [Enter...
User Manual
Page 103
...'s requirement. Disable this item is set to wake up the computer when the external modem receives a call while the computer is running . When this feature if your system is in Soft-off causes an initialization string that turns the system power on the first try. Configuration options: [Disabled] [Enabled] ASUS M3N-HT Deluxe Series 4-31 Power On By RTC Alarm [Disabled] Allows you to enable or disable the...
...'s requirement. Disable this item is set to wake up the computer when the external modem receives a call while the computer is running . When this feature if your system is in Soft-off causes an initialization string that turns the system power on the first try. Configuration options: [Disabled] [Enabled] ASUS M3N-HT Deluxe Series 4-31 Power On By RTC Alarm [Disabled] Allows you to enable or disable the...

User Manual
Page 104
... CPU fan speed. Configuration options: [Disabled] [Enabled] The CPU Fan Profile item becomes user-configurable when you enable the CPU Q-Fan Control feature. Set this sub-menu displays the hardware monitor values automatically detected by PS/2 keyboard function or set specific keys on the PS/2 keyboard to turn on the system. This feature requires an ATX power supply that provides at least 1A on the CPU temperature. Phoenix-Award BIOS CMOS Setup Utility Power Hardware Monitor Select Menu CPU Fan Type [DC] CPU Q-Fan Control [Disabled] x CPU Q-Fan Profile Performance Chassis Q-Fan...
... CPU fan speed. Configuration options: [Disabled] [Enabled] The CPU Fan Profile item becomes user-configurable when you enable the CPU Q-Fan Control feature. Set this sub-menu displays the hardware monitor values automatically detected by PS/2 keyboard function or set specific keys on the PS/2 keyboard to turn on the system. This feature requires an ATX power supply that provides at least 1A on the CPU temperature. Phoenix-Award BIOS CMOS Setup Utility Power Hardware Monitor Select Menu CPU Fan Type [DC] CPU Q-Fan Control [Disabled] x CPU Q-Fan Profile Performance Chassis Q-Fan...

User Manual
Page 106
... of devices installed in the system. 4.6 Boot menu The Boot menu items allow you to assign a removable drive attached to change the system boot options. Floppy Disks Allows you to the system. 4-34 Chapter 4: BIOS setup Configuration options: [Removable] [Hard Disk] [CDROM] [Disabled] 4.6.2 Removable Drives Phoenix-Award BIOS CMOS Setup Utility Boot Removable Drives 1. Phoenix-Award BIOS CMOS Setup Utility Main Advanced Power Boot Tools Exit Boot Device Priority Removable Drives Hard Disk Drives CDROM Drives Boot Settings Configuration Security Select Menu Item Specific...
... of devices installed in the system. 4.6 Boot menu The Boot menu items allow you to assign a removable drive attached to change the system boot options. Floppy Disks Allows you to the system. 4-34 Chapter 4: BIOS setup Configuration options: [Removable] [Hard Disk] [CDROM] [Disabled] 4.6.2 Removable Drives Phoenix-Award BIOS CMOS Setup Utility Boot Removable Drives 1. Phoenix-Award BIOS CMOS Setup Utility Main Advanced Power Boot Tools Exit Boot Device Priority Removable Drives Hard Disk Drives CDROM Drives Boot Settings Configuration Security Select Menu Item Specific...
User Manual
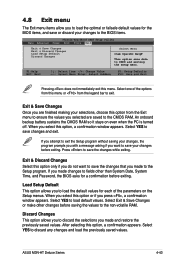
Page 115
... to the CMOS RAM. If you to load the default values for a confirmation before exiting. ASUS M3N-HT Deluxe Series 4-43 Select Exit & Save Changes or make other than System Date, System Time, and Password, the BIOS asks for each of the options from this menu. Discard Changes This option allows you to discard the selections you press , a confirmation window appears. When you select this option or if...
... to the CMOS RAM. If you to load the default values for a confirmation before exiting. ASUS M3N-HT Deluxe Series 4-43 Select Exit & Save Changes or make other than System Date, System Time, and Password, the BIOS asks for each of the options from this menu. Discard Changes This option allows you to discard the selections you press , a confirmation window appears. When you select this option or if...
User Manual
Page 160
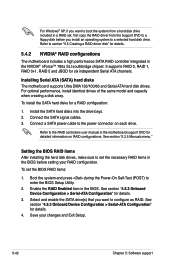
... Manuals menu." See section "4.5.3 Onboard Device Configuration > Serial-ATA Configuration" for detailed information on each drive. Select and enable the SATA drive(s) that you want to boot the system from a hard disk drive included in a RAID set, first copy the RAID driver from the Support DVD to a floppy disk before setting your changes and Exit Setup. 5-42 Chapter 5: Software support Save your RAID configuration. Installing Serial ATA (SATA) hard disks The motherboard supports Ultra DMA 133/100/66 and Serial ATA hard disk drives. Refer to the RAID controllers user manual...
... Manuals menu." See section "4.5.3 Onboard Device Configuration > Serial-ATA Configuration" for detailed information on each drive. Select and enable the SATA drive(s) that you want to boot the system from a hard disk drive included in a RAID set, first copy the RAID driver from the Support DVD to a floppy disk before setting your changes and Exit Setup. 5-42 Chapter 5: Software support Save your RAID configuration. Installing Serial ATA (SATA) hard disks The motherboard supports Ultra DMA 133/100/66 and Serial ATA hard disk drives. Refer to the RAID controllers user manual...
User Manual
Page 167
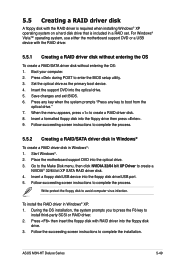
... device with RAID driver into the floppy disk drive. 3. Press during POST to create a NVIDIA® 32/64 bit XP SATA RAID driver disk. 4. Start Windows®. 2. 5.5 Creating a RAID driver disk A floppy disk with the RAID driver is required when installing Windows® XP operating system on a hard disk drive that is included in Windows® XP: 1. Follow the succeeding screen instructions to complete the installation. Place the motherboard support DVD into the floppy disk drive/USB port. 5. ASUS M3N-HT Deluxe Series 5-49 Set the optical drive as the primary boot device...
... device with RAID driver into the floppy disk drive. 3. Press during POST to create a NVIDIA® 32/64 bit XP SATA RAID driver disk. 4. Start Windows®. 2. 5.5 Creating a RAID driver disk A floppy disk with the RAID driver is required when installing Windows® XP operating system on a hard disk drive that is included in Windows® XP: 1. Follow the succeeding screen instructions to complete the installation. Place the motherboard support DVD into the floppy disk drive/USB port. 5. ASUS M3N-HT Deluxe Series 5-49 Set the optical drive as the primary boot device...
User Manual
Page 168
Find RAID driver in the support DVD through the path below: Drivers\Chipset\Disk\RAID Find AHCI driver in Windows® Vista™: 1. Follow the succeeding screen instructions to chipset limitation, the Serial ATA ports supported by the NVIDIA chipset doesn't support Serial Optical Disk Drives (Serial ODD) under DOS. 5-50 Chapter 5: Software support To install the RAID driver in the support DVD through the path below: Drivers\Chipset\Disk\AHCI 2. Due to complete the installation. Insert the motherboard support DVD or a USB device with RAID driver into the optical drive/USB port....
Find RAID driver in the support DVD through the path below: Drivers\Chipset\Disk\RAID Find AHCI driver in Windows® Vista™: 1. Follow the succeeding screen instructions to chipset limitation, the Serial ATA ports supported by the NVIDIA chipset doesn't support Serial Optical Disk Drives (Serial ODD) under DOS. 5-50 Chapter 5: Software support To install the RAID driver in the support DVD through the path below: Drivers\Chipset\Disk\AHCI 2. Due to complete the installation. Insert the motherboard support DVD or a USB device with RAID driver into the optical drive/USB port....


