
User Manual
Page 8
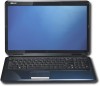
...without restarting the computer. 4 Display (Monitor) Output The 15-pin D-sub monitor port supports a standard VGAcompatible device such as keyboards, pointing devices, cameras, hard disk drives, printers, and scanners connected in sites or hubs. Use this feature for video conferencing, voice narrations, or simple audio recordings. 3 2.0 USB Port (2.0/1.1) ...this jack automatically disables the built-in speakers. 2 Microphone Input Jack The mono microphone jack (1/8 inch) can be used to connect the Notebook PC's audio out signal to run simultaneously on a larger external display...
...without restarting the computer. 4 Display (Monitor) Output The 15-pin D-sub monitor port supports a standard VGAcompatible device such as keyboards, pointing devices, cameras, hard disk drives, printers, and scanners connected in sites or hubs. Use this feature for video conferencing, voice narrations, or simple audio recordings. 3 2.0 USB Port (2.0/1.1) ...this jack automatically disables the built-in speakers. 2 Microphone Input Jack The mono microphone jack (1/8 inch) can be used to connect the Notebook PC's audio out signal to run simultaneously on a larger external display...
User Manual
Page 12
...EMS Enabled] 3. Recover Windows to a network drive and make note of any customized configuration settings (such as drive "C". 12 Notebook PC User Manual This option deletes all partitions from your hard disk drive and creates a new system partition as network ...Notebook PC to an authorized ASUS service center if you to keep other partitions, and to create a new system partition as drive "C". DO NOT delete the partition named RECOVERY. Read the ASUS Preload Wizard screen and click Next. 4. IMPORTANT! The Recovery Partition is a reserved space on your hard disk drive...
...EMS Enabled] 3. Recover Windows to a network drive and make note of any customized configuration settings (such as drive "C". 12 Notebook PC User Manual This option deletes all partitions from your hard disk drive and creates a new system partition as network ...Notebook PC to an authorized ASUS service center if you to keep other partitions, and to create a new system partition as drive "C". DO NOT delete the partition named RECOVERY. Read the ASUS Preload Wizard screen and click Next. 4. IMPORTANT! The Recovery Partition is a reserved space on your hard disk drive...
User Manual
Page 13
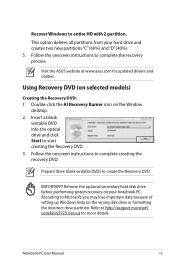
.... 2. Using Recovery DVD (on your hard drive and creates two new partitions "C" (60%) and "D" (40%). 5. Prepare three blank writable DVDs to http://support.microsoft. com/kb/937251/en-us for updated drivers and utilities. This option deletes all partitions from your Notebook PC. Remove the optional secondary hard disk drive before performing system recovery on...
.... 2. Using Recovery DVD (on your hard drive and creates two new partitions "C" (60%) and "D" (40%). 5. Prepare three blank writable DVDs to http://support.microsoft. com/kb/937251/en-us for updated drivers and utilities. This option deletes all partitions from your Notebook PC. Remove the optional secondary hard disk drive before performing system recovery on...
User Manual
Page 14
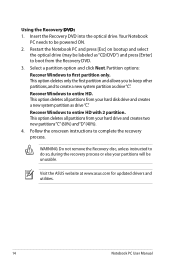
... entire HD with 2 partition. This option deletes all partitions from your hard drive and creates two new partitions"C"(60%) and"D"(40%). 4. Visit the ASUS website at www.asus.com for updated drivers and utilities. 14 Notebook PC User Manual Recover Windows to entire HD. Select a partition option ... recovery process or else your hard disk drive and creates a new system partition as drive"C". Restart the Notebook PC and press [Esc] on bootup and select the optical drive (may be labeled as drive"C". Insert the Recovery DVD into the optical drive.Your Notebook PC needs to boot from ...
... entire HD with 2 partition. This option deletes all partitions from your hard drive and creates two new partitions"C"(60%) and"D"(40%). 4. Visit the ASUS website at www.asus.com for updated drivers and utilities. 14 Notebook PC User Manual Recover Windows to entire HD. Select a partition option ... recovery process or else your hard disk drive and creates a new system partition as drive"C". Restart the Notebook PC and press [Esc] on bootup and select the optical drive (may be labeled as drive"C". Insert the Recovery DVD into the optical drive.Your Notebook PC needs to boot from ...


