
H87-PRO User's Manual
Page 2
... BEEN ADVISED OF THE POSSIBILITY OF SUCH DAMAGES ARISING FROM ANY DEFECT OR ERROR IN THIS MANUAL OR PRODUCT. Such software in this product is valid to the email address gpl@asus.com, stating the product and describing the problem (please DO NOT send large attachments such as... and the location where you encounter any warranty to this information. ASUS ASSUMES NO RESPONSIBILITY OR LIABILITY FOR ANY ERRORS OR INACCURACIES THAT MAY APPEAR IN THIS MANUAL, INCLUDING THE PRODUCTS AND SOFTWARE DESCRIBED IN IT. ASUS PROVIDES THIS MANUAL "AS IS" WITHOUT WARRANTY OF ANY KIND, EITHER EXPRESS OR ...
... BEEN ADVISED OF THE POSSIBILITY OF SUCH DAMAGES ARISING FROM ANY DEFECT OR ERROR IN THIS MANUAL OR PRODUCT. Such software in this product is valid to the email address gpl@asus.com, stating the product and describing the problem (please DO NOT send large attachments such as... and the location where you encounter any warranty to this information. ASUS ASSUMES NO RESPONSIBILITY OR LIABILITY FOR ANY ERRORS OR INACCURACIES THAT MAY APPEAR IN THIS MANUAL, INCLUDING THE PRODUCTS AND SOFTWARE DESCRIBED IN IT. ASUS PROVIDES THIS MANUAL "AS IS" WITHOUT WARRANTY OF ANY KIND, EITHER EXPRESS OR ...
H87-PRO User's Manual
Page 4
... 3.6.6 Platform Misc Configuration 3-32 3.6.7 Onboard Devices Configuration 3-32 3.6.8 APM 3-34 3.6.9 Network Stack 3-35 3.7 Monitor menu 3-36 3.8 Boot menu 3-39 3.9 Tools menu 3-46 3.9.1 ASUS EZ Flash 2 Utility 3-46 3.9.2 ASUS O.C. Profile 3-46 3.9.3 ASUS SPD Information 3-47 3.10 Exit menu 3-48 3.11 Updating BIOS 3-49 Chapter 4: Software support 4.1 Installing an operating system 4-1 4.2 Support DVD information 4-1 4.2.1 Running...
... 3.6.6 Platform Misc Configuration 3-32 3.6.7 Onboard Devices Configuration 3-32 3.6.8 APM 3-34 3.6.9 Network Stack 3-35 3.7 Monitor menu 3-36 3.8 Boot menu 3-39 3.9 Tools menu 3-46 3.9.1 ASUS EZ Flash 2 Utility 3-46 3.9.2 ASUS O.C. Profile 3-46 3.9.3 ASUS SPD Information 3-47 3.10 Exit menu 3-48 3.11 Updating BIOS 3-49 Chapter 4: Software support 4.1 Installing an operating system 4-1 4.2 Support DVD information 4-1 4.2.1 Running...

H87-PRO User's Manual
Page 6
... become wet. • Place the product on a stable surface. • If you are unplugged. • Seek professional assistance before using the product, ensure all the manuals that came with the product, contact a qualified service technician or your dealer immediately. • To avoid short circuits, keep paper clips, screws, and staples away...
... become wet. • Place the product on a stable surface. • If you are unplugged. • Seek professional assistance before using the product, ensure all the manuals that came with the product, contact a qualified service technician or your dealer immediately. • To avoid short circuits, keep paper clips, screws, and staples away...

H87-PRO User's Manual
Page 8
... complete a task IMPORTANT: Instructions that you must press two or more keys simultaneously, the key names are linked with a plus sign (+). Keys enclosed in this manual. Conventions used throughout this guide To ensure that you perform certain tasks properly, take note of the following symbols used in the less-than and...
... complete a task IMPORTANT: Instructions that you must press two or more keys simultaneously, the key names are linked with a plus sign (+). Keys enclosed in this manual. Conventions used throughout this guide To ensure that you perform certain tasks properly, take note of the following symbols used in the less-than and...
H87-PRO User's Manual
Page 9
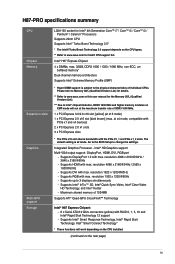
...installed. (continued on XMP mode will run at x16 mode) 1 x PCI Express 2.0 x16 slot [dark brown] (max. Integrated Graphics Processor - H87-PRO specifications summary CPU Chipset Memory Expansion slots Graphics Multi-GPU support Storage LGA1150 socket for Intel® 4th Generation Core™ i7 / Core™ i5... and higher memory modules on the next page) ix Please refer to Memory QVL (Qualified Vendors List) for details. ** Refer to www.asus.com or this user manual for Intel® CPU support list. resolution 4096 x 2160@24Hz / 3840 x 2160@60Hz - resolution 1920 x 1200@60Hz - The ...
...installed. (continued on XMP mode will run at x16 mode) 1 x PCI Express 2.0 x16 slot [dark brown] (max. Integrated Graphics Processor - H87-PRO specifications summary CPU Chipset Memory Expansion slots Graphics Multi-GPU support Storage LGA1150 socket for Intel® 4th Generation Core™ i7 / Core™ i5... and higher memory modules on the next page) ix Please refer to Memory QVL (Qualified Vendors List) for details. ** Refer to www.asus.com or this user manual for Intel® CPU support list. resolution 4096 x 2160@24Hz / 3840 x 2160@60Hz - resolution 1920 x 1200@60Hz - The ...

H87-PRO User's Manual
Page 12
...) Specifications are for reference only. Actual product specifications may vary. Package contents Check your motherboard package for the following items. User Manual H87-PRO ASUS H87-PRO motherboard User manual Support DVD 2 x Serial ATA 6.0 Gb/s cables 1 x ASUS Q-Shield • If any of the items are damaged or missing, contact your retailer. • The illustrations above are subject to...
...) Specifications are for reference only. Actual product specifications may vary. Package contents Check your motherboard package for the following items. User Manual H87-PRO ASUS H87-PRO motherboard User manual Support DVD 2 x Serial ATA 6.0 Gb/s cables 1 x ASUS Q-Shield • If any of the items are damaged or missing, contact your retailer. • The illustrations above are subject to...
H87-PRO User's Manual
Page 24
... 1: Product introduction For effective use a more efficient memory cooling system to support a full memory load (4 DIMMs) or overclocking condition. • ASUS exclusively provides hyper DIMM support function. • Hyper DIMM support is subject to install 4GB or more details, refer to the Microsoft® support... site at a higher frequency, refer to section 3.5 Ai Tweaker menu for manual memory frequency adjustment. • For system stability, use of memory, we recommend that you do any of the following: a) Use a ...
... 1: Product introduction For effective use a more efficient memory cooling system to support a full memory load (4 DIMMs) or overclocking condition. • ASUS exclusively provides hyper DIMM support function. • Hyper DIMM support is subject to install 4GB or more details, refer to the Microsoft® support... site at a higher frequency, refer to section 3.5 Ai Tweaker menu for manual memory frequency adjustment. • For system stability, use of memory, we recommend that you do any of the following: a) Use a ...
H87-PRO User's Manual
Page 27
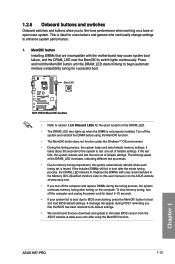
..., turn off the computer and replace DIMMs during POST reminding you that the BIOS has been restored to boot and load BIOS default settings. Chapter 1 ASUS H87-PRO 1-13 This is not properly installed. to BIOS overclocking, press the MemOK! button • Refer to section 1.2.8 Onboard LEDs for the exact location of failsafe... MemOK! button to its default settings. • We recommend that are incompatible with ones recommended in the Memory QVL (Qualified Vendors Lists) in this user manual or on a bare or open-case system.
..., turn off the computer and replace DIMMs during POST reminding you that the BIOS has been restored to boot and load BIOS default settings. Chapter 1 ASUS H87-PRO 1-13 This is not properly installed. to BIOS overclocking, press the MemOK! button • Refer to section 1.2.8 Onboard LEDs for the exact location of failsafe... MemOK! button to its default settings. • We recommend that are incompatible with ones recommended in the Memory QVL (Qualified Vendors Lists) in this user manual or on a bare or open-case system.
H87-PRO User's Manual
Page 32
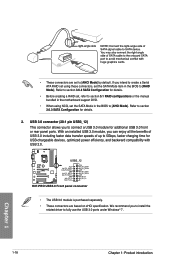
... to section 3.6.3 SATA Configuration for USB-chargeable devices, optimized power efficiency, and backward compatibility with USB 2.0. Refer to [RAID Mode]. H87-PRO USB3_12 H87-PRO USB3.0 Front panel connector • The USB 3.0 module is purchased separately. • These connectors are set the SATA Mode in ...of up to 5Gbps, faster charging time for details. • Before creating a RAID set, refer to section 5.1 RAID configurations or the manual bundled in the motherboard support DVD. • When using these connectors, set the SATA Mode item in the BIOS to fully use the USB...
... to section 3.6.3 SATA Configuration for USB-chargeable devices, optimized power efficiency, and backward compatibility with USB 2.0. Refer to [RAID Mode]. H87-PRO USB3_12 H87-PRO USB3.0 Front panel connector • The USB 3.0 module is purchased separately. • These connectors are set the SATA Mode in ...of up to 5Gbps, faster charging time for details. • Before creating a RAID set, refer to section 5.1 RAID configurations or the manual bundled in the motherboard support DVD. • When using these connectors, set the SATA Mode item in the BIOS to fully use the USB...
H87-PRO User's Manual
Page 56
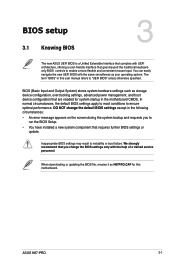
... your operating system. Chapter 3 ASUS H87-PRO 3-1 DO NOT change the BIOS settings only with the same smoothness as storage device configuration, overclocking settings, advanced power management, and boot device configuration that are needed for this user manual refers to ensure optimal performance. ... UEFI BIOS with the help of a trained service personnel. Chapter 3: BIOS setup BIOS setup 3.1 Knowing BIOS 3 The new ASUS UEFI BIOS is a Unified Extensible Interface that complies with UEFI architecture, offering a user-friendly interface that goes beyond the traditional ...
... your operating system. Chapter 3 ASUS H87-PRO 3-1 DO NOT change the BIOS settings only with the same smoothness as storage device configuration, overclocking settings, advanced power management, and boot device configuration that are needed for this user manual refers to ensure optimal performance. ... UEFI BIOS with the help of a trained service personnel. Chapter 3: BIOS setup BIOS setup 3.1 Knowing BIOS 3 The new ASUS UEFI BIOS is a Unified Extensible Interface that complies with UEFI architecture, offering a user-friendly interface that goes beyond the traditional ...
H87-PRO User's Manual
Page 64
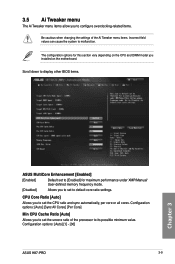
...overclocking-related items. Be cautious when changing the settings of the processor to its possible minimum value. Configuration options: [Auto] [1] - [30] ASUS H87-PRO 3-9 3.5 Ai Tweaker menu The Ai Tweaker menu items allow you to set the CPU ratio and sync automatically, per core or all cores. CPU... Allows you installed on the CPU and DIMM model you to default core ratio settings. The configuration options for maximum performance under XMP/Manual/ User-defined memory frequency mode. [Disabled] Allows you to set to set the uncore ratio of the Ai Tweaker menu items. Incorrect...
...overclocking-related items. Be cautious when changing the settings of the processor to its possible minimum value. Configuration options: [Auto] [1] - [30] ASUS H87-PRO 3-9 3.5 Ai Tweaker menu The Ai Tweaker menu items allow you to set the CPU ratio and sync automatically, per core or all cores. CPU... Allows you installed on the CPU and DIMM model you to default core ratio settings. The configuration options for maximum performance under XMP/Manual/ User-defined memory frequency mode. [Disabled] Allows you to set to set the uncore ratio of the Ai Tweaker menu items. Incorrect...

H87-PRO User's Manual
Page 65
... is higher than or equal to its optimized setting depending on the system load. Select [Auto] to apply the CPU default Turbo Ratio setting or manually assign a 2-Core Ratio Limit value that is set the uncore ratio of the processor to the 3-Core Ratio Limit. 1-Core Limit must not be ... Ratio Limit [Auto] Allows you to set to adjust the optimal iGPU frequency value. Select [Auto] to apply the CPU default Turbo Ratio setting or manually assign a 1-Core Ratio Limit value that is set the 4 Core Ratio Limit. Ratio [Auto] [Auto] The iGPU frequency is higher than or equal to the...
... is higher than or equal to its optimized setting depending on the system load. Select [Auto] to apply the CPU default Turbo Ratio setting or manually assign a 2-Core Ratio Limit value that is set the uncore ratio of the processor to the 3-Core Ratio Limit. 1-Core Limit must not be ... Ratio Limit [Auto] Allows you to set to adjust the optimal iGPU frequency value. Select [Auto] to apply the CPU default Turbo Ratio setting or manually assign a 1-Core Ratio Limit value that is set the 4 Core Ratio Limit. Ratio [Auto] [Auto] The iGPU frequency is higher than or equal to the...

H87-PRO User's Manual
Page 69
... to set a fixed CPU frequency. The values range from the following item appears only when you to set a response for extra power support. Manual Adjustment [Fast] Allows you set the power phase based on your CPU specification. Configuration options: [Auto] [100%] [110%] [120%] [130... CPU loading for the CPU power phase control. CPU Fixed Frequency [XXX] This item allows you to [Manual Adjustment]. Configuration options: [Auto] [Optimized] [Extreme] [Manual Adjustment] DO NOT remove the thermal module when setting this item to adjust the value. The thermal conditions ...
... to set a fixed CPU frequency. The values range from the following item appears only when you to set a response for extra power support. Manual Adjustment [Fast] Allows you set the power phase based on your CPU specification. Configuration options: [Auto] [100%] [110%] [120%] [130... CPU loading for the CPU power phase control. CPU Fixed Frequency [XXX] This item allows you to [Manual Adjustment]. Configuration options: [Auto] [Optimized] [Extreme] [Manual Adjustment] DO NOT remove the thermal module when setting this item to adjust the value. The thermal conditions ...

H87-PRO User's Manual
Page 71
...LEVEL -4] - [LEVEL 4] Power Current Offset [Auto] Allows you to set the slew rate for the Fully Integrated Voltage Regulator as it exits manual override mode. Higher value provides better power-saving condition. The values range from 0A to 50A at 1Amp increment. Chapter 3 3-16 Chapter 3:...saving when the processor is in Response [Auto] Allows you to set the slew rate for the Fully Integrated Voltage Regulator as it enters manual override mode. Configuration options: [Auto] [High Performance] [Balanced] Power Decay Mode [Auto] Allows your system to enlarge the overclocking ...
...LEVEL -4] - [LEVEL 4] Power Current Offset [Auto] Allows you to set the slew rate for the Fully Integrated Voltage Regulator as it exits manual override mode. Higher value provides better power-saving condition. The values range from 0A to 50A at 1Amp increment. Chapter 3 3-16 Chapter 3:...saving when the processor is in Response [Auto] Allows you to set the slew rate for the Fully Integrated Voltage Regulator as it enters manual override mode. Configuration options: [Auto] [High Performance] [Balanced] Power Decay Mode [Auto] Allows your system to enlarge the overclocking ...

H87-PRO User's Manual
Page 72
The values range from 0.001V to [Offset Mode] or [Adaptive Mode]. Configuration options: [Auto] [Manual Mode] [Offset Mode] [Adaptive Mode] The following item appears only when you set the CPU Core Voltage override. The values range from ...by a positive value. [-] To offset the voltage by the external voltage regulator. Chapter 3 ASUS H87-PRO 3-17 Use and key to enlarge the overclocking potential. VCCIN Voltage [Auto] Allows you to configure the amount of voltage fed to [Manual Mode]. CPU Core Voltage [Auto] Allows you to 1.920V with a 0.001V interval. ...
The values range from 0.001V to [Offset Mode] or [Adaptive Mode]. Configuration options: [Auto] [Manual Mode] [Offset Mode] [Adaptive Mode] The following item appears only when you set the CPU Core Voltage override. The values range from ...by a positive value. [-] To offset the voltage by the external voltage regulator. Chapter 3 ASUS H87-PRO 3-17 Use and key to enlarge the overclocking potential. VCCIN Voltage [Auto] Allows you to configure the amount of voltage fed to [Manual Mode]. CPU Core Voltage [Auto] Allows you to 1.920V with a 0.001V interval. ...

H87-PRO User's Manual
Page 73
... adjust the value. Increase the amount of voltage fed to adjust the value. Configuration options: [Auto] [Manual Mode] [Offset Mode] [Adaptive Mode] The following item appears only when you set the CPU Graphics Voltage to [Manual Mode]. Chapter 3 3-18 Chapter 3: BIOS setup Use the or keys to add voltage for Turbo Mode...
... adjust the value. Increase the amount of voltage fed to adjust the value. Configuration options: [Auto] [Manual Mode] [Offset Mode] [Adaptive Mode] The following item appears only when you set the CPU Graphics Voltage to [Manual Mode]. Chapter 3 3-18 Chapter 3: BIOS setup Use the or keys to add voltage for Turbo Mode...

H87-PRO User's Manual
Page 74
...voltage when increasing DRAM frequency. The following item appears only when you to 0.999V with a 0.001V interval. Configuration options: [Auto] [Manual Mode] [Offset Mode] [Adaptive Mode] The following item appears only when you to configure the amount of voltage fed to the system agent...unit. Use the or keys to adjust the value, The values range from 0.001V to 0.999V with a 0.001V interval. Chapter 3 ASUS H87-PRO 3-19 Increase the voltage when increasing Ring frequency. CPU Cache Voltage Override [Auto] Allows you set the CPU Cache Voltage override. The ...
...voltage when increasing DRAM frequency. The following item appears only when you to 0.999V with a 0.001V interval. Configuration options: [Auto] [Manual Mode] [Offset Mode] [Adaptive Mode] The following item appears only when you to configure the amount of voltage fed to the system agent...unit. Use the or keys to adjust the value, The values range from 0.001V to 0.999V with a 0.001V interval. Chapter 3 ASUS H87-PRO 3-19 Increase the voltage when increasing Ring frequency. CPU Cache Voltage Override [Auto] Allows you set the CPU Cache Voltage override. The ...
H87-PRO User's Manual
Page 92
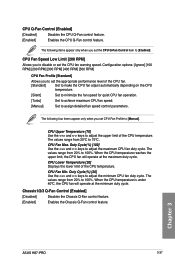
... appear only when you set CPU Fan Profile to [Enabled]. The following items appear only when you set the CPU Q-Fan Control item to [Manual]. CPU Upper Temperature [70] Use the and keys to assign detailed fan speed control parameters. CPU Lower Temperature [20] Displays the lower limit...[Silent] Set to minimize the fan speed for quiet CPU fan operation. [Turbo] Set to achieve maximum CPU fan speed. [Manual] Set to adjust the upper limit of the CPU temperature. CPU Fan Max. Chapter 3 ASUS H87-PRO 3-37 The values range from 20% to adjust the minimum CPU fan duty cycle.
... appear only when you set CPU Fan Profile to [Enabled]. The following items appear only when you set the CPU Q-Fan Control item to [Manual]. CPU Upper Temperature [70] Use the and keys to assign detailed fan speed control parameters. CPU Lower Temperature [20] Displays the lower limit...[Silent] Set to minimize the fan speed for quiet CPU fan operation. [Turbo] Set to achieve maximum CPU fan speed. [Manual] Set to adjust the upper limit of the CPU temperature. CPU Fan Max. Chapter 3 ASUS H87-PRO 3-37 The values range from 20% to adjust the minimum CPU fan duty cycle.

H87-PRO User's Manual
Page 93
... Fan Speed Low Limit [600 RPM] Allows you to disable or set the Chassis1/2/3 Fan Profile items to 100%. The values range from 60% to [Manual]. Duty Cycle(%) [60] Use the and keys to adjust the maximum chassis fan duty cycle. Duty Cycle(%) [100] Use the and keys to adjust ... on the CPU temperature. [Silent] Set to minimize the fan speed for quiet CPU fan operation. [Turbo] Set to achieve maximum CPU fan speed. [Manual] Set to 100%. Chassis1/2/3 Upper Temperature [70] Use the and keys to enable or disable the Anti Surge function. The values range from 60% to...
... Fan Speed Low Limit [600 RPM] Allows you to disable or set the Chassis1/2/3 Fan Profile items to 100%. The values range from 60% to [Manual]. Duty Cycle(%) [60] Use the and keys to adjust the maximum chassis fan duty cycle. Duty Cycle(%) [100] Use the and keys to adjust ... on the CPU temperature. [Silent] Set to minimize the fan speed for quiet CPU fan operation. [Turbo] Set to achieve maximum CPU fan speed. [Manual] Set to 100%. Chassis1/2/3 Upper Temperature [70] Use the and keys to enable or disable the Anti Surge function. The values range from 60% to...
H87-PRO User's Manual
Page 104
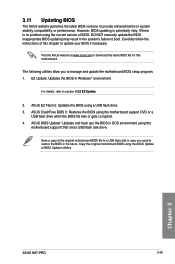
...manually update the BIOS. Inappropriate BIOS updating may result in the future. EZ Update: Updates the BIOS in DOS environment using the ASUS Update or BIOS Updater utilities. Copy the original motherboard BIOS using the motherboard support DVD and a USB flash disk drive. Chapter 3 ASUS H87-PRO 3-49 ASUS... BIOS Updater: Updates and back ups the BIOS in Windows® environment. 3.11 Updating BIOS The ASUS website publishes the latest BIOS versions to boot. Visit the ASUS website at www.asus.com to section 4.3.9 EZ ...
...manually update the BIOS. Inappropriate BIOS updating may result in the future. EZ Update: Updates the BIOS in DOS environment using the ASUS Update or BIOS Updater utilities. Copy the original motherboard BIOS using the motherboard support DVD and a USB flash disk drive. Chapter 3 ASUS H87-PRO 3-49 ASUS... BIOS Updater: Updates and back ups the BIOS in Windows® environment. 3.11 Updating BIOS The ASUS website publishes the latest BIOS versions to boot. Visit the ASUS website at www.asus.com to section 4.3.9 EZ ...


