User Guide
Page 3
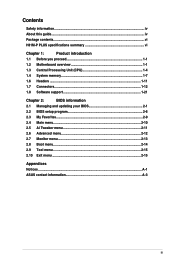
Contents Safety information...iv About this guide...iv Package contents...vi H81M-P PLUS specifications summary vi Chapter 1: Product introduction 1.1 Before you proceed 1-1 1.2 Motherboard overview 1-1 1.3 Central Processing Unit (CPU 1-4 1.4 System memory 1-7 1.6 Headers...1-11 1.7 Connectors 1-12 1.8 Software support 1-21 Chapter 2: ... 2-9 2.4 Main menu...2-10 2.5 Ai Tweaker menu 2-11 2.6 Advanced menu 2-12 2.7 Monitor menu 2-13 2.8 Boot menu...2-14 2.9 Tool menu...2-15 2.10 Exit menu...2-15 Appendices Notices...A-1 ASUS contact information A-3 iii
Contents Safety information...iv About this guide...iv Package contents...vi H81M-P PLUS specifications summary vi Chapter 1: Product introduction 1.1 Before you proceed 1-1 1.2 Motherboard overview 1-1 1.3 Central Processing Unit (CPU 1-4 1.4 System memory 1-7 1.6 Headers...1-11 1.7 Connectors 1-12 1.8 Software support 1-21 Chapter 2: ... 2-9 2.4 Main menu...2-10 2.5 Ai Tweaker menu 2-11 2.6 Advanced menu 2-12 2.7 Monitor menu 2-13 2.8 Boot menu...2-14 2.9 Tool menu...2-15 2.10 Exit menu...2-15 Appendices Notices...A-1 ASUS contact information A-3 iii

User Guide
Page 6
... / 2560x1600@60Hz - Package contents Check your retailer. resolution up to 1920x1200@60Hz - Supports D-Sub with max. H81M-P PLUS specifications summary CPU Chipset Memory Graphics Expansion slots LGA1150 socket for the 4th Generation and New 4th Generation Intel® ... the physical characteristics of DDR3 1600MHz. Maximum shared memory of the above items is subject to www.asus.com for the following items. Motherboard Cables Accessories Application DVD Documentation ASUS H81M-P PLUS motherboard 2 x Serial ATA 6.0 Gb/s cables 1 x I/O Shield Support DVD User Guide If ...
... / 2560x1600@60Hz - Package contents Check your retailer. resolution up to 1920x1200@60Hz - Supports D-Sub with max. H81M-P PLUS specifications summary CPU Chipset Memory Graphics Expansion slots LGA1150 socket for the 4th Generation and New 4th Generation Intel® ... the physical characteristics of DDR3 1600MHz. Maximum shared memory of the above items is subject to www.asus.com for the following items. Motherboard Cables Accessories Application DVD Documentation ASUS H81M-P PLUS motherboard 2 x Serial ATA 6.0 Gb/s cables 1 x I/O Shield Support DVD User Guide If ...

User Guide
Page 9
... a grounded antistatic pad or in the bag that the ATX power supply is switched off or the power cord is detached from the power supply. ASUS H81M-P PLUS 1-1 Failure to do so may cause severe damage to do so can cause you physical injury and damage motherboard components. 1.2.1 Placement direction When installing the...
... a grounded antistatic pad or in the bag that the ATX power supply is switched off or the power cord is detached from the power supply. ASUS H81M-P PLUS 1-1 Failure to do so may cause severe damage to do so can cause you physical injury and damage motherboard components. 1.2.1 Placement direction When installing the...

User Guide
Page 13
1.3.1 Installing the CPU 1 2 3 A B 4 C 5 A B ASUS H81M-P PLUS 1-5
1.3.1 Installing the CPU 1 2 3 A B 4 C 5 A B ASUS H81M-P PLUS 1-5

User Guide
Page 15
DIMM_A1 DIMM_B1 H81M-P PLUS Channel Channel A Channel B Sockets DIMM_A1 DIMM_B1 H81M-P PLUS 240-pin DDR3 DIMM sockets ASUS H81M-P PLUS 1-7 According to Intel® CPU spec, DIMM voltage below 1.65V is notched differently from a DDR or DDR2 module. DO NOT install a DDR or DDR2 memory module to protect the CPU. To uninstall the CPU heatsink and fan assembly 1 2 A B B A 1.4 System memory 1.4.1 Overview This motherboard comes with two Double Data Rate 3 (DDR3) Dual Inline Memory Module (DIMM) sockets. A DDR3 module is recommended to the DDR3 slot.
DIMM_A1 DIMM_B1 H81M-P PLUS Channel Channel A Channel B Sockets DIMM_A1 DIMM_B1 H81M-P PLUS 240-pin DDR3 DIMM sockets ASUS H81M-P PLUS 1-7 According to Intel® CPU spec, DIMM voltage below 1.65V is notched differently from a DDR or DDR2 module. DO NOT install a DDR or DDR2 memory module to protect the CPU. To uninstall the CPU heatsink and fan assembly 1 2 A B B A 1.4 System memory 1.4.1 Overview This motherboard comes with two Double Data Rate 3 (DDR3) Dual Inline Memory Module (DIMM) sockets. A DDR3 module is recommended to the DDR3 slot.

User Guide
Page 17
1.4.3 Installing a DIMM 1 2 3 To remove a DIMM B A ASUS H81M-P PLUS 1-9
1.4.3 Installing a DIMM 1 2 3 To remove a DIMM B A ASUS H81M-P PLUS 1-9

User Guide
Page 19
... header allows you to overclocking. For system failure due to short the two pins. 3. ASUS H81M-P PLUS 1-11 Turn OFF the computer and unplug the power cord. 2. Use a metal object such as system passwords. +3V_BAT GND H81M-P PLUS CLRTC PIN 1 H81M-P PLUS Clear RTC RAM To erase the RTC RAM: 1. The onboard button cell battery powers the...
... header allows you to overclocking. For system failure due to short the two pins. 3. ASUS H81M-P PLUS 1-11 Turn OFF the computer and unplug the power cord. 2. Use a metal object such as system passwords. +3V_BAT GND H81M-P PLUS CLRTC PIN 1 H81M-P PLUS Clear RTC RAM To erase the RTC RAM: 1. The onboard button cell battery powers the...

User Guide
Page 21
... 3.0 devices to the 7.1-channel configuration in the table. 7. Side Speaker Out For an 7.1-channel speaker setup, refer to USB 3.0 ports for any DVI-D compatible device. ASUS H81M-P PLUS 1-13 USB 2.0 ports 3 and 4. HDMI port. This port is for a High-Definition Multimedia Interface (HDMI), and is for faster and better performance from your USB...
... 3.0 devices to the 7.1-channel configuration in the table. 7. Side Speaker Out For an 7.1-channel speaker setup, refer to USB 3.0 ports for any DVI-D compatible device. ASUS H81M-P PLUS 1-13 USB 2.0 ports 3 and 4. HDMI port. This port is for a High-Definition Multimedia Interface (HDMI), and is for faster and better performance from your USB...

User Guide
Page 23
... each cable matches the ground pin of maximum 1A (12 W) fan power. Only the 4-pin CPU fan and chassis fan support the ASUS Fan Xpert feature. ASUS H81M-P PLUS 1-15 CPU and chassis fan connectors (4-pin CPU_FAN, 4-pin CHA_FAN) Connect the fan cables to the fan connectors. CPU_FAN CPU FAN PWM... CPU FAN IN CPU FAN PWR GND H81M-P PLUS CHA_FAN +5V CHA FAN IN CHA FAN PWR GND H81M-P PLUS Fan connectors Do not forget to ...
... each cable matches the ground pin of maximum 1A (12 W) fan power. Only the 4-pin CPU fan and chassis fan support the ASUS Fan Xpert feature. ASUS H81M-P PLUS 1-15 CPU and chassis fan connectors (4-pin CPU_FAN, 4-pin CHA_FAN) Connect the fan cables to the fan connectors. CPU_FAN CPU FAN PWM... CPU FAN IN CPU FAN PWR GND H81M-P PLUS CHA_FAN +5V CHA FAN IN CHA FAN PWR GND H81M-P PLUS Fan connectors Do not forget to ...

User Guide
Page 25
... about the minimum power supply requirement for the chassis-mounted system warning speaker. ATX12V EATXPWR +12V DC +12V DC H81M-P PLUS GND GND +3 Volts +12 Volts +12 Volts +5V Standby Power OK PIN 1 GND +5 Volts GND +5 Volts GND +3 Volts +3 Volts PIN... Volts +3 Volts • We recommend that you intend to hear system beeps and warnings. +5V GND GND Speaker Out SPEAKER H81M-P PLUS PIN 1 H81M-P PLUS Speaker Out connector ASUS H81M-P PLUS 1-17 com/PowerSupplyCalculator/PSCalculator.aspx?SLanguage=en-us for ATX power supply plugs. 6. This PSU type has 24-pin and 4-pin...
... about the minimum power supply requirement for the chassis-mounted system warning speaker. ATX12V EATXPWR +12V DC +12V DC H81M-P PLUS GND GND +3 Volts +12 Volts +12 Volts +5V Standby Power OK PIN 1 GND +5 Volts GND +5 Volts GND +3 Volts +3 Volts PIN... Volts +3 Volts • We recommend that you intend to hear system beeps and warnings. +5V GND GND Speaker Out SPEAKER H81M-P PLUS PIN 1 H81M-P PLUS Speaker Out connector ASUS H81M-P PLUS 1-17 com/PowerSupplyCalculator/PSCalculator.aspx?SLanguage=en-us for ATX power supply plugs. 6. This PSU type has 24-pin and 4-pin...

User Guide
Page 27
... then generated as a chassis intrusion event. F_CLKRUN F_SERIRQ F_FRAME# F_LAD3 F_LAD2 F_LAD1 F_LAD0 +3VSB S_PCIRST#_TBD GND C_PCICLK_TPM +3V +3V ASUS H81M-P PLUS 1-19 By default, the pin labeled "Chassis Signal" and "Ground" are shorted with a jumper cap. Remove the jumper caps... only when you intend to this connector. +5VSB_MB Chassis Signal GND 10. CHASSIS H81M-P PLUS PIN 1 H81M-P PLUS Chassis intrusion connector 11. Chassis intrusion connector (4-1 pin CHASSIS) This connector is removed or replaced. A TPM system also helps enhance...
... then generated as a chassis intrusion event. F_CLKRUN F_SERIRQ F_FRAME# F_LAD3 F_LAD2 F_LAD1 F_LAD0 +3VSB S_PCIRST#_TBD GND C_PCICLK_TPM +3V +3V ASUS H81M-P PLUS 1-19 By default, the pin labeled "Chassis Signal" and "Ground" are shorted with a jumper cap. Remove the jumper caps... only when you intend to this connector. +5VSB_MB Chassis Signal GND 10. CHASSIS H81M-P PLUS PIN 1 H81M-P PLUS Chassis intrusion connector 11. Chassis intrusion connector (4-1 pin CHASSIS) This connector is removed or replaced. A TPM system also helps enhance...

User Guide
Page 29
...of the Support DVD to display their respective menus. Motherboard settings and hardware options vary. Visit the ASUS website at any time without notice. To run the DVD. Double-click the ASSETUP.EXE to install ...The Support DVD that comes with the motherboard package contains the drivers, software applications, and utilities that you can install to your ASUS motherboard. 1.8 Software support 1.8.1 Installing an operating system This motherboard supports Windows® 7 (32bit/64bit) , Windows® 8... contents of your OS documentation for reference only. ASUS H81M-P PLUS 1-21
...of the Support DVD to display their respective menus. Motherboard settings and hardware options vary. Visit the ASUS website at any time without notice. To run the DVD. Double-click the ASSETUP.EXE to install ...The Support DVD that comes with the motherboard package contains the drivers, software applications, and utilities that you can install to your ASUS motherboard. 1.8 Software support 1.8.1 Installing an operating system This motherboard supports Windows® 7 (32bit/64bit) , Windows® 8... contents of your OS documentation for reference only. ASUS H81M-P PLUS 1-21

User Guide
Page 31
... select a boot logo when the system goes into POST. With this utlity, you to automatically update your motherboard's softwares, drivers and the BIOS version easily. ASUS H81M-P PLUS 2-1 BIOS information 2.1 Managing and updating your motherboard's driver, software and firmware Click to find and select the BIOS from file Click to select a boot logo...
... select a boot logo when the system goes into POST. With this utlity, you to automatically update your motherboard's softwares, drivers and the BIOS version easily. ASUS H81M-P PLUS 2-1 BIOS information 2.1 Managing and updating your motherboard's driver, software and firmware Click to find and select the BIOS from file Click to select a boot logo...

User Guide
Page 33
...and stability, we recommend that your USB flash drive is not supported under FreeDOS environment. You can cause system boot failure! 2.1.4 ASUS BIOS Updater ASUS BIOS Updater allows you press to restore the BIOS file when it fails or gets corrupted during the updating process. Download the ...BIOS: 1. The utility automatically checks the devices for reference only and may not be exactly the same as actually shown on the system. 2. ASUS H81M-P PLUS 2-3 Insert the support DVD to the optical drive or the USB flash drive that contains the updated BIOS file. • Before using this...
...and stability, we recommend that your USB flash drive is not supported under FreeDOS environment. You can cause system boot failure! 2.1.4 ASUS BIOS Updater ASUS BIOS Updater allows you press to restore the BIOS file when it fails or gets corrupted during the updating process. Download the ...BIOS: 1. The utility automatically checks the devices for reference only and may not be exactly the same as actually shown on the system. 2. ASUS H81M-P PLUS 2-3 Insert the support DVD to the optical drive or the USB flash drive that contains the updated BIOS file. • Before using this...

User Guide
Page 35
When BIOS update is not supported due to security regulations. 5. Select the Load Optimized Defaults item under the Exit BIOS menu. ASUS H81M-P PLUS 2-5 Are you sure you want to select the BIOS file and press . 4. Select Yes then press . Drives panel ASUSTeK BIOS Updater for details. ... to Files panel then press keys to update the BIOS? Restart your motherboard user guide for DOS V1.30 [2014/01/01] Current ROM BOARD: H81M-P PLUS VER: 0302 (H :00 B :00) DATE: 07/15/2014 PATH: C:\ Update ROM BOARD: Unknown VER: Unknown DATE: Unknown C: FORMAN~1 D: H81MPP.CAP 8390656 2014-07...
When BIOS update is not supported due to security regulations. 5. Select the Load Optimized Defaults item under the Exit BIOS menu. ASUS H81M-P PLUS 2-5 Are you sure you want to select the BIOS file and press . 4. Select Yes then press . Drives panel ASUSTeK BIOS Updater for details. ... to Files panel then press keys to update the BIOS? Restart your motherboard user guide for DOS V1.30 [2014/01/01] Current ROM BOARD: H81M-P PLUS VER: 0302 (H :00 B :00) DATE: 07/15/2014 PATH: C:\ Update ROM BOARD: Unknown VER: Unknown DATE: Unknown C: FORMAN~1 D: H81MPP.CAP 8390656 2014-07...

User Guide
Page 37
... setup program without saving the changes, saves the changes and resets the system, or enters the Advanced Mode Power Saving mode Selects the boot device ASUS Optimal mode Loads optimized default Selects the priority Displays the system properties Advanced mode Normal mode of the basic system information, and allows you installed... vary depending on the devices you to the system. EZ Mode By default, the EZ Mode screen appears when you enter the BIOS setup program. ASUS H81M-P PLUS 2-7 The default screen for the advanced BIOS setting.
... setup program without saving the changes, saves the changes and resets the system, or enters the Advanced Mode Power Saving mode Selects the boot device ASUS Optimal mode Loads optimized default Selects the priority Displays the system properties Advanced mode Normal mode of the basic system information, and allows you installed... vary depending on the devices you to the system. EZ Mode By default, the EZ Mode screen appears when you enter the BIOS setup program. ASUS H81M-P PLUS 2-7 The default screen for the advanced BIOS setting.
User Guide
Page 39
... submenu options • User-configurable items such as language and boot device order • Configuration items such as Memory SPD Information, system time and date ASUS H81M-P PLUS 2-9
... submenu options • User-configurable items such as language and boot device order • Configuration items such as Memory SPD Information, system time and date ASUS H81M-P PLUS 2-9

User Guide
Page 41
The configuration options for this section vary depending on the motherboard. Scroll down to malfunction. 2.5 Ai Tweaker menu The Ai Tweaker menu items allow you installed on the CPU and DIMM model you to configure overclocking-related items. Be cautious when changing the settings of the Ai Tweaker menu items. Incorrect field values can cause the system to display the following items: ASUS H81M-P PLUS 2-11
The configuration options for this section vary depending on the motherboard. Scroll down to malfunction. 2.5 Ai Tweaker menu The Ai Tweaker menu items allow you installed on the CPU and DIMM model you to configure overclocking-related items. Be cautious when changing the settings of the Ai Tweaker menu items. Incorrect field values can cause the system to display the following items: ASUS H81M-P PLUS 2-11

User Guide
Page 43
2.7 Monitor menu The Monitor menu displays the system temperature/power status, and allows you to display the following items: ASUS H81M-P PLUS 2-13 Scroll down to change the fan settings.
2.7 Monitor menu The Monitor menu displays the system temperature/power status, and allows you to display the following items: ASUS H81M-P PLUS 2-13 Scroll down to change the fan settings.
User Guide
Page 45
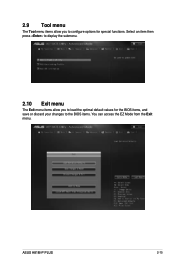
ASUS H81M-P PLUS 2-15 Select an item then press to display the submenu. 2.10 Exit menu The Exit menu items allow you to load the optimal default values for the BIOS items, and save or discard your changes to configure options for special functions. 2.9 Tool menu The Tool menu items allow you to the BIOS items. You can access the EZ Mode from the Exit menu.
ASUS H81M-P PLUS 2-15 Select an item then press to display the submenu. 2.10 Exit menu The Exit menu items allow you to load the optimal default values for the BIOS items, and save or discard your changes to configure options for special functions. 2.9 Tool menu The Tool menu items allow you to the BIOS items. You can access the EZ Mode from the Exit menu.

