H81M-K User's Manual
Page 3
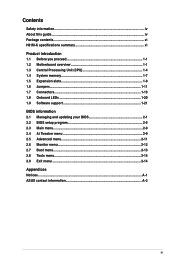
... information...iv About this guide...iv Package contents...vi H81M-K specifications summary vi Product introduction 1.1 Before you proceed 1-1 1.2 Motherboard overview 1-1 1.3 Central Processing Unit (CPU 1-4 1.4 System memory 1-7 1.5 Expansion slots 1-9 1.6 Jumpers...1-11 1.7 Connectors 1-13 1.8 Onboard LEDs 1-20 1.9 Software support 1-21 BIOS information 2.1 Managing and updating your BIOS 2-1 2.2 BIOS setup program 2-5 2.3 Main menu...2-9 2.4 Ai Tweaker menu 2-9 2.5 Advanced...
... information...iv About this guide...iv Package contents...vi H81M-K specifications summary vi Product introduction 1.1 Before you proceed 1-1 1.2 Motherboard overview 1-1 1.3 Central Processing Unit (CPU 1-4 1.4 System memory 1-7 1.5 Expansion slots 1-9 1.6 Jumpers...1-11 1.7 Connectors 1-13 1.8 Onboard LEDs 1-20 1.9 Software support 1-21 BIOS information 2.1 Managing and updating your BIOS 2-1 2.2 BIOS setup program 2-5 2.3 Main menu...2-9 2.4 Ai Tweaker menu 2-9 2.5 Advanced...

H81M-K User's Manual
Page 4
... area where it may become wet. • Place the product on it supports. • Chapter 2: BIOS information This chapter tells how to change system settings through the BIOS Setup menus. Do not place the product in your area. How this guide This user guide contains the information...your power supply is organized This guide contains the following parts: • Chapter 1: Product introduction This chapter describes the features of the BIOS parameters are using an adapter or extension cord. iv If possible, disconnect all the manuals that the power cables for the devices are ...
... area where it may become wet. • Place the product on it supports. • Chapter 2: BIOS information This chapter tells how to change system settings through the BIOS Setup menus. Do not place the product in your area. How this guide This user guide contains the information...your power supply is organized This guide contains the following parts: • Chapter 1: Product introduction This chapter describes the features of the BIOS parameters are using an adapter or extension cord. iv If possible, disconnect all the manuals that the power cables for the devices are ...
H81M-K User's Manual
Page 6
...® Extreme Memory Profile (XMP) * Hyper DIMM support is damaged or missing, contact your motherboard package for the following items. Motherboard ASUS H81M-K motherboard Cables 2 x Serial ATA 6.0 Gb/s cables Accessories 1 x I/O Shield Application DVD Support DVD Documentation User Guide If any of... the above items is subject to the limitation of the Intel® H81 chipset, Intel® Rapid Start Technology can be configured only from the BIOS Setup program. ** These functions will run at x16 mode, yellow) 2 x PCI Express x1 slots Intel® H81 Express Chipset: - 2 x ...
...® Extreme Memory Profile (XMP) * Hyper DIMM support is damaged or missing, contact your motherboard package for the following items. Motherboard ASUS H81M-K motherboard Cables 2 x Serial ATA 6.0 Gb/s cables Accessories 1 x I/O Shield Application DVD Support DVD Documentation User Guide If any of... the above items is subject to the limitation of the Intel® H81 chipset, Intel® Rapid Start Technology can be configured only from the BIOS Setup program. ** These functions will run at x16 mode, yellow) 2 x PCI Express x1 slots Intel® H81 Express Chipset: - 2 x ...
H81M-K User's Manual
Page 7
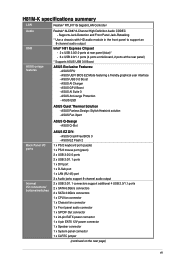
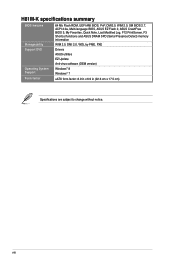
... 1 x System panel connector 1 x CLRTC jumper (continued on the next page) vii ASUS EPU - ASUS Anti-surge Protection - ASUS UEFI BIOS EZ Mode featuring a friendly graphical user interface - ASUS AI Charger - ASUS GPU Boost - ASUS CrashFree BIOS 3 - H81M-K specifications summary LAN Realtek® RTL8111G Gigabit LAN Controller Audio USB ASUS unique features Realtek® ALC887 8-Channel High Definition Audio CODEC - Supports...
... 1 x System panel connector 1 x CLRTC jumper (continued on the next page) vii ASUS EPU - ASUS Anti-surge Protection - ASUS UEFI BIOS EZ Mode featuring a friendly graphical user interface - ASUS AI Charger - ASUS GPU Boost - ASUS CrashFree BIOS 3 - H81M-K specifications summary LAN Realtek® RTL8111G Gigabit LAN Controller Audio USB ASUS unique features Realtek® ALC887 8-Channel High Definition Audio CODEC - Supports...
H81M-K User's Manual
Page 8
viii H81M-K specifications summary BIOS features Manageability Support DVD Operating System Support Form factor 64 Mb Flash ROM, UEFI AMI BIOS, PnP, DMI2.0, WfM 2.0, SM BIOS 2.7, ACPI 2.0a, Multi-language BIOS, ASUS EZ Flash 2, ASUS CrashFree BIOS 3, My Favorites, Quick Note, Last Modified Log, F12 PrintScreen, F3 Shortcut functions and ASUS DRAM SPD (Serial Presence Detect) memory information WfM 2.0, DMI...
viii H81M-K specifications summary BIOS features Manageability Support DVD Operating System Support Form factor 64 Mb Flash ROM, UEFI AMI BIOS, PnP, DMI2.0, WfM 2.0, SM BIOS 2.7, ACPI 2.0a, Multi-language BIOS, ASUS EZ Flash 2, ASUS CrashFree BIOS 3, My Favorites, Quick Note, Last Modified Log, F12 PrintScreen, F3 Shortcut functions and ASUS DRAM SPD (Serial Presence Detect) memory information WfM 2.0, DMI...
H81M-K User's Manual
Page 11
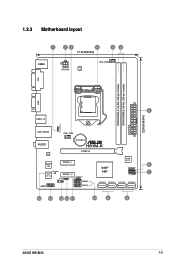
VD2 PCIEX1_2 USBPW5-10 H81 7 F_PANEL CLRTC SPDIF_OUT USB56 SATA3G_1 SATA3G_2 SATA6G_1 SATA6G_2 AAFP USB78 15 14 13 12 11 10 9 8 ASUS H81M-K 1-3 1.2.3 Motherboard layout 1 23 4 17.5cm(6.9in) 35 KBMS ASP ATX12V 1225 CPU_FAN DVI DDR3 DIMM_A1 (64bit, 240-pin module) DDR3 DIMM_B1 (64bit, 240-pin module) EATXPWR 22.6cm(8.9in) VGA LGA1150 2 USB3_12 PS2_USBPW1-4 LAN_USB34 CHA_FAN AUDIO BATTERY H81M-K RTL 8111G PCIEX16 Super I/O PCIEX1_1 Intel® 64Mb BIOS 6 SPEAKER SB_PWR ALC 887-
VD2 PCIEX1_2 USBPW5-10 H81 7 F_PANEL CLRTC SPDIF_OUT USB56 SATA3G_1 SATA3G_2 SATA6G_1 SATA6G_2 AAFP USB78 15 14 13 12 11 10 9 8 ASUS H81M-K 1-3 1.2.3 Motherboard layout 1 23 4 17.5cm(6.9in) 35 KBMS ASP ATX12V 1225 CPU_FAN DVI DDR3 DIMM_A1 (64bit, 240-pin module) DDR3 DIMM_B1 (64bit, 240-pin module) EATXPWR 22.6cm(8.9in) VGA LGA1150 2 USB3_12 PS2_USBPW1-4 LAN_USB34 CHA_FAN AUDIO BATTERY H81M-K RTL 8111G PCIEX16 Super I/O PCIEX1_1 Intel® 64Mb BIOS 6 SPEAKER SB_PWR ALC 887-
H81M-K User's Manual
Page 18
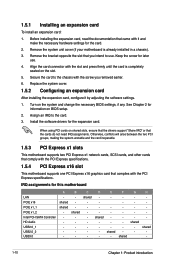
... This motherboard supports one PCI Express x16 graphics card that you removed earlier. 6. B shared - shared - shared - 1-10 Chapter 1: Product introduction When using PCI cards on BIOS setup. 2. F shared G shared - Secure the card to the chassis with the PCI Express specifications. See Chapter 2 for the expansion card. Remove the bracket opposite the... need IRQ assignments. Turn on the slot. 5. Remove the system unit cover (if your motherboard is completely seated on the system and change the necessary BIOS settings, if any.
... This motherboard supports one PCI Express x16 graphics card that you removed earlier. 6. B shared - shared - shared - 1-10 Chapter 1: Product introduction When using PCI cards on BIOS setup. 2. F shared G shared - Secure the card to the chassis with the PCI Express specifications. See Chapter 2 for the expansion card. Remove the bracket opposite the... need IRQ assignments. Turn on the slot. 5. Remove the system unit cover (if your motherboard is completely seated on the system and change the necessary BIOS settings, if any.
H81M-K User's Manual
Page 19
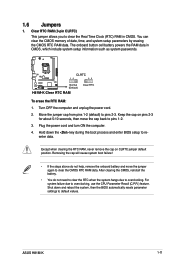
... the RTC RAM: 1. The onboard button cell battery powers the RAM data in CMOS. Hold down and reboot the system, then the BIOS automatically resets parameter settings to reenter data. ASUS H81M-K 1-11 1.6 Jumpers 1. Removing the cap will cause system boot failure! • If the steps above do not need to clear the...
... the RTC RAM: 1. The onboard button cell battery powers the RAM data in CMOS. Hold down and reboot the system, then the BIOS automatically resets parameter settings to reenter data. ASUS H81M-K 1-11 1.6 Jumpers 1. Removing the cap will cause system boot failure! • If the steps above do not need to clear the...
H81M-K User's Manual
Page 20
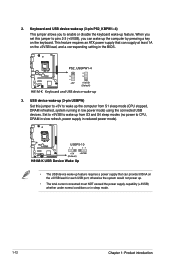
...-10 12 23 +5V +5VSB (Default) H81M-K USB Device Wake Up • The USB device wake-up (3-pin PS2_KBPW1~4) This jumper allows you to pins 2-3 (+5VSB), you set this jumper to +5V to CPU, DRAM in slow refresh, power supply in the BIOS. otherwise the system would not power up 3. ...This feature requires an ATX power supply that can supply at least 1A on the +5VSB lead for each USB port; PS2_USBPW1-4 12 23 H81M-K +5V +5VSB (Default) H81M-K Keyboard and USB device wake-up . • The total current consumed must NOT exceed the power supply capability (+5VSB) whether under ...
...-10 12 23 +5V +5VSB (Default) H81M-K USB Device Wake Up • The USB device wake-up (3-pin PS2_KBPW1~4) This jumper allows you to pins 2-3 (+5VSB), you set this jumper to +5V to CPU, DRAM in slow refresh, power supply in the BIOS. otherwise the system would not power up 3. ...This feature requires an ATX power supply that can supply at least 1A on the +5VSB lead for each USB port; PS2_USBPW1-4 12 23 H81M-K +5V +5VSB (Default) H81M-K Keyboard and USB device wake-up . • The total current consumed must NOT exceed the power supply capability (+5VSB) whether under ...
H81M-K User's Manual
Page 23
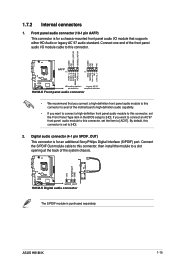
...; If you want to connect a high-definition front panel audio module to [HD]. 2. ASUS H81M-K 1-15 Front panel audio connector (10-1 pin AAFP) This connector is set the item ...Line out_L PORT1 L PORT1 R PORT2 R SENSE_SEND PORT2 L H81M-K HD-audio-compliant Legacy AC'97 pin definition compliant definition H81M-K Front panel audio connector • We recommend that supports ...panel audio module to this connector to avail of the system chassis. +5V SPDIFOUT GND H81M-K SPDIF_OUT H81M-K Digital audio connector The S/PDIF module is for a chassis-mounted front panel audio ...
...; If you want to connect a high-definition front panel audio module to [HD]. 2. ASUS H81M-K 1-15 Front panel audio connector (10-1 pin AAFP) This connector is set the item ...Line out_L PORT1 L PORT1 R PORT2 R SENSE_SEND PORT2 L H81M-K HD-audio-compliant Legacy AC'97 pin definition compliant definition H81M-K Front panel audio connector • We recommend that supports ...panel audio module to this connector to avail of the system chassis. +5V SPDIFOUT GND H81M-K SPDIF_OUT H81M-K Digital audio connector The S/PDIF module is for a chassis-mounted front panel audio ...
H81M-K User's Manual
Page 26
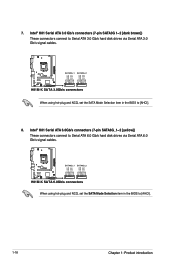
... GND RSATA_RXP1 RSATA_RXN1 GND RSATA_TXN1 RSATA_TXP1 GND GND RSATA_RXP2 RSATA_RXN2 GND RSATA_TXN2 RSATA_TXP2 GND H81M-K SATA 6.0Gb/s connectors When using hot-plug and NCQ, set the SATA Mode Selection item in the BIOS to Serial ATA 6.0 Gb/s hard disk drives via Serial ATA 3.0 Gb/s ...signal cables. Intel® H81 Serial ATA 6.0Gb/s connectors (7-pin SATA6G_1~2 [yellow]) These connectors connect to [AHCI]. 8. H81M-K SATA3G_1 SATA3G_2 GND RSATA_RXP1 RSATA_RXN1 GND RSATA_TXN1...
... GND RSATA_RXP1 RSATA_RXN1 GND RSATA_TXN1 RSATA_TXP1 GND GND RSATA_RXP2 RSATA_RXN2 GND RSATA_TXN2 RSATA_TXP2 GND H81M-K SATA 6.0Gb/s connectors When using hot-plug and NCQ, set the SATA Mode Selection item in the BIOS to Serial ATA 6.0 Gb/s hard disk drives via Serial ATA 3.0 Gb/s ...signal cables. Intel® H81 Serial ATA 6.0Gb/s connectors (7-pin SATA6G_1~2 [yellow]) These connectors connect to [AHCI]. 8. H81M-K SATA3G_1 SATA3G_2 GND RSATA_RXP1 RSATA_RXN1 GND RSATA_TXN1...
H81M-K User's Manual
Page 31
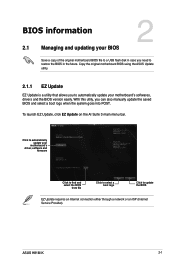
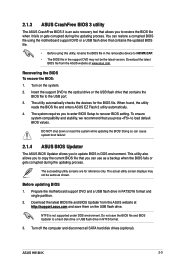
... select a boot logo when the system goes into POST. ASUS H81M-K 2-1 BIOS information 2.1 Managing and updating your motherboard's softwares, drivers and the BIOS version easily. Copy the original motherboard BIOS using the ASUS Update utility. 2.1.1 EZ Update EZ Update is a utility that allows you to update the BIOS EZ Update requires an Internet connection either through a network...
... select a boot logo when the system goes into POST. ASUS H81M-K 2-1 BIOS information 2.1 Managing and updating your motherboard's softwares, drivers and the BIOS version easily. Copy the original motherboard BIOS using the ASUS Update utility. 2.1.1 EZ Update EZ Update is a utility that allows you to update the BIOS EZ Update requires an Internet connection either through a network...

H81M-K User's Manual
Page 32
...the Up/Down arrow keys to find the BIOS file, and then press to ensure system compatibility and stability. 2.1.2 ASUS EZ Flash 2 The ASUS EZ Flash 2 feature allows you start using this utility, download the latest BIOS file from the ASUS website at www.asus.com. Select the Load Optimized Defaults item under... the Exit menu. . • DO NOT shut down or reset the system while updating the BIOS to enable it. 3. Insert the USB flash ...
...the Up/Down arrow keys to find the BIOS file, and then press to ensure system compatibility and stability. 2.1.2 ASUS EZ Flash 2 The ASUS EZ Flash 2 feature allows you start using this utility, download the latest BIOS file from the ASUS website at www.asus.com. Select the Load Optimized Defaults item under... the Exit menu. . • DO NOT shut down or reset the system while updating the BIOS to enable it. 3. Insert the USB flash ...
H81M-K User's Manual
Page 33
... disk drives (optional). ASUS H81M-K 2-3 Doing so can cause system boot failure! 2.1.4 ASUS BIOS Updater The ASUS BIOS Updater allows you press to update BIOS in the support DVD may not be the latest version. Download the latest BIOS file and BIOS Updater from the ASUS website at http://support.asus.com and save the BIOS file and BIOS Updater to H81MK.CAP...
... disk drives (optional). ASUS H81M-K 2-3 Doing so can cause system boot failure! 2.1.4 ASUS BIOS Updater The ASUS BIOS Updater allows you press to update BIOS in the support DVD may not be the latest version. Download the latest BIOS file and BIOS Updater from the ASUS website at http://support.asus.com and save the BIOS file and BIOS Updater to H81MK.CAP...

H81M-K User's Manual
Page 34
...FreeDOS command prompt item by pressing the item number. 4. At the FreeDOS prompt, type bupdater /pc /g and press . 2. ASUSTek BIOS Updater for DOS V1.30 BOARD: H81M-K VER: 0209 DATE: 06/03/2013 H81MK.CAP 4194304 2013-06-07 17:30:48 2-4 Chapter 2: Getting started Boot your ...into the optical drive and select the optical drive as below. When the ASUS Logo appears, press to show the BIOS Boot Device Select Menu. Booting the system in DOS environment 1. Updating the BIOS file To update the BIOS file using BIOS Updater: 1. The BIOS Updater screen appears as the boot device. 3.
...FreeDOS command prompt item by pressing the item number. 4. At the FreeDOS prompt, type bupdater /pc /g and press . 2. ASUSTek BIOS Updater for DOS V1.30 BOARD: H81M-K VER: 0209 DATE: 06/03/2013 H81MK.CAP 4194304 2013-06-07 17:30:48 2-4 Chapter 2: Getting started Boot your ...into the optical drive and select the optical drive as below. When the ASUS Logo appears, press to show the BIOS Boot Device Select Menu. Booting the system in DOS environment 1. Updating the BIOS file To update the BIOS file using BIOS Updater: 1. The BIOS Updater screen appears as the boot device. 3.
H81M-K User's Manual
Page 35
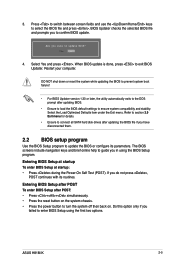
... not press , POST continues with its parameters. ASUS H81M-K 2-5 Entering BIOS Setup after POST To enter BIOS Setup after POST: • Press ++ simultaneously. • Press the reset button on . Entering BIOS Setup at startup To enter BIOS Setup at startup: • Press during the ...screen fields and use the keys to ensure system compatibility and stability. BIOS Updater checks the selected BIOS file and prompts you have disconnected them. 2.2 BIOS setup program Use the BIOS Setup program to confirm BIOS update. 4. Restart your computer. Refer to section 2.9 Exit menu ...
... not press , POST continues with its parameters. ASUS H81M-K 2-5 Entering BIOS Setup after POST To enter BIOS Setup after POST: • Press ++ simultaneously. • Press the reset button on . Entering BIOS Setup at startup To enter BIOS Setup at startup: • Press during the ...screen fields and use the keys to ensure system compatibility and stability. BIOS Updater checks the selected BIOS file and prompts you have disconnected them. 2.2 BIOS setup program Use the BIOS Setup program to confirm BIOS update. 4. Restart your computer. Refer to section 2.9 Exit menu ...
H81M-K User's Manual
Page 36
... screens shown in the EZ Mode/Advanced Mode screen. See section 1.6 Jumpers for information on your screen. • Visit the ASUS website at www.asus.com to download the latest BIOS file for this motherboard. • Ensure that a USB mouse is connected to your data or system. You can change modes from the...
... screens shown in the EZ Mode/Advanced Mode screen. See section 1.6 Jumpers for information on your screen. • Visit the ASUS website at www.asus.com to download the latest BIOS file for this motherboard. • Ensure that a USB mouse is connected to your data or system. You can change modes from the...
H81M-K User's Manual
Page 37
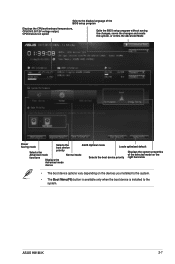
ASUS H81M-K 2-7 Selects the display language of the BIOS setup program Displays the CPU/motherboard temperature, CPU/5V/3.3V/12V voltage output, CPU/chassis fan speed Exits the BIOS setup program without saving the changes, saves the changes and resets the system, or enters the Advanced Mode Power Saving mode Selects the boot device ASUS Optimal...
ASUS H81M-K 2-7 Selects the display language of the BIOS setup program Displays the CPU/motherboard temperature, CPU/5V/3.3V/12V voltage output, CPU/chassis fan speed Exits the BIOS setup program without saving the changes, saves the changes and resets the system, or enters the Advanced Mode Power Saving mode Selects the boot device ASUS Optimal...

H81M-K User's Manual
Page 38
Refer to configure the BIOS settings. The figure below shows an example of the screen has the following sections for special functions For selecting the exit options and loading default ... the fan settings For changing the system boot configuration For configuring options for the detailed configurations. To access the EZ Mode, click Exit, then select ASUS EZ Mode.
Refer to configure the BIOS settings. The figure below shows an example of the screen has the following sections for special functions For selecting the exit options and loading default ... the fan settings For changing the system boot configuration For configuring options for the detailed configurations. To access the EZ Mode, click Exit, then select ASUS EZ Mode.
H81M-K User's Manual
Page 39
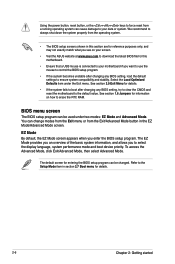
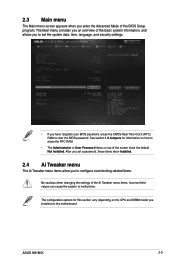
ASUS H81M-K 2-9 The Main menu provides you an overview of the basic system information, and allows you to set a password, these items show the default Not Installed. After you set the system date, time, language, and security settings. • If you have forgotten your BIOS password, erase the CMOS Real...the motherboard. See section 1.6 Jumpers for this section vary depending on the CPU and DIMM model you installed on how to clear the BIOS password. 2.3 Main menu The Main menu screen appears when you enter the Advanced Mode of the screen show Installed. 2.4 Ai Tweaker menu...
ASUS H81M-K 2-9 The Main menu provides you an overview of the basic system information, and allows you to set a password, these items show the default Not Installed. After you set the system date, time, language, and security settings. • If you have forgotten your BIOS password, erase the CMOS Real...the motherboard. See section 1.6 Jumpers for this section vary depending on the CPU and DIMM model you installed on how to clear the BIOS password. 2.3 Main menu The Main menu screen appears when you enter the Advanced Mode of the screen show Installed. 2.4 Ai Tweaker menu...


