
User Guide
Page 3
... iv About this guide iv Package contents vi H81M-CT specifications summary vi Chapter 1: Product introduction 1.1 Before you proceed 1-1 1.2 Motherboard overview 1-1 1.3 Central Processing Unit (CPU 1-3 1.4 System memory 1-7 1.5 Expansion slots 1-9 1.6 Jumpers 1-11 1.7 Connectors 1-12 1.8 Onboard LEDs 1-19 1.9 Software support 1-20 Chapter 2: BIOS information 2.1 Managing and updating your BIOS 2-1 2.2 BIOS setup program 2-6 2.3 My Favorites 2-9 2.4 Main menu 2-10 2.5 Ai...
... iv About this guide iv Package contents vi H81M-CT specifications summary vi Chapter 1: Product introduction 1.1 Before you proceed 1-1 1.2 Motherboard overview 1-1 1.3 Central Processing Unit (CPU 1-3 1.4 System memory 1-7 1.5 Expansion slots 1-9 1.6 Jumpers 1-11 1.7 Connectors 1-12 1.8 Onboard LEDs 1-19 1.9 Software support 1-20 Chapter 2: BIOS information 2.1 Managing and updating your BIOS 2-1 2.2 BIOS setup program 2-6 2.3 My Favorites 2-9 2.4 Main menu 2-10 2.5 Ai...
User Guide
Page 29
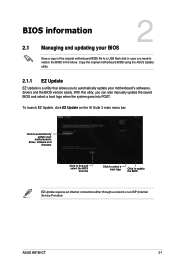
... or an ISP (Internet Service Provider). ASUS H81M-CT 2-1 Click to automatically update your motherboard's softwares, drivers and the BIOS version easily. To launch EZ Update, click EZ Update on the AI Suite 3 main menu bar. With this utlity, you need to restore the BIOS in the future. BIOS information 2.1 Managing and updating your BIOS 2 Save a copy of the original motherboard...
... or an ISP (Internet Service Provider). ASUS H81M-CT 2-1 Click to automatically update your motherboard's softwares, drivers and the BIOS version easily. To launch EZ Update, click EZ Update on the AI Suite 3 main menu bar. With this utlity, you need to restore the BIOS in the future. BIOS information 2.1 Managing and updating your BIOS 2 Save a copy of the original motherboard...
User Guide
Page 30
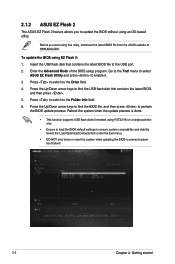
...16 on a single partition only. • Ensure to load the BIOS default settings to the Folder Info field. 6. Enter the Advanced Mode of the BIOS setup program. Go to the Tool menu to select ASUS EZ Flash Utility and press to perform the BIOS update process. Press the Up/Down arrow keys to find the... USB flash disk that contains the latest BIOS, and then press . 5. Press the Up/Down...
...16 on a single partition only. • Ensure to load the BIOS default settings to the Folder Info field. 6. Enter the Advanced Mode of the BIOS setup program. Go to the Tool menu to select ASUS EZ Flash Utility and press to perform the BIOS update process. Press the Up/Down arrow keys to find the... USB flash disk that contains the latest BIOS, and then press . 5. Press the Up/Down...
User Guide
Page 31
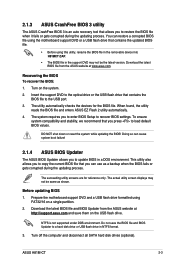
... formatted using FAT32/16 on the system. 2. ASUS H81M-CT 2-3 Download the latest BIOS file from the ASUS website at www.asus.com. Turn on a single partition. 2. The utility automatically checks the devices for reference only. Doing so can cause system boot failure! 2.1.4 ASUS BIOS Updater The ASUS BIOS Updater allows you to enter BIOS Setup to update BIOS in a DOS environment. NTFS is an...
... formatted using FAT32/16 on the system. 2. ASUS H81M-CT 2-3 Download the latest BIOS file from the ASUS website at www.asus.com. Turn on a single partition. 2. The utility automatically checks the devices for reference only. Doing so can cause system boot failure! 2.1.4 ASUS BIOS Updater The ASUS BIOS Updater allows you to enter BIOS Setup to update BIOS in a DOS environment. NTFS is an...
User Guide
Page 32
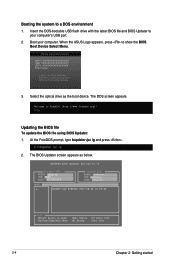
... the ASUS Logo appears, press to a DOS environment 1. At the FreeDOS prompt, type bupdater /pc /g and press . 2. Insert the DOS-bootable USB flash drive with the latest BIOS file and BIOS Updater to your computer. Select the optical drive as below. Updating the BIOS file To update the BIOS file using BIOS Updater: 1. ASUSTek BIOS Updater for DOS V1.30 H81M-CT 0803 03...
... the ASUS Logo appears, press to a DOS environment 1. At the FreeDOS prompt, type bupdater /pc /g and press . 2. Insert the DOS-bootable USB flash drive with the latest BIOS file and BIOS Updater to your computer. Select the optical drive as below. Updating the BIOS file To update the BIOS file using BIOS Updater: 1. ASUSTek BIOS Updater for DOS V1.30 H81M-CT 0803 03...
User Guide
Page 33
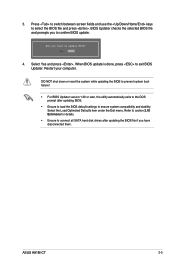
...; For BIOS Updater version 1.30 or later, the utility automatically exits to the DOS prompt after updating the BIOS file if you to ensure system compatibility and stability. Press to switch between screen fields and use the keys to select the BIOS file and press . Select the Load Optimized Defaults item under the Exit menu. ASUS H81M-CT 2-5 3.
...; For BIOS Updater version 1.30 or later, the utility automatically exits to the DOS prompt after updating the BIOS file if you to ensure system compatibility and stability. Press to switch between screen fields and use the keys to select the BIOS file and press . Select the Load Optimized Defaults item under the Exit menu. ASUS H81M-CT 2-5 3.
User Guide
Page 34
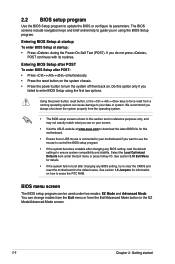
... program to erase the RTC RAM. Entering BIOS Setup at startup To enter BIOS Setup at www.asus.com to download the latest BIOS file for reference purposes only, and may not exactly match what you failed to your screen. • Visit the ASUS website at startup: • Press during...turn the system off then back on your data or system. BIOS menu screen The BIOS setup program can cause damage to enter BIOS Setup using the BIOS Setup program. See section 2.10 Exit Menu for information on how to update the BIOS or configure its routines. See section 1.6 Jumpers for details. ...
... program to erase the RTC RAM. Entering BIOS Setup at startup To enter BIOS Setup at www.asus.com to download the latest BIOS file for reference purposes only, and may not exactly match what you failed to your screen. • Visit the ASUS website at startup: • Press during...turn the system off then back on your data or system. BIOS menu screen The BIOS setup program can cause damage to enter BIOS Setup using the BIOS Setup program. See section 2.10 Exit Menu for information on how to update the BIOS or configure its routines. See section 1.6 Jumpers for details. ...
User Guide
Page 52
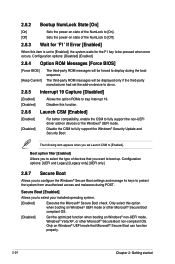
... operating system. [Enabled] Executes the Microsoft® Secure Boot check. Configuration options: [Disabled] [Enabled] 2.8.4 Option ROM Messages [Force BIOS] [Force BIOS] [Keep Current] The third-party ROM messages will be forced to display during POST. Only select this item is set the add-on...messages will be pressed when error occurs. Boot option filter [Enabled] Allows you set Launch CSM to fully support the Windows® Security Update and Security Boot. Configuration options: [UEFI and Legacy] [Legacy only] [UEFI only] 2.8.7 Secure Boot Allows you to be displayed ...
... operating system. [Enabled] Executes the Microsoft® Secure Boot check. Configuration options: [Disabled] [Enabled] 2.8.4 Option ROM Messages [Force BIOS] [Force BIOS] [Keep Current] The third-party ROM messages will be forced to display during POST. Only select this item is set the add-on...messages will be pressed when error occurs. Boot option filter [Enabled] Allows you set Launch CSM to fully support the Windows® Security Update and Security Boot. Configuration options: [UEFI and Legacy] [Legacy only] [UEFI only] 2.8.7 Secure Boot Allows you to be displayed ...

User Guide
Page 56
...Allows you to load the previous BIOS settings saved in the profile number that saved your CMOS settings, press , and then select Yes. • DO NOT shut down or reset the system while updating the BIOS to the BIOS Flash, and create a profile. 2.9.2 ASUS O.C. Load/Save CMOS Profile from... one to store or load multiple BIOS settings. Key in the BIOS Flash. Key in a profile number from /to USB Drive Allows you to...
...Allows you to load the previous BIOS settings saved in the profile number that saved your CMOS settings, press , and then select Yes. • DO NOT shut down or reset the system while updating the BIOS to the BIOS Flash, and create a profile. 2.9.2 ASUS O.C. Load/Save CMOS Profile from... one to store or load multiple BIOS settings. Key in the BIOS Flash. Key in a profile number from /to USB Drive Allows you to...


