
H61M-PRO User's Manual
Page 1
H61M-PRO Motherboard
H61M-PRO Motherboard

H61M-PRO User's Manual
Page 3
Contents Safety information...iv About this guide...iv Package contents...vi H61M-PRO specifications summary vi Product introduction 1.1 Before you proceed 1-1 1.2 Motherboard overview 1-1 1.3 Central Processing Unit (CPU 1-3 1.4 System memory 1-6 1.5 Expansion slots 1-9 1.6 Jumpers...1-11 1.7 Connectors 1-13 1.8 Onboard LEDs 1-19 1.9 Software support 1-20 BIOS information 2.1 ... Main menu...2-9 2.4 Ai Tweaker menu 2-11 2.5 Advanced menu 2-13 2.6 Monitor menu 2-21 2.7 Boot menu 2-24 2.8 Tools menu 2-30 2.9 Exit menu...2-31 Appendices Notices...A-1 ASUS contact information A-3 iii
Contents Safety information...iv About this guide...iv Package contents...vi H61M-PRO specifications summary vi Product introduction 1.1 Before you proceed 1-1 1.2 Motherboard overview 1-1 1.3 Central Processing Unit (CPU 1-3 1.4 System memory 1-6 1.5 Expansion slots 1-9 1.6 Jumpers...1-11 1.7 Connectors 1-13 1.8 Onboard LEDs 1-19 1.9 Software support 1-20 BIOS information 2.1 ... Main menu...2-9 2.4 Ai Tweaker menu 2-11 2.5 Advanced menu 2-13 2.6 Monitor menu 2-21 2.7 Boot menu 2-24 2.8 Tools menu 2-30 2.9 Exit menu...2-31 Appendices Notices...A-1 ASUS contact information A-3 iii
H61M-PRO User's Manual
Page 4
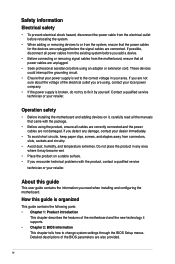
...away from connectors, slots, sockets and circuitry. • Avoid dust, humidity, and temperature extremes. Operation safety • Before installing the motherboard and adding devices on it may become wet. • Place the product on a stable surface. • If you encounter technical problems... are unplugged. • Seek professional assistance before you add a device. • Before connecting or removing signal cables from the motherboard, ensure that all power cables are connected. These devices could interrupt the grounding circuit. • Ensure that came with the product...
...away from connectors, slots, sockets and circuitry. • Avoid dust, humidity, and temperature extremes. Operation safety • Before installing the motherboard and adding devices on it may become wet. • Place the product on a stable surface. • If you encounter technical problems... are unplugged. • Seek professional assistance before you add a device. • Before connecting or removing signal cables from the motherboard, ensure that all power cables are connected. These devices could interrupt the grounding circuit. • Ensure that came with the product...
H61M-PRO User's Manual
Page 6
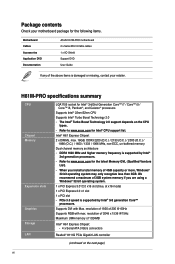
...memory architecture • DDR3 1600 MHz and higher memory frequency is damaged or missing, contact your motherboard package for the following items. Motherboard Cables Accessories Application DVD Documentation ASUS H61M-PRO motherboard 2 x Serial ATA 3.0 Gb/s cables 1 x I/O Shield Support DVD User Guide If ... 2.0 support depends on the next page) vi We recommend a maximum of 1920 x1200 @ 60Hz Supports RGB with Max. H61M-PRO specifications summary CPU Chipset Memory Expansion slots Graphics Storage LAN LGA1155 socket for the latest Memory QVL (Qualified Vendors List). •...
...memory architecture • DDR3 1600 MHz and higher memory frequency is damaged or missing, contact your motherboard package for the following items. Motherboard Cables Accessories Application DVD Documentation ASUS H61M-PRO motherboard 2 x Serial ATA 3.0 Gb/s cables 1 x I/O Shield Support DVD User Guide If ... 2.0 support depends on the next page) vi We recommend a maximum of 1920 x1200 @ 60Hz Supports RGB with Max. H61M-PRO specifications summary CPU Chipset Memory Expansion slots Graphics Storage LAN LGA1155 socket for the latest Memory QVL (Qualified Vendors List). •...
H61M-PRO User's Manual
Page 9
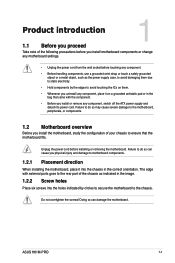
... damage to avoid touching the ICs on a grounded antistatic pad or in the bag that the motherboard fits. ASUS H61M-PRO 1-1 Product introduction 1.1 Before you proceed 1 Take note of the following precautions before you install motherboard components or change any motherboard settings. • Unplug the power cord from the wall socket before installing or removing the...
... damage to avoid touching the ICs on a grounded antistatic pad or in the bag that the motherboard fits. ASUS H61M-PRO 1-1 Product introduction 1.1 Before you proceed 1 Take note of the following precautions before you install motherboard components or change any motherboard settings. • Unplug the power cord from the wall socket before installing or removing the...

H61M-PRO User's Manual
Page 10
... towards the rear of the chassis H61M-PRO 1.2.3 Motherboard layout 12 34 3 5 17.8cm(7.0in) KBMS RT 8876 ATX12V CPU_FAN DVI DDR3 DIMM_A1 (64bit, 240-pin module) DDR3 DIMM_B1 (64bit, 240-pin module) LPT VGA LGA1155 23.4cm(9.2in) 1-2 PS2_USBPW1-4 USB34 EATXPWR LAN_USB12 CHA_FAN RTL 8111G BATTERY 2 AUDIO H61M-PRO PCIEX16 SATA3G_2 SATA3G_1 Super I/O PCIEX1_1...
... towards the rear of the chassis H61M-PRO 1.2.3 Motherboard layout 12 34 3 5 17.8cm(7.0in) KBMS RT 8876 ATX12V CPU_FAN DVI DDR3 DIMM_A1 (64bit, 240-pin module) DDR3 DIMM_B1 (64bit, 240-pin module) LPT VGA LGA1155 23.4cm(9.2in) 1-2 PS2_USBPW1-4 USB34 EATXPWR LAN_USB12 CHA_FAN RTL 8111G BATTERY 2 AUDIO H61M-PRO PCIEX16 SATA3G_2 SATA3G_1 Super I/O PCIEX1_1...

H61M-PRO User's Manual
Page 11
... (RMA) requests only if the motherboard comes with a surface mount LGA1155 socket designed for the Intel® 3rd / 2nd Generation Core™ i7 / Core™ i5 / Core™ i3, Pentium®, and Celeron® processors. ASUS H61M-PRO 1-3 1.2.4 Layout contents Connectors/Jumpers/Slots.../LED 1. USB 2.0 connectors (10-1 pin USB56, USB78) 13. H61M-PRO CPU socket LGA1155 Unplug all power cables before installing the CPU. • Upon purchase ...
... (RMA) requests only if the motherboard comes with a surface mount LGA1155 socket designed for the Intel® 3rd / 2nd Generation Core™ i7 / Core™ i5 / Core™ i3, Pentium®, and Celeron® processors. ASUS H61M-PRO 1-3 1.2.4 Layout contents Connectors/Jumpers/Slots.../LED 1. USB 2.0 connectors (10-1 pin USB56, USB78) 13. H61M-PRO CPU socket LGA1155 Unplug all power cables before installing the CPU. • Upon purchase ...

H61M-PRO User's Manual
Page 14
...: DIMM_A1 DIMM_B1 H61M-PRO Channel Channel A Channel B H61M-PRO 240-pin DDR3 DIMM sockets Sockets DIMM_A1 DIMM_B1 1-6 Chapter 1: Product introduction DDR3 modules are developed for better performance with two Double Data Rate 3 (DDR3) Dual Inline Memory Modules (DIMM) sockets. To uninstall the CPU heatsink and fan assembly 1 2 A B B A 1.4 System memory 1.4.1 Overview This motherboard comes with less...
...: DIMM_A1 DIMM_B1 H61M-PRO Channel Channel A Channel B H61M-PRO 240-pin DDR3 DIMM sockets Sockets DIMM_A1 DIMM_B1 1-6 Chapter 1: Product introduction DDR3 modules are developed for better performance with two Double Data Rate 3 (DDR3) Dual Inline Memory Modules (DIMM) sockets. To uninstall the CPU heatsink and fan assembly 1 2 A B B A 1.4 System memory 1.4.1 Overview This motherboard comes with less...
H61M-PRO User's Manual
Page 15
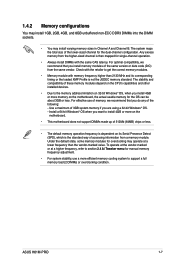
... memory for the dual-channel configuration. Use a maximum of 3GB system memory if you install 4GB or more on the motherboard. • This motherboard does not support DIMMs made up of the following: - ASUS H61M-PRO 1-7 1.4.2 Memory configurations You may install 1GB, 2GB, 4GB, and 8GB unbuffered non-ECC DDR3 DIMMs into the DIMM sockets...
... memory for the dual-channel configuration. Use a maximum of 3GB system memory if you install 4GB or more on the motherboard. • This motherboard does not support DIMMs made up of the following: - ASUS H61M-PRO 1-7 1.4.2 Memory configurations You may install 1GB, 2GB, 4GB, and 8GB unbuffered non-ECC DDR3 DIMMs into the DIMM sockets...
H61M-PRO User's Manual
Page 17
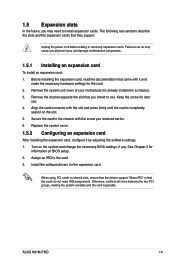
... cause you intend to the card. 3. ASUS H61M-PRO 1-9 See Chapter 2 for the card. 2. Unplug the power cord before adding or removing expansion cards. Before installing the expansion card, read the documentation that you physical injury and damage motherboard components. 1.5.1 Installing an expansion card To ...describe the slots and the expansion cards that the cards do so may need IRQ assignments. Remove the system unit cover (if your motherboard is completely seated on BIOS setup. 2. 1.5 Expansion slots In the future, you removed earlier. 6. Turn on shared slots, ensure...
... cause you intend to the card. 3. ASUS H61M-PRO 1-9 See Chapter 2 for the card. 2. Unplug the power cord before adding or removing expansion cards. Before installing the expansion card, read the documentation that you physical injury and damage motherboard components. 1.5.1 Installing an expansion card To ...describe the slots and the expansion cards that the cards do so may need IRQ assignments. Remove the system unit cover (if your motherboard is completely seated on BIOS setup. 2. 1.5 Expansion slots In the future, you removed earlier. 6. Turn on shared slots, ensure...

H61M-PRO User's Manual
Page 18
... USB card, and other cards that comply with PCI specifications. 1.5.4 PCI Express 2.0 x1 slot This motherboard supports PCI Express 2.0 x1 network cards, SCSI cards, and other cards that comply with the PCI Express specifications. ...1.5.5 PCI Express 3.0/2.0 x16 slot This motherboard has a PCI Express 3.0/2.0 x16 slot that supports PCI Express 3.0/2.0 x16 graphic cards complying with the PCI Express specifications. PCIEx1_1 PCI 1 shared - - - - - - - IRQ assignments for this motherboard A B C D E PCIEx16 shared - - - - shared - ...
... USB card, and other cards that comply with PCI specifications. 1.5.4 PCI Express 2.0 x1 slot This motherboard supports PCI Express 2.0 x1 network cards, SCSI cards, and other cards that comply with the PCI Express specifications. ...1.5.5 PCI Express 3.0/2.0 x16 slot This motherboard has a PCI Express 3.0/2.0 x16 slot that supports PCI Express 3.0/2.0 x16 graphic cards complying with the PCI Express specifications. PCIEx1_1 PCI 1 shared - - - - - - - IRQ assignments for this motherboard A B C D E PCIEx16 shared - - - - shared - ...

H61M-PRO User's Manual
Page 22
USB 2.0 ports 1 and 2. Connect one end of the motherboard's high-definition audio capability. • If you want to connect a high-definition front panel audio module to this connector is for a PS/2 keyboard. 1.7.2 Internal connectors 1. ... SENSE2_RETUR AGND NC NC NC AAFP PIN 1 PIN 1 MIC2 MICPWR Line out_R NC Line out_L PORT1 L PORT1 R PORT2 R SENSE_SEND PORT2 L H61M-PRO HD-audio-compliant Legacy AC'97 pin definition compliant definition H61M-PRO Front panel audio connector • We recommend that supports either HD Audio or legacy AC`97 audio standard. See section...
USB 2.0 ports 1 and 2. Connect one end of the motherboard's high-definition audio capability. • If you want to connect a high-definition front panel audio module to this connector is for a PS/2 keyboard. 1.7.2 Internal connectors 1. ... SENSE2_RETUR AGND NC NC NC AAFP PIN 1 PIN 1 MIC2 MICPWR Line out_R NC Line out_L PORT1 L PORT1 R PORT2 R SENSE_SEND PORT2 L H61M-PRO HD-audio-compliant Legacy AC'97 pin definition compliant definition H61M-PRO Front panel audio connector • We recommend that supports either HD Audio or legacy AC`97 audio standard. See section...

H61M-PRO User's Manual
Page 25
...may damage the motherboard components. Do not place jumper caps on the motherboard, ensuring that supports up to 480 Mbps connection speed. USB78 USB56 USB+5V USB_P5USB_P5+ GND NC USB+5V USB_P7USB_P7+ GND NC H61M-PRO PIN 1 PIN 1 USB+5V USB_P6USB_P6+ GND USB+5V USB_P8USB_P8+ GND H61M-PRO USB2.0 connectors ... PWR GND H61M-PRO CHA_FAN CHA FAN PWM CHA FAN IN CHA FAN PWR GND H61M-PRO Fan connectors Do not forget to connect the fan cables to the fan connectors on the fan connectors! • The two fan connectors support fans of the connector. ASUS H61M-PRO 1-17 The...
...may damage the motherboard components. Do not place jumper caps on the motherboard, ensuring that supports up to 480 Mbps connection speed. USB78 USB56 USB+5V USB_P5USB_P5+ GND NC USB+5V USB_P7USB_P7+ GND NC H61M-PRO PIN 1 PIN 1 USB+5V USB_P6USB_P6+ GND USB+5V USB_P8USB_P8+ GND H61M-PRO USB2.0 connectors ... PWR GND H61M-PRO CHA_FAN CHA FAN PWM CHA FAN IN CHA FAN PWR GND H61M-PRO Fan connectors Do not forget to connect the fan cables to the fan connectors on the fan connectors! • The two fan connectors support fans of the connector. ASUS H61M-PRO 1-17 The...
H61M-PRO User's Manual
Page 27
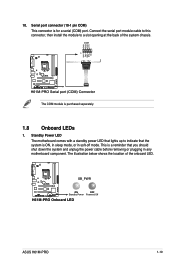
... DSR CTS DCD TXD GND RTS RI H61M-PRO H61M-PRO Serial port (COM) Connector The COM module is for a serial (COM) port. H61M-PRO SB_PWR ON OFF Standby Power Powered Off H61M-PRO Onboard LED ASUS H61M-PRO 1-19 This is a reminder that the system is ON, in sleep mode, or in any motherboard component. 10. Connect the serial port module...
... DSR CTS DCD TXD GND RTS RI H61M-PRO H61M-PRO Serial port (COM) Connector The COM module is for a serial (COM) port. H61M-PRO SB_PWR ON OFF Standby Power Powered Off H61M-PRO Onboard LED ASUS H61M-PRO 1-19 This is a reminder that the system is ON, in sleep mode, or in any motherboard component. 10. Connect the serial port module...
H61M-PRO User's Manual
Page 28
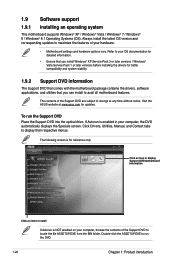
...displays the Specials screen. To run the DVD. 1-20 Chapter 1: Product introduction Click Drivers, Utilities, Manual, and Contact tabs to avail all motherboard features. The contents of your OS documentation for detailed information. • Ensure that you install Windows® XP Service Pack 3 or later ...subject to change at www.asus.com for reference only. Double-click the ASSETUP.EXE to locate the file ASSETUP.EXE from the BIN folder. Visit the ASUS website at any time without notice. Click an icon to display Support DVD/motherboard information Click an item ...
...displays the Specials screen. To run the DVD. 1-20 Chapter 1: Product introduction Click Drivers, Utilities, Manual, and Contact tabs to avail all motherboard features. The contents of your OS documentation for detailed information. • Ensure that you install Windows® XP Service Pack 3 or later ...subject to change at www.asus.com for reference only. Double-click the ASSETUP.EXE to locate the file ASSETUP.EXE from the BIN folder. Visit the ASUS website at any time without notice. Click an icon to display Support DVD/motherboard information Click an item ...
H61M-PRO User's Manual
Page 29
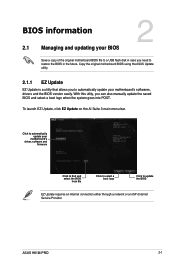
... Update requires an Internet connection either through a network or an ISP (Internet Service Provider. ASUS H61M-PRO 2-1 Copy the original motherboard BIOS using the ASUS Update utility. 2.1.1 EZ Update EZ Update is a utility that allows you need to automatically update your motherboard's softwares, drivers and the BIOS version easily. To launch EZ Update, click EZ Update...
... Update requires an Internet connection either through a network or an ISP (Internet Service Provider. ASUS H61M-PRO 2-1 Copy the original motherboard BIOS using the ASUS Update utility. 2.1.1 EZ Update EZ Update is a utility that allows you need to automatically update your motherboard's softwares, drivers and the BIOS version easily. To launch EZ Update, click EZ Update...

H61M-PRO User's Manual
Page 30
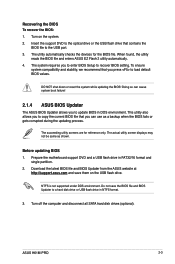
...BIOS using this utility, download the latest BIOS file from the ASUS website at www.asus.com. Download the latest BIOS file from the ASUS website at www.asus.com. 2-2 Chapter 2: Getting started You can restore a corrupted BIOS file using the motherboard support DVD or a USB flash drive that allows you to... restore the BIOS file when it . 3. Before you start using an OS‑based utility. Press to switch to the Drive field. 4. Go to the Tool menu to select ASUS EZ Flash 2 Utility ...
...BIOS using this utility, download the latest BIOS file from the ASUS website at www.asus.com. Download the latest BIOS file from the ASUS website at www.asus.com. 2-2 Chapter 2: Getting started You can restore a corrupted BIOS file using the motherboard support DVD or a USB flash drive that allows you to... restore the BIOS file when it . 3. Before you start using an OS‑based utility. Press to switch to the Drive field. 4. Go to the Tool menu to select ASUS EZ Flash 2 Utility ...
H61M-PRO User's Manual
Page 31
... Updater The ASUS BIOS Updater allows you to enter BIOS Setup to load default BIOS values. DO NOT shut down or reset the system while updating the BIOS! Turn on the USB flash drive. The succeeding utility screens are for the BIOS file. Prepare the motherboard support DVD and a USB ... DOS environment. The actual utility screen displays may not be same as a backup when the BIOS fails or gets corrupted during the updating process. ASUS H61M-PRO 2-3 Recovering the BIOS To recover the BIOS: 1. Doing so can use as shown. Download the latest BIOS file and BIOS Updater from the...
... Updater The ASUS BIOS Updater allows you to enter BIOS Setup to load default BIOS values. DO NOT shut down or reset the system while updating the BIOS! Turn on the USB flash drive. The succeeding utility screens are for the BIOS file. Prepare the motherboard support DVD and a USB ... DOS environment. The actual utility screen displays may not be same as a backup when the BIOS fails or gets corrupted during the updating process. ASUS H61M-PRO 2-3 Recovering the BIOS To recover the BIOS: 1. Doing so can use as shown. Download the latest BIOS file and BIOS Updater from the...
H61M-PRO User's Manual
Page 33
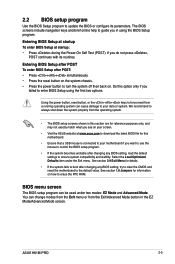
... failed to enter BIOS Setup using the BIOS Setup program. Select the Load Optimized Defaults item under two modes: EZ Mode and Advanced Mode. ASUS H61M-PRO 2-5 2.2 BIOS setup program Use the BIOS Setup program to update the BIOS or configure its routines. Entering BIOS Setup after POST To enter ...to boot after POST: • Press ++ simultaneously. • Press the reset button on the system chassis. • Press the power button to your motherboard if you in the EZ Mode/Advanced Mode screen. You can be used under the Exit menu. Using the power button, reset button, or the...
... failed to enter BIOS Setup using the BIOS Setup program. Select the Load Optimized Defaults item under two modes: EZ Mode and Advanced Mode. ASUS H61M-PRO 2-5 2.2 BIOS setup program Use the BIOS Setup program to update the BIOS or configure its routines. Entering BIOS Setup after POST To enter ...to boot after POST: • Press ++ simultaneously. • Press the reset button on the system chassis. • Press the power button to your motherboard if you in the EZ Mode/Advanced Mode screen. You can be used under the Exit menu. Using the power button, reset button, or the...

H61M-PRO User's Manual
Page 34
... press F7 hot key for entering the BIOS setup program can be changed. Selects the display language of the BIOS setup program Displays the CPU/motherboard temperature, CPU/5V/3.3V/12V voltage output, CPU/chassis fan speed Exits the BIOS setup program without saving the changes, saves the changes and resets...
... press F7 hot key for entering the BIOS setup program can be changed. Selects the display language of the BIOS setup program Displays the CPU/motherboard temperature, CPU/5V/3.3V/12V voltage output, CPU/chassis fan speed Exits the BIOS setup program without saving the changes, saves the changes and resets...


