H61M-A User's Manual
Page 12
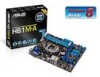
Package contents Check your motherboard package for the following items. H61M-PLUS H61M-A/USB3 ASUS H61M series motherboard User Guide H61M-PLUS: 2 x Serial ATA 6.0 Gb/s cables H61M-A/USB3 & H61M-A: 2 x Serial ATA 3.0 Gb/s cables 1 x I/O Shield User Guide Support DVD • The layout illustrations in this user manual are for H61M-PLUS only. • If any of the above items is damaged or missing, contact your retailer. • The illustrations above are for reference only. xii Actual product specifications may vary with different models.
Package contents Check your motherboard package for the following items. H61M-PLUS H61M-A/USB3 ASUS H61M series motherboard User Guide H61M-PLUS: 2 x Serial ATA 6.0 Gb/s cables H61M-A/USB3 & H61M-A: 2 x Serial ATA 3.0 Gb/s cables 1 x I/O Shield User Guide Support DVD • The layout illustrations in this user manual are for H61M-PLUS only. • If any of the above items is damaged or missing, contact your retailer. • The illustrations above are for reference only. xii Actual product specifications may vary with different models.

H61M-A User's Manual
Page 13
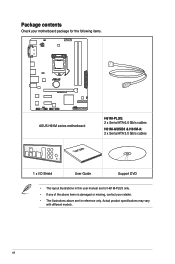
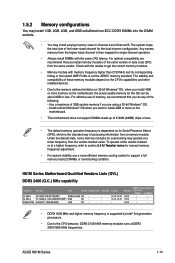
... is supported by Intel® 3rd generation processors. ** Due to the CPU behavior, DDR3 2133/18666 memory modules runs at DDR3 2000/1800 MHz frequencies. ASUS H61M Series 1-1 Intel® 3rd/2nd generation Core™ i7 / i5 / i3 / Pentium® / Celeron® processors are among the most powerful and energy efficient CPUs...
... is supported by Intel® 3rd generation processors. ** Due to the CPU behavior, DDR3 2133/18666 memory modules runs at DDR3 2000/1800 MHz frequencies. ASUS H61M Series 1-1 Intel® 3rd/2nd generation Core™ i7 / i5 / i3 / Pentium® / Celeron® processors are among the most powerful and energy efficient CPUs...
H61M-A User's Manual
Page 15
...of useful profiles offer flexible controls of fan speed to achieve a quiet and cool environment. ASUS H61M Series 1-3 AI Suite II With its user-friendly interface, ASUS AI Suite II integrates several ASUS utilities and allows you to restore a corrupted BIOS file using a bootable floppy disk or an...product design and innovation to reduce carbon footprint of creating environment-friendly and energyefficient products through the AI Suite II utility. ASUS Fan Xpert ASUS Fan Xpert intelligently allows you to update the BIOS without using the bundled support DVD or a USB flash disk that ...
...of useful profiles offer flexible controls of fan speed to achieve a quiet and cool environment. ASUS H61M Series 1-3 AI Suite II With its user-friendly interface, ASUS AI Suite II integrates several ASUS utilities and allows you to restore a corrupted BIOS file using a bootable floppy disk or an...product design and innovation to reduce carbon footprint of creating environment-friendly and energyefficient products through the AI Suite II utility. ASUS Fan Xpert ASUS Fan Xpert intelligently allows you to update the BIOS without using the bundled support DVD or a USB flash disk that ...
H61M-A User's Manual
Page 17
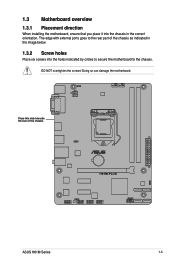
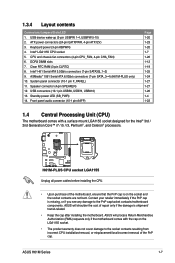
DO NOT overtighten the screws! Doing so can damage the motherboard. Place this side towards the rear of the chassis as indicated in the correct orientation. The edge with external ports goes to the chassis. 1.3 Motherboard overview 1.3.1 Placement direction When installing the motherboard, ensure that you place it into the chassis in the image below. 1.3.2 Screw holes Place six screws into the holes indicated by circles to secure the motherboard to the rear part of the chassis H61M-PLUS ASUS H61M Series 1-5
DO NOT overtighten the screws! Doing so can damage the motherboard. Place this side towards the rear of the chassis as indicated in the correct orientation. The edge with external ports goes to the chassis. 1.3 Motherboard overview 1.3.1 Placement direction When installing the motherboard, ensure that you place it into the chassis in the image below. 1.3.2 Screw holes Place six screws into the holes indicated by circles to secure the motherboard to the rear part of the chassis H61M-PLUS ASUS H61M Series 1-5
H61M-A User's Manual
Page 19
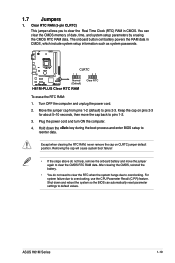
...components. Clear RTC RAM (3-pin CLRTC) 8. ASMedia® 1061 Serial ATA 6.0Gb/s connectors (7-pin SATA_3~4) (H61M-PLUS only) 10. Standby power LED (SB_PWR) 14. ASUS will shoulder the cost of the motherboard, ensure that the PnP cap is missing, or if you see any ...4-pin CHA_FAN) 6. ATX power connectors (24-pin EATXPWR, 4-pin ATX12V) 3. Intel® LGA1155 CPU socket 5. USB device wake-up (3-pin USBPW 1-4, USBPW 5-10) 2. ASUS H61M Series 1-7 DDR3 DIMM slots 7. Front panel audio connector (10-1 pin AAFP) Page 1-20 1-23 1-20 1-7 1-26 1-12 1-19 1-25 1-24 1-27 1-27 1-26 ...
...components. Clear RTC RAM (3-pin CLRTC) 8. ASMedia® 1061 Serial ATA 6.0Gb/s connectors (7-pin SATA_3~4) (H61M-PLUS only) 10. Standby power LED (SB_PWR) 14. ASUS will shoulder the cost of the motherboard, ensure that the PnP cap is missing, or if you see any ...4-pin CHA_FAN) 6. ATX power connectors (24-pin EATXPWR, 4-pin ATX12V) 3. Intel® LGA1155 CPU socket 5. USB device wake-up (3-pin USBPW 1-4, USBPW 5-10) 2. ASUS H61M Series 1-7 DDR3 DIMM slots 7. Front panel audio connector (10-1 pin AAFP) Page 1-20 1-23 1-20 1-7 1-26 1-12 1-19 1-25 1-24 1-27 1-27 1-26 ...

H61M-A User's Manual
Page 23
To uninstall the CPU heatsink and fan assembly 1 2 B A B A ASUS H61M Series 1-11
To uninstall the CPU heatsink and fan assembly 1 2 B A B A ASUS H61M Series 1-11
H61M-A User's Manual
Page 25
... the default state, some memory modules for overclocking may install varying memory sizes in Channel A and Channel B. H61M Series Motherboard Qualified Vendors Lists (QVL) DDR3 2400 (O.C.) MHz capability Vendors G.SKILL G.SKILL KINGSTON Part No. ASUS H61M Series 1-13 The system maps the total size of the same version or date code (D/C) from the...
... the default state, some memory modules for overclocking may install varying memory sizes in Channel A and Channel B. H61M Series Motherboard Qualified Vendors Lists (QVL) DDR3 2400 (O.C.) MHz capability Vendors G.SKILL G.SKILL KINGSTON Part No. ASUS H61M Series 1-13 The system maps the total size of the same version or date code (D/C) from the...
H61M-A User's Manual
Page 27
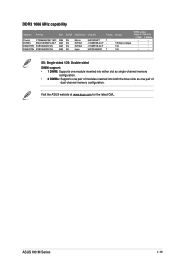
Visit the ASUS website at www.asus.com for the latest QVL. ASUS H61M Series 1-15 DDR3 1066 MHz capability Vendors Part No. Size Crucial CT25664BA1067.16FF 2GB ELPIDA EBJ21UE8EDF0-AE-F 2GB KINGSTON KVR1066D3N7/2G 2GB KINGSTON KVR1066D3N7/4G ...
Visit the ASUS website at www.asus.com for the latest QVL. ASUS H61M Series 1-15 DDR3 1066 MHz capability Vendors Part No. Size Crucial CT25664BA1067.16FF 2GB ELPIDA EBJ21UE8EDF0-AE-F 2GB KINGSTON KVR1066D3N7/2G 2GB KINGSTON KVR1066D3N7/4G ...
H61M-A User's Manual
Page 29
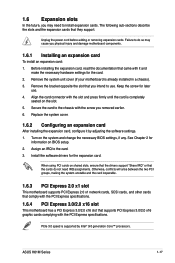
... on the slot. 5. Before installing the expansion card, read the documentation that you removed earlier. 6. Turn on BIOS setup. 2. Secure the card to the card. 3. ASUS H61M Series 1-17 Unplug the power cord before adding or removing expansion cards. Otherwise, conflicts will arise between the two PCI groups, making the system unstable...
... on the slot. 5. Before installing the expansion card, read the documentation that you removed earlier. 6. Turn on BIOS setup. 2. Secure the card to the card. 3. ASUS H61M Series 1-17 Unplug the power cord before adding or removing expansion cards. Otherwise, conflicts will arise between the two PCI groups, making the system unstable...
H61M-A User's Manual
Page 31
... the boot process and enter BIOS setup to overclocking, use the CPU Parameter Recall (C.P.R) feature. Move the jumper cap from pins 1-2 (default) to default values. ASUS H61M Series 1-19 The onboard button cell battery powers the RAM data in CMOS. CLRTC...
... the boot process and enter BIOS setup to overclocking, use the CPU Parameter Recall (C.P.R) feature. Move the jumper cap from pins 1-2 (default) to default values. ASUS H61M Series 1-19 The onboard button cell battery powers the RAM data in CMOS. CLRTC...

H61M-A User's Manual
Page 33
... hub. Refer to the table below for the LAN port LED indications. 1.8 1.8.1 1 Connectors Rear panel ports 2 3 45 11 10 9 8 1. PS/2 Mouse port. Microphone port (pink). ASUS H61M Series 1-21 This port connects to a headphone or a speaker. Refer to the audio configuration table below for the function of this port becomes Front Speaker...
... hub. Refer to the table below for the LAN port LED indications. 1.8 1.8.1 1 Connectors Rear panel ports 2 3 45 11 10 9 8 1. PS/2 Mouse port. Microphone port (pink). ASUS H61M Series 1-21 This port connects to a headphone or a speaker. Refer to the audio configuration table below for the function of this port becomes Front Speaker...

H61M-A User's Manual
Page 35
...• If you use a power supply unit (PSU) that you are for your system, refer to fit these connectors in only one orientation. ASUS H61M Series 1-23 ATX power connectors (24-pin EATXPWR, 4-pin ATX12V) These connectors are uncertain about the minimum power supply requirement for ATX power supply ...plugs. ATX12V EATXPWR +12V DC +12V DC H61M-PLUS GND GND +3 Volts +12 Volts +12 Volts +5V Standby Power OK PIN 1 GND +5 Volts GND +5 Volts GND +3 Volts +3 Volts PIN...
...• If you use a power supply unit (PSU) that you are for your system, refer to fit these connectors in only one orientation. ASUS H61M Series 1-23 ATX power connectors (24-pin EATXPWR, 4-pin ATX12V) These connectors are uncertain about the minimum power supply requirement for ATX power supply ...plugs. ATX12V EATXPWR +12V DC +12V DC H61M-PLUS GND GND +3 Volts +12 Volts +12 Volts +5V Standby Power OK PIN 1 GND +5 Volts GND +5 Volts GND +3 Volts +3 Volts PIN...
H61M-A User's Manual
Page 37
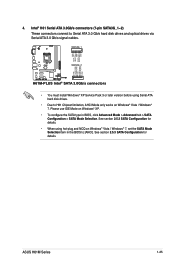
... 2.5.3 SATA Configuration for details. SATA3G_1 GND RSATA_TXP1 RSATA_TXN1 GND RSATA_RXN1 RSATA_RXP1 GND GND RSATA_TXP1 RSATA_TXN1 GND RSATA_RXN1 RSATA_RXP1 GND H61M-PLUS SATA3G_2 H61M-PLUS Intel® SATA 3.0Gb/s connectors • You must install Windows® XP Service Pack 3 or later... / Windows® 7, set the SATA Mode Selection item in BIOS, click Advanced Mode > Advanced tab > SATA Configuration > SATA Mode Selection. ASUS H61M Series 1-25 4. See section 2.5.3 SATA Configuration for details. • When using Serial ATA hard disk drives. • Due to H61 Chipset ...
... 2.5.3 SATA Configuration for details. SATA3G_1 GND RSATA_TXP1 RSATA_TXN1 GND RSATA_RXN1 RSATA_RXP1 GND GND RSATA_TXP1 RSATA_TXN1 GND RSATA_RXN1 RSATA_RXP1 GND H61M-PLUS SATA3G_2 H61M-PLUS Intel® SATA 3.0Gb/s connectors • You must install Windows® XP Service Pack 3 or later... / Windows® 7, set the SATA Mode Selection item in BIOS, click Advanced Mode > Advanced tab > SATA Configuration > SATA Mode Selection. ASUS H61M Series 1-25 4. See section 2.5.3 SATA Configuration for details. • When using Serial ATA hard disk drives. • Due to H61 Chipset ...
H61M-A User's Manual
Page 39
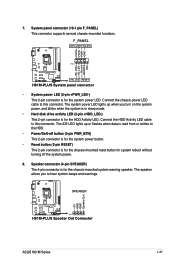
... when data is read from or written to hear system beeps and warnings. SPEAKER H61M-PLUS PIN 1 H61M-PLUS Speaker Out Connector +5V GND GND Speaker Out ASUS H61M Series 1-27 F_PANEL PWR LED PWR BTN PIN 1 H61M-PLUS +HD_LED RESET H61M-PLUS System panel connector • System power LED (2-pin +PWR_LED-) This 2-pin connector is...
... when data is read from or written to hear system beeps and warnings. SPEAKER H61M-PLUS PIN 1 H61M-PLUS Speaker Out Connector +5V GND GND Speaker Out ASUS H61M Series 1-27 F_PANEL PWR LED PWR BTN PIN 1 H61M-PLUS +HD_LED RESET H61M-PLUS System panel connector • System power LED (2-pin +PWR_LED-) This 2-pin connector is...
H61M-A User's Manual
Page 41
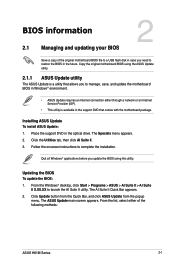
... either through a network or an Internet Service Provider (ISP). • This utility is available in Windows® environment. • ASUS Update requires an Internet connection either of the original motherboard BIOS file to a USB flash disk in case you to restore the BIOS ...Save a copy of the following methods: ASUS H61M Series 2-1 The AI Suite II Quick Bar appears. 2. The ASUS Update main screen appears. Quit all Windows® applications before you update the BIOS using the ASUS Update utility. 2.1.1 ASUS Update utility The ASUS Update is a utility that allows you need...
... either through a network or an Internet Service Provider (ISP). • This utility is available in Windows® environment. • ASUS Update requires an Internet connection either of the original motherboard BIOS file to a USB flash disk in case you to restore the BIOS ...Save a copy of the following methods: ASUS H61M Series 2-1 The AI Suite II Quick Bar appears. 2. The ASUS Update main screen appears. Quit all Windows® applications before you update the BIOS using the ASUS Update utility. 2.1.1 ASUS Update utility The ASUS Update is a utility that allows you need...
H61M-A User's Manual
Page 43
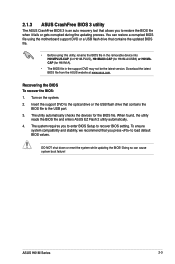
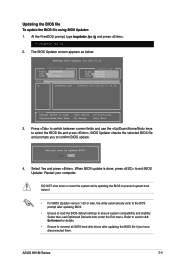
... gets corrupted during the updating process. The utility automatically checks the devices for H61M-A/USB3) or H61MA. Download the latest BIOS file from the ASUS website at www.asus.com. When found, the utility reads the BIOS file and enters ASUS EZ Flash 2 utility automatically. 4. The system requires you press to load... the updated BIOS file. • Before using this utility, rename the BIOS file in the support DVD may not be the latest version. ASUS H61M Series 2-3 You can cause system boot failure! Turn on the system. 2. DO NOT shut down or reset the system while updating the BIOS...
... gets corrupted during the updating process. The utility automatically checks the devices for H61M-A/USB3) or H61MA. Download the latest BIOS file from the ASUS website at www.asus.com. When found, the utility reads the BIOS file and enters ASUS EZ Flash 2 utility automatically. 4. The system requires you press to load... the updated BIOS file. • Before using this utility, rename the BIOS file in the support DVD may not be the latest version. ASUS H61M Series 2-3 You can cause system boot failure! Turn on the system. 2. DO NOT shut down or reset the system while updating the BIOS...
H61M-A User's Manual
Page 45
... hard disk drives after updating BIOS. • Ensure to load the BIOS default settings to section 2.9 Exit menu for DOS V1.30 Current ROM BOARD: H61M-PLUS VER: 0215 DATE: 11/07/2012 Update ROM BOARD: Unknown VER: Unknown DATE: Unknown PATH: A:\ A: H61MPLUS.CAP 8390656 2013-01-10 17:30:48... Load [Up/Down/Home/End] Move [Tab] Switch [B] Backup [V] Drive Info [Esc] Exit 3. Updating the BIOS file To update the BIOS file using BIOS Updater: 1. ASUS H61M Series 2-5
... hard disk drives after updating BIOS. • Ensure to load the BIOS default settings to section 2.9 Exit menu for DOS V1.30 Current ROM BOARD: H61M-PLUS VER: 0215 DATE: 11/07/2012 Update ROM BOARD: Unknown VER: Unknown DATE: Unknown PATH: A:\ A: H61MPLUS.CAP 8390656 2013-01-10 17:30:48... Load [Up/Down/Home/End] Move [Tab] Switch [B] Backup [V] Drive Info [Esc] Exit 3. Updating the BIOS file To update the BIOS file using BIOS Updater: 1. ASUS H61M Series 2-5
H61M-A User's Manual
Page 47
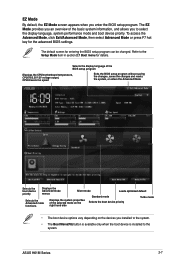
... fan speed Exits the BIOS setup program without saving the changes, saves the changes and resets the system, or enters the Advanced Mode H61M-PLUS Selects the boot device priority Displays the Advanced mode menus Silent mode Loads optimized default Standard mode Turbo mode Selects the Advanced mode ... right hand side Selects the boot device priority • The boot device options vary depending on the devices you enter the BIOS setup program. ASUS H61M Series 2-7 Refer to the Setup Mode item in section 2.7 Boot menu for details. EZ Mode By default, the EZ Mode screen appears when...
... fan speed Exits the BIOS setup program without saving the changes, saves the changes and resets the system, or enters the Advanced Mode H61M-PLUS Selects the boot device priority Displays the Advanced mode menus Silent mode Loads optimized default Standard mode Turbo mode Selects the Advanced mode ... right hand side Selects the boot device priority • The boot device options vary depending on the devices you enter the BIOS setup program. ASUS H61M Series 2-7 Refer to the Setup Mode item in section 2.7 Boot menu for details. EZ Mode By default, the EZ Mode screen appears when...

H61M-A User's Manual
Page 49
... or / keys to display a list of the selected item. Use the navigation keys to the previous menu screen. A configurable field is a brief description of options. ASUS H61M Series 2-9 General help At the top right corner of the field opposite the item. Submenu items A greater than sign (>) before each item on the menu...
... or / keys to display a list of the selected item. Use the navigation keys to the previous menu screen. A configurable field is a brief description of options. ASUS H61M Series 2-9 General help At the top right corner of the field opposite the item. Submenu items A greater than sign (>) before each item on the menu...

H61M-A User's Manual
Page 51
... the password. To clear the user password, follow the same steps as in changing a user password, but press when prompted to create/confirm the password. ASUS H61M Series 2-11 Select the User Password item and press . 2. To set an administrator password: 1. Confirm the password when prompted. From the Create New Password box...
... the password. To clear the user password, follow the same steps as in changing a user password, but press when prompted to create/confirm the password. ASUS H61M Series 2-11 Select the User Password item and press . 2. To set an administrator password: 1. Confirm the password when prompted. From the Create New Password box...


