
User Guide
Page 6
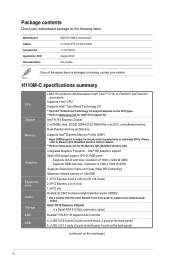
... (2 ports at mid-board, 4 ports at the back panel) (continued on the CPU types. ** Refer to www.asus.com for the following items. Motherboard Cables Accessories Application DVD Documentation ASUS H110M-C motherboard 2 x Serial ATA 6.0 Gb/s cables 1 x I/O Shield Support DVD User Guide If any of the above ... 2.0 support depends on the next page) vi Intel® HD Graphics support Multi-VGA output support: DVI-D, RGB ports - H110M-C specifications summary CPU Chipset Memory Graphics Expansion slots Audio Storage LAN USB LGA1151 socket for Intel® CPU support list. Supports RGB with...
... (2 ports at mid-board, 4 ports at the back panel) (continued on the CPU types. ** Refer to www.asus.com for the following items. Motherboard Cables Accessories Application DVD Documentation ASUS H110M-C motherboard 2 x Serial ATA 6.0 Gb/s cables 1 x I/O Shield Support DVD User Guide If any of the above ... 2.0 support depends on the next page) vi Intel® HD Graphics support Multi-VGA output support: DVI-D, RGB ports - H110M-C specifications summary CPU Chipset Memory Graphics Expansion slots Audio Storage LAN USB LGA1151 socket for Intel® CPU support list. Supports RGB with...
User Guide
Page 9
...; Before you install or remove any component, ensure that the motherboard fits. Do not overtighten the screws! Failure to do so can damage the motherboard. ASUS H110M-C 1-1 Doing so can cause you install the motherboard, study the configuration of your chassis to ensure that the ATX power supply is switched off or...
...; Before you install or remove any component, ensure that the motherboard fits. Do not overtighten the screws! Failure to do so can damage the motherboard. ASUS H110M-C 1-1 Doing so can cause you install the motherboard, study the configuration of your chassis to ensure that the ATX power supply is switched off or...
User Guide
Page 11
..., 4-pin CHA_FAN) 3. Intel® LGA1151 CPU socket 4. Intel® H110 Serial ATA 6.0 Gb/s connector (7-pin SATA6G_1~4) 10. Front panel audio connector (10-1 pin AAFP) 15. H110M-C H110M-C CPU socket LGA1151 Unplug all power cables before installing the CPU. Clear RTC RAM (2-pin CLRTC) 7. LPT connector (26-1 pin LPT) 12. Serial port connector... 1. USB 3.0 connector (20-1 pin USB3_12) 6. Chassis intrusion connector (4-1 pin CHASSIS) 13. ATX power connectors (24-pin EATXPWR, 4-pin ATX12V) 2. TPM connector (14-1 pin TPM) 14. ASUS H110M-C 1-3
..., 4-pin CHA_FAN) 3. Intel® LGA1151 CPU socket 4. Intel® H110 Serial ATA 6.0 Gb/s connector (7-pin SATA6G_1~4) 10. Front panel audio connector (10-1 pin AAFP) 15. H110M-C H110M-C CPU socket LGA1151 Unplug all power cables before installing the CPU. Clear RTC RAM (2-pin CLRTC) 7. LPT connector (26-1 pin LPT) 12. Serial port connector... 1. USB 3.0 connector (20-1 pin USB3_12) 6. Chassis intrusion connector (4-1 pin CHASSIS) 13. ATX power connectors (24-pin EATXPWR, 4-pin ATX12V) 2. TPM connector (14-1 pin TPM) 14. ASUS H110M-C 1-3
User Guide
Page 13
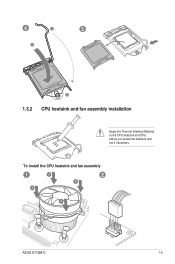
4 C 5 A B 1.3.2 CPU heatsink and fan assembly installation Apply the Thermal Interface Material to the CPU heatsink and CPU before you install the heatsink and fan if necessary. To install the CPU heatsink and fan assembly 1 A 2 B B A ASUS H110M-C 1-5
4 C 5 A B 1.3.2 CPU heatsink and fan assembly installation Apply the Thermal Interface Material to the CPU heatsink and CPU before you install the heatsink and fan if necessary. To install the CPU heatsink and fan assembly 1 A 2 B B A ASUS H110M-C 1-5
User Guide
Page 15
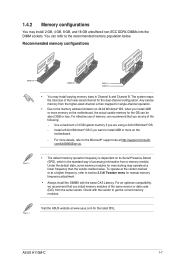
... usable memory for manual memory frequency adjustment. • Always install the DIMMS with the vendor to get the correct memory modules. Visit the ASUS website at a higher frequency, refer to section 2.5 Ai Tweaker menu for the OS can refer to the Microsoft® support site at ...CAS Latency. For an optimum compatibility, we recommend that you install 4GB or more details, refer to the recommended memory population below. ASUS H110M-C 1-7 The system maps the total size of accessing information from the higher-sized channel is the standard way of the lower-sized channel...
... usable memory for manual memory frequency adjustment. • Always install the DIMMS with the vendor to get the correct memory modules. Visit the ASUS website at a higher frequency, refer to section 2.5 Ai Tweaker menu for the OS can refer to the Microsoft® support site at ...CAS Latency. For an optimum compatibility, we recommend that you install 4GB or more details, refer to the recommended memory population below. ASUS H110M-C 1-7 The system maps the total size of accessing information from the higher-sized channel is the standard way of the lower-sized channel...
User Guide
Page 17
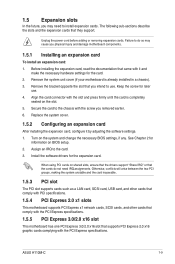
... motherboard has one PCI Express 3.0/2.0 x16 slot that you may cause you removed earlier. 6. Align the card connector with it by adjusting the software settings. 1. ASUS H110M-C 1-9 1.5 Expansion slots In the future, you intend to use . 4. See Chapter 2 for later use . When using PCI cards on BIOS setup. 2. The following sub‑...
... motherboard has one PCI Express 3.0/2.0 x16 slot that you may cause you removed earlier. 6. Align the card connector with it by adjusting the software settings. 1. ASUS H110M-C 1-9 1.5 Expansion slots In the future, you intend to use . 4. See Chapter 2 for later use . When using PCI cards on BIOS setup. 2. The following sub‑...
User Guide
Page 19
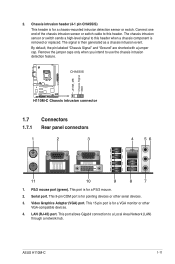
CHASSIS H110M-C H110M-C Chassis intrusion connector +5VSB_MB Chassis Signal GND 1.7 Connectors 1.7.1 Rear panel connectors 1 2 3 4 56 11 10 9 8 7 1. This port allows Gigabit connection to this header when a chassis component ... chassis intrusion sensor or switch cable to a Local Area Network (LAN) through a network hub. Remove the jumper caps only when you intend to this header. ASUS H110M-C 1-11 2. By default, the pin labeled "Chassis Signal" and "Ground" are shorted with a jumper cap. LAN (RJ-45) port. The signal is removed or replaced...
CHASSIS H110M-C H110M-C Chassis intrusion connector +5VSB_MB Chassis Signal GND 1.7 Connectors 1.7.1 Rear panel connectors 1 2 3 4 56 11 10 9 8 7 1. This port allows Gigabit connection to this header when a chassis component ... chassis intrusion sensor or switch cable to a Local Area Network (LAN) through a network hub. Remove the jumper caps only when you intend to this header. ASUS H110M-C 1-11 2. By default, the pin labeled "Chassis Signal" and "Ground" are shorted with a jumper cap. LAN (RJ-45) port. The signal is removed or replaced...

User Guide
Page 21
The CPU_FAN connector supports a CPU fan of the connector CPU_FAN CHA_FAN H110M-C H110M-C Fan connectors Do not forget to connect the fan cables to the fan connectors on the motherboard, ensuring that the black wire of each... GND GND GND GND GND GND GND GND O_LPT_XSTB#_R O_LPT_XPD0_R O_LPT_XPD1_R O_LPT_XPD2_R O_LPT_XPD3_R O_LPT_XPD4_R O_LPT_XPD5_R O_LPT_XPD6_R O_LPT_XPD7_R O_LPT_ACK#_R O_LPT_BUSY_R O_LPT_PE_R O_LPT_SLCT_R H110M-C LPT PIN 1 H110M-C Parallel port connector ASUS H110M-C 1-13 LPT standardizes as a printer. CPU FAN PWM CPU FAN IN CPU FAN PWR GND CHA FAN PWM CHA FAN IN...
The CPU_FAN connector supports a CPU fan of the connector CPU_FAN CHA_FAN H110M-C H110M-C Fan connectors Do not forget to connect the fan cables to the fan connectors on the motherboard, ensuring that the black wire of each... GND GND GND GND GND GND GND GND O_LPT_XSTB#_R O_LPT_XPD0_R O_LPT_XPD1_R O_LPT_XPD2_R O_LPT_XPD3_R O_LPT_XPD4_R O_LPT_XPD5_R O_LPT_XPD6_R O_LPT_XPD7_R O_LPT_ACK#_R O_LPT_BUSY_R O_LPT_PE_R O_LPT_SLCT_R H110M-C LPT PIN 1 H110M-C Parallel port connector ASUS H110M-C 1-13 LPT standardizes as a printer. CPU FAN PWM CPU FAN IN CPU FAN PWR GND CHA FAN PWM CHA FAN IN...

User Guide
Page 23
... plug. com/PowerSupplyCalculator/PSCalculator.aspx?SLanguage=en-us for the chassis-mounted system warning speaker. SPEAKER +5V GND GND Speaker Out H110M-C PIN 1 H110M-C Speaker out connector ASUS H110M-C 1-15 ATX12V EATXPWR PIN 1 H110M-C +12V DC +12V DC GND +3 Volts GND +12 Volts +12 Volts +5V Standby Power OK GND +5 Volts GND +5 Volts GND +3 Volts...
... plug. com/PowerSupplyCalculator/PSCalculator.aspx?SLanguage=en-us for the chassis-mounted system warning speaker. SPEAKER +5V GND GND Speaker Out H110M-C PIN 1 H110M-C Speaker out connector ASUS H110M-C 1-15 ATX12V EATXPWR PIN 1 H110M-C +12V DC +12V DC GND +3 Volts GND +12 Volts +12 Volts +5V Standby Power OK GND +5 Volts GND +5 Volts GND +3 Volts...
User Guide
Page 25
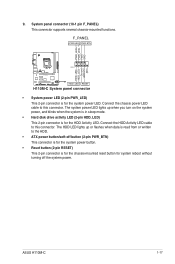
...connector (10-1 pin F_PANEL) This connector supports several chassis-mounted functions. F_PANEL +PWR LED- Connect the HDD Activity LED cable to this connector. ASUS H110M-C 1-17 The HDD LED lights up when you turn on the system power, and blinks when the system is in sleep mode. • ...Hard disk drive activity LED (2-pin HDD_LED) This 2-pin connector is for the HDD Activity LED. RESET H110M-C System panel connector • System power LED (2-pin PWR_LED) This 2-pin connector is for system reboot without turning off button (2-pin PWR_BTN) This...
...connector (10-1 pin F_PANEL) This connector supports several chassis-mounted functions. F_PANEL +PWR LED- Connect the HDD Activity LED cable to this connector. ASUS H110M-C 1-17 The HDD LED lights up when you turn on the system power, and blinks when the system is in sleep mode. • ...Hard disk drive activity LED (2-pin HDD_LED) This 2-pin connector is for the HDD Activity LED. RESET H110M-C System panel connector • System power LED (2-pin PWR_LED) This 2-pin connector is for system reboot without turning off button (2-pin PWR_BTN) This...
User Guide
Page 27
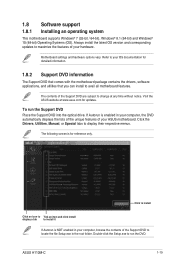
...Support DVD Place the Support DVD into the optical drive. Double-click the Setup.exe to install it If Autorun is for reference only. ASUS H110M-C 1-19 Refer to avail all motherboard features. To run the DVD. 1.8 Software support 1.8.1 Installing an operating system This motherboard supports Windows... install the latest OS version and corresponding updates to maximize the features of the Support DVD are subject to change at www.asus.com for detailed information. 1.8.2 Support DVD information The Support DVD that comes with the motherboard package contains the drivers, software ...
...Support DVD Place the Support DVD into the optical drive. Double-click the Setup.exe to install it If Autorun is for reference only. ASUS H110M-C 1-19 Refer to avail all motherboard features. To run the DVD. 1.8 Software support 1.8.1 Installing an operating system This motherboard supports Windows... install the latest OS version and corresponding updates to maximize the features of the Support DVD are subject to change at www.asus.com for detailed information. 1.8.2 Support DVD information The Support DVD that comes with the motherboard package contains the drivers, software ...
User Guide
Page 29
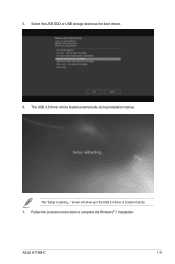
The USB 3.0 driver will show up if the USB 3.0 driver is starting..." Follow the onscreen instructions to complete the Windows® 7 installation. Select the USB ODD or USB storage device as the boot device. 6. screen will be loaded automatically during installation startup. ASUS H110M-C 1-21 The "Setup is loaded correctly. 7. 5.
The USB 3.0 driver will show up if the USB 3.0 driver is starting..." Follow the onscreen instructions to complete the Windows® 7 installation. Select the USB ODD or USB storage device as the boot device. 6. screen will be loaded automatically during installation startup. ASUS H110M-C 1-21 The "Setup is loaded correctly. 7. 5.
User Guide
Page 31
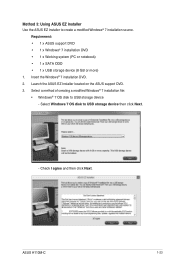
... create a modified Windows® 7 installation source. Check I agree and then click Next. ASUS H110M-C 1-23 Insert the Windows® 7 installation DVD. 2. Method 3: Using ASUS EZ Installer Use the ASUS EZ Installer to USB storage device - Launch the ASUS EZ Installer located on the ASUS support DVD. 3. Select Windows 7 OS disk to USB storage device then click...
... create a modified Windows® 7 installation source. Check I agree and then click Next. ASUS H110M-C 1-23 Insert the Windows® 7 installation DVD. 2. Method 3: Using ASUS EZ Installer Use the ASUS EZ Installer to USB storage device - Launch the ASUS EZ Installer located on the ASUS support DVD. 3. Select Windows 7 OS disk to USB storage device then click...
User Guide
Page 33
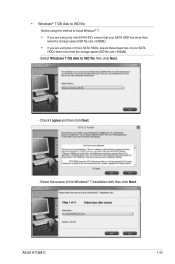
Select Windows 7 OS disk to install Windows® 7: • If you are using only one SATA HDD, ensure that your SATA HDDs have more than twice the storage space (ISO file size +500MB). • If you are using this method to ISO file then click Next. - • Windows® 7 OS disk to ISO file Before using two or more SATA HDDs, ensure that at least two of the Windows® 7 installation disk then click Next. Check I agree and then click Next. - Select the source of your SATA HDD has more than the storage space (ISO file size +500Mb). - ASUS H110M-C 1-25
Select Windows 7 OS disk to install Windows® 7: • If you are using only one SATA HDD, ensure that your SATA HDDs have more than twice the storage space (ISO file size +500MB). • If you are using this method to ISO file then click Next. - • Windows® 7 OS disk to ISO file Before using two or more SATA HDDs, ensure that at least two of the Windows® 7 installation disk then click Next. Check I agree and then click Next. - Select the source of your SATA HDD has more than the storage space (ISO file size +500Mb). - ASUS H110M-C 1-25
User Guide
Page 35
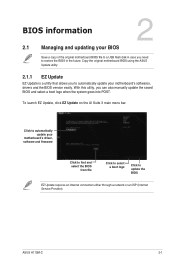
Copy the original motherboard BIOS using the ASUS Update utility. 2.1.1 EZ Update EZ Update is a utility that allows you can also manually update the saved BIOS and select a boot logo when the system ... select a boot logo Click to restore the BIOS in the future. To launch EZ Update, click EZ Update on the AI Suite 3 main menu bar. ASUS H110M-C 2-1 BIOS information 2 2.1 Managing and updating your BIOS Save a copy of the original motherboard BIOS file to a USB flash disk in case you need to update...
Copy the original motherboard BIOS using the ASUS Update utility. 2.1.1 EZ Update EZ Update is a utility that allows you can also manually update the saved BIOS and select a boot logo when the system ... select a boot logo Click to restore the BIOS in the future. To launch EZ Update, click EZ Update on the AI Suite 3 main menu bar. ASUS H110M-C 2-1 BIOS information 2 2.1 Managing and updating your BIOS Save a copy of the original motherboard BIOS file to a USB flash disk in case you need to update...
User Guide
Page 37
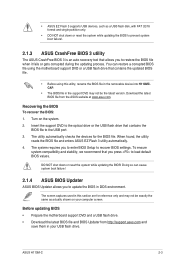
Doing so can restore a corrupted BIOS file using this section are for the BIOS file. ASUS H110M-C 2-3 Download the latest BIOS file from http://support.asus.com and save them in DOS environment. The utility automatically checks the devices for reference only and may not be exactly the ... • Prepare the motherboard support DVD and a USB flash drive. • Download the latest BIOS file and BIOS Updater from the ASUS website at www.asus.com. Recovering the BIOS To recover the BIOS: 1. Turn on your USB flash drive. The system requires you to recover BIOS settings....
Doing so can restore a corrupted BIOS file using this section are for the BIOS file. ASUS H110M-C 2-3 Download the latest BIOS file from http://support.asus.com and save them in DOS environment. The utility automatically checks the devices for reference only and may not be exactly the ... • Prepare the motherboard support DVD and a USB flash drive. • Download the latest BIOS file and BIOS Updater from the ASUS website at www.asus.com. Recovering the BIOS To recover the BIOS: 1. Turn on your USB flash drive. The system requires you to recover BIOS settings....
User Guide
Page 39
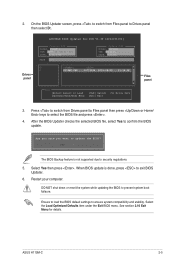
...BIOS file, select Yes to ensure system compatibility and stability. Are you sure you want to prevent system boot failaure. Select Yes then press . ASUS H110M-C 2-5 Yes No The BIOS Backup feature is done, press to security regulations. 5. When BIOS update is not supported due to exit BIOS Updater... the Load Optimized Defaults item under the Exit BIOS menu. See section 2.10 Exit Menu for DOS V1.30 [2014/01/01] Current ROM BOARD: H110M-C VER: 0305 (H :00 B :00) DATE: 8/20/2015 PATH: C:\ Update ROM BOARD: Unknown VER: Unknown DATE: Unknown C: FORMAN~1 D: H110MC.CAP ...
...BIOS file, select Yes to ensure system compatibility and stability. Are you sure you want to prevent system boot failaure. Select Yes then press . ASUS H110M-C 2-5 Yes No The BIOS Backup feature is done, press to security regulations. 5. When BIOS update is not supported due to exit BIOS Updater... the Load Optimized Defaults item under the Exit BIOS menu. See section 2.10 Exit Menu for DOS V1.30 [2014/01/01] Current ROM BOARD: H110M-C VER: 0305 (H :00 B :00) DATE: 8/20/2015 PATH: C:\ Update ROM BOARD: Unknown VER: Unknown DATE: Unknown C: FORMAN~1 D: H110MC.CAP ...
User Guide
Page 41
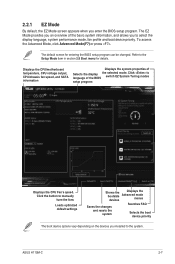
... display language of the basic system information, and allows you installed to select the display language, system performance mode, fan profile and boot device priority. ASUS H110M-C 2-7 The default screen for details. Click the button to manually tune the fans Loads optimized default settings Shows the bootable devices Displays the Advanced mode...
... display language of the basic system information, and allows you installed to select the display language, system performance mode, fan profile and boot device priority. ASUS H110M-C 2-7 The default screen for details. Click the button to manually tune the fans Loads optimized default settings Shows the bootable devices Displays the Advanced mode...
User Guide
Page 43
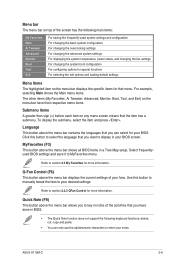
... select the language that you have their respective menu items. Submenu items A greater than sign (>) before each item on any menu screen means that menu. ASUS H110M-C 2-9 To display the submenu, select the item and press . Menu bar The menu bar on top of the screen has the following keyboard functions: delete...
... select the language that you have their respective menu items. Submenu items A greater than sign (>) before each item on any menu screen means that menu. ASUS H110M-C 2-9 To display the submenu, select the item and press . Menu bar The menu bar on top of the screen has the following keyboard functions: delete...
User Guide
Page 45
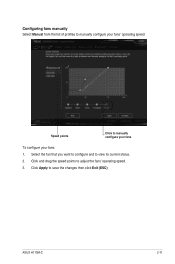
Click Apply to view its current status. 2. Configuring fans manually Select Manual from the list of profiles to manually configure your fans: 1. Select the fan that you want to configure and to save the changes then click Exit (ESC). Click and drag the speed points to manually configure your fans To configure your fans' operating speed. Speed points Click to adjust the fans' operating speed. 3. ASUS H110M-C 2-11
Click Apply to view its current status. 2. Configuring fans manually Select Manual from the list of profiles to manually configure your fans: 1. Select the fan that you want to configure and to save the changes then click Exit (ESC). Click and drag the speed points to manually configure your fans To configure your fans' operating speed. Speed points Click to adjust the fans' operating speed. 3. ASUS H110M-C 2-11


