
User Manual
Page 3
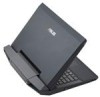
... Card Reader 61 Hard Disk Drive 62 Memory (RAM 64 Connections...65 Network Connection 65 Wireless LAN Connection (on selected models 67 Windows Wireless Network Connection 69 Bluetooth Wireless Connection(on selected models 71 Appendix Optional Accessories A-2 Optional Connections A-2 Operating System and Software A-3 System BIOS Settings A-4 Common Problems and Solutions A-7 Recovering Your Notebook PC A-13 Using Recovery Partition A-13 Using Recovery DVD (on selected models A-14 DVD-ROM Drive Information A-16 Blu-ray ROM Drive Information (on selected models A-18 Internal...
... Card Reader 61 Hard Disk Drive 62 Memory (RAM 64 Connections...65 Network Connection 65 Wireless LAN Connection (on selected models 67 Windows Wireless Network Connection 69 Bluetooth Wireless Connection(on selected models 71 Appendix Optional Accessories A-2 Optional Connections A-2 Operating System and Software A-3 System BIOS Settings A-4 Common Problems and Solutions A-7 Recovering Your Notebook PC A-13 Using Recovery Partition A-13 Using Recovery DVD (on selected models A-14 DVD-ROM Drive Information A-16 Blu-ray ROM Drive Information (on selected models A-18 Internal...
User Manual
Page 6
... followed for This Manual A few notes and warnings are used throughout this User's Manual: 1. Using the Notebook PC Gives you information on the Notebook PC's components. 3. Please accept your Notebook PC and the pictures shown in the Notebook PC and how to complete certain tasks safely and effectively.These notes have different degrees of this guide, allowing you to optional accessories and...
... followed for This Manual A few notes and warnings are used throughout this User's Manual: 1. Using the Notebook PC Gives you information on the Notebook PC's components. 3. Please accept your Notebook PC and the pictures shown in the Notebook PC and how to complete certain tasks safely and effectively.These notes have different degrees of this guide, allowing you to optional accessories and...
User Manual
Page 7
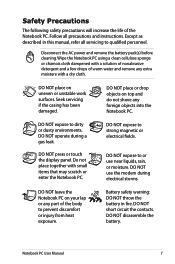
... work surfaces. Do not place together with a dry cloth. DO NOT disassemble the battery. Disconnect the AC power and remove the battery pack(s) before cleaning. DO NOT operate during electrical storms. DO NOT leave the Notebook PC on your lap or any part of the body to prevent discomfort or injury from heat exposure. DO NOT press or touch the display panel...
... work surfaces. Do not place together with a dry cloth. DO NOT disassemble the battery. Disconnect the AC power and remove the battery pack(s) before cleaning. DO NOT operate during electrical storms. DO NOT leave the Notebook PC on your lap or any part of the body to prevent discomfort or injury from heat exposure. DO NOT press or touch the display panel...
User Manual
Page 20
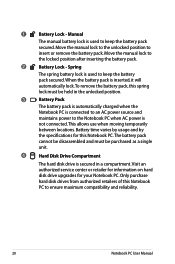
... battery pack. 2 Battery Lock - Visit an authorized service center or retailer for information on hard disk drive upgrades for this Notebook PC.The battery pack cannot be disassembled and must be purchased as a single unit. 4 Hard Disk Drive Compartment The hard disk drive is secured in the unlocked position. 3 Battery Pack The battery pack is automatically charged when the Notebook PC is not connected. Move the manual lock to insert or remove the battery pack. Only purchase hard disk drives...
... battery pack. 2 Battery Lock - Visit an authorized service center or retailer for information on hard disk drive upgrades for this Notebook PC.The battery pack cannot be disassembled and must be purchased as a single unit. 4 Hard Disk Drive Compartment The hard disk drive is secured in the unlocked position. 3 Battery Pack The battery pack is automatically charged when the Notebook PC is not connected. Move the manual lock to insert or remove the battery pack. Only purchase hard disk drives...

User Manual
Page 22
... support compact discs (CD) and/or digital video discs (DVD) and may have recordable (R) or re-writable (RW) capabilities. Using this jack automatically disables the built-in microphone. Use this jack automatically disables the built-in speakers. 2 Microphone Input Jack The mono microphone jack (1/8 inch) can be used to connect the Notebook PC's audio out signal to connect an external microphone or output signals from audio devices. Using this feature for details on each model. 22 Notebook PC User Manual...
... support compact discs (CD) and/or digital video discs (DVD) and may have recordable (R) or re-writable (RW) capabilities. Using this jack automatically disables the built-in microphone. Use this jack automatically disables the built-in speakers. 2 Microphone Input Jack The mono microphone jack (1/8 inch) can be used to connect the Notebook PC's audio out signal to connect an external microphone or output signals from audio devices. Using this feature for details on each model. 22 Notebook PC User Manual...

User Manual
Page 25
..., or high-definition video, plus multi-channel digital audio on a single computer, with USB 2.0 or USB 1.1 devices such as additional plug-in a series up to exit the Notebook PC. USB supports hot-swapping of the air vents or else overheating may occur. 5 HDMI HDMI Port HDMI (High-Definition Multimedia Interface) is compatible with some peripherals acting as keyboards, pointing devices, cameras, hard disk drives, printers, and scanners connected in sites or...
..., or high-definition video, plus multi-channel digital audio on a single computer, with USB 2.0 or USB 1.1 devices such as additional plug-in a series up to exit the Notebook PC. USB supports hot-swapping of the air vents or else overheating may occur. 5 HDMI HDMI Port HDMI (High-Definition Multimedia Interface) is compatible with some peripherals acting as keyboards, pointing devices, cameras, hard disk drives, printers, and scanners connected in sites or...

User Manual
Page 27
.... 5 Display (Monitor) Output The 15-pin D-sub monitor port supports a standard VGA-compatible device such as a monitor or projector to allow viewing on a larger external display. 6 USB Port (2.0) The USB (Universal Serial Bus) port is compatible with some peripherals acting as a digital television (DTV). Supports standard, enhanced, or high-definition video, plus multi-channel digital audio on a single computer, with USB 2.0 or USB 1.1 devices such as keyboards, pointing devices, cameras, hard disk drives, printers, and scanners connected...
.... 5 Display (Monitor) Output The 15-pin D-sub monitor port supports a standard VGA-compatible device such as a monitor or projector to allow viewing on a larger external display. 6 USB Port (2.0) The USB (Universal Serial Bus) port is compatible with some peripherals acting as a digital television (DTV). Supports standard, enhanced, or high-definition video, plus multi-channel digital audio on a single computer, with USB 2.0 or USB 1.1 devices such as keyboards, pointing devices, cameras, hard disk drives, printers, and scanners connected...
User Manual
Page 36
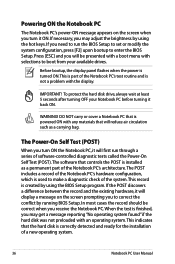
.... The Power-On Self Test (POST) When you turn it ON. To protect the hard disk drive, always wait at least 5 seconds after turning OFF your available drives. This record is part of a new operating system. 36 Notebook PC User Manual In most cases the record should be presented with a boot menu with any materials that will first run the BIOS Setup to set or modify the system configuration...
.... The Power-On Self Test (POST) When you turn it ON. To protect the hard disk drive, always wait at least 5 seconds after turning OFF your available drives. This record is part of a new operating system. 36 Notebook PC User Manual In most cases the record should be presented with a boot menu with any materials that will first run the BIOS Setup to set or modify the system configuration...
User Manual
Page 42
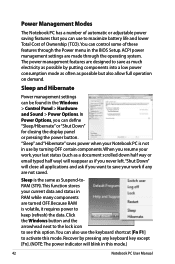
.... Sleep and Hibernate Power management settings can be found in RAM while many components are not saved. When you resume your current data and status in the Windows > Control Panel > Hardware and Sound > Power Options. Click the Windows button and the arrowhead next to the lock icon to see this mode. Power Management Modes The Notebook PC has a number of these features through the operating system. This function stores your work if any keyboard key except...
.... Sleep and Hibernate Power management settings can be found in RAM while many components are not saved. When you resume your current data and status in the Windows > Control Panel > Hardware and Sound > Power Options. Click the Windows button and the arrowhead next to the lock icon to see this mode. Power Management Modes The Notebook PC has a number of these features through the operating system. This function stores your work if any keyboard key except...

User Manual
Page 44
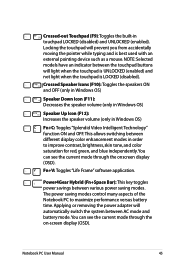
... on the Notebook PC's keyboard. Windows software settings are necessary to -Disk depending on sleep button setting in Display Property Settings.) NOTE: Must connect an external monitor "before" booting up. 44 Notebook PC User Manual The colored commands can only be accessed by first pressing and holding the function key while pressing a key with an on selected models) ON or OFF with a colored command. Radio Tower (F2): Wireless Models Only:Toggles the internal wireless LAN or Bluetooth (on -screen-display. Sun...
... on the Notebook PC's keyboard. Windows software settings are necessary to -Disk depending on sleep button setting in Display Property Settings.) NOTE: Must connect an external monitor "before" booting up. 44 Notebook PC User Manual The colored commands can only be accessed by first pressing and holding the function key while pressing a key with an on selected models) ON or OFF with a colored command. Radio Tower (F2): Wireless Models Only:Toggles the internal wireless LAN or Bluetooth (on -screen-display. Sun...
User Manual
Page 45
Notebook PC User Manual 45 This allows switching between the touchpad buttons will light when the touchpad is UNLOCKED (enabled) and not light when the touchpad is best used with an external pointing device such as a mouse. Fn+V: Toggles "Life Frame" software application. Applying or removing the power adapter will prevent you from accidentally moving the pointer while typing and is LOCKED (disabled). The power saving modes control many aspects of the Notebook PC to improve contrast, brightness, skin...
Notebook PC User Manual 45 This allows switching between the touchpad buttons will light when the touchpad is UNLOCKED (enabled) and not light when the touchpad is best used with an external pointing device such as a mouse. Fn+V: Toggles "Life Frame" software application. Applying or removing the power adapter will prevent you from accidentally moving the pointer while typing and is LOCKED (disabled). The power saving modes control many aspects of the Notebook PC to improve contrast, brightness, skin...
User Manual
Page 61
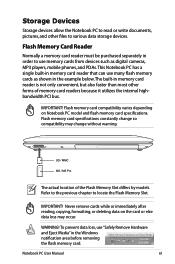
...! Never remove cards while or immediately after reading, copying, formatting, or deleting data on Notebook PC model and flash memory card specifications. Flash memory card specifications constantly change so compatibility may occur. Notebook PC User Manual 61 IMPORTANT! Storage Devices Storage devices allow the Notebook PC to read or write documents, pictures, and other forms of the Flash Memory Slot differs by models. SD / MMC MS / MS Pro The actual location of memory card readers because it utilizes the internal highbandwidth...
...! Never remove cards while or immediately after reading, copying, formatting, or deleting data on Notebook PC model and flash memory card specifications. Flash memory card specifications constantly change so compatibility may occur. Notebook PC User Manual 61 IMPORTANT! Storage Devices Storage devices allow the Notebook PC to read or write documents, pictures, and other forms of the Flash Memory Slot differs by models. SD / MMC MS / MS Pro The actual location of memory card readers because it utilizes the internal highbandwidth...

User Manual
Page 64
There is no hardware or software (including BIOS) setup required after the memory is only an example.) Notebook PC User Manual The actual location of the memory differs by decreasing hard disk access. Installing a Memory Card: Removing a Memory Card: 33 (This is only an example.) 64 (This is installed. Memory (RAM) Additional memory will increase application performance by models. The BIOS automatically detects the amount of this Notebook PC to locate the memory. Refer to the previous chapter to...
There is no hardware or software (including BIOS) setup required after the memory is only an example.) Notebook PC User Manual The actual location of the memory differs by decreasing hard disk access. Installing a Memory Card: Removing a Memory Card: 33 (This is only an example.) 64 (This is installed. Memory (RAM) Additional memory will increase application performance by models. The BIOS automatically detects the amount of this Notebook PC to locate the memory. Refer to the previous chapter to...
User Manual
Page 77
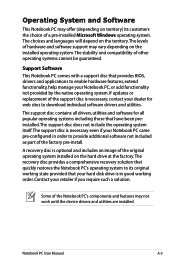
... recovery solution that quickly restores the Notebook PC's operating system to download individual software drivers and utilities. The stability and compatibility of hardware and software support may not work until the device drivers and utilities are installed. Contact your Notebook PC came pre-configured in good working order. Support Software This Notebook PC comes with a support disc that have been preinstalled.The support disc does not include the operating system itself.The support disc is in order to enable hardware features, extend functionality, help manage your hard disk...
... recovery solution that quickly restores the Notebook PC's operating system to download individual software drivers and utilities. The stability and compatibility of hardware and software support may not work until the device drivers and utilities are installed. Contact your Notebook PC came pre-configured in good working order. Support Software This Notebook PC comes with a support disc that have been preinstalled.The support disc does not include the operating system itself.The support disc is in order to enable hardware features, extend functionality, help manage your hard disk...
User Manual
Page 79
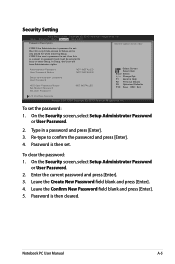
... Enter: Select +/-: Change Opt. On the Security screen, select Setup Administrator Password or User Password. 2. Password is set . Enter the current password and press [Enter]. 3. To set , then this is then cleared. Copyright (C) 2010 American Megatrends, Inc. Leave the Confirm New Password field blank and press [Enter]. 5. Leave the Create New Password field blank and press [Enter]. 4. Notebook PC User Manual A-5 Security Setting Aptio Setup Utility - Main Advanced Boot Security Save & Exit Password Description Set the system boot order. Type in a password...
... Enter: Select +/-: Change Opt. On the Security screen, select Setup Administrator Password or User Password. 2. Password is set . Enter the current password and press [Enter]. 3. To set , then this is then cleared. Copyright (C) 2010 American Megatrends, Inc. Leave the Confirm New Password field blank and press [Enter]. 5. Leave the Create New Password field blank and press [Enter]. 4. Notebook PC User Manual A-5 Security Setting Aptio Setup Utility - Main Advanced Boot Security Save & Exit Password Description Set the system boot order. Type in a password...
User Manual
Page 81
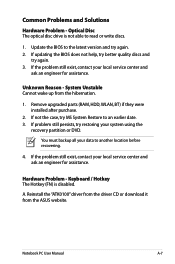
... - Notebook PC User Manual A-7 Optical Disc The optical disc drive is disabled. Remove upgraded parts (RAM, HDD, WLAN, BT) if they were installed after purchase. 2. A. If problem still persists, try again. 3. Keyboard / Hotkey The Hotkey (FN) is not able to read or write discs. 1. If the problem still exist, contact your system using the recovery partition or DVD. If the problem still exist, contact your data to an earlier date. 3. Hardware Problem - Reinstall the "ATK0100" driver from...
... - Notebook PC User Manual A-7 Optical Disc The optical disc drive is disabled. Remove upgraded parts (RAM, HDD, WLAN, BT) if they were installed after purchase. 2. A. If problem still persists, try again. 3. Keyboard / Hotkey The Hotkey (FN) is not able to read or write discs. 1. If the problem still exist, contact your system using the recovery partition or DVD. If the problem still exist, contact your data to an earlier date. 3. Hardware Problem - Reinstall the "ATK0100" driver from...

User Manual
Page 83
... repair. Enter Control Panel -> Device Manager. Make sure that the FAN works when the CPU temperature is high and check whether there is equipped with a wireless card? IMPORTANT! Battery problem; If you have many applications running (see whether the Notebook PC has a WLAN card under the "Network Adapter" item. B. C. Adapter problem; Wireless Card How to another location before recovering. You will see taskbar), close them . 4. You must backup all your system using the recovery partition or disc. Symptom & Solutions: A. Problem...
... repair. Enter Control Panel -> Device Manager. Make sure that the FAN works when the CPU temperature is high and check whether there is equipped with a wireless card? IMPORTANT! Battery problem; If you have many applications running (see whether the Notebook PC has a WLAN card under the "Network Adapter" item. B. C. Adapter problem; Wireless Card How to another location before recovering. You will see taskbar), close them . 4. You must backup all your system using the recovery partition or disc. Symptom & Solutions: A. Problem...
User Manual
Page 86
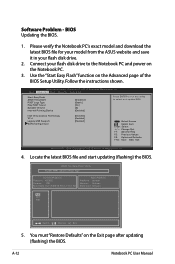
...-d Legacy USB Support SATA Configuration [Enabled] [Enabled] [Enabled] : Select Screen : Select Item Enter: Select +/-: Change Opt. F1: General Help F2: Previous Values F9: Optimized Defaults F10: Save ESC: Exit Version 2.01.1204. A-12 Notebook PC User Manual Use the "Start Easy Flash" function on the Notebook PC. 3. You must "Restore Defaults" on the Exit page after updating (flashing) the BIOS. Follow the instructions shown. Software Problem - ASUS Tek. Please verify the Notebook PC's exact model and download the latest BIOS file...
...-d Legacy USB Support SATA Configuration [Enabled] [Enabled] [Enabled] : Select Screen : Select Item Enter: Select +/-: Change Opt. F1: General Help F2: Previous Values F9: Optimized Defaults F10: Save ESC: Exit Version 2.01.1204. A-12 Notebook PC User Manual Use the "Start Easy Flash" function on the Notebook PC. 3. You must "Restore Defaults" on the Exit page after updating (flashing) the BIOS. Follow the instructions shown. Software Problem - ASUS Tek. Please verify the Notebook PC's exact model and download the latest BIOS file...
User Manual
Page 88
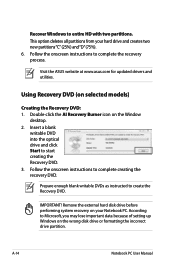
... for updated drivers and utilities. Remove the external hard disk drive before performing system recovery on selected models) Creating the Recovery DVD: 1. Double-click the AI Recovery Burner icon on the wrong disk drive or formatting the incorrect drive partition. According to entire HD with two partitions. This option deletes all partitions from your Notebook PC. Using Recovery DVD (on your hard drive and creates two new partitions"C"(25%) and"D"(75%). 6. Follow the onscreen instructions to create the Recovery DVD. Prepare enough blank writable DVDs as instructed...
... for updated drivers and utilities. Remove the external hard disk drive before performing system recovery on selected models) Creating the Recovery DVD: 1. Double-click the AI Recovery Burner icon on the wrong disk drive or formatting the incorrect drive partition. According to entire HD with two partitions. This option deletes all partitions from your Notebook PC. Using Recovery DVD (on your hard drive and creates two new partitions"C"(25%) and"D"(75%). 6. Follow the onscreen instructions to create the Recovery DVD. Prepare enough blank writable DVDs as instructed...

User Manual
Page 89
Using the Recovery DVD: 1. Visit the ASUS website at www.asus.com for updated drivers and utilities. Follow the onscreen instructions to restore the image. 4. WARNING: DO NOT remove the Recovery disc, unless instructed to boot from the Recovery DVD. 3. Unstable power supply may be labeled as "CD/DVD") and press [Enter] to do so, during the recovery process or else your partitions will overwrite your hard drive. Ensure to be unusable. Notebook PC User Manual A-15 Restart...
Using the Recovery DVD: 1. Visit the ASUS website at www.asus.com for updated drivers and utilities. Follow the onscreen instructions to restore the image. 4. WARNING: DO NOT remove the Recovery disc, unless instructed to boot from the Recovery DVD. 3. Unstable power supply may be labeled as "CD/DVD") and press [Enter] to do so, during the recovery process or else your partitions will overwrite your hard drive. Ensure to be unusable. Notebook PC User Manual A-15 Restart...


