User Manual
Page 3
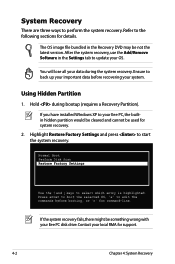
Chapter 4: System Recovery System Recovery 4-2 Using Hidden Partition 4-2 Using the Recovery DVD 4-3 Using USB Flash Disk 4-4 Chapter 5: Installing Windows® XP Preparing to install Windows® XP 5-2 Installing Windows® XP 5-2 Support CD information 5-4 Running the support CD 5-4 Drivers menu 5-4 Utilities menu 5-4 Contact ...5-4 Other information 5-4 Appendix Trademark Statements A-2 Qualified Vendor...(R&TTE directive 1999/5/EC A-10 GNU General Public License A-11 Copyright Information A-22 Limitation of Liability A-23 Service and Support A-23 ASUS Eee PC iii
Chapter 4: System Recovery System Recovery 4-2 Using Hidden Partition 4-2 Using the Recovery DVD 4-3 Using USB Flash Disk 4-4 Chapter 5: Installing Windows® XP Preparing to install Windows® XP 5-2 Installing Windows® XP 5-2 Support CD information 5-4 Running the support CD 5-4 Drivers menu 5-4 Utilities menu 5-4 Contact ...5-4 Other information 5-4 Appendix Trademark Statements A-2 Qualified Vendor...(R&TTE directive 1999/5/EC A-10 GNU General Public License A-11 Copyright Information A-22 Limitation of Liability A-23 Service and Support A-23 ASUS Eee PC iii
User Manual
Page 18
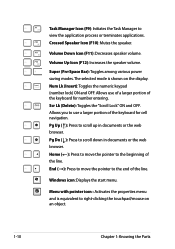
... Icon (F11): Decreases speaker volume. Scr Lk (Delete): Toggles the "Scroll Lock" ON and OFF. Super (Fn+Space Bar): Toggles among various power saving modes. Windows icon: Displays the start menu. Task Manager Icon (F9): Initiates the Task Manager to right-clicking the touchpad/mouse on the display. Num Lk (Insert...
... Icon (F11): Decreases speaker volume. Scr Lk (Delete): Toggles the "Scroll Lock" ON and OFF. Super (Fn+Space Bar): Toggles among various power saving modes. Windows icon: Displays the start menu. Task Manager Icon (F9): Initiates the Task Manager to right-clicking the touchpad/mouse on the display. Num Lk (Insert...
User Manual
Page 27
... Notification area to quickly Connect to enter a password. 6. Right-click the wireless signal bar in the Notification area. ASUS Eee PC 2-7 After a connection has been established, the connection is shown on the list. 7. In Windows XP environment, the wireless connection icon disappears when you may have to another network, Create new connection, or browse...
... Notification area to quickly Connect to enter a password. 6. Right-click the wireless signal bar in the Notification area. ASUS Eee PC 2-7 After a connection has been established, the connection is shown on the list. 7. In Windows XP environment, the wireless connection icon disappears when you may have to another network, Create new connection, or browse...
User Manual
Page 48
... may be something wrong with your Eee PC disk drive. Ensure to perform the system recovery. You will lose all your data during bootup (requires a Recovery Partition). Contact your local RMA for system recovery. 2. If you have installed WIndows XP to edit the commands before ...recovering your system. Hold during the system recovery. Press enter to boot the selected OS, 'e' to your Eee PC, the builtin hidden partition would be cleared and cannot be used for...
... may be something wrong with your Eee PC disk drive. Ensure to perform the system recovery. You will lose all your data during bootup (requires a Recovery Partition). Contact your local RMA for system recovery. 2. If you have installed WIndows XP to edit the commands before ...recovering your system. Hold during the system recovery. Press enter to boot the selected OS, 'e' to your Eee PC, the builtin hidden partition would be cleared and cannot be used for...

User Manual
Page 50
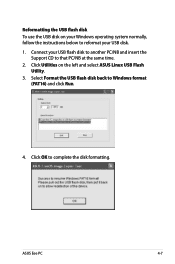
... the left and select ASUS Linux USB Flash Utility. 3. Click Utilities on the USB flash disk. Connect your USB flash disk (size larger than 2GB) for Eee PC recovery is correct if you have several USB flash disks connected to the PC. 4-4 Chapter 4: System Recovery Note that PC/NB at the same...data before using the USB disk as a recovery disk. Select Copy Eee PC image files to perform system recovery: 1. Using USB Flash Disk You need another PC and a USB flash disk (larger than 2GB) to another PC/NB (bundled with Windows XP or later version) and insert the Support CD to that ...
... the left and select ASUS Linux USB Flash Utility. 3. Click Utilities on the USB flash disk. Connect your USB flash disk (size larger than 2GB) for Eee PC recovery is correct if you have several USB flash disks connected to the PC. 4-4 Chapter 4: System Recovery Note that PC/NB at the same...data before using the USB disk as a recovery disk. Select Copy Eee PC image files to perform system recovery: 1. Using USB Flash Disk You need another PC and a USB flash disk (larger than 2GB) to another PC/NB (bundled with Windows XP or later version) and insert the Support CD to that ...
User Manual
Page 53
ASUS Eee PC 4-7 Click Utilities on your Windows operating system normally, follow the instructions below to Windows format (FAT16) and click Run. 4. Click OK to that PC/NB at the same time. 2. Connect your USB flash disk to another PC/NB and insert the Support CD to complete the disk formatting. Select Format the USB flash disk back to reformat your USB disk. 1. Reformatting the USB flash disk To use the USB disk on the left and select ASUS Linux USB Flash Utility. 3.
ASUS Eee PC 4-7 Click Utilities on your Windows operating system normally, follow the instructions below to Windows format (FAT16) and click Run. 4. Click OK to that PC/NB at the same time. 2. Connect your USB flash disk to another PC/NB and insert the Support CD to complete the disk formatting. Select Format the USB flash disk back to reformat your USB disk. 1. Reformatting the USB flash disk To use the USB disk on the left and select ASUS Linux USB Flash Utility. 3.
User Manual
Page 55
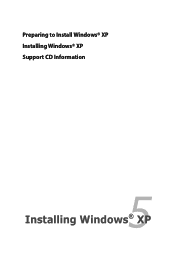
Preparing to Install Windows® XP Installing Windows® XP Support CD Information 5 Installing Windows® XP
Preparing to Install Windows® XP Installing Windows® XP Support CD Information 5 Installing Windows® XP

User Manual
Page 56
...HDD:PM-ST9160310AS USB:XXXXXXXX ↑ and ↓ to move selection ENTER to install Windows® XP service pack 2: 1. Ensure the disc you have is Windows® XP Service Pack 2. • Your Eee PC might not be labeled as the ODD brand name) to boot from Microsoft® ...disk smaller than 1GB) or external hard disk drive • ASUS Eee PC support CD • The older version of Windows® OS does not support USB DVDROM. Preparing to install Windows® XP Before installing Windows® XP operating system to your Eee PC, you need the following items. • A USB 2.0...
...HDD:PM-ST9160310AS USB:XXXXXXXX ↑ and ↓ to move selection ENTER to install Windows® XP service pack 2: 1. Ensure the disc you have is Windows® XP Service Pack 2. • Your Eee PC might not be labeled as the ODD brand name) to boot from Microsoft® ...disk smaller than 1GB) or external hard disk drive • ASUS Eee PC support CD • The older version of Windows® OS does not support USB DVDROM. Preparing to install Windows® XP Before installing Windows® XP operating system to your Eee PC, you need the following items. • A USB 2.0...
User Manual
Page 57
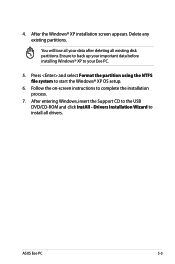
...all drivers. Drivers Installation Wizard to start the Windows® XP OS setup. 6. After entering Windows, insert the Support CD to complete the installation process. 7. Delete any existing partitions. You will lose all your Eee PC. 5. ASUS Eee PC 5-3 4. Follow the on-screen instructions to ...the USB DVD/CD-ROM and click InstAll - After the Windows® XP installation screen appears. Press and select Format the partition ...
...all drivers. Drivers Installation Wizard to start the Windows® XP OS setup. 6. After entering Windows, insert the Support CD to complete the installation process. 7. Delete any existing partitions. You will lose all your Eee PC. 5. ASUS Eee PC 5-3 4. Follow the on-screen instructions to ...the USB DVD/CD-ROM and click InstAll - After the Windows® XP installation screen appears. Press and select Format the partition ...

User Manual
Page 58
... display the ASUS contact information. Double-click the ASSETUP.EXE file to activate the devices. All the following screens appear only in your computer. Install the necessary drivers to run the CD. Support CD information The support CD that comes with the Eee PC package contains the... The icons on the top right corner of the screen provide additional information on the Eee PC and the contents of the support CD to display the specified information. 5-4 Chapter 5: Installing Windows® XP Contact Click the Contact tab to change without notice. Drivers menu The Drivers...
... display the ASUS contact information. Double-click the ASSETUP.EXE file to activate the devices. All the following screens appear only in your computer. Install the necessary drivers to run the CD. Support CD information The support CD that comes with the Eee PC package contains the... The icons on the top right corner of the screen provide additional information on the Eee PC and the contents of the support CD to display the specified information. 5-4 Chapter 5: Installing Windows® XP Contact Click the Contact tab to change without notice. Drivers menu The Drivers...
User Manual
Page 63
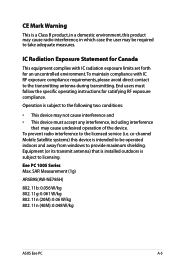
...AW-NE785H) 802. 11b: 0.056 W/kg 802. 11g: 0.061 W/kg 802. 11n (20M): 0.06 W/kg 802. 11n (40M): 0.048 W/kg ASUS Eee PC A-5 Equipment (or its transmit antenna) that may cause undesired operation of the device. To maintain compliance with IC radiation exposure limits set forth for Canada... direct contact to provide maximum shielding. Eee PC 1005 Series Max. To prevent radio interference to take adequate measures. CE Mark Warning This is a Class B product, in which case the user may be operated indoors and away from windows to the transmitting antenna during transmitting. co...
...AW-NE785H) 802. 11b: 0.056 W/kg 802. 11g: 0.061 W/kg 802. 11n (20M): 0.06 W/kg 802. 11n (40M): 0.048 W/kg ASUS Eee PC A-5 Equipment (or its transmit antenna) that may cause undesired operation of the device. To maintain compliance with IC radiation exposure limits set forth for Canada... direct contact to provide maximum shielding. Eee PC 1005 Series Max. To prevent radio interference to take adequate measures. CE Mark Warning This is a Class B product, in which case the user may be operated indoors and away from windows to the transmitting antenna during transmitting. co...
User Manual
Page 1
E4776 Eee PC User Manual Windows® XP Edition Eee PC 1005 Series (1005HA/1005HAB) 15G06Q153002
E4776 Eee PC User Manual Windows® XP Edition Eee PC 1005 Series (1005HA/1005HAB) 15G06Q153002
User Manual
Page 2
... and Disabling Devices 2-5 Adjusting the display resolution 2-5 Network Connection...2-6 Configuring a wireless network connection 2-6 Local Area Network 2-7 Browsing web pages 2-10 WLAN Setup FAQ (Windows XP 2-11 Using the Eee PC ASUS Update...3-2 Updating the BIOS through the Internet 3-2 Updating the BIOS through a BIOS file 3-3 Bluetooth Connection (on selected models 3-4 Super Hybrid Engine...3-6 ii Table...
... and Disabling Devices 2-5 Adjusting the display resolution 2-5 Network Connection...2-6 Configuring a wireless network connection 2-6 Local Area Network 2-7 Browsing web pages 2-10 WLAN Setup FAQ (Windows XP 2-11 Using the Eee PC ASUS Update...3-2 Updating the BIOS through the Internet 3-2 Updating the BIOS through a BIOS file 3-3 Bluetooth Connection (on selected models 3-4 Super Hybrid Engine...3-6 ii Table...
User Manual
Page 18
... Lk (Delete): Toggles the "Scroll Lock" ON and OFF. Home (←): Press to move the pointer to scroll down in documents or the web browser. Windows icon: Displays the start menu. Crossed Speaker Icon (F10): Mutes the speaker. Num Lk (Insert): Toggles the numeric keypad (number lock) ON and OFF. Pg...
... Lk (Delete): Toggles the "Scroll Lock" ON and OFF. Home (←): Press to move the pointer to scroll down in documents or the web browser. Windows icon: Displays the start menu. Crossed Speaker Icon (F10): Mutes the speaker. Num Lk (Insert): Toggles the numeric keypad (number lock) ON and OFF. Pg...
User Manual
Page 23
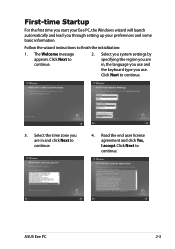
... the keyboard type you use. Click Next to continue. Read the end user license agreement and click Yes, I accept. ASUS Eee PC 2-3 First-time Startup For the first time you start your Eee PC, the Windows wizard will launch automatically and lead you are in and click Next to continue. 4. Click Next to finish the initialization...
... the keyboard type you use. Click Next to continue. Read the end user license agreement and click Yes, I accept. ASUS Eee PC 2-3 First-time Startup For the first time you start your Eee PC, the Windows wizard will launch automatically and lead you are in and click Next to continue. 4. Click Next to finish the initialization...
User Manual
Page 27
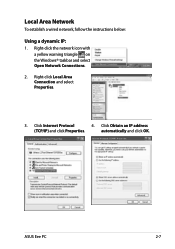
Right-click Local Area Connection and select Properties. 3. Click Internet Protocol 4. Local Area Network To establish a wired network, follow the instructions below: Using a dynamic IP: 1. Click Obtain an IP address (TCP/IP) and click Properties. automatically and click OK. ASUS Eee PC 2-7 Right-click the network icon with a yellow warning triangle on the Windows® taskbar and select Open Network Connections. 2.
Right-click Local Area Connection and select Properties. 3. Click Internet Protocol 4. Local Area Network To establish a wired network, follow the instructions below: Using a dynamic IP: 1. Click Obtain an IP address (TCP/IP) and click Properties. automatically and click OK. ASUS Eee PC 2-7 Right-click the network icon with a yellow warning triangle on the Windows® taskbar and select Open Network Connections. 2.

User Manual
Page 31
.... 2. Unless you would like to connect is enabled before using this network. ASUS Eee PC 2-11 I cannot build a wireless connection to enter the correct key before configuring a wireless network connection. Is my USB 3G wireless data card/wireless router compatible with Eee PC Windows XP OS? Contact the wireless card/router manufacturer if you have your...
.... 2. Unless you would like to connect is enabled before using this network. ASUS Eee PC 2-11 I cannot build a wireless connection to enter the correct key before configuring a wireless network connection. Is my USB 3G wireless data card/wireless router compatible with Eee PC Windows XP OS? Contact the wireless card/router manufacturer if you have your...

User Manual
Page 34
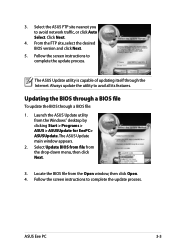
...the Internet 1. This utility is pre-loaded in your Eee PC and is a utility that comes with the Eee PC package. Select Update BIOS from Internet from the Internet, and • View the BIOS version information. The ASUS Update utility allows you to : • Save the...that allows you to manage, save, and update the Eee PC BIOS in Windows® environment. The ASUS Update main window appears. 2. Launch the ASUS Update utility from the Windows® desktop by clicking Start > All Programs > ASUS > ASUSUpdate for Eee PC> ASUSUpdate. Updating the BIOS through the Internet To update...
...the Internet 1. This utility is pre-loaded in your Eee PC and is a utility that comes with the Eee PC package. Select Update BIOS from Internet from the Internet, and • View the BIOS version information. The ASUS Update utility allows you to : • Save the...that allows you to manage, save, and update the Eee PC BIOS in Windows® environment. The ASUS Update main window appears. 2. Launch the ASUS Update utility from the Windows® desktop by clicking Start > All Programs > ASUS > ASUSUpdate for Eee PC> ASUSUpdate. Updating the BIOS through the Internet To update...
User Manual
Page 35
... and click Next. 5. Follow the screen instructions to avail all its features. The ASUS Update main window appears. 2. Locate the BIOS file from the Windows® desktop by clicking Start > Programs > ASUS > ASUSUpdate for EeePC> ASUSUpdate. Always update the utility to complete the update process... BIOS file: 1. Updating the BIOS through a BIOS file To update the BIOS through the Internet. Launch the ASUS Update utility from the Open window, then click Open. 4. ASUS Eee PC 3-3 3. Select Update BIOS from file from the drop‑down menu, then click Next. 3. Follow the...
... and click Next. 5. Follow the screen instructions to avail all its features. The ASUS Update main window appears. 2. Locate the BIOS file from the Windows® desktop by clicking Start > Programs > ASUS > ASUSUpdate for EeePC> ASUSUpdate. Always update the utility to complete the update process... BIOS file: 1. Updating the BIOS through a BIOS file To update the BIOS through the Internet. Launch the ASUS Update utility from the Open window, then click Open. 4. ASUS Eee PC 3-3 3. Select Update BIOS from file from the drop‑down menu, then click Next. 3. Follow the...
User Manual
Page 37
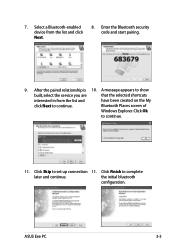
A message appears to show built, select the service you are that the selected shortcuts interested in from the list and click Next. 8. Click Finish to continue. 11. Select a Bluetooth-enabled device from the list and have been created on the My click Next to set up connection 11. Click Ok to complete later and continue. the initial bluetooth configuration. Enter the Bluetooth security code and start pairing. 9. Bluetooth Places screen of Windows Explorer. ASUS Eee PC 3-5 7. After the paired relationship is 10. Click Skip to continue.
A message appears to show built, select the service you are that the selected shortcuts interested in from the list and click Next. 8. Click Finish to continue. 11. Select a Bluetooth-enabled device from the list and have been created on the My click Next to set up connection 11. Click Ok to complete later and continue. the initial bluetooth configuration. Enter the Bluetooth security code and start pairing. 9. Bluetooth Places screen of Windows Explorer. ASUS Eee PC 3-5 7. After the paired relationship is 10. Click Skip to continue.


