User Guide
Page 4
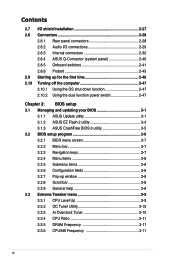
... utility 3-1 3.1.2 ASUS EZ Flash 2 utility 3-4 3.1.3 ASUS CrashFree BIOS 3 utility 3-5 3.2 BIOS setup program 3-6 3.2.1 BIOS menu screen 3-7 3.2.2 Menu bar 3-7 3.2.3 Navigation keys 3-7 3.2.4 Menu items 3-8 3.2.5 Submenu items 3-8 3.2.6 Configuration fields 3-8 3.2.7 Pop-up window 3-8 3.2.8 Scroll bar 3-8 3.2.9 General help 3-8 3.3 Extreme Tweaker menu 3-9 3.3.1 CPU Level Up 3-9 3.3.2 OC Tuner Utility 3-10 3.3.3 Ai Overclock Tuner 3-10 3.3.4 CPU Ratio 3-11 3.3.5 DRAM Frequency 3-11 3.3.6 CPU/NB Frequency 3-11 iv
... utility 3-1 3.1.2 ASUS EZ Flash 2 utility 3-4 3.1.3 ASUS CrashFree BIOS 3 utility 3-5 3.2 BIOS setup program 3-6 3.2.1 BIOS menu screen 3-7 3.2.2 Menu bar 3-7 3.2.3 Navigation keys 3-7 3.2.4 Menu items 3-8 3.2.5 Submenu items 3-8 3.2.6 Configuration fields 3-8 3.2.7 Pop-up window 3-8 3.2.8 Scroll bar 3-8 3.2.9 General help 3-8 3.3 Extreme Tweaker menu 3-9 3.3.1 CPU Level Up 3-9 3.3.2 OC Tuner Utility 3-10 3.3.3 Ai Overclock Tuner 3-10 3.3.4 CPU Ratio 3-11 3.3.5 DRAM Frequency 3-11 3.3.6 CPU/NB Frequency 3-11 iv

User Guide
Page 10
... provides updated information on the motherboard. • Chapter 3: BIOS setup This chapter tells how to the ASUS contact information. 2. Refer to change system settings through the BIOS Setup menus. Where to find more information Refer to the following parts: • Chapter 1: Product ...introduction This chapter describes the features of the switches, jumpers, and connectors on ASUS hardware and software products. How this...
... provides updated information on the motherboard. • Chapter 3: BIOS setup This chapter tells how to the ASUS contact information. 2. Refer to change system settings through the BIOS Setup menus. Where to find more information Refer to the following parts: • Chapter 1: Product ...introduction This chapter describes the features of the switches, jumpers, and connectors on ASUS hardware and software products. How this...
User Guide
Page 49
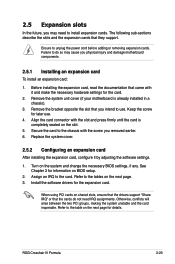
Before installing the expansion card, read the documentation that you removed earlier. 6. Keep the screw for the card. 2. Turn on BIOS setup. 2. See Chapter 3 for details. Otherwise, conflicts will arise between the two PCI groups, making the system unstable and the card... IRQ assignments. Align the card connector with it by adjusting the software settings. 1. Failure to do not need to use . 4. ROG Crosshair IV Formula 2-23 Refer to the tables on shared slots, ensure that the drivers support "Share IRQ" or that they support. Install the software drivers...
Before installing the expansion card, read the documentation that you removed earlier. 6. Keep the screw for the card. 2. Turn on BIOS setup. 2. See Chapter 3 for details. Otherwise, conflicts will arise between the two PCI groups, making the system unstable and the card... IRQ assignments. Align the card connector with it by adjusting the software settings. 1. Failure to do not need to use . 4. ROG Crosshair IV Formula 2-23 Refer to the tables on shared slots, ensure that the drivers support "Share IRQ" or that they support. Install the software drivers...
User Guide
Page 52
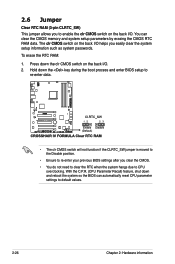
...down the clr CMOS switch on the back I /O helps you easily clear the system setup information such as system passwords. With the C.P.R. (CPU Parameter Recall) feature, shut down the key during the boot process and enter BIOS setup to re-enter data. • The clr CMOS switch will not function if the ...CLRTC_SW jumper is moved to the Disable position. • Ensure to re-enter your previous BIOS settings after you to enable the clr CMOS switch on ...
...down the clr CMOS switch on the back I /O helps you easily clear the system setup information such as system passwords. With the C.P.R. (CPU Parameter Recall) feature, shut down the key during the boot process and enter BIOS setup to re-enter data. • The clr CMOS switch will not function if the ...CLRTC_SW jumper is moved to the Disable position. • Ensure to re-enter your previous BIOS settings after you to enable the clr CMOS switch on ...
User Guide
Page 54
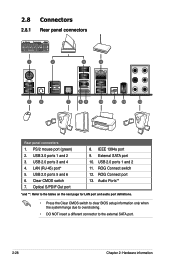
... Ports** *and **: Refer to the tables on the next page for LAN port and audio port definitions. • Press the Clear CMOS switch to clear BIOS setup information only when the system hangs due to overclocking. • DO NOT insert a different connector to the external SATA port. 2-28 Chapter 2: Hardware information USB...
... Ports** *and **: Refer to the tables on the next page for LAN port and audio port definitions. • Press the Clear CMOS switch to clear BIOS setup information only when the system hangs due to overclocking. • DO NOT insert a different connector to the external SATA port. 2-28 Chapter 2: Hardware information USB...
User Guide
Page 60
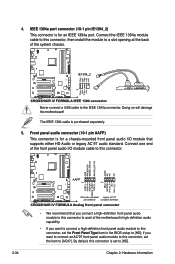
... audio capability. • If you want to connect a high-definition front panel audio module to this connector, set the Front Panel Type item in the BIOS setup to this connector. • We recommend that supports either HD Audio or legacy AC`97 audio standard. IEEE 1394a port connector (10-1 pin IE1394_2) This...
... audio capability. • If you want to connect a high-definition front panel audio module to this connector, set the Front Panel Type item in the BIOS setup to this connector. • We recommend that supports either HD Audio or legacy AC`97 audio standard. IEEE 1394a port connector (10-1 pin IE1394_2) This...
User Guide
Page 69
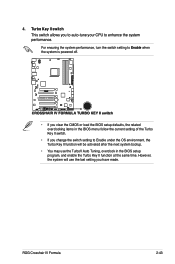
ROG Crosshair IV Formula 2-43 For ensuring the system performance, turn the switch setting to Enable when the system is powered off. • If you clear the CMOS or load the BIOS setup defaults, the related overclocking items in the BIOS menu follow the current setting of the Turbo Key II switch. • If you change the... to auto-tune your CPU to Enable under the OS environment, the Turbo Key II function will use the TurboV Auto Tuning, overclock in the BIOS setup program, and enable the Turbo Key II function at the same time. Turbo Key II switch This switch allows you have made.
ROG Crosshair IV Formula 2-43 For ensuring the system performance, turn the switch setting to Enable when the system is powered off. • If you clear the CMOS or load the BIOS setup defaults, the related overclocking items in the BIOS menu follow the current setting of the Turbo Key II switch. • If you change the... to auto-tune your CPU to Enable under the OS environment, the Turbo Key II function will use the TurboV Auto Tuning, overclock in the BIOS setup program, and enable the Turbo Key II function at the same time. Turbo Key II switch This switch allows you have made.
User Guide
Page 70
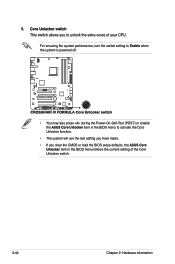
5. Core Unlocker switch This switch allows you clear the CMOS or load the BIOS setup defaults, the ASUS Core Unlocker item in the BIOS menu to activate the Core Unlocker function. • The system will use the last setting you have made. • If you to unlock the extra ... switch setting to Enable when the system is powered off. • You may also press during the Power-On-Self-Test (POST) or enable the ASUS Core Unlocker item in the BIOS menu follows the current setting of your CPU.
5. Core Unlocker switch This switch allows you clear the CMOS or load the BIOS setup defaults, the ASUS Core Unlocker item in the BIOS menu to activate the Core Unlocker function. • The system will use the last setting you have made. • If you to unlock the extra ... switch setting to Enable when the system is powered off. • You may also press during the Power-On-Self-Test (POST) or enable the ASUS Core Unlocker item in the BIOS menu follows the current setting of your CPU.
User Guide
Page 72
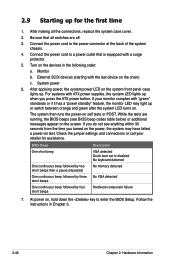
... the power connector at the back of the system chassis. 4. Follow the instructions in the following order: a. Connect the power cord to enter the BIOS Setup. Be sure that is equipped with "green" standards or if it has a "power standby" feature, the monitor LED may have failed a power-...on the screen. 2.9 Starting up for assistance. If you do not see BIOS beep codes table below) or additional messages appear on test. After making all switches are running, the BIOS beeps (see anything within 30 seconds from the time you press the ATX power button. ...
... the power connector at the back of the system chassis. 4. Follow the instructions in the following order: a. Connect the power cord to enter the BIOS Setup. Be sure that is equipped with "green" standards or if it has a "power standby" feature, the monitor LED may have failed a power-...on the screen. 2.9 Starting up for assistance. If you do not see BIOS beep codes table below) or additional messages appear on test. After making all switches are running, the BIOS beeps (see anything within 30 seconds from the time you press the ATX power button. ...
User Guide
Page 75
Detailed descriptions of the BIOS parameters are also provided. This chapter tells how to change the BIOS se3tup system settings through the BIOS Setup menus.
Detailed descriptions of the BIOS parameters are also provided. This chapter tells how to change the BIOS se3tup system settings through the BIOS Setup menus.
User Guide
Page 76
Chapter summary 3 3.1 Managing and updating your BIOS 3-1 3.2 BIOS setup program 3-6 3.3 Extreme Tweaker menu 3-9 3.4 Main menu 3-16 3.5 Advanced menu 3-21 3.6 Power menu 3-30 3.7 Boot menu 3-36 3.8 Tools menu 3-40 3.9 Exit menu 3-44 ROG Crosshair IV Formula
Chapter summary 3 3.1 Managing and updating your BIOS 3-1 3.2 BIOS setup program 3-6 3.3 Extreme Tweaker menu 3-9 3.4 Main menu 3-16 3.5 Advanced menu 3-21 3.6 Power menu 3-30 3.7 Boot menu 3-36 3.8 Tools menu 3-40 3.9 Exit menu 3-44 ROG Crosshair IV Formula
User Guide
Page 77
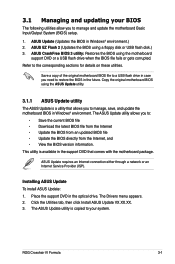
... an Internet connection either through a network or an Internet Service Provider (ISP). ROG Crosshair IV Formula 3-1 The ASUS Update utility allows you to manage and update the motherboard Basic Input/Output System (BIOS) setup. 1. Installing ASUS Update To install ASUS Update: 1. ASUS CrashFree BIOS 3 utility: Restores the BIOS using a floppy disk or USB flash disk.) 3. Click the Utilities tab, then click...
... an Internet connection either through a network or an Internet Service Provider (ISP). ROG Crosshair IV Formula 3-1 The ASUS Update utility allows you to manage and update the motherboard Basic Input/Output System (BIOS) setup. 1. Installing ASUS Update To install ASUS Update: 1. ASUS CrashFree BIOS 3 utility: Restores the BIOS using a floppy disk or USB flash disk.) 3. Click the Utilities tab, then click...
User Guide
Page 78
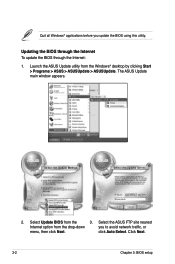
Launch the ASUS Update utility from the drop‑down you update the BIOS using this utility. Select the ASUS FTP site nearest Internet option from the Windows® desktop by clicking Start > Programs > ASUS > ASUSUpdate > ASUSUpdate. Quit all Windows® applications before you to avoid network traffic, or menu, then click Next. Select Update BIOS from the 3. Updating the BIOS through the Internet To update the BIOS through the Internet: 1. click Auto Select. The ASUS Update main window appears. 2. Click Next. 3-2 Chapter 3: BIOS setup
Launch the ASUS Update utility from the drop‑down you update the BIOS using this utility. Select the ASUS FTP site nearest Internet option from the Windows® desktop by clicking Start > Programs > ASUS > ASUSUpdate > ASUSUpdate. Quit all Windows® applications before you to avoid network traffic, or menu, then click Next. Select Update BIOS from the 3. Updating the BIOS through the Internet To update the BIOS through the Internet: 1. click Auto Select. The ASUS Update main window appears. 2. Click Next. 3-2 Chapter 3: BIOS setup
User Guide
Page 80
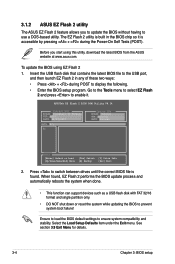
... www.asus.com. See section 3.9 Exit Menu for details. 3-4 Chapter 3: BIOS setup Before you to update the BIOS without having to use a DOS‑based utility. Select the Load Setup Defaults item under the Exit menu. Press to prevent system boot failure! When found . ASUSTek EZ Flash 2 BIOS ROM Utility V4.14 Current ROM BOARD: Crosshair IV Formula VER...
... www.asus.com. See section 3.9 Exit Menu for details. 3-4 Chapter 3: BIOS setup Before you to update the BIOS without having to use a DOS‑based utility. Select the Load Setup Defaults item under the Exit menu. Press to prevent system boot failure! When found . ASUSTek EZ Flash 2 BIOS ROM Utility V4.14 Current ROM BOARD: Crosshair IV Formula VER...
User Guide
Page 81
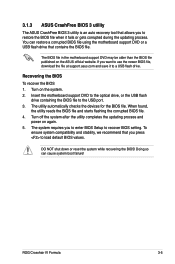
... or the USB flash drive containing the BIOS file to use the newer BIOS file, download the file at support.asus.com and save it fails or gets corrupted during the updating process. ROG Crosshair IV Formula 3-5 3.1.3 ASUS CrashFree BIOS 3 utility The ASUS CrashFree BIOS 3 utility is an auto recovery tool that... or a USB flash drive that you to enter BIOS Setup to load default BIOS values. When found, the utility reads the BIOS file and starts flashing the corrupted BIOS file. 4. The system requires you press to recover BIOS setting. Turn off the system after the utility completes...
... or the USB flash drive containing the BIOS file to use the newer BIOS file, download the file at support.asus.com and save it fails or gets corrupted during the updating process. ROG Crosshair IV Formula 3-5 3.1.3 ASUS CrashFree BIOS 3 utility The ASUS CrashFree BIOS 3 utility is an auto recovery tool that... or a USB flash drive that you to enter BIOS Setup to load default BIOS values. When found, the utility reads the BIOS file and starts flashing the corrupted BIOS file. 4. The system requires you press to recover BIOS setting. Turn off the system after the utility completes...
User Guide
Page 82
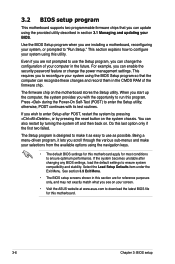
...CMOS RAM of your screen. • Visit the ASUS website at www.asus.com to download the latest BIOS file for this motherboard apply for most conditions to run this program. The Setup program is designed to make your system using the ...navigation keys. • The default BIOS settings for reference purposes only, and may not exactly match what you are for this motherboard. 3-6 Chapter 3: BIOS setup...
...CMOS RAM of your screen. • Visit the ASUS website at www.asus.com to download the latest BIOS file for this motherboard apply for most conditions to run this program. The Setup program is designed to make your system using the ...navigation keys. • The default BIOS settings for reference purposes only, and may not exactly match what you are for this motherboard. 3-6 Chapter 3: BIOS setup...
User Guide
Page 83
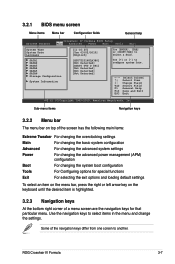
... power management (APM) configuration Boot For changing the system boot configuration Tools For Configuring options for that particular menu. 3.2.1 BIOS menu screen Menu items Menu bar Configuration fields General help Extreme Tweaker Crosshair IV Formula BIOS Setup Main Advanced Power Boot Tools Exit System Time [11:10:25] System Date [Tue 03/02/2010] Language [English... select a field. Change Field Tab Select Field F1 General Help F10 Save and Exit ESC Exit v02.61 (C)Copyright 1985-2010, American Megatrends, Inc. ROG Crosshair IV Formula 3-7
... power management (APM) configuration Boot For changing the system boot configuration Tools For Configuring options for that particular menu. 3.2.1 BIOS menu screen Menu items Menu bar Configuration fields General help Extreme Tweaker Crosshair IV Formula BIOS Setup Main Advanced Power Boot Tools Exit System Time [11:10:25] System Date [Tue 03/02/2010] Language [English... select a field. Change Field Tab Select Field F1 General Help F10 Save and Exit ESC Exit v02.61 (C)Copyright 1985-2010, American Megatrends, Inc. ROG Crosshair IV Formula 3-7
User Guide
Page 84
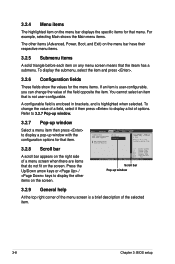
... the values for the menu items. If an item is highlighted when selected. To change the value of the field opposite the item. Main Advanced Crosshair IV Formula BIOS Setup Power Boot Tools Exit Suspend Mode ACPI Version Features ACPI APIC support [Auto] [Disabled] [EDniasbalbelde]d APM Configuration Hardware Monitor Use [ENTER], [TAB] or [SHIFT-TAB... that menu. 3.2.4 Menu items The highlighted item on the menu bar displays the specific items for that is a brief description of the selected item. 3-8 Chapter 3: BIOS setup
... the values for the menu items. If an item is highlighted when selected. To change the value of the field opposite the item. Main Advanced Crosshair IV Formula BIOS Setup Power Boot Tools Exit Suspend Mode ACPI Version Features ACPI APIC support [Auto] [Disabled] [EDniasbalbelde]d APM Configuration Hardware Monitor Use [ENTER], [TAB] or [SHIFT-TAB... that menu. 3.2.4 Menu items The highlighted item on the menu bar displays the specific items for that is a brief description of the selected item. 3-8 Chapter 3: BIOS setup
User Guide
Page 85
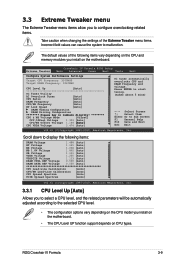
... to start tuning. (takes about 5 mins) ←→ Select Screen ↑↓ Select Item Enter Go to malfunction. ROG Crosshair IV Formula 3-9 3.3 Extreme Tweaker menu The Extreme Tweaker menu items allow you install on CPU types. The default values of the following items: ... model you install on the motherboard. • The CPU Level UP function support depends on the motherboard. Extreme Tweaker Crosshair IV Formula BIOS Setup Main Advanced Power Boot Tools Exit Configure System Performance Settings Target CPU Frequency: 3100MHZ Target DRAM Frequency: 1067MHZ CPU Level...
... to start tuning. (takes about 5 mins) ←→ Select Screen ↑↓ Select Item Enter Go to malfunction. ROG Crosshair IV Formula 3-9 3.3 Extreme Tweaker menu The Extreme Tweaker menu items allow you install on CPU types. The default values of the following items: ... model you install on the motherboard. • The CPU Level UP function support depends on the motherboard. Extreme Tweaker Crosshair IV Formula BIOS Setup Main Advanced Power Boot Tools Exit Configure System Performance Settings Target CPU Frequency: 3100MHZ Target DRAM Frequency: 1067MHZ CPU Level...

User Guide
Page 86
... select a DRAM O.C. You can also key in the desired frequency using the numeric keypad. Configuration options: [DDR31600MHz] [DDR3-1800MHz] [DDR3-1866MHz] [DDR3-2000MHz] 3-10 Chapter 3: BIOS setup Allows you to select a CPU level, and the related parameters will be automatically adjusted according to select a DRAM O.C. OC From CPU Level UP [Auto] This...
... select a DRAM O.C. You can also key in the desired frequency using the numeric keypad. Configuration options: [DDR31600MHz] [DDR3-1800MHz] [DDR3-1866MHz] [DDR3-2000MHz] 3-10 Chapter 3: BIOS setup Allows you to select a CPU level, and the related parameters will be automatically adjusted according to select a DRAM O.C. OC From CPU Level UP [Auto] This...


