User Guide
Page 7
...ASUS Unique Overclocking Utility-TurboV EVO......... 4-23 4.3.9 ROG Connect 4-26 4.4 RAID configurations 4-28 4.4.1 RAID definitions 4-28 4.4.2 Installing Serial ATA hard disks 4-29 4.4.3 Setting the RAID item in BIOS 4-29 4.4.4 AMD® Option ROM Utility 4-30 4.5 Creating a RAID driver disk 4-33 4.5.1 Creating a RAID driver disk without entering the OS.... 4-33 4.5.2 Creating a RAID driver disk in Windows 4-33 4.5.3 Installing the RAID driver during Windows® OS installation 4-34 4.5.4 Using a USB floppy disk drive 4-34 Chapter 5: ATI® CrossFireX™ technology support...
...ASUS Unique Overclocking Utility-TurboV EVO......... 4-23 4.3.9 ROG Connect 4-26 4.4 RAID configurations 4-28 4.4.1 RAID definitions 4-28 4.4.2 Installing Serial ATA hard disks 4-29 4.4.3 Setting the RAID item in BIOS 4-29 4.4.4 AMD® Option ROM Utility 4-30 4.5 Creating a RAID driver disk 4-33 4.5.1 Creating a RAID driver disk without entering the OS.... 4-33 4.5.2 Creating a RAID driver disk in Windows 4-33 4.5.3 Installing the RAID driver during Windows® OS installation 4-34 4.5.4 Using a USB floppy disk drive 4-34 Chapter 5: ATI® CrossFireX™ technology support...
User Guide
Page 23
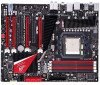
... overclocking settings. ASUS EZ Flash 2 EZ Flash 2 is a user-friendly BIOS update utility. Simply launch this tool and update BIOS using an OS-based flash utility. With better electric conductivity, it ideally protects your favorite settings. The motherboard features the ASUS O.C. ASUS Q-Shield The specially designed ASUS Q-Shield does without entering the OS. ASUS CrashFree BIOS 3 The ASUS CrashFree BIOS 3 allows users to install. ROG Crosshair IV Formula 1-7 ASUS EZ DIY ASUS EZ DIY feature collection provides you to connect or disconnect chassis...
... overclocking settings. ASUS EZ Flash 2 EZ Flash 2 is a user-friendly BIOS update utility. Simply launch this tool and update BIOS using an OS-based flash utility. With better electric conductivity, it ideally protects your favorite settings. The motherboard features the ASUS O.C. ASUS Q-Shield The specially designed ASUS Q-Shield does without entering the OS. ASUS CrashFree BIOS 3 The ASUS CrashFree BIOS 3 allows users to install. ROG Crosshair IV Formula 1-7 ASUS EZ DIY ASUS EZ DIY feature collection provides you to connect or disconnect chassis...
User Guide
Page 77
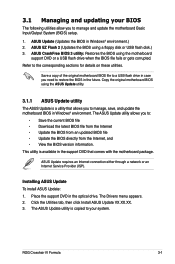
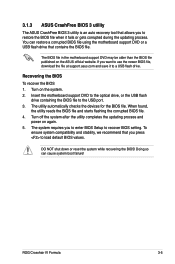
ASUS CrashFree BIOS 3 utility: Restores the BIOS using a floppy disk or USB flash disk.) 3. Save a copy of the original motherboard BIOS file to a USB flash drive in case you to manage and update the motherboard Basic Input/Output System (BIOS) setup. 1. The Drivers menu appears. 2. ASUS Update requires an Internet connection either through a network or an Internet Service Provider (ISP). ROG Crosshair IV Formula 3-1 Copy the original motherboard BIOS using the ASUS Update utility. 3.1.1 ASUS Update utility The ASUS Update is a utility that comes with the motherboard package...
ASUS CrashFree BIOS 3 utility: Restores the BIOS using a floppy disk or USB flash disk.) 3. Save a copy of the original motherboard BIOS file to a USB flash drive in case you to manage and update the motherboard Basic Input/Output System (BIOS) setup. 1. The Drivers menu appears. 2. ASUS Update requires an Internet connection either through a network or an Internet Service Provider (ISP). ROG Crosshair IV Formula 3-1 Copy the original motherboard BIOS using the ASUS Update utility. 3.1.1 ASUS Update utility The ASUS Update is a utility that comes with the motherboard package...
User Guide
Page 80
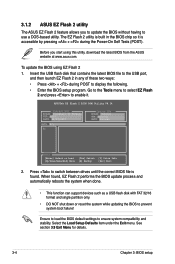
... USB flash disk that contains the latest BIOS file to the USB port, and then launch EZ Flash 2 in the BIOS chip so it . ASUSTek EZ Flash 2 BIOS ROM Utility V4.14 Current ROM BOARD: Crosshair IV Formula VER: 0215 DATE: 02/23/2010 Update ROM BOARD: Unknown VER: Unknown DATE: Unknown PATH: A:\ A: Note [Enter] Select or Load [Up/Down/Home/End] Move [Tab] Switch [B] Backup [V] Drive Info [Esc] Exit 2. Press to display the following. • Enter the BIOS setup...
... USB flash disk that contains the latest BIOS file to the USB port, and then launch EZ Flash 2 in the BIOS chip so it . ASUSTek EZ Flash 2 BIOS ROM Utility V4.14 Current ROM BOARD: Crosshair IV Formula VER: 0215 DATE: 02/23/2010 Update ROM BOARD: Unknown VER: Unknown DATE: Unknown PATH: A:\ A: Note [Enter] Select or Load [Up/Down/Home/End] Move [Tab] Switch [B] Backup [V] Drive Info [Esc] Exit 2. Press to display the following. • Enter the BIOS setup...
User Guide
Page 81
... or reset the system while recovering the BIOS! You can cause system boot failure! Turn on again. 5. Turn off the system after the utility completes the updating process and power on the system. 2. The system requires you to enter BIOS Setup to load default BIOS values. To ensure system compatibility and stability, we recommend that you press to recover BIOS setting. Doing so can restore a corrupted BIOS file using the motherboard support DVD or a USB flash drive...
... or reset the system while recovering the BIOS! You can cause system boot failure! Turn on again. 5. Turn off the system after the utility completes the updating process and power on the system. 2. The system requires you to enter BIOS Setup to load default BIOS values. To ensure system compatibility and stability, we recommend that you press to recover BIOS setting. Doing so can restore a corrupted BIOS file using the motherboard support DVD or a USB flash drive...
User Guide
Page 93
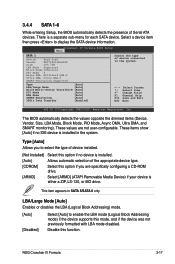
...detects the presence of device connected to the system. ←→ Select Screen ↑↓ Select Item +- Crosshair IV Formula BIOS Setup Main SATA 1 Device :Hard Disk Vendor :HDT722516DLA380 Size :164.7GB LBA Mode :Supported Block Mode:16Sectors PIO Mode :4 Async DMA :MultiWord DMA-2 Ultra DMA :Ultra DMA-5 SMART Monitoring:Supported Type [Auto] LBA/Large Mode [Auto] Block(Multi-Sector Transfer)M [Auto] PIO Mode [Auto] DMA Mode [Auto] SMART Monitoring [Auto] 32Bit Data Transfer [Enabled] Select the type of Serial ATA devices. Change Field F1 General Help...
...detects the presence of device connected to the system. ←→ Select Screen ↑↓ Select Item +- Crosshair IV Formula BIOS Setup Main SATA 1 Device :Hard Disk Vendor :HDT722516DLA380 Size :164.7GB LBA Mode :Supported Block Mode:16Sectors PIO Mode :4 Async DMA :MultiWord DMA-2 Ultra DMA :Ultra DMA-5 SMART Monitoring:Supported Type [Auto] LBA/Large Mode [Auto] Block(Multi-Sector Transfer)M [Auto] PIO Mode [Auto] DMA Mode [Auto] SMART Monitoring [Auto] 32Bit Data Transfer [Enabled] Select the type of Serial ATA devices. Change Field F1 General Help...
User Guide
Page 95
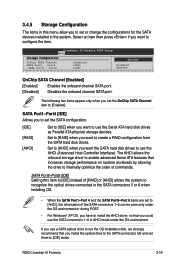
... change the configurations for the SATA devices installed in the system. Crosshair IV Formula BIOS Setup Main Storage Configuration OnChip SATA Channel [Enabled] SATA Port1 - Port4 [IDE] SATA Port5 - SATA Port5-Port6 [IDE] Setting this menu allow you to set them to [IDE] mode. Select an item then press if you want to use the Serial ATA hard disk drives as Parallel ATA physical storage devices. The AHCI allows the onboard storage driver to enable advanced Serial ATA features that increases storage performance on random workloads by allowing the drive to internally...
... change the configurations for the SATA devices installed in the system. Crosshair IV Formula BIOS Setup Main Storage Configuration OnChip SATA Channel [Enabled] SATA Port1 - Port4 [IDE] SATA Port5 - SATA Port5-Port6 [IDE] Setting this menu allow you to set them to [IDE] mode. Select an item then press if you want to use the Serial ATA hard disk drives as Parallel ATA physical storage devices. The AHCI allows the onboard storage driver to enable advanced Serial ATA features that increases storage performance on random workloads by allowing the drive to internally...
User Guide
Page 97
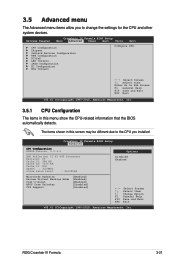
... F10 Save and Exit ESC Exit v02.61 (C)Copyright 1985-2010, American Megatrends, Inc. 3.5.1 CPU Configuration The items in this menu show the CPU-related information that the BIOS automatically detects. Extreme Tweaker Crosshair IV Formula BIOS Setup Main Advanced Power Boot Tools Exit CPU Configuration Chipset Onboard Devices Configuration USB Configuration PCIPnP LED Control iROG Configuration EC Configuration ROG Connect Configure CPU. ←→ Select Screen ↑↓ Select Item Enter Go to change the settings for the CPU and other system...
... F10 Save and Exit ESC Exit v02.61 (C)Copyright 1985-2010, American Megatrends, Inc. 3.5.1 CPU Configuration The items in this menu show the CPU-related information that the BIOS automatically detects. Extreme Tweaker Crosshair IV Formula BIOS Setup Main Advanced Power Boot Tools Exit CPU Configuration Chipset Onboard Devices Configuration USB Configuration PCIPnP LED Control iROG Configuration EC Configuration ROG Connect Configure CPU. ←→ Select Screen ↑↓ Select Item Enter Go to change the settings for the CPU and other system...

User Guide
Page 98
...] Enables the ASUS Core Unlocker to change the advanced chipset settings. Cool'n'Quiet [Enabled [Enabled] Enables the AMD Cool'n'Quiet function. [Disabled] Disables this function. Crosshair IV Formula BIOS Setup Advanced NorthBridge Chipset Configuration DRAM Controller configuration ECC Configuration Primary Display Adapter [PCI-E] DRAM Controller Configuration Crosshair IV Formula BIOS Setup Advanced DRAM Controller Configuration Channel Interleaving MemClk Tristate C3/ATLVID Memory Hole Remapping DCT Unganged Mode Power Down Enable [XOR of the processor. [Disabled...
...] Enables the ASUS Core Unlocker to change the advanced chipset settings. Cool'n'Quiet [Enabled [Enabled] Enables the AMD Cool'n'Quiet function. [Disabled] Disables this function. Crosshair IV Formula BIOS Setup Advanced NorthBridge Chipset Configuration DRAM Controller configuration ECC Configuration Primary Display Adapter [PCI-E] DRAM Controller Configuration Crosshair IV Formula BIOS Setup Advanced DRAM Controller Configuration Channel Interleaving MemClk Tristate C3/ATLVID Memory Hole Remapping DCT Unganged Mode Power Down Enable [XOR of the processor. [Disabled...
User Guide
Page 101
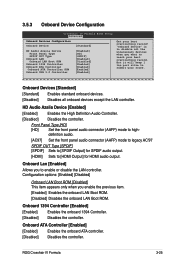
...] Enables the High Definition Audio Controller. [Disabled] Disables the controller. Front Panel Type [HD] [HD] Set the front panel audio connector (AAFP) mode to [HDMI Output] for HDMI audio output. "Onboard Device" is to submit your best overclocking record. 3.5.3 Onboard Device Configuration Crosshair IV Formula BIOS Setup Advanced Onboard Devices Configuration Onboard Device [Standard] HD Audio Azalia Device Front Panel Type SPDIF OUT Type Onboard LAN Onboard LAN Boot ROM Onboard 1394 Controller Onboard ATA Controller Onboard ATA Controller ROM Onboard USB...
...] Enables the High Definition Audio Controller. [Disabled] Disables the controller. Front Panel Type [HD] [HD] Set the front panel audio connector (AAFP) mode to [HDMI Output] for HDMI audio output. "Onboard Device" is to submit your best overclocking record. 3.5.3 Onboard Device Configuration Crosshair IV Formula BIOS Setup Advanced Onboard Devices Configuration Onboard Device [Standard] HD Audio Azalia Device Front Panel Type SPDIF OUT Type Onboard LAN Onboard LAN Boot ROM Onboard 1394 Controller Onboard ATA Controller Onboard ATA Controller ROM Onboard USB...
User Guide
Page 102
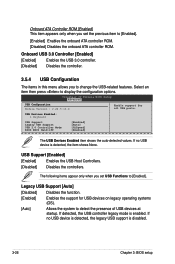
... appear only when you to [Enabled]. [Enabled] Enables the onboard ATA controller ROM. [Disabled] Disables the onboard ATA controller ROM. Legacy USB Support [Auto] [Disabled] Disables the function. [Enabled] Enables the support for all USB ports. Crosshair IV Formula BIOS Setup Advanced USB Configuration Module Version - 2.24.5-13.4 Enable support for USB devices on legacy operating systems (OS). [Auto] Allows the system to display the configuration options. If detected, the USB controller legacy mode is enabled. Onboard ATA Controller ROM [Enabled] This item appears only...
... appear only when you to [Enabled]. [Enabled] Enables the onboard ATA controller ROM. [Disabled] Disables the onboard ATA controller ROM. Legacy USB Support [Auto] [Disabled] Disables the function. [Enabled] Enables the support for all USB ports. Crosshair IV Formula BIOS Setup Advanced USB Configuration Module Version - 2.24.5-13.4 Enable support for USB devices on legacy operating systems (OS). [Auto] Allows the system to display the configuration options. If detected, the USB controller legacy mode is enabled. Onboard ATA Controller ROM [Enabled] This item appears only...
User Guide
Page 114
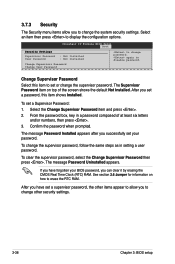
..., key in setting a user password. If you have set your BIOS password, you can clear it by erasing the CMOS Real Time Clock (RTC) RAM. again to disable password. After you set a password, this item to set a Supervisor Password: 1. 3.7.3 Security The Security menu items allow you to change other items appear to allow you to change the supervisor password, follow the same steps as in a password composed of the screen shows the default Not Installed.
..., key in setting a user password. If you have set your BIOS password, you can clear it by erasing the CMOS Real Time Clock (RTC) RAM. again to disable password. After you set a password, this item to set a Supervisor Password: 1. 3.7.3 Security The Security menu items allow you to change other items appear to allow you to change the supervisor password, follow the same steps as in a password composed of the screen shows the default Not Installed.
User Guide
Page 116
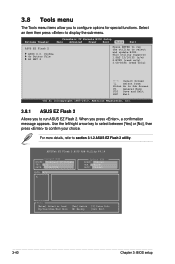
Extreme Tweaker Crosshair IV Formula BIOS Setup Main Advanced Power Boot Tools Exit ASUS EZ Flash 2 ASUS O.C. Profile Go Button File AI NET 2 Press ENTER to run ASUS EZ Flash 2. ASUSTek EZ Flash 2 BIOS ROM Utility V4.14 Current ROM BOARD: Crosshair-IV-Formula VER: 0215 DATE: 02/23/2010 Update ROM BOARD: Unknown VER: Unknown DATE: Unknown PATH: A:\ A: Note [Enter] Select or Load [Up/Down/Home/End] Move [Tab] Switch [B] Backup [V] Drive Info [Esc] Exit 3-40 Chapter 3: BIOS setup For more details, refer to...
Extreme Tweaker Crosshair IV Formula BIOS Setup Main Advanced Power Boot Tools Exit ASUS EZ Flash 2 ASUS O.C. Profile Go Button File AI NET 2 Press ENTER to run ASUS EZ Flash 2. ASUSTek EZ Flash 2 BIOS ROM Utility V4.14 Current ROM BOARD: Crosshair-IV-Formula VER: 0215 DATE: 02/23/2010 Update ROM BOARD: Unknown VER: Unknown DATE: Unknown PATH: A:\ A: Note [Enter] Select or Load [Up/Down/Home/End] Move [Tab] Switch [B] Backup [V] Drive Info [Esc] Exit 3-40 Chapter 3: BIOS setup For more details, refer to...
User Guide
Page 123
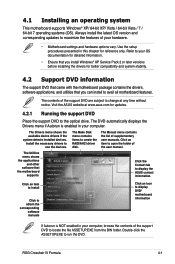
... item to open the folder of the support DVD are subject to locate the file ASSETUP.EXE from the BIN folder. The Manual menu contains the list of supplementary user manuals. The Utilities menu shows the applications and other software that you can install to the optical drive. ROG Crosshair IV Formula 4-1 Install the necessary drivers to run the DVD. Use the setup procedures presented in your hardware. • Motherboard settings and hardware options vary.
... item to open the folder of the support DVD are subject to locate the file ASSETUP.EXE from the BIN folder. The Manual menu contains the list of supplementary user manuals. The Utilities menu shows the applications and other software that you can install to the optical drive. ROG Crosshair IV Formula 4-1 Install the necessary drivers to run the DVD. Use the setup procedures presented in your hardware. • Motherboard settings and hardware options vary.
User Guide
Page 124
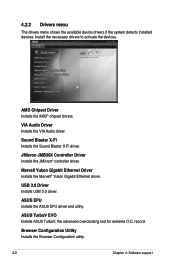
... Chipset Driver Installs the AMD® chipset drivers. ASUS TurboV EVO Installs ASUS TurboV, the advanced overclocking tool for extreme O.C. ASUS EPU Installs the ASUS EPU driver and utility. USB 3.0 Driver Installs USB 3.0 driver. Browser Configuration Utility Installs the Browser Configuration utility. 4-2 Chapter 4: Software support Marvell Yukon Gigabit Ethernet Driver Installs the Marvell® Yukon Gigabit Ethernet driver. JMicron JMB36X Controller Driver Installs the JMicron® controller driver. record. VIA Audio Driver Installs the VIA Audio driver. Sound...
... Chipset Driver Installs the AMD® chipset drivers. ASUS TurboV EVO Installs ASUS TurboV, the advanced overclocking tool for extreme O.C. ASUS EPU Installs the ASUS EPU driver and utility. USB 3.0 Driver Installs USB 3.0 driver. Browser Configuration Utility Installs the Browser Configuration utility. 4-2 Chapter 4: Software support Marvell Yukon Gigabit Ethernet Driver Installs the Marvell® Yukon Gigabit Ethernet driver. JMicron JMB36X Controller Driver Installs the JMicron® controller driver. record. VIA Audio Driver Installs the VIA Audio driver. Sound...
User Guide
Page 131
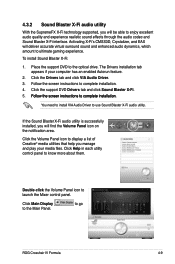
... the support DVD to launch the Mixer control panel. You need to install VIA Audio Driver to ultimate gaming experience. Activating X-Fi's CMSS3D, Crystalizer, and EAX will deliver accurate virtual surround sound and enhanced audio dynamics, which amount to use Sound Blaster X-Fi audio utility. Click the Drivers tab and click VIA Audio Driver. 3. Click Main Display to go ROG Crosshair IV Formula 4-9 Click the Volume Panel icon to complete installation. 4. to the Main Panel. To install Sound...
... the support DVD to launch the Mixer control panel. You need to install VIA Audio Driver to ultimate gaming experience. Activating X-Fi's CMSS3D, Crystalizer, and EAX will deliver accurate virtual surround sound and enhanced audio dynamics, which amount to use Sound Blaster X-Fi audio utility. Click the Drivers tab and click VIA Audio Driver. 3. Click Main Display to go ROG Crosshair IV Formula 4-9 Click the Volume Panel icon to complete installation. 4. to the Main Panel. To install Sound...
User Guide
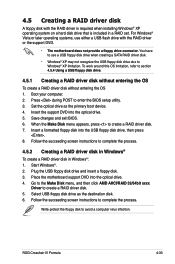
Page 155
... Make Disk menu appears, press to enter the BIOS setup utility. 3. Plug the USB floppy disk drive and insert a floppy disk. 3. Set the optical drive as the destination disk. 6. Insert the support DVD into the USB floppy disk drive, then press . 8. Save changes and exit BIOS. 6. Place the motherboard support DVD into the optical drive. 4. Press during POST to create a RAID driver disk. 7. Follow the succeeding screen instructions to complete the process. 4.5.2 Creating a RAID driver disk in Windows® To create a RAID driver disk in a RAID set. For Windows®...
... Make Disk menu appears, press to enter the BIOS setup utility. 3. Plug the USB floppy disk drive and insert a floppy disk. 3. Set the optical drive as the destination disk. 6. Insert the support DVD into the USB floppy disk drive, then press . 8. Save changes and exit BIOS. 6. Place the motherboard support DVD into the optical drive. 4. Press during POST to create a RAID driver disk. 7. Follow the succeeding screen instructions to complete the process. 4.5.2 Creating a RAID driver disk in Windows® To create a RAID driver disk in a RAID set. For Windows®...
User Guide
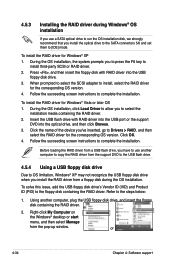
Page 156
... dirve to the SATA connectors 5/6 and set them to install third-party SCSI or RAID driver. 2. or 4-34 Chapter 4: Software support Using another computer to copy the RAID driver from the pop-up window. Press , and then insert the floppy disk with RAID driver into the USB port or the support DVD into the USB floppy disk drive. 3. During the OS installation, the system prompts you to press the F6 key to [IDE] mode. 4.5.3 Installing the RAID driver during the OS...
... dirve to the SATA connectors 5/6 and set them to install third-party SCSI or RAID driver. 2. or 4-34 Chapter 4: Software support Using another computer to copy the RAID driver from the pop-up window. Press , and then insert the floppy disk with RAID driver into the USB port or the support DVD into the USB floppy disk drive. 3. During the OS installation, the system prompts you to press the F6 key to [IDE] mode. 4.5.3 Installing the RAID driver during the OS...
User Guide
Page 167
... CMOS setup. Initialize VGA BIOS 1. ROG Crosshair IV Formula A-1 Early chipset initialization: -Disable shadow RAM -Disable L2 cache -Program basic chipset registers Detect memory -Auto-detection of DRAM size, type and ECC. -Auto-detection of L2 cache Expand compressed BIOS code to DRAM Call chipset hook to copy BIOS back to load appropriate flash R/W codes into chipset. Clear 8042 interface 2. Initialize 8042 self-test 1. Enable keyboard interface. 1. Test F000h segment shadow to check out interface in F000 for ESCD & DMI support. Use...
... CMOS setup. Initialize VGA BIOS 1. ROG Crosshair IV Formula A-1 Early chipset initialization: -Disable shadow RAM -Disable L2 cache -Program basic chipset registers Detect memory -Auto-detection of DRAM size, type and ECC. -Auto-detection of L2 cache Expand compressed BIOS code to DRAM Call chipset hook to copy BIOS back to load appropriate flash R/W codes into chipset. Clear 8042 interface 2. Initialize 8042 self-test 1. Enable keyboard interface. 1. Test F000h segment shadow to check out interface in F000 for ESCD & DMI support. Use...
User Guide
Page 168
...Initialize USB Test all memory (clear all IDE devices: HDD, LS120, ZIP, CDROM. Assign resources to enter Setup utility. Calculate total memory by testing the last double word of each CPU are not identical. Detect serial ports & parallel ports. Detect & install co-processor New CPU installed Execute EZ Flash CPR error Fan error UCODE error Floppy error Keyboard error HDD error CMOS error Mouse error HDD smart function error Hard monitor error AI NET error Case open A-2 Appendix: Debug code table Initialize PS/2 Mouse Prepare memory size information for P6 class CPU & program CPU with...
...Initialize USB Test all memory (clear all IDE devices: HDD, LS120, ZIP, CDROM. Assign resources to enter Setup utility. Calculate total memory by testing the last double word of each CPU are not identical. Detect serial ports & parallel ports. Detect & install co-processor New CPU installed Execute EZ Flash CPR error Fan error UCODE error Floppy error Keyboard error HDD error CMOS error Mouse error HDD smart function error Hard monitor error AI NET error Case open A-2 Appendix: Debug code table Initialize PS/2 Mouse Prepare memory size information for P6 class CPU & program CPU with...


