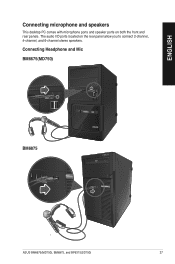
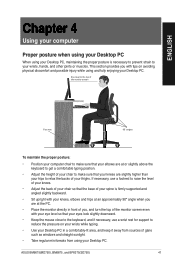
BM6675_BM6875_BP6375 User's Manual
Page 11
All these values are for purchasing the ASUS Desktop PC! ASUS BM6675(MD750), BM6875, and BP6375(SD750) 11 The ASUS Desktop PC provides cutting-edge performance, uncompromised reliability, and user-centric utilities. Chapter 1 Getting started Welcome! Thank you for reference only. Getting to know your ASUS Desktop PC. Read the ASUS Warranty Card before setting up your computer Illustrations are encapsulated in a stunningly futuristic and stylish system casing. The ports and their locations, and the chassis color vary with different models.
BM6675_BM6875_BP6375 User's Manual
Page 13
... tray. 3. USB 2.0 ports. ENGLISH 1 2 3 2 9 4 8 5 7 6 BM6875 1. Optical disk drive bay (empty). Headphone port. This port connects to a microphone. 7. Microphone. This port connects to a headphone or speaker. 8. ASUS BM6675(MD750), BM6875, and BP6375(SD750) 13 HDD LED. Power button. Press this button to turn on your USB 3.0 devices. 9. Optical disk drive eject button. USB...
BM6675_BM6875_BP6375 User's Manual
Page 15
This port is for a PS/2 mouse. 4. This port connects a display monitor or home-theater system. DVI-D port. ASUS BM6675(MD750), BM6875, and BP6375(SD750) 15 Plug the power cord to DVI and HDMI. 6. This port is for any DVI-D ... (USB 3.0) ports connect to �r�. Use this connector. 2 . ENGLISH Rear panel 1 2 14 3 17 4 16 5 6 15 7 14 9 10 11 8 13 12 BM6675(MD750) 1. ���P�o�w��e�r�c�o�n�n��e�c�to USB 3.0 devices such as a mouse, printer, scanner...
BM6675_BM6875_BP6375 User's Manual
Page 17
... monitor or home-theater system. This port is for a PS/2 keyboard. 6. These Universal Serial Bus 3.0 (USB 3.0) ports connect to �r�. PS/2 keyboard port (purple). ASUS BM6675(MD750), BM6875, and BP6375(SD750) 17 If the voltage supply in your area. Switch to turn ON/OFF the power supply to your area is...
BM6675_BM6875_BP6375 User's Manual
Page 19
...;s�. These Universal Serial Bus 3.0 (USB 3.0) ports connect to DVI and HDMI. 4. ���D�V��I-�D�p��o�rt�. ASUS BM6675(MD750), BM6875, and BP6375(SD750) 19 This port is for any USB 3.0 port when installing Windows® operating system. • Due to USB 3.0 controller limitation...
BM6675_BM6875_BP6375 User's Manual
Page 21
To connect an external monitor using the onboard display output ports: 1. Connect your monitor to the VGA port, DVI-D port, or display port of your monitor to the onboard display output port. Plug your computer. 2. Using the onboard display output ports Connect your computer. BM6675(MD750) ASUS BM6675(MD750), BM6875, and BP6375(SD750) 21 ENGLISH Setting up your computer This section guides you through connecting the main hardware devices, such as the external monitor, keyboard, mouse, and power cord, to your monitor to a power source.
BM6675_BM6875_BP6375 User's Manual
Page 23
ENGLISH Connecting a USB keyboard and a USB mouse Connect a USB keyboard and a USB mouse to the USB ports on the rear panel of your computer. BM6675(MD750) BM6875 ASUS BM6675(MD750), BM6875, and BP6375(SD750) 23
BM6675_BM6875_BP6375 User's Manual
Page 25
ENGLISH BM6875 BP6375(SD750) ASUS BM6675(MD750), BM6875, and BP6375(SD750) 25
BM6675_BM6875_BP6375 User's Manual
Page 27
... for the first time When you start your computer for the first time, a series of your computer. To start using your date and time settings. ASUS BM6675(MD750), BM6875, and BP6375(SD750) 27 Select Use recommended settings or Install important updates only to skip this step without entering any information. Review your...
BM6675_BM6875_BP6375 User's Manual
Page 29
... Start menu or taskbar: 1. You may pin items on the jumplist such as favorite websites, often-visited folders or drives, or recently played media files. ASUS BM6675(MD750), BM6875, and BP6375(SD750) 29 From the Windows® taskbar, click the Start icon to taskbar. Unpinning programs from the Start menu To unpin...
BM6675_BM6875_BP6375 User's Manual
Page 31
... drive or folder. Launch Windows Explorer. 2. Launch Windows Explorer. 2. Grouping your files To group your preferred grouping type. Right-click anywhere on the View pane. 3. ASUS BM6675(MD750), BM6875, and BP6375(SD750) 31 From the menu that you want . From the menu that appears, select Group by field, click to view the...
BM6675_BM6875_BP6375 User's Manual
Page 33
...; Update To launch Windows® Update: 1. Select Create a new account. 4. Select either Standard user or Administrator as the user type. 6. When done, click Create Account. ASUS BM6675(MD750), BM6875, and BP6375(SD750) 33 From Windows 7 Action Center, click the task that you want to the previous section Customizing icons and notifications in...
BM6675_BM6875_BP6375 User's Manual
Page 35
To connect a USB storage device: • Insert the USB storage device to your computer. Front panel BM6675(MD750) BM6875 BP6375(SD750) ASUS BM6675(MD750), BM6875, and BP6375(SD750) 35 ENGLISH Chapter 3 Connecting devices to your computer Connecting a USB storage device This desktop PC provides USB 2.0/1.1 ports on both the front and rear panels. The USB ports allow you to connect USB devices such as storage devices.
BM6675_BM6875_BP6375 User's Manual
Page 37
Connecting Headphone and Mic BM6675(MD750) BM6875 ASUS BM6675(MD750), BM6875, and BP6375(SD750) 37 The audio I/O ports located on both the front and rear panels. ENGLISH Connecting microphone and speakers This desktop PC comes with microphone ports and speaker ports on the rear panel allow you to connect 2-channel, 4-channel, and 6-channel stereo speakers.
BM6675_BM6875_BP6375 User's Manual
Page 39
ENGLISH Connecting 4-channel Speakers Connecting 6-channel Speakers ASUS BM6675(MD750), BM6875, and BP6375(SD750) 39
BM6675_BM6875_BP6375 User's Manual
Page 41
... your knees. • Adjust the back of your chair so that the base of your spine is necessary to prevent strain to your Desktop PC. ASUS BM6675(MD750), BM6875, and BP6375(SD750) 41 If necessary, use a wrist rest for support to reduce the pressure on avoiding physical discomfort and possible injury while...
BM6675_BM6875_BP6375 User's Manual
Page 43
... RJ-45 cable ASUS BM6675(MD750), BM6875, and BP6375(SD750) 43 Refer to a DSL/cable modem. Connect one end of an RJ-45 cable to the LAN (RJ-45) port ...
BM6675_BM6875_BP6375 User's Manual
Page 45
BM6675(MD750) BM6875 RJ-45 cable LAN RJ-45 cable LAN ASUS BM6675(MD750), BM6875, and BP6375(SD750) 45 Connect one end of an RJ-45 cable to the LAN (RJ-45) port on the rear panel of your computer and the other end to your LAN. ENGLISH Connecting via a local area network (LAN) To connect via a LAN: 1.
BM6675_BM6875_BP6375 User's Manual
Page 47
...update the motherboard BIOS Click to show the system information Click to complete the installation. Follow the onscreen instructions to customize the interface settings ASUS BM6675(MD750), BM6875, and BP6375(SD750) 47 ENGLISH Chapter 6 Using the utilities The Support DVD and Recovery DVD may use the Recovery ...Partition feature to open the AI Suite II main menu bar. Place the support DVD in -one interface that integrates several ASUS utilities and allows users to customize the settings of AI Suite II. Click each button to select and launch a utility, to monitor ...
BM6675_BM6875_BP6375 User's Manual
Page 49
... Launching and configuring Probe II Probe II is a utility that monitors the computer's vital components, and detects and alerts you are assured that your changes ASUS BM6675(MD750), BM6875, and BP6375(SD750) 49 Saves your configuration Loads your saved configuration Loads the default threshold values for each sensor Applies your computer is...