
User Guide
Page 2
... problem (please DO NOT send large attachments such as stated in the About Box of this email address). SPECIFICATIONS AND INFORMATION CONTAINED IN THIS MANUAL ARE FURNISHED FOR INFORMATIONAL USE ONLY, AND ARE SUBJECT TO CHANGE AT ANY TIME WITHOUT NOTICE, AND SHOULD NOT BE CONSTRUED AS A COMMITMENT BY ASUS. Offer to Provide Source Code of Certain Software...
... problem (please DO NOT send large attachments such as stated in the About Box of this email address). SPECIFICATIONS AND INFORMATION CONTAINED IN THIS MANUAL ARE FURNISHED FOR INFORMATIONAL USE ONLY, AND ARE SUBJECT TO CHANGE AT ANY TIME WITHOUT NOTICE, AND SHOULD NOT BE CONSTRUED AS A COMMITMENT BY ASUS. Offer to Provide Source Code of Certain Software...
User Guide
Page 18
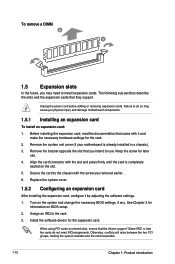
... removing expansion cards. Align the card connector with the slot and press firmly until the card is already installed in a chassis). 3. Assign an IRQ to the chassis with it by adjusting the software settings. 1. Remove the bracket opposite the slot that came with the screw you may cause you physical injury and damage motherboard components. 1.5.1 Installing an expansion card To install an expansion card: 1. Install the software drivers for the card. 2. Failure to use . 4. Turn...
... removing expansion cards. Align the card connector with the slot and press firmly until the card is already installed in a chassis). 3. Assign an IRQ to the chassis with it by adjusting the software settings. 1. Remove the bracket opposite the slot that came with the screw you may cause you physical injury and damage motherboard components. 1.5.1 Installing an expansion card To install an expansion card: 1. Install the software drivers for the card. 2. Failure to use . 4. Turn...
User Guide
Page 19
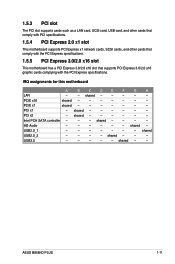
... LAN card, SCSI card, USB card, and other cards that comply with PCI specifications. 1.5.4 PCI Express 2.0 x1 slot This motherboard supports PCI Express x1 network cards, SCSI cards, and other cards that comply with the PCI Express specifications. 1.5.5 PCI Express 3.0/2.0 x16 slot This motherboard has a PCI Express 3.0/2.0 x16 slot that supports PCI Express 3.0/2.0 x16 graphic cards complying with the PCI Express specifications. PCIE x1 shared - - - - - - - shared USB2.0_2 - - - - shared - - PCIE x16 shared - - - - - - - shared - - - - ASUS B85M-D PLUS 1-11...
... LAN card, SCSI card, USB card, and other cards that comply with PCI specifications. 1.5.4 PCI Express 2.0 x1 slot This motherboard supports PCI Express x1 network cards, SCSI cards, and other cards that comply with the PCI Express specifications. 1.5.5 PCI Express 3.0/2.0 x16 slot This motherboard has a PCI Express 3.0/2.0 x16 slot that supports PCI Express 3.0/2.0 x16 graphic cards complying with the PCI Express specifications. PCIE x1 shared - - - - - - - shared USB2.0_2 - - - - shared - - PCIE x16 shared - - - - - - - shared - - - - ASUS B85M-D PLUS 1-11...
User Guide
Page 25
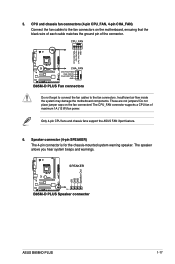
... ASUS B85M-D PLUS 1-17 CPU_FAN CPU FAN PWM CPU FAN IN CPU FAN PWR GND B85M-D PLUS CHA_FAN CHA FAN PWM CHA FAN IN CHA FAN PWR GND B85M-D PLUS Fan connectors Do not forget to connect the fan cables to the fan connectors on the fan connectors! Speaker connector (4-pin SPEAKER) The 4-pin connector is for the chassis-mounted system warning speaker. 5. Do not place jumper caps on the motherboard, ensuring that the black wire of each cable matches the ground pin of maximum 1A (12 W) fan power. Only 4-pin CPU fans...
... ASUS B85M-D PLUS 1-17 CPU_FAN CPU FAN PWM CPU FAN IN CPU FAN PWR GND B85M-D PLUS CHA_FAN CHA FAN PWM CHA FAN IN CHA FAN PWR GND B85M-D PLUS Fan connectors Do not forget to connect the fan cables to the fan connectors on the fan connectors! Speaker connector (4-pin SPEAKER) The 4-pin connector is for the chassis-mounted system warning speaker. 5. Do not place jumper caps on the motherboard, ensuring that the black wire of each cable matches the ground pin of maximum 1A (12 W) fan power. Only 4-pin CPU fans...

User Guide
Page 27
.... ASUS B85M-D PLUS 1-19 These USB connectors comply with USB 2.0. USB 2.0 connectors (10-1 pin USB1112, USB1314) These connectors are for USB-chargeable devices, optimized power efficiency, and backward compatibility with USB 2.0 specifications and supports up to 5Gbps, faster charging time for USB 2.0 ports. 9. Connect the USB module cable to any of these connectors, then install the module to a slot opening at the back of up to 480Mbps connection speed. Doing so will damage the motherboard! USB 3.0 connector (20-1 pin USB3_12) This connector...
.... ASUS B85M-D PLUS 1-19 These USB connectors comply with USB 2.0. USB 2.0 connectors (10-1 pin USB1112, USB1314) These connectors are for USB-chargeable devices, optimized power efficiency, and backward compatibility with USB 2.0 specifications and supports up to 5Gbps, faster charging time for USB 2.0 ports. 9. Connect the USB module cable to any of these connectors, then install the module to a slot opening at the back of up to 480Mbps connection speed. Doing so will damage the motherboard! USB 3.0 connector (20-1 pin USB3_12) This connector...
User Guide
Page 29
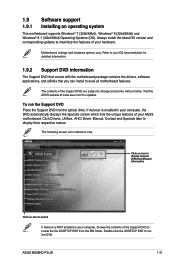
... the Support DVD Place the Support DVD into the optical drive. Always install the latest OS version and corresponding updates to display their respective menus. The following screen is NOT enabled in your computer, the DVD automatically displays the Specials screen which lists the unique features of your computer, browse the contents of the Support DVD are subject to locate the file ASSETUP.EXE from the BIN folder. ASUS B85M-D PLUS 1-21 1.9 Software support 1.9.1 Installing...
... the Support DVD Place the Support DVD into the optical drive. Always install the latest OS version and corresponding updates to display their respective menus. The following screen is NOT enabled in your computer, the DVD automatically displays the Specials screen which lists the unique features of your computer, browse the contents of the Support DVD are subject to locate the file ASSETUP.EXE from the BIN folder. ASUS B85M-D PLUS 1-21 1.9 Software support 1.9.1 Installing...
User Guide
Page 31
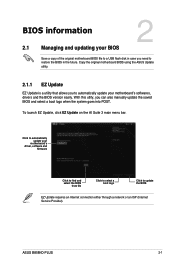
... automatically update your BIOS 2 Save a copy of the original motherboard BIOS file to a USB flash disk in the future. ASUS B85M-D PLUS 2-1 To launch EZ Update, click EZ Update on the AI Suite 3 main menu bar. BIOS information 2.1 Managing and updating your motherboard's softwares, drivers and the BIOS version easily. Copy the original motherboard BIOS using the ASUS Update utility. 2.1.1 EZ Update EZ Update is a utility that allows you to update the BIOS EZ Update requires an Internet connection either through a network or an ISP (Internet Service...
... automatically update your BIOS 2 Save a copy of the original motherboard BIOS file to a USB flash disk in the future. ASUS B85M-D PLUS 2-1 To launch EZ Update, click EZ Update on the AI Suite 3 main menu bar. BIOS information 2.1 Managing and updating your motherboard's softwares, drivers and the BIOS version easily. Copy the original motherboard BIOS using the ASUS Update utility. 2.1.1 EZ Update EZ Update is a utility that allows you to update the BIOS EZ Update requires an Internet connection either through a network or an ISP (Internet Service...
User Guide
Page 33
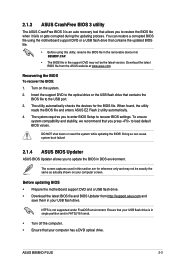
2.1.3 ASUS CrashFree BIOS 3 utility The ASUS CrashFree BIOS 3 is an auto recovery tool that allows you press to load default BIOS values. You can cause system boot failure! 2.1.4 ASUS BIOS Updater ASUS BIOS Updater allows you to enter BIOS Setup to restore the BIOS file when it fails or gets corrupted during the updating process. Turn on your USB flash drive is not supported under FreeDOS environment. The screen captures used in the support DVD may not be the latest version. Insert the support DVD to the...
2.1.3 ASUS CrashFree BIOS 3 utility The ASUS CrashFree BIOS 3 is an auto recovery tool that allows you press to load default BIOS values. You can cause system boot failure! 2.1.4 ASUS BIOS Updater ASUS BIOS Updater allows you to enter BIOS Setup to restore the BIOS file when it fails or gets corrupted during the updating process. Turn on your USB flash drive is not supported under FreeDOS environment. The screen captures used in the support DVD may not be the latest version. Insert the support DVD to the...
User Guide
Page 34
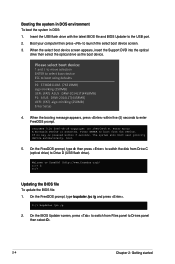
... BIOS Updater screen, press to switch from the DVD/CD. Please select boot device: and to move selection ENTER to select boot device ESC to the USB port. 2. When the select boot device screen appears, insert the Support DVD into the optical drive then select the optical drive as the boot device. Booting the system in DOS environment To boot the system in DOS: 1. Insert the USB flash drive with the latest BIOS file and BIOS Updater to boot using defaults...
... BIOS Updater screen, press to switch from the DVD/CD. Please select boot device: and to move selection ENTER to select boot device ESC to the USB port. 2. When the select boot device screen appears, insert the Support DVD into the optical drive then select the optical drive as the boot device. Booting the system in DOS environment To boot the system in DOS: 1. Insert the USB flash drive with the latest BIOS file and BIOS Updater to boot using defaults...
User Guide
Page 44
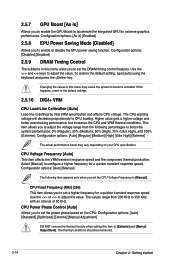
... on your CPU specification. Configuration options: [Auto] [Regular] [Medium] [High] [Ultra High] [Extreme] The actual performance boost may cause the system to [Extreme] and [Manual Adjustment]. The CPU working voltage will decrease proportionally to configure a higher frequency for extreme graphics performance. 2.5.7 GPU Boost [As is defined by Intel VRM specification and affects CPU voltage. Configuration options: [As is] [Enabled]. 2.5.8 EPU Power Saving Mode [Disabled] Allows you to enable or disable the EPU power saving function. CPU Voltage Frequency [Auto] This...
... on your CPU specification. Configuration options: [Auto] [Regular] [Medium] [High] [Ultra High] [Extreme] The actual performance boost may cause the system to [Extreme] and [Manual Adjustment]. The CPU working voltage will decrease proportionally to configure a higher frequency for extreme graphics performance. 2.5.7 GPU Boost [As is defined by Intel VRM specification and affects CPU voltage. Configuration options: [As is] [Enabled]. 2.5.8 EPU Power Saving Mode [Disabled] Allows you to enable or disable the EPU power saving function. CPU Voltage Frequency [Auto] This...

User Guide
Page 45
... overclocking, or under a high CPU loading for the CPU power phase control. Use the and keys to limit the turbo ratio's long duration package power. Use the and keys to enable or disable the Enhanced Intel® SpeedStep Technology (EIST). [Disabled] Disables this function. [Enabled] The operating system dynamically adjusts the processor voltage and core frequency which may result in this menu allow you to set the CPU Power Phase Control item to [Enabled]. ASUS B85M-D PLUS 2-15 Enhanced Intel® SpeedStep Technology [Enabled...
... overclocking, or under a high CPU loading for the CPU power phase control. Use the and keys to limit the turbo ratio's long duration package power. Use the and keys to enable or disable the Enhanced Intel® SpeedStep Technology (EIST). [Disabled] Disables this function. [Enabled] The operating system dynamically adjusts the processor voltage and core frequency which may result in this menu allow you to set the CPU Power Phase Control item to [Enabled]. ASUS B85M-D PLUS 2-15 Enhanced Intel® SpeedStep Technology [Enabled...
User Guide
Page 47
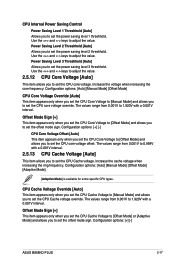
... [Auto] [Manual Mode] [Offset Mode] [Adaptive Mode]. [Adaptive Mode] is available for some specific CPU types. Configuration options: [+] [-] ASUS B85M-D PLUS 2-17 Use the and keys to set the CPU Core Voltage to [Offset Mode] and allows you to adjust the value. Configuration options: [+] [-] CPU Core Voltage Offset [Auto] This item appears only when you set the CPU core voltage offset. Configuration options: [Auto] [Manual Mode] [Offset Mode] CPU Core Voltage Override [Auto] This item appears only when you set the CPU Core Voltage to [Manual Mode] and allows you to set the CPU core...
... [Auto] [Manual Mode] [Offset Mode] [Adaptive Mode]. [Adaptive Mode] is available for some specific CPU types. Configuration options: [+] [-] ASUS B85M-D PLUS 2-17 Use the and keys to set the CPU Core Voltage to [Offset Mode] and allows you to adjust the value. Configuration options: [+] [-] CPU Core Voltage Offset [Auto] This item appears only when you set the CPU core voltage offset. Configuration options: [Auto] [Manual Mode] [Offset Mode] CPU Core Voltage Override [Auto] This item appears only when you set the CPU Core Voltage to [Manual Mode] and allows you to set the CPU core...
User Guide
Page 51
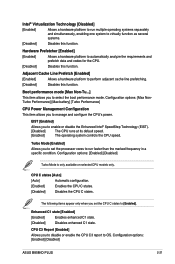
...system to virtually function as several systems. [Disabled] Disables this function. Enhanced C1 state [Enabled] [Enabled] Enables enhanced C1 state. [Disabled] Disables enhanced C1 state. Configuration options: [Enabled] [Disabled] ASUS B85M-D PLUS 2-21 Configuration options: [Max NonTurbo Performance] [Max battery] [Turbo Performance] CPU Power Management Configuration This item allows you to enable or disable the Enhanced Intel® SpeedStep Technology (EIST). [Disabled] The CPU runs at its default speed. [Enabled] The operating system controls the CPU speed. The...
...system to virtually function as several systems. [Disabled] Disables this function. Enhanced C1 state [Enabled] [Enabled] Enables enhanced C1 state. [Disabled] Disables enhanced C1 state. Configuration options: [Enabled] [Disabled] ASUS B85M-D PLUS 2-21 Configuration options: [Max NonTurbo Performance] [Max battery] [Turbo Performance] CPU Power Management Configuration This item allows you to enable or disable the Enhanced Intel® SpeedStep Technology (EIST). [Disabled] The CPU runs at its default speed. [Enabled] The operating system controls the CPU speed. The...
User Guide
Page 52
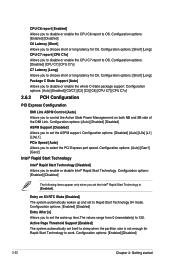
... to disable or enable the CPU C7 report to set the Intel® Rapid Start Technology to enable or disable Intel® Rapid Start Technology. Configuration options: [Short] [Long] CPU C7 report [CPU C7s] Allows you to OS. Active Page Threshold Support [Enabled] The system automatically set to OS. PCIe Speed [Auto] Allows you to set the wake-up and set itself to sleep when the partition size is not enough for Rapid Start Technology to select the PCI Express port speed. Configuration options: [Enabled] [Disabled] Entry...
... to disable or enable the CPU C7 report to set the Intel® Rapid Start Technology to enable or disable Intel® Rapid Start Technology. Configuration options: [Short] [Long] CPU C7 report [CPU C7s] Allows you to OS. Active Page Threshold Support [Enabled] The system automatically set to OS. PCIe Speed [Auto] Allows you to set the wake-up and set itself to sleep when the partition size is not enough for Rapid Start Technology to select the PCI Express port speed. Configuration options: [Enabled] [Disabled] Entry...
User Guide
Page 53
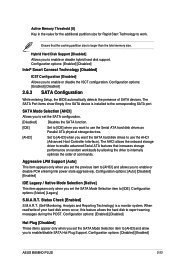
... only when you set the SATA Mode Selection item to [AHCI] and allow you want the SATA hard disk drives to enable or disable the ISCT configuration. The AHCI allows the onboard storage driver to report warning messages during the POST. Configuration options: [Native] [Legacy] S.M.A.R.T. Configuration options: [Enabled] [Disabled] Hot Plug [Disabled] These items appear only when you set the previous item to [AHCI] and allows you to the corresponding SATA port. Configuration options: [Disabled] [Enabled] ASUS B85M-D PLUS 2-23 Active Memory Threshold [0] Key in the...
... only when you set the SATA Mode Selection item to [AHCI] and allow you want the SATA hard disk drives to enable or disable the ISCT configuration. The AHCI allows the onboard storage driver to report warning messages during the POST. Configuration options: [Native] [Legacy] S.M.A.R.T. Configuration options: [Enabled] [Disabled] Hot Plug [Disabled] These items appear only when you set the previous item to [AHCI] and allows you to the corresponding SATA port. Configuration options: [Disabled] [Enabled] ASUS B85M-D PLUS 2-23 Active Memory Threshold [0] Key in the...

User Guide
Page 54
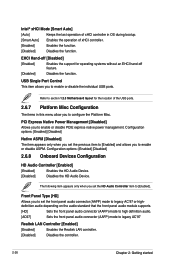
Configuration options: [Auto] [Disabled] [Enabled] iGPU Multi-Monitor [Disabled] Allows you to enable or disable DMI Gen 2. DMI Gen 2 [Auto] Allows you to enable the iGPU Multi-Monitor. Configuration options: [Auto] [IGPU] [PCIE] [PCI] iGPU Memory [Auto] Allows you to enable or disable Intel® Graphics Render Standby support to reduce iGPU power use when the system is idle. Configuration options: [Enabled] [Disabled] DVI Port Audio [Disabled] Enable this item to have an audio output when converting DVI to HDMI output. Configuration options: [Auto] [32M] [64M] [96M] [128M] [...
Configuration options: [Auto] [Disabled] [Enabled] iGPU Multi-Monitor [Disabled] Allows you to enable or disable DMI Gen 2. DMI Gen 2 [Auto] Allows you to enable the iGPU Multi-Monitor. Configuration options: [Auto] [IGPU] [PCIE] [PCI] iGPU Memory [Auto] Allows you to enable or disable Intel® Graphics Render Standby support to reduce iGPU power use when the system is idle. Configuration options: [Enabled] [Disabled] DVI Port Audio [Disabled] Enable this item to have an audio output when converting DVI to HDMI output. Configuration options: [Auto] [32M] [64M] [96M] [128M] [...

User Guide
Page 55
...function. ASUS B85M-D PLUS 2-25 Configuration options: [Enabled] [Disabled] Un-Configure ME [Disabled] Sets this menu allow you to change the USB-related features. Configuration options: [Enabled] [Disabled] 2.6.6 USB Configuration The items in the BIOS extension. Legacy USB Support [Enabled] [Enabled] Enables the support for USB devices on legacy operating systems (OS). [Disabled] The USB devices can be used only for the BIOS setup program. [Auto] Allows the system to control ASPM support for the PEG Device. ASPM [Disabled] Allows you to use a password. The USB Devices item...
...function. ASUS B85M-D PLUS 2-25 Configuration options: [Enabled] [Disabled] Un-Configure ME [Disabled] Sets this menu allow you to change the USB-related features. Configuration options: [Enabled] [Disabled] 2.6.6 USB Configuration The items in the BIOS extension. Legacy USB Support [Enabled] [Enabled] Enables the support for USB devices on legacy operating systems (OS). [Disabled] The USB devices can be used only for the BIOS setup program. [Auto] Allows the system to control ASPM support for the PEG Device. ASPM [Disabled] Allows you to use a password. The USB Devices item...
User Guide
Page 56
... [Enabled] and allows you set the HD Audio Controller item to enable or disable PCIE express native power management. Refer to legacy AC'97 Realtek LAN Controller [Enabled] [Enabled] Enables the Realtek LAN controller. [Disabled] Disables the controller. 2-26 Chapter 2: Getting started EHCI Hand-off [Disabled] [Enabled] Enables the support for the location of the USB ports. 2.6.7 Platform Misc Configuration The items in OS during bootup. [Smart Auto] Enables the operation of xHCI controller in this menu allow you to set the front panel audio connector (AAFP) mode to legacy...
... [Enabled] and allows you set the HD Audio Controller item to enable or disable PCIE express native power management. Refer to legacy AC'97 Realtek LAN Controller [Enabled] [Enabled] Enables the Realtek LAN controller. [Disabled] Disables the controller. 2-26 Chapter 2: Getting started EHCI Hand-off [Disabled] [Enabled] Enables the support for the location of the USB ports. 2.6.7 Platform Misc Configuration The items in OS during bootup. [Smart Auto] Enables the operation of xHCI controller in this menu allow you to set the front panel audio connector (AAFP) mode to legacy...
User Guide
Page 57
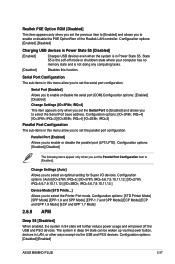
... Port [Enabled] Allows you to [Enabled]. Configuration options: [Enabled] [Disabled] The following items appear only when you set the Serial Port to [Enabled] and allows you to enable or disable the PXE OptionRom of the Realtek LAN controller. Configuration options: [Auto] [IO=378h; Configuration options: [STD Printer Mode] [SPP Mode] [EPP-1.9 and SPP Mode] [EPP-1.7 and SPP Mode] [ECP Mode] [ECP and EPP 1.9 Mode] [ECP and EPP 1.7 Mode] 2.6.9 APM Deep S4 [Disabled] When enabled, the system in Power State S5. Configuration options: [Disabled] [Enabled] ASUS B85M-D PLUS...
... Port [Enabled] Allows you to [Enabled]. Configuration options: [Enabled] [Disabled] The following items appear only when you set the Serial Port to [Enabled] and allows you to enable or disable the PXE OptionRom of the Realtek LAN controller. Configuration options: [Auto] [IO=378h; Configuration options: [STD Printer Mode] [SPP Mode] [EPP-1.9 and SPP Mode] [EPP-1.7 and SPP Mode] [ECP Mode] [ECP and EPP 1.9 Mode] [ECP and EPP 1.7 Mode] 2.6.9 APM Deep S4 [Disabled] When enabled, the system in Power State S5. Configuration options: [Disabled] [Enabled] ASUS B85M-D PLUS...
User Guide
Page 63
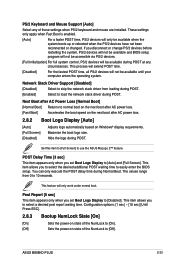
... boot speed on the next boot after AC power loss. 2.8.2 Boot Logo Display [Auto] [Auto] [Full Screen] [Disabled] Adjusts logo automatically based on state of these settings when PS/2 keyboard and mouse are installed. POST Delay Time [3 sec] This item appears only when you to [Off]. Network Stack Driver Support [Disabled] [Disabled] Select to skip the network stack driver from 0 to use the ASUS MyLogo 2™ feature. These settings only apply when Fast Boot is enabled. [Auto...
... boot speed on the next boot after AC power loss. 2.8.2 Boot Logo Display [Auto] [Auto] [Full Screen] [Disabled] Adjusts logo automatically based on state of these settings when PS/2 keyboard and mouse are installed. POST Delay Time [3 sec] This item appears only when you to [Off]. Network Stack Driver Support [Disabled] [Disabled] Select to skip the network stack driver from 0 to use the ASUS MyLogo 2™ feature. These settings only apply when Fast Boot is enabled. [Auto...


