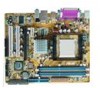
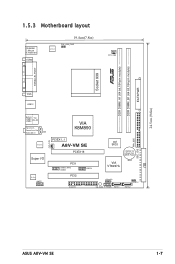
A8V-VM SE User's Manual for English Edtion
Page 14
... in the long line of the above items is damaged or missing, contact your retailer. 1- Chapter 1: Product introduction Before you for the following items. Motherboard ASUS A8V-VM SE motherboard Cables Accessories 1 x floppy disk drive cable 1 x Ultra DMA 133/100/66 cable 1 x SATA cable kit (SATA/power) I/O shield Application CD...
A8V-VM SE User's Manual for English Edtion
Page 15
...;p���ro���n d��e���s�k��t��o��p� processors are based on USB 2.0. ASUS A8V-VM SE 1- The SATA specification allows for thinner, more powerful computing. Dual-channel DDR400 memory support Employing the Double Date Rate (DDR) memory technology, the motherboard supports...
A8V-VM SE User's Manual for English Edtion
Page 17
... component. • Use a grounded wrist strap or touch a safely grounded object or a metal object, such as the power supply case, before installing any system component. R A8V-VM SE A8V-VM SE Onboard LED SB_PWR ON Standby Power OFF Powered Off ASUS A8V-VM SE 1- Failure to do so may cause severe damage to the motherboard, peripherals, and/or components.
A8V-VM SE User's Manual for English Edtion
Page 19
R DDR DIMM_A1 (64 bit,184-pin module) DDR DIMM_B1 (64 bit,184-pin module) EATXPWR 1.5.3 Motherboard layout PS/2KBM T: Mouse B: Keyboard COM2 19.4cm(7.8in) ATX12V PS2_USB_PWR CPU_FAN Socket 939 PARALLEL PORT VGA USB12 Bottom: USB3 USB4 Top: RJ-45 Top:Line In Center:Line Out Below:Mic In CD RTL8201CL Super I/O ALC660 AAFP CHA_FAN VIA K8M890 PCIEX1_1 A8V-VM SE PCIEX16 4M BIOS CR2032 3V Lithium Cell CMOS Power PCI1 USB56_WFG USB56 PCI2 FLOPPY USB78 VIA VT8237A SPEAKER SB_PWR F_PANEL SATA1 CLRTC SATA2 24.5cm (9.6in) PRI_IDE SEC_IDE ASUS A8V-VM SE 1-
A8V-VM SE User's Manual for English Edtion
Page 21
...;-100° angle, otherwise the CPU does not fit in place, push down the socket lever to prevent bending the pins and damaging the CPU! 5. ASUS A8V-VM SE 1- DO NOT force the CPU into the socket until it up to a 90°-100° angle. Carefully insert the CPU into the socket to...
A8V-VM SE User's Manual for English Edtion
Page 23
... sure that the retention bracket is in place. Push down the retention bracket lock on the motherboard labeled CPU_FAN. CPU_FAN R GND +12V Tachometer A8V-VM SE A8V-VM SE CPU Fan Connector ASUS A8V-VM SE Do not forget to the retention module base. 2. Attach one end of the retention bracket (near the retention bracket lock) to connect the CPU...
A8V-VM SE User's Manual for English Edtion
Page 25
...-J • • KDL388P4LA-50 • • KDL388P4EA-50 • • VDD9616A8A-5C • • PM4D328D50406EU • • PM4D328S50403DU • • (Continued on the next page) ASUS A8V-VM SE 1-13
A8V-VM SE User's Manual for English Edtion
Page 27
... and the components. 1. Locked Retaining Clip 1.7.4 Removing a DIMM Follow these steps to unlock the DIMM. 1 1 DDR DIMM notch Support the DIMM lightly with extra force. 2. ASUS A8V-VM SE 1-15 Align a DIMM on the socket. 1 2 DDR DIMM notch 1 Unlocked retaining clip A DDR DIMM is properly seated. Unlock a DIMM socket by pressing the retaining clips...
A8V-VM SE User's Manual for English Edtion
Page 29
... SATA Controller - When using PCI cards on shared slots, ensure that the drivers support "Share IRQ" or that the cards do not need IRQ assignments; ASUS A8V-VM SE 1-17 PCI slot 2 - shared - - - - Onboard USB controller 3 - - - Integrated graphics shared - - - - - - - shared - - - - - - Onboard LAN shared - - - - - - - otherwise, conflicts will arise between the two PCI groups, making the...
A8V-VM SE User's Manual for English Edtion
Page 31
...4. Turn OFF the computer and unplug the power cord. 2. Removing the cap will cause system boot failure. To erase the RTC RAM: 1. ASUS A8V-VM SE 1-19 You can clear the CMOS memory of date, time, and system setup parameters by erasing the CMOS RTC RAM data. The onboard button cell...jumper cap from pins 1-2 (default) to re-enter data. Hold down the key during the boot process and enter BIOS setup to pins 2-3. R A8V-VM SE A8V-VM SE Clear RTC RAM CLRTC 12 23 Normal (Default) Clear CMOS Except when clearing the RTC RAM, never remove the cap on pins 2-3 for about ...
A8V-VM SE User's Manual for English Edtion
Page 33
... Gigabit connection with a speed of this port becomes Front Speaker Out. 6. Line Out port (lime). This port connects a tape, CD, DVD player, or other devices. 3. ASUS A8V-VM SE 1-21 This port connects a headphone or a speaker. Microphone port (pink). 1.10 Connectors 1.10.1 Rear panel connectors 1 2 3 4 5 6 11 10 9 8 7 1.
A8V-VM SE User's Manual for English Edtion
Page 35
PRI_IDE R SEC_IDE A8V-VM SE A8V-VM SE IDE Connectors ASUS A8V-VM SE 1-23 There are for Ultra DMA 133/100/66 IDE devices. Drive jumper setting Single device Two devices Cable-Select or Master Cable-Select Master ...
A8V-VM SE User's Manual for English Edtion
Page 37
Insufficient air flow inside the system may damage the motherboard components. CPU_FAN R GND +12V Tachometer A8V-VM SE CHA_FAN GND +12V Tachometer A8V-VM SE Fan Connectors ASUS A8V-VM SE 1-25 5. Do not forget to connect the fan cables to the fan connectors on the fan connectors! Do not place jumper caps on the motherboard, ...
A8V-VM SE User's Manual for English Edtion
Page 39
... power connectors (24-pin EATXPWR, 4-pin ATX12V) These connectors are designed to connect the 4-pin ATX +12 V power plug; ATX12V EATXPWR R +12V DC +12V DC A8V-VM SE A8V-VM SE ATX Power Connectors GND GND +3 Volts +12 Volts +12 Volts +5V Standby Power OK Ground +5 Volts Ground +5 Volts Ground +3 Volts +3 Volts Ground +5 Volts +5 Volts +5 Volts... connectors in only one orientation. This PSU type has 24-pin and 4-pin power plugs. • If you use a PSU with more power-consuming devices. ASUS A8V-VM SE 1-27 7.
A8V-VM SE User's Manual for English Edtion
Page 41
... the system is in sleep mode. • Hard disk drive activity (Red 2-pin HD_LED) This 2-pin connector is for the HDD Activity LED. ASUS A8V-VM SE 1-29 Connect the HDD Activity LED cable to the connector description below for details. • System power LED (Green 2-pin PLED) This 2-pin ...ON turns the system OFF. • Reset button (Blue 2-pin RESET) This 2-pin connector is for easy connection. Ground Reset HDLED RESET A8V-VM SE System Panel Connector The system panel connector is read from or written to this connector. 10. Connect the chassis power LED cable to the ...
A8V-VM SE User's Manual for English Edtion
Page 45
... "A8VVMSE.ROM". Start programming... Rebooting. • Do not shutdown or reset the system while updating the BIOS to display the following. ASUS A8V-VM SE 2- EZFlash starting BIOS update Checking for floppy... error message appears if there is not found ! A "A8VVMSE.ROM not found !" Visit the... without having to the floppy disk drive. Copy the original or the latest motherboard BIOS file to the bootable floppy disk. 2.1.2 ASUS EZ Flash utility The ASUS EZ Flash feature allows you rename the BIOS file to A8VVMSE.ROM. 2. Insert the floppy disk that D: is found, EZ...
A8V-VM SE User's Manual for English Edtion
Page 47
.... A:\>afudos /iA8VVMSE.ROM AMI Firmware Update Utility - done Erasing flash .... done Erasing flash .... done Search bootblock version: 0% Advance Check ........ done Please restart your computer 100% ASUS A8V-VM SE 2- The utility returns to prevent system boot failure! 5. WARNING!! done Writing flash ..... done Search bootblock version: 0% 100% Do not shut down or reset the system...
A8V-VM SE User's Manual for English Edtion
Page 49
... system after the utility completes the updating process. Floppy not found ! Doing so can cause system boot failure! 4. Starting BIOS recovery... Completed. Visit the ASUS website (www.asus.com) to the optical drive. 3. Insert the support CD to download the latest BIOS file. Checking for floppy... Checking for floppy... Recovering the BIOS.... Checking for the original or updated BIOS file. CD-ROM found ! Start flashing... DO NOT shut down or reset the system while updating the BIOS! ASUS A8V-VM SE 2-
A8V-VM SE User's Manual for English Edtion
Page 51
Select the ASUS FTP site nearest you to avoid network traffic, or click Auto Select. Launch the ASUS Update utility from the drop‑down menu, then click Next. 3. Click Next. ASUS A8V-VM SE 2- The ASUS Update main window appears. 2. Select Update BIOS from the Internet option from the Windows® desktop by clicking Start > Programs > ASUS > ASUSUpdate > ASUSUpdate. Updating the BIOS through the Internet To update the BIOS through the Internet: 1.
A8V-VM SE User's Manual for English Edtion
Page 53
..., POST continues with the opportunity to enter the Setup utility; Do this motherboard apply for this last option only if the first two failed. ASUS A8V-VM SE 2-11 You can change the power management settings. If the system becomes unstable after POST, restart the system by pressing ++, or by turning ...the latest BIOS file for reference purposes only, and may not exactly match what you wish to configure your screen. • Visit the ASUS website (www.asus.com) to "Run Setup". Select the Load Default Settings item under the Exit Menu. Use the BIOS Setup program when you are ...