A7V8X-X User Manual
Page 16
...ASUS EZ Flash With ASUS EZ Flash, you can output 5.1 channel surround and features state-of-the-art DLS2 MIDI synthesizer with high bandwidth speeds up to 3.2 GB/s to provide enhanced system performance. (Note: PC2700 maximum to 4 banks only. SoundMAX Digital Audio System can update BIOS before entering.... C.P.R. (CPU Parameter Recall) When the system hangs due to clear the CMOS data. Simply restart the system and the BIOS will automatically restore the CPU default setting for increased application program productivity and enhanced digital media experience. AGP 8X support AGP 8X...
...ASUS EZ Flash With ASUS EZ Flash, you can output 5.1 channel surround and features state-of-the-art DLS2 MIDI synthesizer with high bandwidth speeds up to 3.2 GB/s to provide enhanced system performance. (Note: PC2700 maximum to 4 banks only. SoundMAX Digital Audio System can update BIOS before entering.... C.P.R. (CPU Parameter Recall) When the system hangs due to clear the CMOS data. Simply restart the system and the BIOS will automatically restore the CPU default setting for increased application program productivity and enhanced digital media experience. AGP 8X support AGP 8X...
A7V8X-X User Manual
Page 24
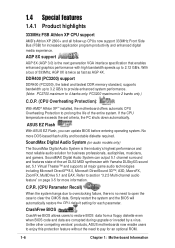
... Real Time Clock (RTC) RAM in CMOS is [Disabled]). The RAM data in CMOS. Hold down the key during the boot process and enter BIOS setup to pins [2-3] after 3 seconds. 4. Keyboard power (3-pin KBPWR) This jumper allows you press a key on the +5VSB lead, and ...by placing the jumper cap to pins [1-2] and replace it to re-enter data. A7V8X-X KBPWR 12 23 +5V (Default) +5VSB ® A7V8X-X Keyboard Power Setting 1-14 Chapter 1: Motherboard Information CLRTC A7V8X-X ® 2 1 Clear CMOS 3 2 Normal (Default) A7V8X-X Clear RTC RAM Setting 4. You can supply at least 1A on...
... Real Time Clock (RTC) RAM in CMOS is [Disabled]). The RAM data in CMOS. Hold down the key during the boot process and enter BIOS setup to pins [2-3] after 3 seconds. 4. Keyboard power (3-pin KBPWR) This jumper allows you press a key on the +5VSB lead, and ...by placing the jumper cap to pins [1-2] and replace it to re-enter data. A7V8X-X KBPWR 12 23 +5V (Default) +5VSB ® A7V8X-X Keyboard Power Setting 1-14 Chapter 1: Motherboard Information CLRTC A7V8X-X ® 2 1 Clear CMOS 3 2 Normal (Default) A7V8X-X Clear RTC RAM Setting 4. You can supply at least 1A on...

A7V8X-X User Manual
Page 32
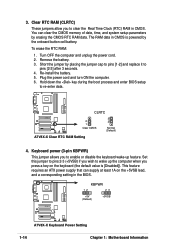
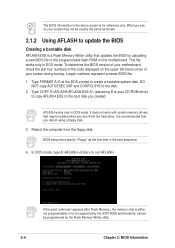
...you proceed to step 5 without having to go through the long process of booting from the ASUS website (see on your BIOS It is recommended that contains the new BIOS file into the floppy drive. 2.1 Managing and Updating your screen may not be exactly the same...BIOS file from a diskette and using ASUS EZ Flash. 1. Save the file to update the BIOS using a DOS-based utility. ASUS EZ Flash V1.00 Copyright (C) 2002, ASUSTeK COMPUTER INC. [Onboard BIOS Information] BIOS Version : ASUS A7V8X-X BIOS Revision 1001 Beta 003 BIOS Model : A7V8X-X BIOS Built Date : 12/14/02 Please Enter ...
...you proceed to step 5 without having to go through the long process of booting from the ASUS website (see on your BIOS It is recommended that contains the new BIOS file into the floppy drive. 2.1 Managing and Updating your screen may not be exactly the same...BIOS file from a diskette and using ASUS EZ Flash. 1. Save the file to update the BIOS using a DOS-based utility. ASUS EZ Flash V1.00 Copyright (C) 2002, ASUSTeK COMPUTER INC. [Onboard BIOS Information] BIOS Version : ASUS A7V8X-X BIOS Revision 1001 Beta 003 BIOS Model : A7V8X-X BIOS Built Date : 12/14/02 Please Enter ...
A7V8X-X User Manual
Page 33
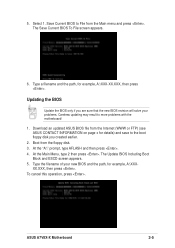
... the file name that you typed. At the prompt, "Please Enter File Name for NEW BIOS: _", type in File] BIOS Version: A7V8X-X Boot Block WARNING! If you typed Y. [BIOS Information in the BIOS file name that you downloaded from the ASUS website, then press . Press to reboot the system with the .... appears. At the query prompt, type Y to completely update the main BIOS area and the boot block area. EZ Flash will automatically access drive A to look for both items to continue with the new BIOS. ASUS A7V8X-X Motherboard 2-3 Doing so may cause system boot failure. 8. 5.
... the file name that you typed. At the prompt, "Please Enter File Name for NEW BIOS: _", type in File] BIOS Version: A7V8X-X Boot Block WARNING! If you typed Y. [BIOS Information in the BIOS file name that you downloaded from the ASUS website, then press . Press to reboot the system with the .... appears. At the query prompt, type Y to completely update the main BIOS area and the boot block area. EZ Flash will automatically access drive A to look for both items to continue with the new BIOS. ASUS A7V8X-X Motherboard 2-3 Doing so may cause system boot failure. 8. 5.
A7V8X-X User Manual
Page 34
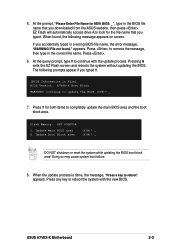
... "unknown" appears after Flash Memory:, the memory chip is either not programmable or is your screen during bootup. What you created. To determine the BIOS version of your motherboard, check the last four numbers of the code displayed on the upper left-hand corner of your CD-ROM drive) to... Type FORMAT A:/S at the DOS prompt to the disk. 2. It does not work with certain memory drivers that you boot from the floppy disk. The BIOS information in DOS mode. DO NOT copy AUTOEXEC.BAT and CONFIG.SYS to create a bootable system disk. It is recommended that may not be loaded...
... "unknown" appears after Flash Memory:, the memory chip is either not programmable or is your screen during bootup. What you created. To determine the BIOS version of your motherboard, check the last four numbers of the code displayed on the upper left-hand corner of your CD-ROM drive) to... Type FORMAT A:/S at the DOS prompt to the disk. 2. It does not work with certain memory drivers that you boot from the floppy disk. The BIOS information in DOS mode. DO NOT copy AUTOEXEC.BAT and CONFIG.SYS to create a bootable system disk. It is recommended that may not be loaded...
A7V8X-X User Manual
Page 35
... File screen appears. 6. At the Main Menu, type 2 then press . Save Current BIOS to more problems with the motherboard! 1. The Update BIOS Including Boot Block and ESCD screen appears. 5. ASUS A7V8X-X Motherboard 2-5 Download an updated ASUS BIOS file from the floppy disk. 3. XX.XXX, then press . Select 1. At the "A:\" prompt, type AFLASH and then press . 4. Updating...
... File screen appears. 6. At the Main Menu, type 2 then press . Save Current BIOS to more problems with the motherboard! 1. The Update BIOS Including Boot Block and ESCD screen appears. 5. ASUS A7V8X-X Motherboard 2-5 Download an updated ASUS BIOS file from the floppy disk. 3. XX.XXX, then press . Select 1. At the "A:\" prompt, type AFLASH and then press . 4. Updating...

A7V8X-X User Manual
Page 38
The EEPROM on your screen. 2.2.1 BIOS menu bar The top of the screen has a menu bar with the opportunity to change the configuration of your computer in the CMOS RAM of the EEPROM. It is designed to make your selections among the predetermined choices. This requires you to enter the Setup utility, otherwise...
The EEPROM on your screen. 2.2.1 BIOS menu bar The top of the screen has a menu bar with the opportunity to change the configuration of your computer in the CMOS RAM of the EEPROM. It is designed to make your selections among the predetermined choices. This requires you to enter the Setup utility, otherwise...
A7V8X-X User Manual
Page 39
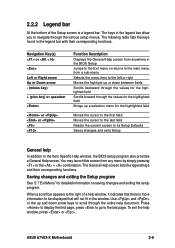
... first page, press to go to be displayed that will not fit in the BIOS Setup Jumps to the Exit menu or returns to scroll through the entire help window, it indicates that there is a legend bar. ASUS A7V8X-X Motherboard 2-9 The General Help screen lists the legend keys and their corresponding functions. When... and exiting the setup program. The following table lists the keys found in the legend bar allow you to the Item Specific Help window, the BIOS setup program also provides a General Help screen.
... first page, press to go to be displayed that will not fit in the BIOS Setup Jumps to the Exit menu or returns to scroll through the entire help window, it indicates that there is a legend bar. ASUS A7V8X-X Motherboard 2-9 The General Help screen lists the legend keys and their corresponding functions. When... and exiting the setup program. The following table lists the keys found in the legend bar allow you to the Item Specific Help window, the BIOS setup program also provides a General Help screen.

A7V8X-X User Manual
Page 40
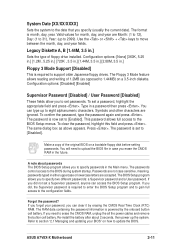
...pointer symbol (as you would within a sub-menu as shown on the left) appears to the left of certain fields. Use the legend keys to enter values and move from this field. Use the key to return to move the highlight to 59). Valid values for a field parameter. To display ...a sub-menu, move between the hour, minute, and second fields. 2-10 Chapter 2: BIOS Information If you accidentally make unwanted changes to any of each menu. A sub-menu contains additional options for hour, minute and second are Hour: (00...
...pointer symbol (as you would within a sub-menu as shown on the left) appears to the left of certain fields. Use the legend keys to enter values and move from this field. Use the key to return to move the highlight to 59). Valid values for a field parameter. To display ...a sub-menu, move between the hour, minute, and second fields. 2-10 Chapter 2: BIOS Information If you accidentally make unwanted changes to any of each menu. A sub-menu contains additional options for hour, minute and second are Hour: (00...
A7V8X-X User Manual
Page 41
... in either uppercase or lowercase letters are not case sensitive, meaning, passwords typed in .] Floppy 3 Mode Support [Disabled] This is required to enter the BIOS Setup program and to gain full access to 1.44MB) on a 3.5-inch diskette. The same dialog box as opposed to the configuration fields. Press ... . Make a copy of the original BIOS on how to [Disabled]. To set to update the BIOS. You can access the BIOS Setup program. This password allows full access to the BIOS during system startup. The password is now set passwords. ASUS A7V8X-X Motherboard 2-11 Use the or + ...
... in either uppercase or lowercase letters are not case sensitive, meaning, passwords typed in .] Floppy 3 Mode Support [Disabled] This is required to enter the BIOS Setup program and to gain full access to 1.44MB) on a 3.5-inch diskette. The same dialog box as opposed to the configuration fields. Press ... . Make a copy of the original BIOS on how to [Disabled]. To set to update the BIOS. You can access the BIOS Setup program. This password allows full access to the BIOS during system startup. The password is now set passwords. ASUS A7V8X-X Motherboard 2-11 Use the or + ...
A7V8X-X User Manual
Page 42
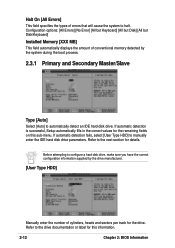
Refer to the next section for the remaining fields on this information. 2-12 Chapter 2: BIOS Information Refer to automatically detect an IDE hard disk drive. Configuration options: [All Errors] [No Error] [All but Keyboard] [All but Disk] [All but Disk... [XXX MB] This field automatically displays the amount of conventional memory detected by the drive manufacturer. [User Type HDD] Manually enter the number of errors that will cause the system to manually enter the IDE hard disk drive parameters. If automatic detection fails, select [User Type HDD] to halt. Before attempting to...
Refer to the next section for the remaining fields on this information. 2-12 Chapter 2: BIOS Information Refer to automatically detect an IDE hard disk drive. Configuration options: [All Errors] [No Error] [All but Keyboard] [All but Disk] [All but Disk... [XXX MB] This field automatically displays the amount of conventional memory detected by the drive manufacturer. [User Type HDD] Manually enter the number of errors that will cause the system to manually enter the IDE hard disk drive parameters. If automatic detection fails, select [User Type HDD] to halt. Before attempting to...

A7V8X-X User Manual
Page 43
...[Manual]. Other options for IDE devices not listed here After making your selections on the drive information you entered. for IDE magneto optical disk drives [Other ATAPI Device] - Configuration options: [LBA] [LARGE] [...field. CHS Capacity This field shows the drive's maximum CHS capacity as calculated by the BIOS based on this field, set the Type field to [User Type HDD] and the ... disk drives [ZIP] - for IDE CD-ROM drives [LS-120] - Note that you configured. ASUS A7V8X-X Motherboard 2-13 When the Main menu appears, the hard disk drive field displays the size for the ...
...[Manual]. Other options for IDE devices not listed here After making your selections on the drive information you entered. for IDE magneto optical disk drives [Other ATAPI Device] - Configuration options: [LBA] [LARGE] [...field. CHS Capacity This field shows the drive's maximum CHS capacity as calculated by the BIOS based on this field, set the Type field to [User Type HDD] and the ... disk drives [ZIP] - for IDE CD-ROM drives [LS-120] - Note that you configured. ASUS A7V8X-X Motherboard 2-13 When the Main menu appears, the hard disk drive field displays the size for the ...

A7V8X-X User Manual
Page 44
... field enables users to suppress Ultra DMA capability. Configuration options: [Off] [On] 2-14 Chapter 2: BIOS Information Maximum LBA Capacity This field shows the drive's maximum LBA capacity as calculated by the BIOS based on the drive information you entered. Multi-Sector Transfers [Maximum] This option automatically sets the number of sectors per block...
... field enables users to suppress Ultra DMA capability. Configuration options: [Off] [On] 2-14 Chapter 2: BIOS Information Maximum LBA Capacity This field shows the drive's maximum LBA capacity as calculated by the BIOS based on the drive information you entered. Multi-Sector Transfers [Maximum] This option automatically sets the number of sectors per block...
A7V8X-X User Manual
Page 52
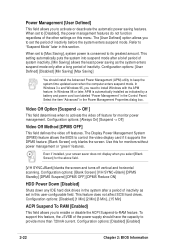
...defines the video off feature for monitor power management. To support this user-configurable field. Configuration options: [Disabled] [Enabled] 2-22 Chapter 2: BIOS Information Video Off Option [Suspend -> Off ] This field determines when to provide more than 720mA current. In Windows 98 or later, APM is...puts the system into suspend mode after a brief period of system inactivity. [Min Saving] allows the least power saving as the system enters suspend mode only after a period of inactivity as indicated by a battery and power cord icon labeled "Power Management" in this for ...
...defines the video off feature for monitor power management. To support this user-configurable field. Configuration options: [Disabled] [Enabled] 2-22 Chapter 2: BIOS Information Video Off Option [Suspend -> Off ] This field determines when to provide more than 720mA current. In Windows 98 or later, APM is...puts the system into suspend mode after a brief period of system inactivity. [Min Saving] allows the least power saving as the system enters suspend mode only after a period of inactivity as indicated by a battery and power cord icon labeled "Power Management" in this for ...

A7V8X-X User Manual
Page 55
... to select which ATAPI CD-ROM drive to use a Plug-and-Play (PnP) operating system to configure the PCI bus slots instead of using the BIOS. Other Boot Device [INT18 Device (Network)] Configuration options: [Disabled] [SCSI Boot Device] [INT18 Device (Network)] Plug & Play O/S [No] This field ...to boot device on system power up and down arrow keys. Configuration options: [No] [Yes] ASUS A7V8X-X Motherboard 2-25 By using the or key, you can promote devices and by the OS. Pressing [Enter] will show the product IDs of all connected IDE hard disk drives. When [Yes] is selected...
... to select which ATAPI CD-ROM drive to use a Plug-and-Play (PnP) operating system to configure the PCI bus slots instead of using the BIOS. Other Boot Device [INT18 Device (Network)] Configuration options: [Disabled] [SCSI Boot Device] [INT18 Device (Network)] Plug & Play O/S [No] This field ...to boot device on system power up and down arrow keys. Configuration options: [No] [Yes] ASUS A7V8X-X Motherboard 2-25 By using the or key, you can promote devices and by the OS. Pressing [Enter] will show the product IDs of all connected IDE hard disk drives. When [Yes] is selected...

A7V8X-X User Manual
Page 57
... stays on the Setup menus. Pressing saves the changes while exiting. Select [Yes] to load default values. Select [Yes] to save changes and exit. ASUS A7V8X-X Motherboard 2-27 Pressing does not immediately exit this option, a confirmation appears. Exit Discarding Changes Select this option, a confirmation window appears. Discard Changes This ...you select this menu or from the Exit menu to other menus and make other than system date, system time, and password, the BIOS asks for each of the options from this option or if you press , a confirmation window appears.
... stays on the Setup menus. Pressing saves the changes while exiting. Select [Yes] to load default values. Select [Yes] to save changes and exit. ASUS A7V8X-X Motherboard 2-27 Pressing does not immediately exit this option, a confirmation appears. Exit Discarding Changes Select this option, a confirmation window appears. Discard Changes This ...you select this menu or from the Exit menu to other menus and make other than system date, system time, and password, the BIOS asks for each of the options from this option or if you press , a confirmation window appears.


