User Manual
Page 17
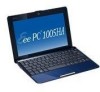
...locations do not match the manual. Sun Up Icon (F6): Increases the display brightness. Crossed Screen Icon (F7): Turns off the display backlight. ASUS Eee PC 1-9 Zz Icon (F1): Places the Eee PC in the Notification area after activation. When enabled, the corresponding wireless indicator will light. The...same. Sun Down Icon (F5): Decreases the display brightness. The Hot Key locations on the function keys may vary depending on the Eee PC's keyboard. Resolution Selection (F4): Press to -RAM). The colored commands can only be accessed by first pressing and holding the ...
...locations do not match the manual. Sun Up Icon (F6): Increases the display brightness. Crossed Screen Icon (F7): Turns off the display backlight. ASUS Eee PC 1-9 Zz Icon (F1): Places the Eee PC in the Notification area after activation. When enabled, the corresponding wireless indicator will light. The...same. Sun Down Icon (F5): Decreases the display brightness. The Hot Key locations on the function keys may vary depending on the Eee PC's keyboard. Resolution Selection (F4): Press to -RAM). The colored commands can only be accessed by first pressing and holding the ...
User Manual
Page 25
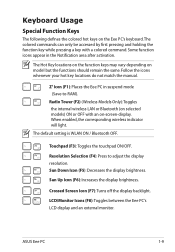
Select the network's location. 10. The initialization is finished. Double-click them to continue. ASUS Eee PC 2-5 Some applications would form minimized icons in the Notification area. Click Next to launch the corresponding applications and enter the specified folders. Desktop There are several shortcuts on the desktop. The actual Desktop screen may vary according to different models. 9.
Select the network's location. 10. The initialization is finished. Double-click them to continue. ASUS Eee PC 2-5 Some applications would form minimized icons in the Notification area. Click Next to launch the corresponding applications and enter the specified folders. Desktop There are several shortcuts on the desktop. The actual Desktop screen may vary according to different models. 9.
User Manual
Page 33
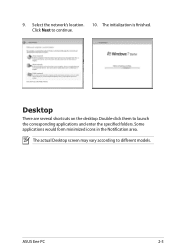
...the drop‑down menu, then click Next. 3. Select the ASUS FTP site nearest you to avail all its features. The ASUS Update utility is capable of updating itself through a BIOS file: 1. ASUS Eee PC 3-3 From the FTP site, select the desired BIOS version and click... click Open. 4. Launch the ASUS Update utility from the Windows® desktop by clicking Start > Programs > ASUS > ASUSUpdate for EeePC> ASUSUpdate. Follow the screen instructions to complete the update process. The ASUS Update main window appears. 2. Follow the screen instructions to complete the update process...
...the drop‑down menu, then click Next. 3. Select the ASUS FTP site nearest you to avail all its features. The ASUS Update utility is capable of updating itself through a BIOS file: 1. ASUS Eee PC 3-3 From the FTP site, select the desired BIOS version and click... click Open. 4. Launch the ASUS Update utility from the Windows® desktop by clicking Start > Programs > ASUS > ASUSUpdate for EeePC> ASUSUpdate. Follow the screen instructions to complete the update process. The ASUS Update main window appears. 2. Follow the screen instructions to complete the update process...

User Manual
Page 39
... the world. System Setting System Setting offers you easy access to the configuration of the desktop background and the Ad-hoc mode. Eee Tools Live Update Live Update keeps your Eee PC screen. Use one account at more than 100,000 hotspots around the world, including airports, hotels, cafes and restaurants. Font Resizer Font... the pre-installed Boingo utility. LocaleMe LocaleMe is a web mapping service application, offering easy search for streets or companies sorted by checking the online updates. ASUS Eee PC 3-9
... the world. System Setting System Setting offers you easy access to the configuration of the desktop background and the Ad-hoc mode. Eee Tools Live Update Live Update keeps your Eee PC screen. Use one account at more than 100,000 hotspots around the world, including airports, hotels, cafes and restaurants. Font Resizer Font... the pre-installed Boingo utility. LocaleMe LocaleMe is a web mapping service application, offering easy search for streets or companies sorted by checking the online updates. ASUS Eee PC 3-9
User Manual
Page 43
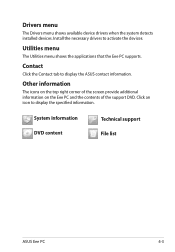
... detects installed devices. Click an icon to display the ASUS contact information. Install the necessary drivers to activate the devices. System information DVD content Technical support File list ASUS Eee PC 4-3 Other information The icons on the top right corner of the screen provide additional information on the Eee PC and the contents of the support DVD.
... detects installed devices. Click an icon to display the ASUS contact information. Install the necessary drivers to activate the devices. System information DVD content Technical support File list ASUS Eee PC 4-3 Other information The icons on the top right corner of the screen provide additional information on the Eee PC and the contents of the support DVD.
User Manual
Page 45
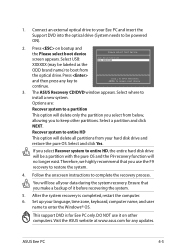
...Therefore, we highly recommend that you to enter the Windows® OS. Set up your Eee PC and insert the Support DVD into the optical drive (System needs to boot from the optical drive. ASUS Eee PC 4-5 If you select Recover system to entire HD, the entire hard disk drive will be...backup of it on bootup and the Please select boot device screen appears. Press and then press any updates. You will delete all your hard disk drive and restore the pure OS. Visit the ASUS website at www.asus.com for Eee PC only. Press on other partitions. Select where to complete the...
...Therefore, we highly recommend that you to enter the Windows® OS. Set up your Eee PC and insert the Support DVD into the optical drive (System needs to boot from the optical drive. ASUS Eee PC 4-5 If you select Recover system to entire HD, the entire hard disk drive will be...backup of it on bootup and the Please select boot device screen appears. Press and then press any updates. You will delete all your hard disk drive and restore the pure OS. Visit the ASUS website at www.asus.com for Eee PC only. Press on other partitions. Select where to complete the...
User Manual
Page 46
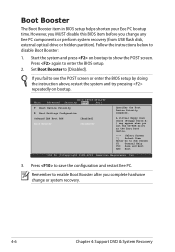
... [Disabled] Specifies the Boot Device Priority sequence. Follow the instructions below to show the POST screen. Start the system and press on bootup. Set Boot Booster to save the configuration and restart Eee PC. Press to [Disabled]. However, you MUST disable this BIOS item before you set the CD...-ROM drive as the first boot device. ←→ Select Screen ↑↓ Select Item Enter Go to Sub Screen F1 General Help F10 Save and...
... [Disabled] Specifies the Boot Device Priority sequence. Follow the instructions below to show the POST screen. Start the system and press on bootup. Set Boot Booster to save the configuration and restart Eee PC. Press to [Disabled]. However, you MUST disable this BIOS item before you set the CD...-ROM drive as the first boot device. ←→ Select Screen ↑↓ Select Item Enter Go to Sub Screen F1 General Help F10 Save and...


