User Manual
Page 2
...Side...1-7 Left Side...1-8 Keyboard Usage...1-9 Touchpad Usage...1-11 Getting Started Powering on your Eee PC...2-2 First-time Startup...2-3 Desktop...2-4 ASUS EeePC Tray Utility...2-5 Enabling and Disabling Devices 2-5 Adjusting the display resolution 2-5 Network Connection...2-6 Configuring a wireless network connection 2-6 Local Area Network 2-7 Browsing web pages 2-10 WLAN Setup FAQ (Windows XP 2-11 Using the Eee PC ASUS Update...3-2 Updating the BIOS through the Internet 3-2 Updating the BIOS through a BIOS file 3-3 Bluetooth Connection (on selected models 3-4 Super Hybrid Engine...
...Side...1-7 Left Side...1-8 Keyboard Usage...1-9 Touchpad Usage...1-11 Getting Started Powering on your Eee PC...2-2 First-time Startup...2-3 Desktop...2-4 ASUS EeePC Tray Utility...2-5 Enabling and Disabling Devices 2-5 Adjusting the display resolution 2-5 Network Connection...2-6 Configuring a wireless network connection 2-6 Local Area Network 2-7 Browsing web pages 2-10 WLAN Setup FAQ (Windows XP 2-11 Using the Eee PC ASUS Update...3-2 Updating the BIOS through the Internet 3-2 Updating the BIOS through a BIOS file 3-3 Bluetooth Connection (on selected models 3-4 Super Hybrid Engine...
User Manual
Page 3
Eee Docking...3-7 Eee @Vibe...3-7 Eee Sharing...3-8 Eee Xperience...3-8 Eee Tools...3-9 Microsoft® Office Trial...3-10 Support DVD & System Recovery Support DVD information 4-2 Running the support DVD 4-2 Drivers menu...4-3 Utilities menu...4-3 Contact...4-3 Other information 4-3 System Recovery...4-4 Using the Support DVD 4-4 Using Recovery Partition 4-5 Boot Booster...4-6 Appendix Declarations and Safety Statements A-2 Federal Communications Commission Statement A-2 FCC Radio Frequency (RF) Exposure Caution Statement A-3 Declaration of Conformity(R&TTE directive 1999/5/EC A-4 ...
Eee Docking...3-7 Eee @Vibe...3-7 Eee Sharing...3-8 Eee Xperience...3-8 Eee Tools...3-9 Microsoft® Office Trial...3-10 Support DVD & System Recovery Support DVD information 4-2 Running the support DVD 4-2 Drivers menu...4-3 Utilities menu...4-3 Contact...4-3 Other information 4-3 System Recovery...4-4 Using the Support DVD 4-4 Using Recovery Partition 4-5 Boot Booster...4-6 Appendix Declarations and Safety Statements A-2 Federal Communications Commission Statement A-2 FCC Radio Frequency (RF) Exposure Caution Statement A-3 Declaration of Conformity(R&TTE directive 1999/5/EC A-4 ...
User Manual
Page 4
... This User's Manual You are reading the Eee PC User's Manual.This User's Manual provides information regarding the various components in this manual. There may be differences between your Eee PC as follows: WARNING! iv Table of importance as being correct. Using the Eee PC Provides information on support DVD contents and system recovery. 5. Important information that must be followed to prevent damage to complete certain tasks safely...
... This User's Manual You are reading the Eee PC User's Manual.This User's Manual provides information regarding the various components in this manual. There may be differences between your Eee PC as follows: WARNING! iv Table of importance as being correct. Using the Eee PC Provides information on support DVD contents and system recovery. 5. Important information that must be followed to prevent damage to complete certain tasks safely...
User Manual
Page 5
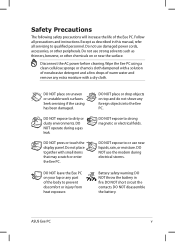
... enter the Eee PC. DO NOT operate during electrical storms. Battery safety warning: DO NOT throw the battery in this manual, refer all precautions and instructions. DO NOT expose to prevent discomfort or injury from heat exposure. DO NOT short circuit the contacts. DO NOT disassemble the battery. Seek servicing if the casing has been damaged. DO NOT press or touch the display panel...
... enter the Eee PC. DO NOT operate during electrical storms. Battery safety warning: DO NOT throw the battery in this manual, refer all precautions and instructions. DO NOT expose to prevent discomfort or injury from heat exposure. DO NOT short circuit the contacts. DO NOT disassemble the battery. Seek servicing if the casing has been damaged. DO NOT press or touch the display panel...
User Manual
Page 11
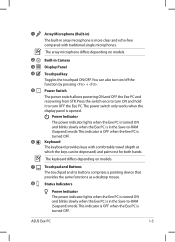
... models. 7 Touchpad and Buttons The touchpad and its buttons comprises a pointing device that provides the same functions as a desktop mouse. 8 Status Indicators Power Indicator The power indicator lights when the Eee PC is turned ON and blinks slowly when the Eee PC is more clear and echo-free compared with comfortable travel (depth at which the keys can also turn OFF the Eee PC. The power switch only works when the display panel is turned OFF. The keyboard differs depending on models. 2 Built-in Camera 3 Display Panel 4 Touchpad key...
... models. 7 Touchpad and Buttons The touchpad and its buttons comprises a pointing device that provides the same functions as a desktop mouse. 8 Status Indicators Power Indicator The power indicator lights when the Eee PC is turned ON and blinks slowly when the Eee PC is more clear and echo-free compared with comfortable travel (depth at which the keys can also turn OFF the Eee PC. The power switch only works when the display panel is turned OFF. The keyboard differs depending on models. 2 Built-in Camera 3 Display Panel 4 Touchpad key...
User Manual
Page 12
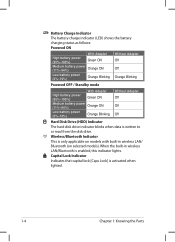
...-in wireless LAN/ Bluetooth (on selected models). Capital Lock Indicator Indicates that capital lock [Caps Lock] is enabled, this indicator lights. Wireless/Bluetooth Indicator This is written to or read from the disk drive. Battery Charge Indicator The battery charge indicator (LED) shows the battery charging status as follows: Powered ON With Adapter High battery power (95%-100%) Green ON Medium battery power (11%-94%) Orange ON Low battery power (0%-10%) Orange Blinking Without Adapter Off Off Orange Blinking Powered OFF / Standby mode With Adapter High battery power...
...-in wireless LAN/ Bluetooth (on selected models). Capital Lock Indicator Indicates that capital lock [Caps Lock] is enabled, this indicator lights. Wireless/Bluetooth Indicator This is written to or read from the disk drive. Battery Charge Indicator The battery charge indicator (LED) shows the battery charging status as follows: Powered ON With Adapter High battery power (95%-100%) Green ON Medium battery power (11%-94%) Orange ON Low battery power (0%-10%) Orange Blinking Without Adapter Off Off Orange Blinking Powered OFF / Standby mode With Adapter High battery power...
User Manual
Page 13
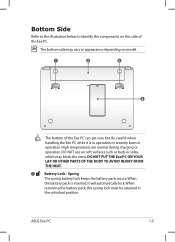
... removing the battery pack, this side of the Eee PC can get very hot. DO NOT PUT THE Eee PC ON YOUR LAP OR OTHER PARTS OF THE BODY TO AVOID INJURY FROM THE HEAT. 1 Battery Lock - Spring The spring battery lock keeps the battery pack secure. When the battery pack is in operation or recently been in operation. ASUS Eee PC 1-5 DO NOT use on model. 1 2 3 4 The bottom of the Eee PC...
... removing the battery pack, this side of the Eee PC can get very hot. DO NOT PUT THE Eee PC ON YOUR LAP OR OTHER PARTS OF THE BODY TO AVOID INJURY FROM THE HEAT. 1 Battery Lock - Spring The spring battery lock keeps the battery pack secure. When the battery pack is in operation or recently been in operation. ASUS Eee PC 1-5 DO NOT use on model. 1 2 3 4 The bottom of the Eee PC...

User Manual
Page 14
... Eee PC when AC power is used to keep the battery pack secured. Move the manual lock to the unlocked position to insert or remove the battery pack. The multimedia sound system features an integrated digital audio controller that produces rich, vibrant sound (results improved with external stereo headphones or speakers). Audio features are software controlled. 1-6 Chapter 1: Knowing the Parts This allows use when moving temporarily between locations. Manual The manual battery lock is not connected...
... Eee PC when AC power is used to keep the battery pack secured. Move the manual lock to the unlocked position to insert or remove the battery pack. The multimedia sound system features an integrated digital audio controller that produces rich, vibrant sound (results improved with external stereo headphones or speakers). Audio features are software controlled. 1-6 Chapter 1: Knowing the Parts This allows use when moving temporarily between locations. Manual The manual battery lock is not connected...
User Manual
Page 15
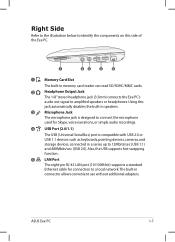
... with USB 2.0 or USB 1.1 devices such as keyboards, pointing devices, cameras, and storage devices, connected in connector allows convenient use without additional adapters. Right Side Refer to the illustration below to identify the components on this jack automatically disables the built-in speakers. 3 Microphone Jack The microphone jack is designed to connect the microphone used for connection to amplified speakers or headphones. Using this side of the Eee PC. 1 23 4 5 1 Memory Card Slot The built-in memory card reader...
... with USB 2.0 or USB 1.1 devices such as keyboards, pointing devices, cameras, and storage devices, connected in connector allows convenient use without additional adapters. Right Side Refer to the illustration below to identify the components on this jack automatically disables the built-in speakers. 3 Microphone Jack The microphone jack is designed to connect the microphone used for connection to amplified speakers or headphones. Using this side of the Eee PC. 1 23 4 5 1 Memory Card Slot The built-in memory card reader...

User Manual
Page 16
... NOT TO COVER THE ADAPTER AND KEEP IT AWAY FROM YOUR BODY. 2 Display (Monitor) Output The 15-pin D-sub monitor port supports a standard VGAcompatible device such as a monitor or projector to allow cool air to enter and warm air to exit the Eee PC. Power supplied through this jack supplies power to the Eee PC and charges the internal battery pack.To prevent damage to the Eee PC and battery pack, always use with...
... NOT TO COVER THE ADAPTER AND KEEP IT AWAY FROM YOUR BODY. 2 Display (Monitor) Output The 15-pin D-sub monitor port supports a standard VGAcompatible device such as a monitor or projector to allow cool air to enter and warm air to exit the Eee PC. Power supplied through this jack supplies power to the Eee PC and charges the internal battery pack.To prevent damage to the Eee PC and battery pack, always use with...
User Manual
Page 17
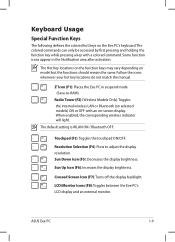
... enabled, the corresponding wireless indicator will light. Sun Down Icon (F5): Decreases the display brightness. LCD/Monitor Icons (F8): Toggles between the Eee PC's LCD display and an external monitor. The colored commands can only be accessed by first pressing and holding the function key while pressing a key with an on-screen-display. The Hot Key locations on the function keys may vary depending on the Eee PC's keyboard. Resolution Selection (F4): Press to -RAM). The default setting is WLAN ON / Bluetooth...
... enabled, the corresponding wireless indicator will light. Sun Down Icon (F5): Decreases the display brightness. LCD/Monitor Icons (F8): Toggles between the Eee PC's LCD display and an external monitor. The colored commands can only be accessed by first pressing and holding the function key while pressing a key with an on-screen-display. The Hot Key locations on the function keys may vary depending on the Eee PC's keyboard. Resolution Selection (F4): Press to -RAM). The default setting is WLAN ON / Bluetooth...
User Manual
Page 22
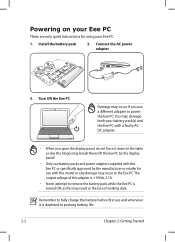
... Eee PC by the display panel! • Only use battery packs and power adapters supplied with this Eee PC or specifically approved by the manufacturer or retailer for using your battery pack(s) and the Eee PC with this model or else damage may occur to prolong battery life. 2-2 Chapter 2: Getting Started Connect the AC power adapter 3 1 2 2 1 3 110V-220V 3. You may damage both your Eee PC. 1. Install the battery pack 2. Powering on your Eee PC These are only quick instructions for use...
... Eee PC by the display panel! • Only use battery packs and power adapters supplied with this Eee PC or specifically approved by the manufacturer or retailer for using your battery pack(s) and the Eee PC with this model or else damage may occur to prolong battery life. 2-2 Chapter 2: Getting Started Connect the AC power adapter 3 1 2 2 1 3 110V-220V 3. You may damage both your Eee PC. 1. Install the battery pack 2. Powering on your Eee PC These are only quick instructions for use...
User Manual
Page 25
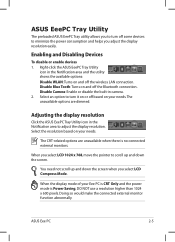
... options: Disable WLAN: Turns on and off the Bluetooth connection. Disable Blue Tooth: Turns on and off the wireless LAN connection. When you select LCD Compress Mode. Doing so would make the connected external monitor function abnormally. ASUS Eee PC 2-5 When the display mode of your Eee PC is CRT Only and the power mode is no connected external monitors. Disable Camera: Enable or disable the built-in the Notification area to minimize the power consumption and helps you adjust the display resolution easily. You need not scroll...
... options: Disable WLAN: Turns on and off the Bluetooth connection. Disable Blue Tooth: Turns on and off the wireless LAN connection. When you select LCD Compress Mode. Doing so would make the connected external monitor function abnormally. ASUS Eee PC 2-5 When the display mode of your Eee PC is CRT Only and the power mode is no connected external monitors. Disable Camera: Enable or disable the built-in the Notification area to minimize the power consumption and helps you adjust the display resolution easily. You need not scroll...
User Manual
Page 30
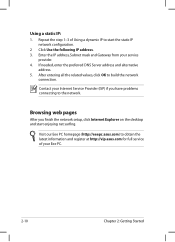
... finish the network setup, click Internet Explorer on the desktop and start the static IP network configuration. 2 Click Use the following IP address. 3. Contact your service provider. 4. Browsing web pages After you have problems connecting to build the network connection. After entering all the related values, click OK to the network. Visit our Eee PC homepage (http://eeepc.asus.com) to start enjoying net surfing. If needed, enter the preferred...
... finish the network setup, click Internet Explorer on the desktop and start the static IP network configuration. 2 Click Use the following IP address. 3. Contact your service provider. 4. Browsing web pages After you have problems connecting to build the network connection. After entering all the related values, click OK to the network. Visit our Eee PC homepage (http://eeepc.asus.com) to start enjoying net surfing. If needed, enter the preferred...

User Manual
Page 31
... need to connect is encrypted, you need a correct key for the wireless connection. Unless you have a compatible issue. 3. asus.com/eeewirelessxphowto.html. Refer to the frequently asked to my wireless router. I cannot build a wireless connection to enter the key for the encrypted wireless network. 2. WLAN Setup FAQ (Windows XP) If you follow the instructions in the manual and fail to activate the wireless LAN function. 1. Ensure that the router setup is enabled before using this network...
... need to connect is encrypted, you need a correct key for the wireless connection. Unless you have a compatible issue. 3. asus.com/eeewirelessxphowto.html. Refer to the frequently asked to my wireless router. I cannot build a wireless connection to enter the key for the encrypted wireless network. 2. WLAN Setup FAQ (Windows XP) If you follow the instructions in the manual and fail to activate the wireless LAN function. 1. Ensure that the router setup is enabled before using this network...
User Manual
Page 34
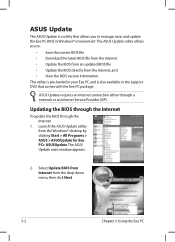
... Start > All Programs > ASUS > ASUSUpdate for Eee PC> ASUSUpdate. Updating the BIOS through the Internet To update the BIOS through a network or an Internet Service Provider (ISP). The ASUS Update main window appears. 2. ASUS Update The ASUS Update is also available in the support DVD that allows you to manage, save, and update the Eee PC BIOS in Windows® environment. The ASUS Update utility allows you to : • Save the current BIOS file • Download the latest BIOS file from the Internet • Update...
... Start > All Programs > ASUS > ASUSUpdate for Eee PC> ASUSUpdate. Updating the BIOS through the Internet To update the BIOS through a network or an Internet Service Provider (ISP). The ASUS Update main window appears. 2. ASUS Update The ASUS Update is also available in the support DVD that allows you to manage, save, and update the Eee PC BIOS in Windows® environment. The ASUS Update utility allows you to : • Save the current BIOS file • Download the latest BIOS file from the Internet • Update...
User Manual
Page 45
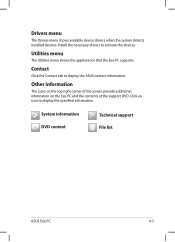
.... Utilities menu The Utilities menu shows the applications that the Eee PC supports. Click an icon to display the ASUS contact information. Other information The icons on the top right corner of the screen provide additional information on the Eee PC and the contents of the support DVD. System information DVD content Technical support File list ASUS Eee PC 4-3 Install the necessary drivers to activate the devices. Drivers menu The Drivers menu shows available device drivers when the system detects installed devices.
.... Utilities menu The Utilities menu shows the applications that the Eee PC supports. Click an icon to display the ASUS contact information. Other information The icons on the top right corner of the screen provide additional information on the Eee PC and the contents of the support DVD. System information DVD content Technical support File list ASUS Eee PC 4-3 Install the necessary drivers to activate the devices. Drivers menu The Drivers menu shows available device drivers when the system detects installed devices.
User Manual
Page 46
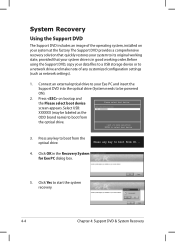
... USB: XXXXXX (may be powered ON). 2. Press any key to boot from the optical drive. ↑ and ↓ to move selection ENTER to select boot device 3. Connect an external optical drive to your system drive is in the Recovery System for Eee PC dialog box. 5. Press on your system at the factory.The Support DVD provides a comprehensive recovery solution that quickly restores your system to its original working order. Click OK in good working...
... USB: XXXXXX (may be powered ON). 2. Press any key to boot from the optical drive. ↑ and ↓ to move selection ENTER to select boot device 3. Connect an external optical drive to your system drive is in the Recovery System for Eee PC dialog box. 5. Press on your system at the factory.The Support DVD provides a comprehensive recovery solution that quickly restores your system to its original working order. Click OK in good working...
User Manual
Page 47
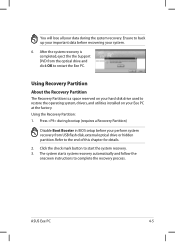
.... Using Recovery Partition About the Recovery Partition The Recovery Partition is completed, eject the the Support DVD from USB flash disk, external optical drive or hidden partition. Using the Recovery Partition: 1. Refer to complete the recovery process. Press during bootup (requires a Recovery Partition) Disable Boot Booster in BIOS setup before recovering your data during the system recovery. The system starts system recovery automatically and follow the onscreen instructions to the end of this chapter for details. 2. ASUS Eee PC 4-5 Click the check mark button...
.... Using Recovery Partition About the Recovery Partition The Recovery Partition is completed, eject the the Support DVD from USB flash disk, external optical drive or hidden partition. Using the Recovery Partition: 1. Refer to complete the recovery process. Press during bootup (requires a Recovery Partition) Disable Boot Booster in BIOS setup before recovering your data during the system recovery. The system starts system recovery automatically and follow the onscreen instructions to the end of this chapter for details. 2. ASUS Eee PC 4-5 Click the check mark button...
User Manual
Page 48
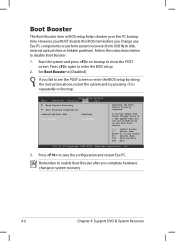
... instructions below to save the configuration and restart Eee PC. A virtual floppy disk drive (Floppy Drive B: ) may appear when you change or system recovery. 4-6 Chapter 4: Support DVD & System Recovery However, you MUST disable this BIOS item before you set the CD-ROM drive as the first boot device. ←→ Select Screen ↑↓ Select Item Enter Go to [Disabled] If you complete hardware change any Eee PC components or perform system recovery (from USB flash disk, external optical drive or hidden partition...
... instructions below to save the configuration and restart Eee PC. A virtual floppy disk drive (Floppy Drive B: ) may appear when you change or system recovery. 4-6 Chapter 4: Support DVD & System Recovery However, you MUST disable this BIOS item before you set the CD-ROM drive as the first boot device. ←→ Select Screen ↑↓ Select Item Enter Go to [Disabled] If you complete hardware change any Eee PC components or perform system recovery (from USB flash disk, external optical drive or hidden partition...


