
Service Guide
Page 1
Service Source PowerBook G4 (15-inch FW800) 16 September 2003 © 2003 Apple Computer, Inc. All rights reserved.
Service Source PowerBook G4 (15-inch FW800) 16 September 2003 © 2003 Apple Computer, Inc. All rights reserved.

Service Guide
Page 3
General Information Overview Some key features that distinguish this computer from earlier PowerBook models include: • New aluminum alloy enclosure • Built-in Bluetooth • Built-in FireWire 800 port • Supports USB 2.0 • Uses double-data rate (DDR) memory • Optional AirPort Extreme card • Optional fiber optic backlit keyboard with ambient light sensors • New battery pack General Information PowerBook G4 (15-inch FW800) Take Apart - 1
General Information Overview Some key features that distinguish this computer from earlier PowerBook models include: • New aluminum alloy enclosure • Built-in Bluetooth • Built-in FireWire 800 port • Supports USB 2.0 • Uses double-data rate (DDR) memory • Optional AirPort Extreme card • Optional fiber optic backlit keyboard with ambient light sensors • New battery pack General Information PowerBook G4 (15-inch FW800) Take Apart - 1
Service Guide
Page 4
...Double-stick tape • Kapton® tape (922-1731) • Voltmeter (for troubleshooting) • Small low-power magnet (for troubleshooting) • Apple Pro keyboard and mouse (for the take apart procedures. • ESD wrist strap and mat • Soft cloth • #0 Phillips screwdriver (magnetized)...or plastic flat- There are a few critical differences: • Important: The top case removal has two critical removal steps: - PowerBook G4 (15-inch FW800) Take Apart General Information Carefully lift the top case to the logic board. Important Note • Memory from ...
...Double-stick tape • Kapton® tape (922-1731) • Voltmeter (for troubleshooting) • Small low-power magnet (for troubleshooting) • Apple Pro keyboard and mouse (for the take apart procedures. • ESD wrist strap and mat • Soft cloth • #0 Phillips screwdriver (magnetized)...or plastic flat- There are a few critical differences: • Important: The top case removal has two critical removal steps: - PowerBook G4 (15-inch FW800) Take Apart General Information Carefully lift the top case to the logic board. Important Note • Memory from ...

Service Guide
Page 5
General Information PowerBook G4 (15-inch FW800) Take Apart - 3 Serial Number Location The serial number is located in the battery bay.
General Information PowerBook G4 (15-inch FW800) Take Apart - 3 Serial Number Location The serial number is located in the battery bay.
Service Guide
Page 6
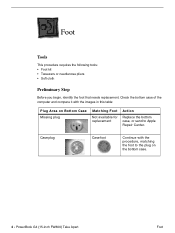
... replacement Action Replace the bottom case, or send to Apple Repair Center. Foot Tools This procedure requires the following tools: • Foot kit • Tweezers or needlenose pliers • Soft cloth Preliminary Step Before you begin, identify the foot that needs replacement. PowerBook G4 (15-inch FW800) Take Apart Foot Case plug Case...
... replacement Action Replace the bottom case, or send to Apple Repair Center. Foot Tools This procedure requires the following tools: • Foot kit • Tweezers or needlenose pliers • Soft cloth Preliminary Step Before you begin, identify the foot that needs replacement. PowerBook G4 (15-inch FW800) Take Apart Foot Case plug Case...
Service Guide
Page 7
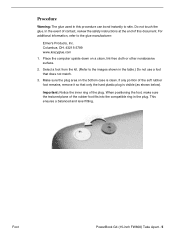
... the event of contact, review the safety instructions at the end of the soft rubber foot remains, remove it so that does not match. 3. Foot PowerBook G4 (15-inch FW800) Take Apart - 5 Make sure the plug area on a clean, lint-free cloth or other nonabrasive surface. 2. Procedure Warning: The glue used in...
... the event of contact, review the safety instructions at the end of the soft rubber foot remains, remove it so that does not match. 3. Foot PowerBook G4 (15-inch FW800) Take Apart - 5 Make sure the plug area on a clean, lint-free cloth or other nonabrasive surface. 2. Procedure Warning: The glue used in...

Service Guide
Page 8
... 15 minutes. 9. Do not spread the glue. 6. Before turning over the computer, allow the glue to use . Contains ethyl cyanoacrylate. Avoid prolonged breathing of glue. PowerBook G4 (15-inch FW800) Take Apart Foot Liquid glue will sting eye temporarily. If skin bonding occurs, soak in the kit is then ready to the...
... 15 minutes. 9. Do not spread the glue. 6. Before turning over the computer, allow the glue to use . Contains ethyl cyanoacrylate. Avoid prolonged breathing of glue. PowerBook G4 (15-inch FW800) Take Apart Foot Liquid glue will sting eye temporarily. If skin bonding occurs, soak in the kit is then ready to the...
Service Guide
Page 9
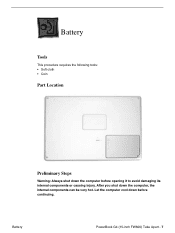
After you shut down before opening it to avoid damaging its internal components or causing injury. Let the computer cool down the computer, the internal components can be very hot. Battery PowerBook G4 (15-inch FW800) Take Apart - 7 Battery Tools This procedure requires the following tools: • Soft cloth • Coin Part Location Preliminary Steps Warning: Always shut down the computer before continuing.
After you shut down before opening it to avoid damaging its internal components or causing injury. Let the computer cool down the computer, the internal components can be very hot. Battery PowerBook G4 (15-inch FW800) Take Apart - 7 Battery Tools This procedure requires the following tools: • Soft cloth • Coin Part Location Preliminary Steps Warning: Always shut down the computer before continuing.
Service Guide
Page 10
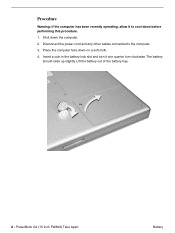
Place the computer face down the computer. 2. Lift the battery out of the battery bay. 8 - PowerBook G4 (15-inch FW800) Take Apart Battery Disconnect the power cord and any other cables connected to cool down before performing this procedure. 1. Procedure Warning: If the computer has been recently operating, allow it one quarter turn clockwise. Insert a coin in the battery lock slot and turn it to the computer. 3. Shut down on a soft cloth. 4. The battery should raise up slightly.
Place the computer face down the computer. 2. Lift the battery out of the battery bay. 8 - PowerBook G4 (15-inch FW800) Take Apart Battery Disconnect the power cord and any other cables connected to cool down before performing this procedure. 1. Procedure Warning: If the computer has been recently operating, allow it one quarter turn clockwise. Insert a coin in the battery lock slot and turn it to the computer. 3. Shut down on a soft cloth. 4. The battery should raise up slightly.

Service Guide
Page 11
Memory Door and Memory Cards Tools This procedure requires the following tools: • Soft cloth • #0 Phillips screwdriver Part Location Preliminary Steps Before you begin, remove the battery. Memory Door and Memory Cards PowerBook G4 (15-inch FW800) Take Apart - 9
Memory Door and Memory Cards Tools This procedure requires the following tools: • Soft cloth • #0 Phillips screwdriver Part Location Preliminary Steps Before you begin, remove the battery. Memory Door and Memory Cards PowerBook G4 (15-inch FW800) Take Apart - 9

Service Guide
Page 12
Note: Memory must be removed from the top slot before performing this procedure. 1. Note: If only one memory card is installed, the factory installs it to cool down on a soft cloth. 2. Place the computer face down before removing from the memory door then remove the door. PowerBook G4 (15-inch FW800) Take Apart Memory Door and Memory Cards Remove the four screws from the bottom slot. 10 - Procedure Warning: If the computer has been recently operating, allow it in the bottom memory slot.
Note: Memory must be removed from the top slot before performing this procedure. 1. Note: If only one memory card is installed, the factory installs it to cool down on a soft cloth. 2. Place the computer face down before removing from the memory door then remove the door. PowerBook G4 (15-inch FW800) Take Apart Memory Door and Memory Cards Remove the four screws from the bottom slot. 10 - Procedure Warning: If the computer has been recently operating, allow it in the bottom memory slot.
Service Guide
Page 13
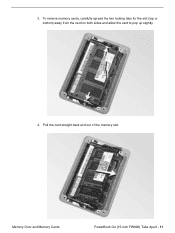
Memory Door and Memory Cards PowerBook G4 (15-inch FW800) Take Apart - 11 3. Pull the card straight back and out of the memory slot. To remove memory cards, carefully spread the two locking tabs for the slot (top or bottom) away from the card on both sides and allow the card to pop up slightly. 4.
Memory Door and Memory Cards PowerBook G4 (15-inch FW800) Take Apart - 11 3. Pull the card straight back and out of the memory slot. To remove memory cards, carefully spread the two locking tabs for the slot (top or bottom) away from the card on both sides and allow the card to pop up slightly. 4.
Service Guide
Page 14
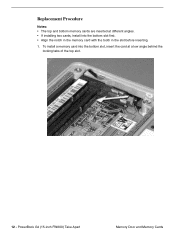
Replacement Procedure Notes: • The top and bottom memory cards are inserted at a low angle behind the locking tabs of the top slot. 12 - To install a memory card into the bottom slot, insert the card at different angles. • If installing two cards, install into the bottom slot first. • Align the notch in the memory card with the tooth in the slot before inserting. 1. PowerBook G4 (15-inch FW800) Take Apart Memory Door and Memory Cards
Replacement Procedure Notes: • The top and bottom memory cards are inserted at a low angle behind the locking tabs of the top slot. 12 - To install a memory card into the bottom slot, insert the card at different angles. • If installing two cards, install into the bottom slot first. • Align the notch in the memory card with the tooth in the slot before inserting. 1. PowerBook G4 (15-inch FW800) Take Apart Memory Door and Memory Cards

Service Guide
Page 15
Memory Door and Memory Cards PowerBook G4 (15-inch FW800) Take Apart - 13 Carefully spread the two locking tabs for the bottom slot away from the card on both sides while pushing the card straight down before it is fully and securely seated along its length. Note: If the back of the card drops down until it into the slot. 3. Firmly push the card straight into the slot until the tabs click onto both sides of the card, locking it is fully seated, raise it fully into place. Slide the card forward to push it up enough to the lower slot. 2.
Memory Door and Memory Cards PowerBook G4 (15-inch FW800) Take Apart - 13 Carefully spread the two locking tabs for the bottom slot away from the card on both sides while pushing the card straight down before it is fully and securely seated along its length. Note: If the back of the card drops down until it into the slot. 3. Firmly push the card straight into the slot until the tabs click onto both sides of the card, locking it is fully seated, raise it fully into place. Slide the card forward to push it up enough to the lower slot. 2.

Service Guide
Page 16
If installing a memory card in until it is firmly seated. 6. PowerBook G4 (15-inch FW800) Take Apart Memory Door and Memory Cards Push the card in the top slot, follow the same procedures as the bottom slot except insert the card at a 30-degree angle, above the locking tabs. 5. As with the bottom slot, spread the locking tabs for the top slot while pushing the card straight down until it locks into place. 14 - 4.
If installing a memory card in until it is firmly seated. 6. PowerBook G4 (15-inch FW800) Take Apart Memory Door and Memory Cards Push the card in the top slot, follow the same procedures as the bottom slot except insert the card at a 30-degree angle, above the locking tabs. 5. As with the bottom slot, spread the locking tabs for the top slot while pushing the card straight down until it locks into place. 14 - 4.

Service Guide
Page 17
7. Use Apple System Profiler to verify that the memory is recognized. (Choose the menu bar Apple logo () > About This Mac, click More Info..., select the System Profile tab, open the Memory Overview.) Memory Door and Memory Cards PowerBook G4 (15-inch FW800) Take Apart - 15 Replace the battery. 10. Install the memory door. 9. Cards should be flat and secure on both sides. 8.
7. Use Apple System Profiler to verify that the memory is recognized. (Choose the menu bar Apple logo () > About This Mac, click More Info..., select the System Profile tab, open the Memory Overview.) Memory Door and Memory Cards PowerBook G4 (15-inch FW800) Take Apart - 15 Replace the battery. 10. Install the memory door. 9. Cards should be flat and secure on both sides. 8.
Service Guide
Page 18
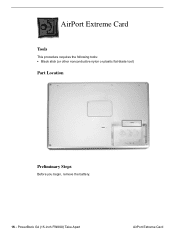
AirPort Extreme Card Tools This procedure requires the following tools: • Black stick (or other nonconductive nylon or plastic flat-blade tool) Part Location Preliminary Steps Before you begin, remove the battery. 16 - PowerBook G4 (15-inch FW800) Take Apart AirPort Extreme Card
AirPort Extreme Card Tools This procedure requires the following tools: • Black stick (or other nonconductive nylon or plastic flat-blade tool) Part Location Preliminary Steps Before you begin, remove the battery. 16 - PowerBook G4 (15-inch FW800) Take Apart AirPort Extreme Card
Service Guide
Page 19
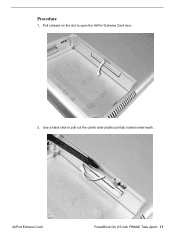
Procedure 1. Pull outward on the slot to pull out the card's clear plastic pull tab, tucked underneath. Use a black stick to open the AirPort Extreme Card door. 2. AirPort Extreme Card PowerBook G4 (15-inch FW800) Take Apart - 17
Procedure 1. Pull outward on the slot to pull out the card's clear plastic pull tab, tucked underneath. Use a black stick to open the AirPort Extreme Card door. 2. AirPort Extreme Card PowerBook G4 (15-inch FW800) Take Apart - 17
Service Guide
Page 20
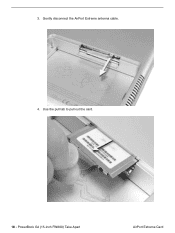
PowerBook G4 (15-inch FW800) Take Apart AirPort Extreme Card Use the pull tab to pull out the card. 18 - Gently disconnect the AirPort Extreme antenna cable. 4. 3.
PowerBook G4 (15-inch FW800) Take Apart AirPort Extreme Card Use the pull tab to pull out the card. 18 - Gently disconnect the AirPort Extreme antenna cable. 4. 3.

Service Guide
Page 21
Slide the replacement AirPort Extreme Card into the slot until fully seated. Push the card into the slot, as shown. 6. AirPort Extreme Card PowerBook G4 (15-inch FW800) Take Apart - 19 5.
Slide the replacement AirPort Extreme Card into the slot until fully seated. Push the card into the slot, as shown. 6. AirPort Extreme Card PowerBook G4 (15-inch FW800) Take Apart - 19 5.