
Service Guide
Page 3
General Information Overview Some key features that distinguish this computer from earlier PowerBook models include: • New aluminum alloy enclosure • Built-in Bluetooth • Built-in FireWire 800 port • Supports USB 2.0 • Uses double-data rate (DDR) memory • Optional AirPort Extreme card • Optional fiber optic backlit keyboard with ambient light sensors • New battery pack General Information PowerBook G4 (15-inch FW800) Take Apart - 1
General Information Overview Some key features that distinguish this computer from earlier PowerBook models include: • New aluminum alloy enclosure • Built-in Bluetooth • Built-in FireWire 800 port • Supports USB 2.0 • Uses double-data rate (DDR) memory • Optional AirPort Extreme card • Optional fiber optic backlit keyboard with ambient light sensors • New battery pack General Information PowerBook G4 (15-inch FW800) Take Apart - 1
Service Guide
Page 4
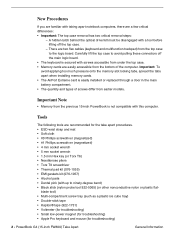
...(922-1731) • Voltmeter (for troubleshooting) • Small low-power magnet (for troubleshooting) • Apple Pro keyboard and mouse (for the take apart procedures. • ESD wrist strap and mat • Soft...stick (nylon probe tool 922-5065) (or other nonconductive nylon or plastic flat- PowerBook G4 (15-inch FW800) Take Apart General Information New Procedures If you are familiar with...models. There are recommended for troubleshooting) 2 - Important Note • Memory from the previous 15-inch PowerBook is secured with this computer. A hidden latch behind the optical drive ...
...(922-1731) • Voltmeter (for troubleshooting) • Small low-power magnet (for troubleshooting) • Apple Pro keyboard and mouse (for the take apart procedures. • ESD wrist strap and mat • Soft...stick (nylon probe tool 922-5065) (or other nonconductive nylon or plastic flat- PowerBook G4 (15-inch FW800) Take Apart General Information New Procedures If you are familiar with...models. There are recommended for troubleshooting) 2 - Important Note • Memory from the previous 15-inch PowerBook is secured with this computer. A hidden latch behind the optical drive ...

Service Guide
Page 11
Memory Door and Memory Cards PowerBook G4 (15-inch FW800) Take Apart - 9 Memory Door and Memory Cards Tools This procedure requires the following tools: • Soft cloth • #0 Phillips screwdriver Part Location Preliminary Steps Before you begin, remove the battery.
Memory Door and Memory Cards PowerBook G4 (15-inch FW800) Take Apart - 9 Memory Door and Memory Cards Tools This procedure requires the following tools: • Soft cloth • #0 Phillips screwdriver Part Location Preliminary Steps Before you begin, remove the battery.

Service Guide
Page 12
Note: If only one memory card is installed, the factory installs it to cool down on a soft cloth. 2. Procedure Warning: If the computer has been recently operating, allow it in the bottom memory slot. Note: Memory must be removed from the top slot before performing this procedure. 1. Remove the four screws from the bottom slot. 10 - Place the computer face down before removing from the memory door then remove the door. PowerBook G4 (15-inch FW800) Take Apart Memory Door and Memory Cards
Note: If only one memory card is installed, the factory installs it to cool down on a soft cloth. 2. Procedure Warning: If the computer has been recently operating, allow it in the bottom memory slot. Note: Memory must be removed from the top slot before performing this procedure. 1. Remove the four screws from the bottom slot. 10 - Place the computer face down before removing from the memory door then remove the door. PowerBook G4 (15-inch FW800) Take Apart Memory Door and Memory Cards
Service Guide
Page 13
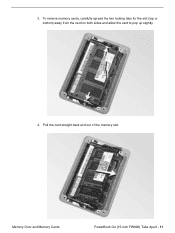
To remove memory cards, carefully spread the two locking tabs for the slot (top or bottom) away from the card on both sides and allow the card to pop up slightly. 4. Memory Door and Memory Cards PowerBook G4 (15-inch FW800) Take Apart - 11 Pull the card straight back and out of the memory slot. 3.
To remove memory cards, carefully spread the two locking tabs for the slot (top or bottom) away from the card on both sides and allow the card to pop up slightly. 4. Memory Door and Memory Cards PowerBook G4 (15-inch FW800) Take Apart - 11 Pull the card straight back and out of the memory slot. 3.
Service Guide
Page 14
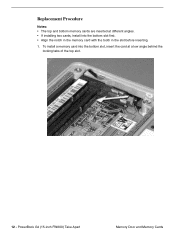
Replacement Procedure Notes: • The top and bottom memory cards are inserted at different angles. • If installing two cards, install into the bottom slot, insert the card at a low angle behind the locking tabs of the top slot. 12 - PowerBook G4 (15-inch FW800) Take Apart Memory Door and Memory Cards To install a memory card into the bottom slot first. • Align the notch in the memory card with the tooth in the slot before inserting. 1.
Replacement Procedure Notes: • The top and bottom memory cards are inserted at different angles. • If installing two cards, install into the bottom slot, insert the card at a low angle behind the locking tabs of the top slot. 12 - PowerBook G4 (15-inch FW800) Take Apart Memory Door and Memory Cards To install a memory card into the bottom slot first. • Align the notch in the memory card with the tooth in the slot before inserting. 1.

Service Guide
Page 15
Firmly push the card straight into place. Carefully spread the two locking tabs for the bottom slot away from the card on both sides while pushing the card straight down until the tabs click onto both sides of the card drops down before it fully into the slot. 3. Note: If the back of the card, locking it into the slot until it is fully seated, raise it up enough to the lower slot. Slide the card forward to push it is fully and securely seated along its length. Memory Door and Memory Cards PowerBook G4 (15-inch FW800) Take Apart - 13 2.
Firmly push the card straight into place. Carefully spread the two locking tabs for the bottom slot away from the card on both sides while pushing the card straight down until the tabs click onto both sides of the card drops down before it fully into the slot. 3. Note: If the back of the card, locking it into the slot until it is fully seated, raise it up enough to the lower slot. Slide the card forward to push it is fully and securely seated along its length. Memory Door and Memory Cards PowerBook G4 (15-inch FW800) Take Apart - 13 2.

Service Guide
Page 16
4. Push the card in the top slot, follow the same procedures as the bottom slot except insert the card at a 30-degree angle, above the locking tabs. 5. PowerBook G4 (15-inch FW800) Take Apart Memory Door and Memory Cards As with the bottom slot, spread the locking tabs for the top slot while pushing the card straight down until it locks into place. 14 - If installing a memory card in until it is firmly seated. 6.
4. Push the card in the top slot, follow the same procedures as the bottom slot except insert the card at a 30-degree angle, above the locking tabs. 5. PowerBook G4 (15-inch FW800) Take Apart Memory Door and Memory Cards As with the bottom slot, spread the locking tabs for the top slot while pushing the card straight down until it locks into place. 14 - If installing a memory card in until it is firmly seated. 6.

Service Guide
Page 17
Cards should be flat and secure on both sides. 8. Replace the battery. 10. Install the memory door. 9. Use Apple System Profiler to verify that the memory is recognized. (Choose the menu bar Apple logo () > About This Mac, click More Info..., select the System Profile tab, open the Memory Overview.) Memory Door and Memory Cards PowerBook G4 (15-inch FW800) Take Apart - 15 7.
Cards should be flat and secure on both sides. 8. Replace the battery. 10. Install the memory door. 9. Use Apple System Profiler to verify that the memory is recognized. (Choose the menu bar Apple logo () > About This Mac, click More Info..., select the System Profile tab, open the Memory Overview.) Memory Door and Memory Cards PowerBook G4 (15-inch FW800) Take Apart - 15 7.
Service Guide
Page 25
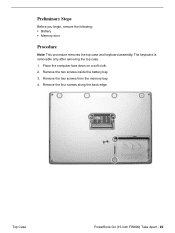
Preliminary Steps Before you begin, remove the following: • Battery • Memory door Procedure Note: This procedure removes the top case and keyboard assembly. Remove the four screws along the back edge. Top Case PowerBook G4 (15-inch FW800) Take Apart - 23 The keyboard is removable only after removing the top case. 1. Remove the two screws inside the battery bay. 3. Remove the two screws from the memory bay. 4. Place the computer face down on a soft cloth. 2.
Preliminary Steps Before you begin, remove the following: • Battery • Memory door Procedure Note: This procedure removes the top case and keyboard assembly. Remove the four screws along the back edge. Top Case PowerBook G4 (15-inch FW800) Take Apart - 23 The keyboard is removable only after removing the top case. 1. Remove the two screws inside the battery bay. 3. Remove the two screws from the memory bay. 4. Place the computer face down on a soft cloth. 2.
Service Guide
Page 36
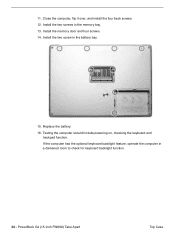
Close the computer, flip it over, and install the four back screws. 12. Replace the battery. 16. PowerBook G4 (15-inch FW800) Take Apart Top Case Install the two screw in a darkened room to check for keyboard backlight function. 34 - Install the memory door and four screws. 14. If the computer has the optional keyboard backlight feature, operate the computer in the battery bay. 15. 11. Install the two screws in the memory bay. 13. Testing the computer should include powering on, checking the keyboard and trackpad function.
Close the computer, flip it over, and install the four back screws. 12. Replace the battery. 16. PowerBook G4 (15-inch FW800) Take Apart Top Case Install the two screw in a darkened room to check for keyboard backlight function. 34 - Install the memory door and four screws. 14. If the computer has the optional keyboard backlight feature, operate the computer in the battery bay. 15. 11. Install the two screws in the memory bay. 13. Testing the computer should include powering on, checking the keyboard and trackpad function.

Service Guide
Page 131
...and replace the damaged parts. 14. The PowerBook G4 (15-inch FW800) uses PC2700 (also called DDR333) DDR SDRAM SO-DIMMs with the following flex cables one at a time, reconnecting each before proceeding to test the memory. 2. Verify proper memory is being used replace it . 3. ... Charts PowerBook G4 (15-inch FW800) Troubleshooting - 13 If the test can't find the memory or finds bad memory, inspect the bad DIMM. Note: If the failure is detected replace the logic board. Replace logic board. Otherwise, try reseating the DIMM and retest. Run Apple Service ...
...and replace the damaged parts. 14. The PowerBook G4 (15-inch FW800) uses PC2700 (also called DDR333) DDR SDRAM SO-DIMMs with the following flex cables one at a time, reconnecting each before proceeding to test the memory. 2. Verify proper memory is being used replace it . 3. ... Charts PowerBook G4 (15-inch FW800) Troubleshooting - 13 If the test can't find the memory or finds bad memory, inspect the bad DIMM. Note: If the failure is detected replace the logic board. Replace logic board. Otherwise, try reseating the DIMM and retest. Run Apple Service ...

Service Guide
Page 135
... a second startup chime. 3. Note: Restore disc images are replaced with OS X. 2. Hardware Symptom Charts PowerBook G4 (15-inch FW800) Troubleshooting - 17 If the test finds bad memory, replace the DIMMs one at least one of system software with the software install and restore disc that no... RAM on after being fully shut down Command-Option-P-R during the startup. Reboot system. 6. Run Apple Service Diagnostic in loop mode (Control-L) for an extended time to Memory Card Take Apart chapter for removal and installation. Computer beeps once at http://service.info...
... a second startup chime. 3. Note: Restore disc images are replaced with OS X. 2. Hardware Symptom Charts PowerBook G4 (15-inch FW800) Troubleshooting - 17 If the test finds bad memory, replace the DIMMs one at least one of system software with the software install and restore disc that no... RAM on after being fully shut down Command-Option-P-R during the startup. Reboot system. 6. Run Apple Service Diagnostic in loop mode (Control-L) for an extended time to Memory Card Take Apart chapter for removal and installation. Computer beeps once at http://service.info...

Service Guide
Page 136
...good and compatible RAM card and restart. • If symptom repeats, replace logic board. PowerBook G4 (15-inch FW800) Troubleshooting Hardware Symptom Charts Three beeps means that EDO memory is not installed in the upper expansion slot, replace RAM in the RAM expansion slot....and restart. • If symptom repeats, replace logic board. Part 2 95132: PowerBook G4: Installing or Replacing Memory 18 - Computer beeps four times at startup 1. Two beeps means that no RAM banks passed memory testing. 2. Computer beeps twice at startup 1. Related Knowledge Base articles: 58442:...
...good and compatible RAM card and restart. • If symptom repeats, replace logic board. PowerBook G4 (15-inch FW800) Troubleshooting Hardware Symptom Charts Three beeps means that EDO memory is not installed in the upper expansion slot, replace RAM in the RAM expansion slot....and restart. • If symptom repeats, replace logic board. Part 2 95132: PowerBook G4: Installing or Replacing Memory 18 - Computer beeps four times at startup 1. Two beeps means that no RAM banks passed memory testing. 2. Computer beeps twice at startup 1. Related Knowledge Base articles: 58442:...

Memory
Page 1
Let the computer cool down your computer on a clean, flat http://www.info.apple.com/installparts/. PowerBook G4 (15-inch FW800) Memory Card Replacement Instructions Follow the instructions in this sheet carefully. Tools Required This procedure requires the following tools: • Soft cloth • #0 Phillips screwdriver ...1. Failure to avoid damaging its warranty. Shut down the computer, the internal components can be very hot. Unplug all cables from the computer. © 2003 Apple Computer, Inc. Note: Online instructions are available at surface. 2.
Let the computer cool down your computer on a clean, flat http://www.info.apple.com/installparts/. PowerBook G4 (15-inch FW800) Memory Card Replacement Instructions Follow the instructions in this sheet carefully. Tools Required This procedure requires the following tools: • Soft cloth • #0 Phillips screwdriver ...1. Failure to avoid damaging its warranty. Shut down the computer, the internal components can be very hot. Unplug all cables from the computer. © 2003 Apple Computer, Inc. Note: Online instructions are available at surface. 2.

Memory
Page 2
.... (Figure 2) Important: To avoid electrostatic discharge, always ground yourself by touching the inside of the battery bay. Figure 1 6. Touch a metal surface inside the computer. Figure 2 PowerBook G4 (15-inch FW800) Memory Card Replacement - 2 Lift the battery out of the battery bay before you have completed the installation and closed the computer.
.... (Figure 2) Important: To avoid electrostatic discharge, always ground yourself by touching the inside of the battery bay. Figure 1 6. Touch a metal surface inside the computer. Figure 2 PowerBook G4 (15-inch FW800) Memory Card Replacement - 2 Lift the battery out of the battery bay before you have completed the installation and closed the computer.

Memory
Page 3
Remove the four screws from the memory door then remove the door. (Figure 3) Figure 3 PowerBook G4 (15-inch FW800) Memory Card Replacement - 3 7.
Remove the four screws from the memory door then remove the door. (Figure 3) Figure 3 PowerBook G4 (15-inch FW800) Memory Card Replacement - 3 7.

Memory
Page 4
Removing Installed Memory Cards Notes: • If only one memory card is installed, the factory installs it in the bottom memory slot. • Memory must be removed from the top slot before removing from the card on both sides and allow the card to pop up. (Figure 4) Figure 4 2. Pull the card straight back and out of the memory slot. (Figure 5) Figure 5 PowerBook G4 (15-inch FW800) Memory Card Replacement - 4 To remove memory cards, carefully spread the two locking tabs for the slot (top or bottom) away from the bottom slot. 1.
Removing Installed Memory Cards Notes: • If only one memory card is installed, the factory installs it in the bottom memory slot. • Memory must be removed from the top slot before removing from the card on both sides and allow the card to pop up. (Figure 4) Figure 4 2. Pull the card straight back and out of the memory slot. (Figure 5) Figure 5 PowerBook G4 (15-inch FW800) Memory Card Replacement - 4 To remove memory cards, carefully spread the two locking tabs for the slot (top or bottom) away from the bottom slot. 1.

Memory
Page 5
To install a memory card into the bottom slot first. • Align the notch in the memory card with the tooth in the slot before inserting. 1. Installing the Replacement Memory Card Notes: • The top and bottom memory cards are inserted at different angles. • If installing two cards, install into the bottom slot, insert the card at a low angle behind the locking tabs of the top slot (see arrow, below). (Figure 6) Figure 6 PowerBook G4 (15-inch FW800) Memory Card Replacement - 5
To install a memory card into the bottom slot first. • Align the notch in the memory card with the tooth in the slot before inserting. 1. Installing the Replacement Memory Card Notes: • The top and bottom memory cards are inserted at different angles. • If installing two cards, install into the bottom slot, insert the card at a low angle behind the locking tabs of the top slot (see arrow, below). (Figure 6) Figure 6 PowerBook G4 (15-inch FW800) Memory Card Replacement - 5

Memory
Page 6
Figure 7 3. Slide the card forward to push it into place. (Figure 8) Figure 8 PowerBook G4 (15-inch FW800) Memory Card Replacement - 6 Carefully spread the two locking tabs for the bottom slot away from the card on both sides of the card drops down until the tabs click onto both sides while pushing the card straight down before it is fully and securely seated along its length. (Figure 7) Note: If the back of the card, locking it fully into the slot until it is fully seated, raise it up enough to the lower slot. 2. Firmly push the card straight into the slot.
Figure 7 3. Slide the card forward to push it into place. (Figure 8) Figure 8 PowerBook G4 (15-inch FW800) Memory Card Replacement - 6 Carefully spread the two locking tabs for the bottom slot away from the card on both sides of the card drops down until the tabs click onto both sides while pushing the card straight down before it is fully and securely seated along its length. (Figure 7) Note: If the back of the card, locking it fully into the slot until it is fully seated, raise it up enough to the lower slot. 2. Firmly push the card straight into the slot.