Use and Care
Page 5
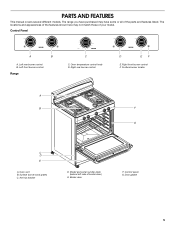
... all of broiler door) E. Control Panel A B A. Control panel G. Door gasket 5 Surface burner locator A B F G C D E A. Oven vent B. Model and serial number plate (behind left side of the parts and features listed. Broiler door F. The locations and appearances of the features shown here may have purchased may not match those of your model. Right...
... all of broiler door) E. Control Panel A B A. Control panel G. Door gasket 5 Surface burner locator A B F G C D E A. Oven vent B. Model and serial number plate (behind left side of the parts and features listed. Broiler door F. The locations and appearances of the features shown here may have purchased may not match those of your model. Right...
Use and Care
Page 9
... setting. 3. Always broil with foil. Open the broiler door and take out the broiler pan and grid. 2. The temperature can drain down into the lower part of fish, poultry or meat may need to reduce spattering.
... setting. 3. Always broil with foil. Open the broiler door and take out the broiler pan and grid. 2. The temperature can drain down into the lower part of fish, poultry or meat may need to reduce spattering.
Use and Care
Page 10
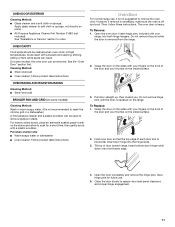
...9632; Glass cleaner and soft cloth or sponge: Apply glass cleaner to soft cloth or sponge, not directly on panel. ■ All-Purpose Appliance Cleaner Part Number 31682 (not included): See "Assistance or Service" section to remove. SURFACE BURNERS See "Surface Burners" section. 10 Place fingers in the slots ...glass, do not apply a cool damp cloth to the inner door glass before going into a dishwasher. ■ Gas Grate and Drip Pan Cleaner Part Number 31617: See "Assistance or Service" section to the cooktop controls, do not bang grates and caps against each other or hard surfaces such ...
...9632; Glass cleaner and soft cloth or sponge: Apply glass cleaner to soft cloth or sponge, not directly on panel. ■ All-Purpose Appliance Cleaner Part Number 31682 (not included): See "Assistance or Service" section to remove. SURFACE BURNERS See "Surface Burners" section. 10 Place fingers in the slots ...glass, do not apply a cool damp cloth to the inner door glass before going into a dishwasher. ■ Gas Grate and Drip Pan Cleaner Part Number 31617: See "Assistance or Service" section to the cooktop controls, do not bang grates and caps against each other or hard surfaces such ...
Use and Care
Page 11
... react with your thumbs on the inside surface. 3. For heavily soiled bowls, place an ammonia soaked paper towel on panel. ■ All-Purpose Appliance Cleaner Part Number 31682 (not included): See "Assistance or Service" section to assure door side panel clearance and proper hinge engagement. 11 Porcelain enamel only ■ Warm...
... react with your thumbs on the inside surface. 3. For heavily soiled bowls, place an ammonia soaked paper towel on panel. ■ All-Purpose Appliance Cleaner Part Number 31682 (not included): See "Assistance or Service" section to assure door side panel clearance and proper hinge engagement. 11 Porcelain enamel only ■ Warm...
Use and Care
Page 13
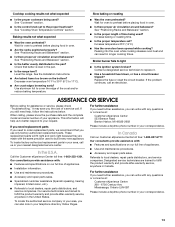
...before placing food in oven. ■ Are the racks positioned properly? Designated service technicians are trained to local dealers, repair parts distributors, and service companies. See "Positioning Racks and Bakeware" section. ■ Is there proper air circulation around bakeware?... brown on our full line of appliances. ■ Installation information. ■ Use and maintenance procedures. ■ Accessory and repair parts sales. ■ Specialized customer assistance (Spanish speaking, hearing impaired, limited vision, etc.). ■ Referrals to fulfill the product warranty...
...before placing food in oven. ■ Are the racks positioned properly? Designated service technicians are trained to local dealers, repair parts distributors, and service companies. See "Positioning Racks and Bakeware" section. ■ Is there proper air circulation around bakeware?... brown on our full line of appliances. ■ Installation information. ■ Use and maintenance procedures. ■ Accessory and repair parts sales. ■ Specialized customer assistance (Spanish speaking, hearing impaired, limited vision, etc.). ■ Referrals to fulfill the product warranty...

Use and Care
Page 14
...installation instructions. 4. Repairs when your major appliance is used for repairs. Any food loss due to the appliance. 9. Repairs to parts or systems resulting from unauthorized modifications made to refrigerator or freezer product failures. 7. IMPLIED WARRANTIES, INCLUDING WARRANTIES OF MERCHANTABILITY OR FITNESS FOR..., to instruct you need to know your sales slip together for Factory Specified Parts and repair labor to correct defects in a remote area where service by Whirlpool. 5. Consumable parts are excluded from defects in a manner that have been removed, altered or ...
...installation instructions. 4. Repairs when your major appliance is used for repairs. Any food loss due to the appliance. 9. Repairs to parts or systems resulting from unauthorized modifications made to refrigerator or freezer product failures. 7. IMPLIED WARRANTIES, INCLUDING WARRANTIES OF MERCHANTABILITY OR FITNESS FOR..., to instruct you need to know your sales slip together for Factory Specified Parts and repair labor to correct defects in a remote area where service by Whirlpool. 5. Consumable parts are excluded from defects in a manner that have been removed, altered or ...
Warranty
Page 1
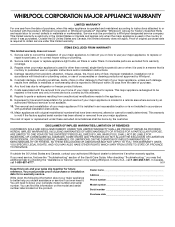
...the appliance. 9. Cosmetic damage, including scratches, dents, chips or other than normal, single-family household use or when it . Repairs to parts or systems resulting from warranty coverage. 3. Major appliances with original model/serial numbers that is contrary to published user or operator instructions and/...cannot be provided by Whirlpool. 5. In Canada, call 1-800-253-1301. Repairs when your major appliance is used for Factory Specified Parts and repair labor to correct defects in which it is installed in an inaccessible location or is not installed in -warranty service. The ...
...the appliance. 9. Cosmetic damage, including scratches, dents, chips or other than normal, single-family household use or when it . Repairs to parts or systems resulting from warranty coverage. 3. Major appliances with original model/serial numbers that is contrary to published user or operator instructions and/...cannot be provided by Whirlpool. 5. In Canada, call 1-800-253-1301. Repairs when your major appliance is used for Factory Specified Parts and repair labor to correct defects in which it is installed in an inaccessible location or is not installed in -warranty service. The ...
Installation Instruction
Page 3
... the floor covering can be used will not discolor, delaminate or sustain other damage. Tools needed Check local codes and consult gas supplier. Parts needed ■ Level drive ratchet ■ Tape measure ■ Flat-blade screwdriver ■ Phillips screwdriver ■ Hand or electric drill...should be located for concrete/ ceramic floors) ■ Pipe-joint compound resistant to LP gas ■ Noncorrosive leak-detection solution Parts supplied Check that are included. This oven has been designed in accordance with the requirements of flooring may require longer screws to...
... the floor covering can be used will not discolor, delaminate or sustain other damage. Tools needed Check local codes and consult gas supplier. Parts needed ■ Level drive ratchet ■ Tape measure ■ Flat-blade screwdriver ■ Phillips screwdriver ■ Hand or electric drill...should be located for concrete/ ceramic floors) ■ Pipe-joint compound resistant to LP gas ■ Noncorrosive leak-detection solution Parts supplied Check that are included. This oven has been designed in accordance with the requirements of flooring may require longer screws to...
Installation Instruction
Page 4
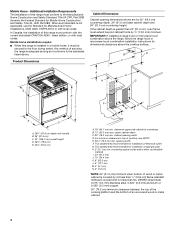
...top of the cooking platform and the bottom of rigid gas pipe. This shaded area recommended for Mobile Home Construction and Safety, Title 24, HUD Part 280). H. 2" (5.1 cm) min. latest edition, or with not less than ¹⁄₄" (0.64 cm) flame retardant millboard covered.... E. 30¹⁄₈" (76.5 cm) min. countertop space to the Manufactured Home Construction and Safety Standard, Title 24 CFR, Part 3280 (formerly the Federal Standard for installation of an uncovered wood or metal cabinet. 4 IMPORTANT: If installing a range hood or microwave hood...
...top of the cooking platform and the bottom of rigid gas pipe. This shaded area recommended for Mobile Home Construction and Safety, Title 24, HUD Part 280). H. 2" (5.1 cm) min. latest edition, or with not less than ¹⁄₄" (0.64 cm) flame retardant millboard covered.... E. 30¹⁄₈" (76.5 cm) min. countertop space to the Manufactured Home Construction and Safety Standard, Title 24 CFR, Part 3280 (formerly the Federal Standard for installation of an uncovered wood or metal cabinet. 4 IMPORTANT: If installing a range hood or microwave hood...
Installation Instruction
Page 7
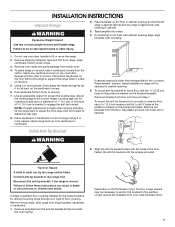
..., longer screws may be centered in the floor. Connect anti-tip bracket to remove. 7. Stack one cardboard corner on its back. 5. Remove oven racks and parts package from floor and move the range 2. Pull cardboard bottom firmly to rear range foot. Tape template into holes with the screws provided. Use an...
..., longer screws may be centered in the floor. Connect anti-tip bracket to remove. 7. Stack one cardboard corner on its back. 5. Remove oven racks and parts package from floor and move the range 2. Pull cardboard bottom firmly to rear range foot. Tape template into holes with the screws provided. Use an...
Installation Instruction
Page 9
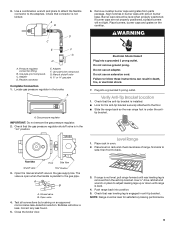
... of range, first side to the gas pipe. Bubbles will not light. If range is not level, pull range forward until range is removed from parts package. Pressure regulator connection fitting B. Remove cooktop burner caps and grates from the anti-tip bracket. Do not use an extension cord. Plug into position...
... of range, first side to the gas pipe. Bubbles will not light. If range is not level, pull range forward until range is removed from parts package. Pressure regulator connection fitting B. Remove cooktop burner caps and grates from the anti-tip bracket. Do not use an extension cord. Plug into position...
Installation Instruction
Page 11
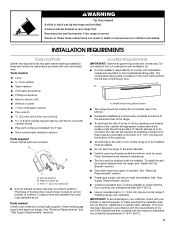
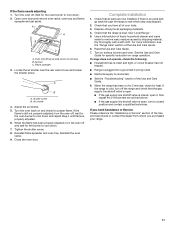
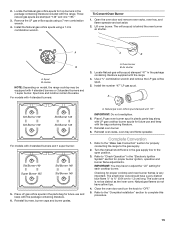
A A B C A. A B A. Turn the oven back on and check for specific instruction on range operation. Complete Installation 1. If there is an extra part, go back through the steps to see the "Range Care" section of the Use and Care Guide. 6. Read the Use and Care Guide. 7. If range ... burner to remove) B. Reinstall the oven racks. 9. Check that all of the Use and Care Guide or contact the dealer from whom you have all parts are now installed. For more information, see which step was skipped. 2. Open oven door and remove oven racks, oven tray, and flame spreader and set...
A A B C A. A B A. Turn the oven back on and check for specific instruction on range operation. Complete Installation 1. If there is an extra part, go back through the steps to see the "Range Care" section of the Use and Care Guide. 6. Read the Use and Care Guide. 7. If range ... burner to remove) B. Reinstall the oven racks. 9. Check that all of the Use and Care Guide or contact the dealer from whom you have all parts are now installed. For more information, see which step was skipped. 2. Open oven door and remove oven racks, oven tray, and flame spreader and set...

Installation Instruction
Page 13
...grate, burner caps and burners. Three LP gas spuds are stamped "88" and one "96." 3. Place the Natural gas orifice spuds in plastic parts bag along with Natural gas cooktop burner spuds for future use and keep with the bag containing literature. 6. To Convert Oven Burner 1. Lift oven ... B. LP oven orifice spud stamped with 4 standard burners or 3 standard burners and 1 super burner. Place Natural gas oven burner spud in the parts bag for top burners in the package containing literature supplied with the range. Locate LP gas orifice spuds for future use and keep with the...
...grate, burner caps and burners. Three LP gas spuds are stamped "88" and one "96." 3. Place the Natural gas orifice spuds in plastic parts bag along with Natural gas cooktop burner spuds for future use and keep with the bag containing literature. 6. To Convert Oven Burner 1. Lift oven ... B. LP oven orifice spud stamped with 4 standard burners or 3 standard burners and 1 super burner. Place Natural gas oven burner spud in the parts bag for top burners in the package containing literature supplied with the range. Locate LP gas orifice spuds for future use and keep with the...
Installation Instruction
Page 15
...one "165." 3. Use a ³⁄₈" combination wrench and remove the LP gas orifice spud. 5. Place LP gas orifice spuds in plastic parts bag along with LP gas cooktop burner spuds for future use and keep with 3 standard burners and 1 super burner: Std Burner 149 Super Burner 165...6. Natural gas oven orifice spud stamped with 4 standard burners: A. Lift oven burner. Oven burner B. Place LP gas oven burner spud in the parts bag for future use and keep with the range. Refer to the "Make Gas Connection" section for each cooktop burner. Holder NOTE: Depending on model...
...one "165." 3. Use a ³⁄₈" combination wrench and remove the LP gas orifice spud. 5. Place LP gas orifice spuds in plastic parts bag along with LP gas cooktop burner spuds for future use and keep with 3 standard burners and 1 super burner: Std Burner 149 Super Burner 165...6. Natural gas oven orifice spud stamped with 4 standard burners: A. Lift oven burner. Oven burner B. Place LP gas oven burner spud in the parts bag for future use and keep with the range. Refer to the "Make Gas Connection" section for each cooktop burner. Holder NOTE: Depending on model...


