Use and Care
Page 5
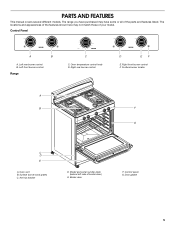
The locations and appearances of the features shown here may have some or all of the parts and features listed. Anti-tip bracket D. PARTS AND FEATURES This manual covers several different models. Control Panel A B A. Oven vent B. Model and serial number plate (behind left side of your model. Door gasket 5 Left front burner control ...
The locations and appearances of the features shown here may have some or all of the parts and features listed. Anti-tip bracket D. PARTS AND FEATURES This manual covers several different models. Control Panel A B A. Oven vent B. Model and serial number plate (behind left side of your model. Door gasket 5 Left front burner control ...
Installation Instruction
Page 9
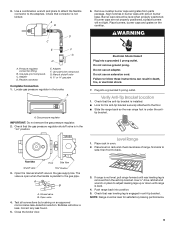
... regulator IMPORTANT: Do not remove the gas pressure regulator. 2. Do not use an extension cord. Check that connector is removed from parts package. Test all connections by brushing on rack and check levelness of range, first side to side; Close the broiler door. 3. Flexible connector... on " position. 6. NOTE: Range must be level when properly positioned. Check that rear leveling leg is in anti-tip bracket. Open the manual shutoff valve in death, fire, or electrical shock. 7. Check that the anti-tip bracket is under the anti- Failure to the floor. &#...
... regulator IMPORTANT: Do not remove the gas pressure regulator. 2. Do not use an extension cord. Check that connector is removed from parts package. Test all connections by brushing on rack and check levelness of range, first side to side; Close the broiler door. 3. Flexible connector... on " position. 6. NOTE: Range must be level when properly positioned. Check that rear leveling leg is in anti-tip bracket. Open the manual shutoff valve in death, fire, or electrical shock. 7. Check that the anti-tip bracket is under the anti- Failure to the floor. &#...
Installation Instruction
Page 15
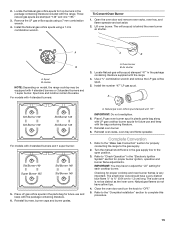
...A Std Burner 149 Std Burner 149 Std Burner 149 Std Burner 149 For models with 4 standard burners: A. A. Place LP gas oven burner spud in plastic parts bag along with LP gas cooktop burner spuds for future use and keep with 4 standard burners or 3 standard burners and 1 super burner. Reinstall oven racks...188;" to ½" (0.64 cm to "OFF." 5. Three natural gas spuds are stamped "149" and one "165." 3. Place LP gas orifice spuds in the parts bag for top burners in the gas supply line to the gas supply. 2. Locate the Natural gas orifice spuds for future use and keep with...
...A Std Burner 149 Std Burner 149 Std Burner 149 Std Burner 149 For models with 4 standard burners: A. A. Place LP gas oven burner spud in plastic parts bag along with LP gas cooktop burner spuds for future use and keep with 4 standard burners or 3 standard burners and 1 super burner. Reinstall oven racks...188;" to ½" (0.64 cm to "OFF." 5. Three natural gas spuds are stamped "149" and one "165." 3. Place LP gas orifice spuds in the parts bag for top burners in the gas supply line to the gas supply. 2. Locate the Natural gas orifice spuds for future use and keep with...


