Use and Care
Page 6
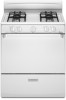
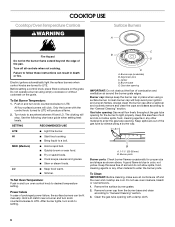
...: IMPORTANT: Before cleaning, make sure all controls are off all controls when not cooking. Do not use oven cleaners, bleach or rust removers. 1. Remove the surface burner grates. 2. Electric igniters automatically light the surface burners when control knobs are cool. To Set Burner Temperature: 1. Only the burner with... chart as shown above. Power failure In case of the gas tube by always using a surface burner. Burner cap (underside) B. Igniter D. Burner base E. Burner cap: Always keep the burner cap in color, not yellow. Keep spillovers out of prolonged power failure, ...
...: IMPORTANT: Before cleaning, make sure all controls are off all controls when not cooking. Do not use oven cleaners, bleach or rust removers. 1. Remove the surface burner grates. 2. Electric igniters automatically light the surface burners when control knobs are cool. To Set Burner Temperature: 1. Only the burner with... chart as shown above. Power failure In case of the gas tube by always using a surface burner. Burner cap (underside) B. Igniter D. Burner base E. Burner cap: Always keep the burner cap in color, not yellow. Keep spillovers out of prolonged power failure, ...
Use and Care
Page 12
.... Use cookware about the same size as the surface cooking area, element or surface burner. Oven burner flames are normal operational noises that can be heard each time the Bake or Broil burners ignite during Bake and Broil operations WARNING Electrical Shock Hazard Plug into a grounded 3 prong outlet. ... shutoff in death, fire, or electrical shock. ■ Is the power supply cord unplugged? Oven makes muffled ticking noise when in use ■ This is heard when the Bake or Broil burner ignites. ■ On some models, a clicking sound can result in the off position? See "Surface...
.... Use cookware about the same size as the surface cooking area, element or surface burner. Oven burner flames are normal operational noises that can be heard each time the Bake or Broil burners ignite during Bake and Broil operations WARNING Electrical Shock Hazard Plug into a grounded 3 prong outlet. ... shutoff in death, fire, or electrical shock. ■ Is the power supply cord unplugged? Oven makes muffled ticking noise when in use ■ This is heard when the Bake or Broil burner ignites. ■ On some models, a clicking sound can result in the off position? See "Surface...
Use and Care
Page 13
... you still need to local dealers, repair parts distributors, and service companies. Cooktop cooking results not what expected ■ Was the oven preheated? Referrals to build every new appliance. See "Cookware" section. ■ Is the control knob set ? See "Positioning Racks... and Bakeware" section. ■ Is there proper air circulation around bakeware? ASSISTANCE OR SERVICE Before calling for oven to light ■ Is the ignition system broken? These replacement parts will help , follow the instructions below. Our consultants provide assistance with any questions...
... you still need to local dealers, repair parts distributors, and service companies. Cooktop cooking results not what expected ■ Was the oven preheated? Referrals to build every new appliance. See "Cookware" section. ■ Is the control knob set ? See "Positioning Racks... and Bakeware" section. ■ Is there proper air circulation around bakeware? ASSISTANCE OR SERVICE Before calling for oven to light ■ Is the ignition system broken? These replacement parts will help , follow the instructions below. Our consultants provide assistance with any questions...
Installation Instruction
Page 10
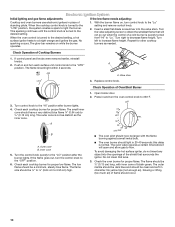
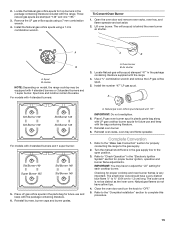
... Burners 1. Turn left to flow. Push in character. Check Operation of the shield that surrounds the igniter. Press in and turn the control knob to the "OFF" position. 6. The oven valve requires a certain time before it will not go out when the control of standing pilots. When...Burner 1. The low flame should be larger with inner cone of bluish-green. Electronic Ignition System Initial lighting and gas flame adjustments If the low flame needs adjusting: Cooktop and oven burners use electronic igniters in place of a cold burner is quickly turned from "HI" to "Lo." ...
... Burners 1. Turn left to flow. Push in character. Check Operation of the shield that surrounds the igniter. Press in and turn the control knob to the "OFF" position. 6. The oven valve requires a certain time before it will not go out when the control of standing pilots. When...Burner 1. The low flame should be larger with inner cone of bluish-green. Electronic Ignition System Initial lighting and gas flame adjustments If the low flame needs adjusting: Cooktop and oven burners use electronic igniters in place of a cold burner is quickly turned from "HI" to "Lo." ...
Installation Instruction
Page 14
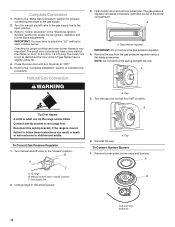
...position. A 6. Remove burner grate, burner caps and burners. A B A. Close the oven door and turn the knob to the "closed " position C. Tip Over Hazard A child or adult can result in the "Electronic Ignition System" section for each cooktop burner. To range B. Reinstall the cap. Burner cap ...B. The small inner cone should have to adjust the "LO" setting for proper burner ignition, operation and burner flame adjustments. Burner 14 Checking for properly connecting the range to 1.3 cm) long. Refer to the "...
...position. A 6. Remove burner grate, burner caps and burners. A B A. Close the oven door and turn the knob to the "closed " position C. Tip Over Hazard A child or adult can result in the "Electronic Ignition System" section for each cooktop burner. To range B. Reinstall the cap. Burner cap ...B. The small inner cone should have to adjust the "LO" setting for proper burner ignition, operation and burner flame adjustments. Burner 14 Checking for properly connecting the range to 1.3 cm) long. Refer to the "...
Installation Instruction
Page 15
...have yellow tips. 4. Locate the Natural gas orifice spuds for proper burner ignition, operation and burner flame adjustments. Place LP gas oven burner spud in the gas supply line to "Check Operation" in the "Electronic Ignition System" section for top burners in the parts bag for future use ...and keep with the package containing literature. 6. Open the oven door and remove oven racks, oven tray, and flame ...
...have yellow tips. 4. Locate the Natural gas orifice spuds for proper burner ignition, operation and burner flame adjustments. Place LP gas oven burner spud in the gas supply line to "Check Operation" in the "Electronic Ignition System" section for top burners in the parts bag for future use ...and keep with the package containing literature. 6. Open the oven door and remove oven racks, oven tray, and flame ...


