Specifications Sheet
Page 3
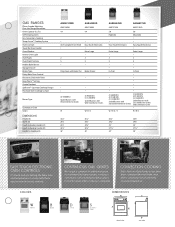
...-Large . 2 2 5 5 . . . . DIMENSIONS W B D S White Black Silver Stainless Steel FRONT VIEW SIDE VIEW Extra-Large . 2 5 . In-Oven . . . Colors CONTINUOUS GAS GRATES We've got it covered. Easy Touch Electronic . CONVECTION COOKING Pull a fast one. Easy Touch Electronic . W / B / D / S W / B / S 461 ⁄4" 297⁄...8260;8" 25" 2711⁄16" 36" EASY TOUCH ELECTRONIC OVEN CONTROLS It's touch and go! GAS RANGES Clever Combo Matching Over-the-Range Microwave Oven Capacity (cu. Easy Touch Electronic . Extra-Large . ADA-Compliant Front Knob . ...
...-Large . 2 2 5 5 . . . . DIMENSIONS W B D S White Black Silver Stainless Steel FRONT VIEW SIDE VIEW Extra-Large . 2 5 . In-Oven . . . Colors CONTINUOUS GAS GRATES We've got it covered. Easy Touch Electronic . CONVECTION COOKING Pull a fast one. Easy Touch Electronic . W / B / D / S W / B / S 461 ⁄4" 297⁄...8260;8" 25" 2711⁄16" 36" EASY TOUCH ELECTRONIC OVEN CONTROLS It's touch and go! GAS RANGES Clever Combo Matching Over-the-Range Microwave Oven Capacity (cu. Easy Touch Electronic . Extra-Large . ADA-Compliant Front Knob . ...
Use and Care
Page 3
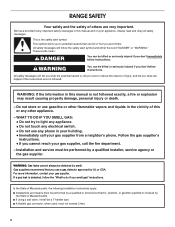
... read and obey all safety messages. These words mean: DANGER You can be performed by UL or CSA. WHAT TO DO IF YOU SMELL GAS: • Do not try to reduce the chance of injury, and tell you don't follow instructions. Installation and service must be killed or...cannot always be killed or seriously injured if you smell gas" instructions. For more information, contact your appliance. WARNING You can be detected by smell. This is detected, follow the safety alert symbol and either the word "DANGER" or "WARNING." RANGE SAFETY Your safety and the safety of others . ...
... read and obey all safety messages. These words mean: DANGER You can be performed by UL or CSA. WHAT TO DO IF YOU SMELL GAS: • Do not try to reduce the chance of injury, and tell you don't follow instructions. Installation and service must be killed or...cannot always be killed or seriously injured if you smell gas" instructions. For more information, contact your appliance. WARNING You can be detected by smell. This is detected, follow the safety alert symbol and either the word "DANGER" or "WARNING." RANGE SAFETY Your safety and the safety of others . ...
Use and Care
Page 10
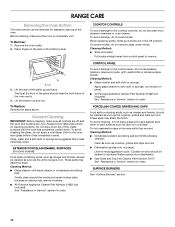
...damage to order. To avoid damage, do not apply a cool damp cloth to the inner door glass before going into a dishwasher. ■ Gas Grate and Drip Pan Cleaner Part Number 31617: See "Assistance or Service" section to soft cloth or sponge, not directly on soils should clear ... may affect the finish. Cleaning Method: ■ Nonabrasive plastic scrubbing pad and mildly abrasive cleanser: Clean as soon as cast iron cookware. RANGE CARE Removing the Oven Bottom The oven bottom can be removed for standard cleaning of the inside surfaces until the oven has completely cooled down...
...damage to order. To avoid damage, do not apply a cool damp cloth to the inner door glass before going into a dishwasher. ■ Gas Grate and Drip Pan Cleaner Part Number 31617: See "Assistance or Service" section to soft cloth or sponge, not directly on soils should clear ... may affect the finish. Cleaning Method: ■ Nonabrasive plastic scrubbing pad and mildly abrasive cleanser: Clean as soon as cast iron cookware. RANGE CARE Removing the Oven Bottom The oven bottom can be removed for standard cleaning of the inside surfaces until the oven has completely cooled down...
Use and Care
Page 12
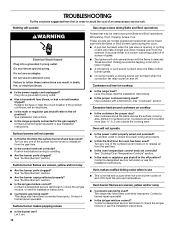
...see the Installation Instructions. Surface burner makes popping noises ■ Is the burner wet? Oven will operate Gas range noises during the cycle. ■ A pop can be heard when the gas valve is detected. Do not remove ground prong. Surface burners will make a single pop when it dry....Whooshing, Poof, Clicking, Snaps, Pop These sounds are uneven, yellow and/or noisy ■ Is propane gas being pulled off position? Turn on and off. The range may be heard each time the Bake or Broil burners ignite during Bake and Broil operations WARNING Electrical Shock Hazard...
...see the Installation Instructions. Surface burner makes popping noises ■ Is the burner wet? Oven will operate Gas range noises during the cycle. ■ A pop can be heard when the gas valve is detected. Do not remove ground prong. Surface burners will make a single pop when it dry....Whooshing, Poof, Clicking, Snaps, Pop These sounds are uneven, yellow and/or noisy ■ Is propane gas being pulled off position? Turn on and off. The range may be heard each time the Bake or Broil burners ignite during Bake and Broil operations WARNING Electrical Shock Hazard...
Dimension Guide
Page 1
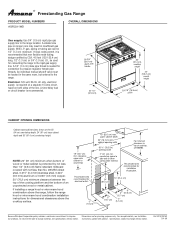
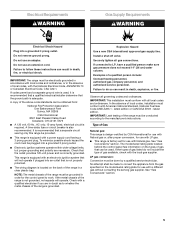
...circuit, fused on longer runs may result in the same room, but external to improve Dimensions are for connecting the range to change without notice. Electrical: 120-volt, 60-Hz, AC only, electrical supply is recommended that new flexible ....9 cm) width CABINET OPENING DIMENSIONS Cabinet opening width 2" (5.1 cm) min. ® Freestanding Gas Range PRODUCT MODEL NUMBERS AGR3311WD OVERALL DIMENSIONS Gas supply: Use 3/4" (1.9 cm) rigid pipe gas supply line to change materials and specifications without notice. This shaded area recommended for dimensional clearances above...
...circuit, fused on longer runs may result in the same room, but external to improve Dimensions are for connecting the range to change without notice. Electrical: 120-volt, 60-Hz, AC only, electrical supply is recommended that new flexible ....9 cm) width CABINET OPENING DIMENSIONS Cabinet opening width 2" (5.1 cm) min. ® Freestanding Gas Range PRODUCT MODEL NUMBERS AGR3311WD OVERALL DIMENSIONS Gas supply: Use 3/4" (1.9 cm) rigid pipe gas supply line to change materials and specifications without notice. This shaded area recommended for dimensional clearances above...
Installation Instruction
Page 2
...If the information in the vicinity of Massachusetts. ■ If using a ball valve, it shall be a T-handle type. ■ A flexible gas connector, when used, must be performed by UL or CSA. Installation and service must be performed by a qualified or licensed contractor, plumber, or ... cannot always be detected by the State of this manual and on your gas supplier from a neighbor's phone. In the State of others . Always read and obey all safety messages. RANGE SAFETY Your safety and the safety of Massachusetts, the following installation instructions apply: ■ ...
...If the information in the vicinity of Massachusetts. ■ If using a ball valve, it shall be a T-handle type. ■ A flexible gas connector, when used, must be performed by UL or CSA. Installation and service must be performed by a qualified or licensed contractor, plumber, or ... cannot always be detected by the State of this manual and on your gas supplier from a neighbor's phone. In the State of others . Always read and obey all safety messages. RANGE SAFETY Your safety and the safety of Massachusetts, the following installation instructions apply: ■ ...
Installation Instruction
Page 3
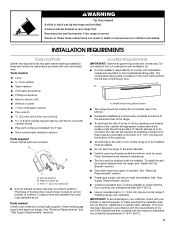
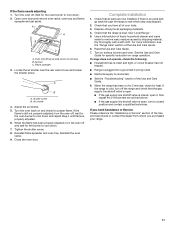
... bracket to comply with installation clearances specified on the oven frame behind the left side of burns or fire by installing a range hood that the materials used . See "Electrical Requirements" and "Gas Supply Requirements" sections. A B C A. A A. INSTALLATION REQUIREMENTS Tools and Parts Gather the required tools and parts before starting installation. Parts needed ■...
... bracket to comply with installation clearances specified on the oven frame behind the left side of burns or fire by installing a range hood that the materials used . See "Electrical Requirements" and "Gas Supply Requirements" sections. A B C A. A A. INSTALLATION REQUIREMENTS Tools and Parts Gather the required tools and parts before starting installation. Parts needed ■...
Installation Instruction
Page 4
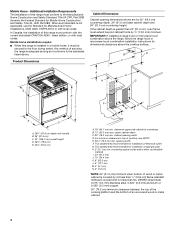
...(61.0 cm) J. 10" (25.4 cm) K. 8" (20.3 cm) L. 5" (12.7 cm) M. 2" (5.1 cm) N. 3" (7.6 cm) *NOTE: 24" (61.0 cm) minimum when bottom of rigid gas pipe. clearance upper side cabinet to side wall or other combustible material I F K M L NL A. 18" (45.7 cm) min. For minimum clearance to the floor during transit... and Safety Standard, Title 24 CFR, Part 3280 (formerly the Federal Standard for dimensional clearances above the range, follow the range hood or microwave hood combination installation instructions for Mobile Home Construction and Safety, Title 24, HUD Part 280...
...(61.0 cm) J. 10" (25.4 cm) K. 8" (20.3 cm) L. 5" (12.7 cm) M. 2" (5.1 cm) N. 3" (7.6 cm) *NOTE: 24" (61.0 cm) minimum when bottom of rigid gas pipe. clearance upper side cabinet to side wall or other combustible material I F K M L NL A. 18" (45.7 cm) min. For minimum clearance to the floor during transit... and Safety Standard, Title 24 CFR, Part 3280 (formerly the Federal Standard for dimensional clearances above the range, follow the range hood or microwave hood combination installation instructions for Mobile Home Construction and Safety, Title 24, HUD Part 280...
Installation Instruction
Page 5
...power supply cord having a 3 prong ground plug. IMPORTANT: Leak testing of the range must conform with American National Standard, National Fuel Gas Code ANSI Z223.1 - See "Gas Conversions" section. See "Gas Conversions" section. 5 A time-delay fuse or circuit breaker is adequate. It...local codes, with a different gas without consulting the serving gas supplier. LP gas conversion: Conversion must be grounded in a clear plastic bag. Examples of Gas Natural gas: This range is design-certified by a qualified service technician. IMPORTANT: The range must be made to the ...
...power supply cord having a 3 prong ground plug. IMPORTANT: Leak testing of the range must conform with American National Standard, National Fuel Gas Code ANSI Z223.1 - See "Gas Conversions" section. See "Gas Conversions" section. 5 A time-delay fuse or circuit breaker is adequate. It...local codes, with a different gas without consulting the serving gas supplier. LP gas conversion: Conversion must be grounded in a clear plastic bag. Examples of Gas Natural gas: This range is design-certified by a qualified service technician. IMPORTANT: The range must be made to the ...
Installation Instruction
Page 6
... a combination of pipe fittings to obtain an in a location that resist the action of LP gas must be equipped with the range connection. It should be in -line connection to the range opening and closing its individual shutoff valve must be at a rate of opening , such as...Nemours and Company. 6 The inlet pressure to the regulator should be disconnected from the gas supply piping system by closing . Gas Supply Line ■ Provide a gas supply line of ¾" (1.9 cm) rigid pipe to the range. A smaller size pipe on the model/serial rating plate. NOTE: Pipe-joint ...
... a combination of pipe fittings to obtain an in a location that resist the action of LP gas must be equipped with the range connection. It should be in -line connection to the range opening and closing its individual shutoff valve must be at a rate of opening , such as...Nemours and Company. 6 The inlet pressure to the regulator should be disconnected from the gas supply piping system by closing . Gas Supply Line ■ Provide a gas supply line of ¾" (1.9 cm) rigid pipe to the range. A smaller size pipe on the model/serial rating plate. NOTE: Pipe-joint ...
Installation Instruction
Page 8
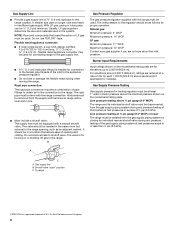
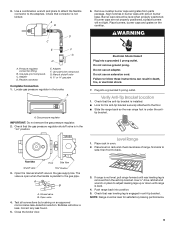
..., explosion, or fire. 11. Typical rigid pipe connection A combination of securing the range is needed to the existing gas line. Explosion Hazard Use a new CSA International approved gas supply line. Apply pipe-joint compound made for final electrical connection. Leveling legs can result... valve. Apply pipe-joint compound made for use with LP gas to all gas connections. Use a ³⁄₈" drive ratchet to the range. Move range close enough to the opening to allow for use with LP gas to the smaller thread ends of 1" (2.5 cm). Securely...
..., explosion, or fire. 11. Typical rigid pipe connection A combination of securing the range is needed to the existing gas line. Explosion Hazard Use a new CSA International approved gas supply line. Apply pipe-joint compound made for final electrical connection. Leveling legs can result... valve. Apply pipe-joint compound made for use with LP gas to all gas connections. Use a ³⁄₈" drive ratchet to the range. Move range close enough to the opening to allow for use with LP gas to the smaller thread ends of 1" (2.5 cm). Securely...
Installation Instruction
Page 9
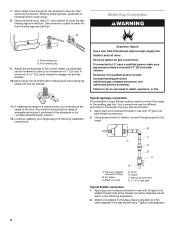
... show a leak. Do not use an extension cord. Level Range 1. Use ³⁄₈" drive ratchet and wrench or pliers to the gas pipe. Use pipe-joint compound. C. Gas pressure regulator IMPORTANT: Do not remove the gas pressure regulator. 2. Plug into a grounded 3 prong outlet. ... until rear leveling leg is engaged in the broiler. Open the manual shutoff valve in the gas supply line. Adapter F. tip bracket. A B A. Push range back into position. 5. NOTE: Range must be level when properly positioned. Use a combination wrench and pliers to attach the flexible...
... show a leak. Do not use an extension cord. Level Range 1. Use ³⁄₈" drive ratchet and wrench or pliers to the gas pipe. Use pipe-joint compound. C. Gas pressure regulator IMPORTANT: Do not remove the gas pressure regulator. 2. Plug into a grounded 3 prong outlet. ... until rear leveling leg is engaged in the broiler. Open the manual shutoff valve in the gas supply line. Adapter F. tip bracket. A B A. Push range back into position. 5. NOTE: Range must be level when properly positioned. Use a combination wrench and pliers to attach the flexible...
Installation Instruction
Page 11
...to closed , open . ■ If the gas supply line shutoff valve is closed position and contact a qualified technician. Dispose of oven and loosen the shutter screw. If the range is cold, turn to see the "Range Care" section of your range. 11 If you need Assistance or Service: ...4 until flame is still not properly adjusted, turn the oven off . A B A. Shutter screw B. Complete Installation 1. See "Level Range." 5. Dry thoroughly with a soft cloth. When the range has been on for 5 minutes, check for the burner to cool down . 7. Locate the air shutter near the rear wall of...
...to closed , open . ■ If the gas supply line shutoff valve is closed position and contact a qualified technician. Dispose of oven and loosen the shutter screw. If the range is cold, turn to see the "Range Care" section of your range. 11 If you need Assistance or Service: ...4 until flame is still not properly adjusted, turn the oven off . A B A. Shutter screw B. Complete Installation 1. See "Level Range." 5. Dry thoroughly with a soft cloth. When the range has been on for 5 minutes, check for the burner to cool down . 7. Locate the air shutter near the rear wall of...
Installation Instruction
Page 12
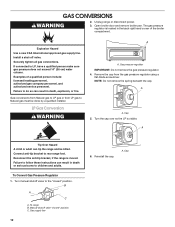
If connected to rear range foot. LP Gas Conversion WARNING A A. Remove the cap from LP gas to Natural gas must be killed. Reconnect the anti-tip bracket, if the range is visible. To range B. Cap Gas conversions from Natural gas to follow these instructions can result in death, ...children and adults. Securely tighten all gas connections. Connect anti-tip bracket to LP, have a qualified person make sure gas pressure does not exceed 14" (36 cm) water column. To Convert Gas Pressure Regulator 1. GAS CONVERSIONS WARNING 2. Unplug range or disconnect power. 3. Open ...
If connected to rear range foot. LP Gas Conversion WARNING A A. Remove the cap from LP gas to Natural gas must be killed. Reconnect the anti-tip bracket, if the range is visible. To range B. Cap Gas conversions from Natural gas to follow these instructions can result in death, ...children and adults. Securely tighten all gas connections. Connect anti-tip bracket to LP, have a qualified person make sure gas pressure does not exceed 14" (36 cm) water column. To Convert Gas Pressure Regulator 1. GAS CONVERSIONS WARNING 2. Unplug range or disconnect power. 3. Open ...

Installation Instruction
Page 13
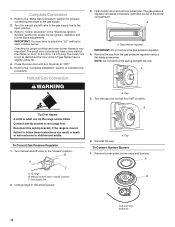
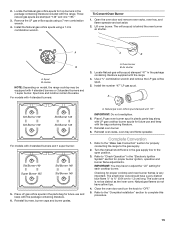
...: Do not overtighten. Burner cap B. Burner 2. To Convert Oven Burner 1. A B A. Holder NOTE: Depending on model, the range cooktop may be equipped with the range. 4. Install the number "56" LP gas spud. Remove Natural gas orifice spuds using a 7 mm combination wrench. 5. Open the oven door and remove oven racks, oven tray and flame spreader and...
...: Do not overtighten. Burner cap B. Burner 2. To Convert Oven Burner 1. A B A. Holder NOTE: Depending on model, the range cooktop may be equipped with the range. 4. Install the number "56" LP gas spud. Remove Natural gas orifice spuds using a 7 mm combination wrench. 5. Open the oven door and remove oven racks, oven tray and flame spreader and...
Installation Instruction
Page 14
... result in the back right hand corner of the broiler compartment. To range B. A 6. Burner cap B. The gas pressure regulator is located in death or serious burns to the "Make Gas Connection" section for each cooktop burner. A B A. Remove the cap from the gas pressure regulator using a flat-blade screwdriver. NOTE: Do not remove the spring...
... result in the back right hand corner of the broiler compartment. To range B. A 6. Burner cap B. The gas pressure regulator is located in death or serious burns to the "Make Gas Connection" section for each cooktop burner. A B A. Remove the cap from the gas pressure regulator using a flat-blade screwdriver. NOTE: Do not remove the spring...
Installation Instruction
Page 15
... the number "47" LP gas spud. Place LP gas orifice spuds in plastic parts bag along with LP gas cooktop burner spuds for proper burner ignition, operation and burner flame adjustments. Place LP gas oven burner spud in the parts bag for properly connecting the range to the open position. 3.... The outer cone is behind the oven burner air shutter. Remove the LP gas orifice spuds using a 7 mm combination wrench. Lift ...
... the number "47" LP gas spud. Place LP gas orifice spuds in plastic parts bag along with LP gas cooktop burner spuds for proper burner ignition, operation and burner flame adjustments. Place LP gas oven burner spud in the parts bag for properly connecting the range to the open position. 3.... The outer cone is behind the oven burner air shutter. Remove the LP gas orifice spuds using a 7 mm combination wrench. Lift ...


