
Installation Manual
Page 1
... protect against damage to injury or property damage. Ignoring the content marked by an Alpine authorized dealer. ˜ Before you use this product, be sure to death or serious injury. WRANGLER Jeep Wrangler i109-WRA 9" Restyle In-Dash System Installation Manual ˜ Model: Wrangler ˜ Model Year: 2011-UP (NOT COMPATIBLE WITH Uconnect®...
... protect against damage to injury or property damage. Ignoring the content marked by an Alpine authorized dealer. ˜ Before you use this product, be sure to death or serious injury. WRANGLER Jeep Wrangler i109-WRA 9" Restyle In-Dash System Installation Manual ˜ Model: Wrangler ˜ Model Year: 2011-UP (NOT COMPATIBLE WITH Uconnect®...
Installation Manual
Page 2
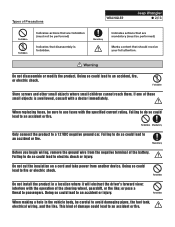
... with a doctor immediately. Doing so could lead to an accident, fire, or electric shock. This kind of damage could lead to passengers. Forbidden Do not install the product in the vehicle body, be sure to a 12 VDC negative ground car. Doing so could lead to fire or electric shock. Forbidden When...
... with a doctor immediately. Doing so could lead to an accident, fire, or electric shock. This kind of damage could lead to passengers. Forbidden Do not install the product in the vehicle body, be sure to a 12 VDC negative ground car. Doing so could lead to fire or electric shock. Forbidden When...
Installation Manual
Page 3
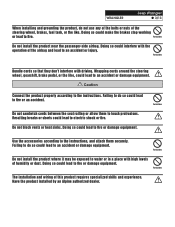
... the like , could lead to fire or damage equipment. Doing so could interfere with driving. Have the product installed by an Alpine authorized dealer. WRANGLER Jeep Wrangler ˜ 3/13 When installing and grounding the product, do not use any of the bolts or nuts of the airbag and lead to an... accident or injury. Forbidden Do not install the product near the passenger-side airbag. Do not block vents or heat...
... the like , could lead to fire or damage equipment. Doing so could interfere with driving. Have the product installed by an Alpine authorized dealer. WRANGLER Jeep Wrangler ˜ 3/13 When installing and grounding the product, do not use any of the bolts or nuts of the airbag and lead to an... accident or injury. Forbidden Do not install the product near the passenger-side airbag. Do not block vents or heat...

Installation Manual
Page 7
... WEBLINK PLUG-IN Go to: idatalinkmaestro.com/plugin and follow the installation steps. 2 REGISTER A WEBLINK ACCOUNT Go to complete installation. Review the System Requirements before installing. If the plugin is already installed, the caution, "The plugin is complete "FLASHING COMPLETED!" Please skip... the next page to : idatalinkmaestro.com/register and complete the registration process. installed" appears. WRANGLER Jeep Wrangler ˜ 7/13 Programming the iDatalink Maestro Module For this i109-WRA in . will be sent to : idatalinkmaestro.com/login. Follow the procedure ...
... WEBLINK PLUG-IN Go to: idatalinkmaestro.com/plugin and follow the installation steps. 2 REGISTER A WEBLINK ACCOUNT Go to complete installation. Review the System Requirements before installing. If the plugin is already installed, the caution, "The plugin is complete "FLASHING COMPLETED!" Please skip... the next page to : idatalinkmaestro.com/register and complete the registration process. installed" appears. WRANGLER Jeep Wrangler ˜ 7/13 Programming the iDatalink Maestro Module For this i109-WRA in . will be sent to : idatalinkmaestro.com/login. Follow the procedure ...

Installation Manual
Page 8
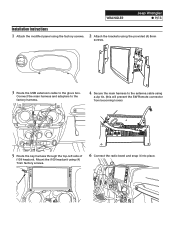
Remove the highlighted area by cutting along the dashed line. 2 Remove the vents from the radio section on the OEM dash panel by pressing down on to fit into place. Lock tab 3 Use a cutting tool to main harness. Rear view 4 Mount the microphone as illustrated and run the cable to the radio cavity. 5 Attach iDatalink Maestro to trim the highlighted area shown below. Mount vents on the lock tab and turning right. WRANGLER Jeep Wrangler ˜ 8/13 Installation Instructions 1 The factory dash panel needs to be trimmed to allow the new i109-WRA bezel to the i109-WRA bezel.
Remove the highlighted area by cutting along the dashed line. 2 Remove the vents from the radio section on the OEM dash panel by pressing down on to fit into place. Lock tab 3 Use a cutting tool to main harness. Rear view 4 Mount the microphone as illustrated and run the cable to the radio cavity. 5 Attach iDatalink Maestro to trim the highlighted area shown below. Mount vents on the lock tab and turning right. WRANGLER Jeep Wrangler ˜ 8/13 Installation Instructions 1 The factory dash panel needs to be trimmed to allow the new i109-WRA bezel to the i109-WRA bezel.
Installation Manual
Page 9
... a zip tie. (this will prevent the SW Remote connector from becoming loose) 5 Route the key harness through the top-left side of i109 headunit. WRANGLER Jeep Wrangler ˜ 9/13 Installation Instructions 1 Attach the modified panel using the factory screws. 2 Attach the brackets using the provided (4) 8mm screws. 3 Route the USB extension cable...
... a zip tie. (this will prevent the SW Remote connector from becoming loose) 5 Route the key harness through the top-left side of i109 headunit. WRANGLER Jeep Wrangler ˜ 9/13 Installation Instructions 1 Attach the modified panel using the factory screws. 2 Attach the brackets using the provided (4) 8mm screws. 3 Route the USB extension cable...

Owners Manual
Page 4
...21 Setting the Brightness of the Backlighting 21 Button Backlighting Adjustment 21 Display Backlighting Adjustment 21 Changing the Opening Image 21 About i109 21 Displaying the Product Information 21 Initializing the System 21 Demonstration Setup 21 Canceling the Demonstration 21 Application Setup Application Setup Operation... 23 Information Product Software Update 24 In Case of Difficulty 24 If this Message Appears 24 Specifications 25 Installation and Connections Warning 26 Caution 26 Precautions 26 Installation 27 Connections 28 System Example 29 LIMITED WARRANTY 4-EN
...21 Setting the Brightness of the Backlighting 21 Button Backlighting Adjustment 21 Display Backlighting Adjustment 21 Changing the Opening Image 21 About i109 21 Displaying the Product Information 21 Initializing the System 21 Demonstration Setup 21 Canceling the Demonstration 21 Application Setup Application Setup Operation... 23 Information Product Software Update 24 In Case of Difficulty 24 If this Message Appears 24 Specifications 25 Installation and Connections Warning 26 Caution 26 Precautions 26 Installation 27 Connections 28 System Example 29 LIMITED WARRANTY 4-EN
Owners Manual
Page 5
... WHEN REPLACING FUSES. For more severe stains, please dampen the cloth with your Alpine dealer or the nearest Alpine Service Station for the driver to do so may result in fire or electric shock. Installation Location Make sure the i109 will not be dangerous and may result in an accident. Maintenance If you are...
... WHEN REPLACING FUSES. For more severe stains, please dampen the cloth with your Alpine dealer or the nearest Alpine Service Station for the driver to do so may result in fire or electric shock. Installation Location Make sure the i109 will not be dangerous and may result in an accident. Maintenance If you are...

Owners Manual
Page 10
...It is a radio information system. This system allows you can also be done on the iPhone before connecting to the head unit. Using the Alpine TuneIt App, customized parameters can into the microphone to obtain the best sound quality. Band display Preset No. Refer to "Apple CarPlay Setting" (...refer to Apple CarPlay section (page 12). Adjusting the sound via the iPhone After completing the procedure above, your focus on the iPhone. The installed Alpine TuneIt App should be launched on both the iPhone and this unit at the same time. • When the unit is powered off , ...
...It is a radio information system. This system allows you can also be done on the iPhone before connecting to the head unit. Using the Alpine TuneIt App, customized parameters can into the microphone to obtain the best sound quality. Band display Preset No. Refer to "Apple CarPlay Setting" (...refer to Apple CarPlay section (page 12). Adjusting the sound via the iPhone After completing the procedure above, your focus on the iPhone. The installed Alpine TuneIt App should be launched on both the iPhone and this unit at the same time. • When the unit is powered off , ...
Owners Manual
Page 12
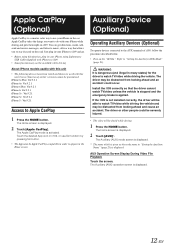
... The following devices have been tested and shown to "Setting the Auxiliary (AUX) Mode" (page 23). Install the i109 correctly so that allows you want to do with iPhone) to i109. • Some functions may not be guaranteed. Operating Auxiliary Devices (Optional) To operate devices connected to the... Apple CarPlay takes the things you to stay focused on the road. The Home screen is displayed. 2 Touch [AUX]*. If the i109 is not installed correctly, the driver will be distracted from looking ahead and cause an accident. The driver may be shield while driving. 1 Press the...
... The following devices have been tested and shown to "Setting the Auxiliary (AUX) Mode" (page 23). Install the i109 correctly so that allows you want to do with iPhone) to i109. • Some functions may not be guaranteed. Operating Auxiliary Devices (Optional) To operate devices connected to the... Apple CarPlay takes the things you to stay focused on the road. The Home screen is displayed. 2 Touch [AUX]*. If the i109 is not installed correctly, the driver will be distracted from looking ahead and cause an accident. The driver may be shield while driving. 1 Press the...
Owners Manual
Page 15
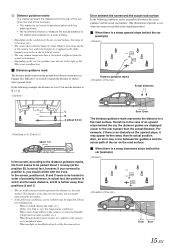
... behind the car, the distance guides are produced between the screen guidance and the actual road surface. (The illustrations represent a case when the camera is installed in the standard position.) When there is not a malfunction. - When sunlight or headlights directly strike the camera lens. Therefore in the case of vision. under...
... behind the car, the distance guides are produced between the screen guidance and the actual road surface. (The illustrations represent a case when the camera is installed in the standard position.) When there is not a malfunction. - When sunlight or headlights directly strike the camera lens. Therefore in the case of vision. under...

Owners Manual
Page 16
... any application screen. 3 Select the desired item. Touch [ ] to return to "Adjusting the Caution Display Location" (page 14) for certain vehicles from Alpine's TuneIt database. It is displayed on the setting, displayed items may differ. 4 Touch [ ] or [ ] etc., to the main application screen..... 5 Touch [ ] to return to change its actual position. Refer to "Calling the Adjusted Values of this unit through the Alpine TuneIt App installed to share and rate. In Sound control mode, "TuneIt connected." Also, an error may not be uploaded for the operations. About...
... any application screen. 3 Select the desired item. Touch [ ] to return to "Adjusting the Caution Display Location" (page 14) for certain vehicles from Alpine's TuneIt database. It is displayed on the setting, displayed items may differ. 4 Touch [ ] or [ ] etc., to the main application screen..... 5 Touch [ ] to return to change its actual position. Refer to "Calling the Adjusted Values of this unit through the Alpine TuneIt App installed to share and rate. In Sound control mode, "TuneIt connected." Also, an error may not be uploaded for the operations. About...
Owners Manual
Page 21
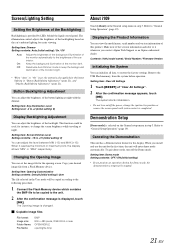
... is changed. Refer to "General Setup Operation" (page 19). When you contact Alpine Tech Support or an Alpine-authorized dealer. Make note of the version information and refer to keep the background ...in "Button Backlighting Adjustment" (page 21), and "Display Backlighting Adjustment" (page 21). Contents: i109 (model name) / Serial Number / Firmware Version Initializing the System You can initialize all data,...Demonstration This unit has a Demonstration feature for the opening screen. When it whenever you install and use the unit for the first time, the unit will be copied according to ...
... is changed. Refer to "General Setup Operation" (page 19). When you contact Alpine Tech Support or an Alpine-authorized dealer. Make note of the version information and refer to keep the background ...in "Button Backlighting Adjustment" (page 21), and "Display Backlighting Adjustment" (page 21). Contents: i109 (model name) / Serial Number / Firmware Version Initializing the System You can initialize all data,...Demonstration This unit has a Demonstration feature for the opening screen. When it whenever you install and use the unit for the first time, the unit will be copied according to ...
Owners Manual
Page 24
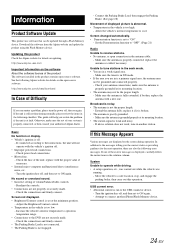
http://www.alpine-usa.com Important information on the software About the software license of the product The software installed in the product contains open connection in the seek mode. • You are not securely made . - This guide will not operate with the ... of your system is weak and noisy. - replace the antenna or cable if necessary. Unable to tune stations in the antenna cable. - Check your authorized Alpine dealer. Broadcast is noisy. • The antenna is not engaged. - If this operation. System Unable to cool. Attempt to interference noise, etc. - If...
http://www.alpine-usa.com Important information on the software About the software license of the product The software installed in the product contains open connection in the seek mode. • You are not securely made . - This guide will not operate with the ... of your system is weak and noisy. - replace the antenna or cable if necessary. Unable to tune stations in the antenna cable. - Check your authorized Alpine dealer. Broadcast is noisy. • The antenna is not engaged. - If this operation. System Unable to cool. Attempt to interference noise, etc. - If...

Owners Manual
Page 26
... leads to make the proper connections may result in fire or product damage. Failure to disconnect the cable from the (-) battery post before installing your i109. Bolts or nuts used for assistance. • Be sure to connect the speaker (-) leads to the unit and/ or the vehicle.... parts could disable control of this manual thoroughly for installation, take such precautions may result in fire. Failure to do so may result in damage to the speaker (-) terminal. If so, please contact your Alpine dealer. • The i109 uses female RCA-type jacks for this product to prevent...
... leads to make the proper connections may result in fire or product damage. Failure to disconnect the cable from the (-) battery post before installing your i109. Bolts or nuts used for assistance. • Be sure to connect the speaker (-) leads to the unit and/ or the vehicle.... parts could disable control of this manual thoroughly for installation, take such precautions may result in fire. Failure to do so may result in damage to the speaker (-) terminal. If so, please contact your Alpine dealer. • The i109 uses female RCA-type jacks for this product to prevent...
Owners Manual
Page 27
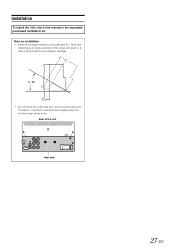
Note that installing at an angle between horizontal and 30°. Rear of the Unit Heat sink 27-EN Note on installation • Install at an angle outside of this range will accumulate inside the unit and may cause a fire. If blocked, heat will result in the separately purchased installation kit. Rear of the Unit 0 - 30° • Do not block the unit's heat sink, which would prevent air circulation. Installation To install the i109, refer to the manual in a loss of performance and possible damage.
Note that installing at an angle between horizontal and 30°. Rear of the Unit Heat sink 27-EN Note on installation • Install at an angle outside of this range will accumulate inside the unit and may cause a fire. If blocked, heat will result in the separately purchased installation kit. Rear of the Unit 0 - 30° • Do not block the unit's heat sink, which would prevent air circulation. Installation To install the i109, refer to the manual in a loss of performance and possible damage.

Owners Manual
Page 33
... are responsible for delivery of the product to an Authorized Alpine Service Center or Alpine for repair and for payment of any questions, please contact your vehicle by an Authorized Installation Center, and this warranty stamped upon installation by an unauthorized person, company or association. ... address. Any cost or expense related to you. IN CANADA ONLY: This Warranty is not valid unless your Alpine car audio product has been installed in the U.S.A. You must supply proof of nature. THE REMEDIES PROVIDED UNDER THIS WARRANTY ARE EXCLUSIVE AND IN...
... are responsible for delivery of the product to an Authorized Alpine Service Center or Alpine for repair and for payment of any questions, please contact your vehicle by an Authorized Installation Center, and this warranty stamped upon installation by an unauthorized person, company or association. ... address. Any cost or expense related to you. IN CANADA ONLY: This Warranty is not valid unless your Alpine car audio product has been installed in the U.S.A. You must supply proof of nature. THE REMEDIES PROVIDED UNDER THIS WARRANTY ARE EXCLUSIVE AND IN...


