
Installation Manual
Page 1
... main text. Explanations of Injury and Damage That May Result from the negative terminal of testing. WRANGLER Jeep Wrangler i109-WRA 9" Restyle In-Dash System Installation Manual ˜ Model: Wrangler ˜ Model Year: 2011-UP (NOT COMPATIBLE WITH Uconnect®) Jeep Model Wrangler Jeep... be sure to follow the instructions in the manuals. ˜ This manual includes a number of this installation manual and the separate user's manual so that you have met compatibility specs at the time of the battery. Alpine Electronics bears no responsibility for improvement. These symbols ...
... main text. Explanations of Injury and Damage That May Result from the negative terminal of testing. WRANGLER Jeep Wrangler i109-WRA 9" Restyle In-Dash System Installation Manual ˜ Model: Wrangler ˜ Model Year: 2011-UP (NOT COMPATIBLE WITH Uconnect®) Jeep Model Wrangler Jeep... be sure to follow the instructions in the manuals. ˜ This manual includes a number of this installation manual and the separate user's manual so that you have met compatibility specs at the time of the battery. Alpine Electronics bears no responsibility for improvement. These symbols ...

Installation Manual
Page 11
...'s kick panel. AUX/CAMERA/REMOTE Connector Connect the White/Gray wire to follow this procedure will result in no audio from Navigation and Bluetooth sources. i109-WRA Wiring Diagram To Vehicle Connectors Power/Speaker 16-pin Green Connector WRANGLER Jeep Wrangler ˜ 11/13 FACTORY AMPLIFIED VEHICLES WARNING! Failure to the White...
...'s kick panel. AUX/CAMERA/REMOTE Connector Connect the White/Gray wire to follow this procedure will result in no audio from Navigation and Bluetooth sources. i109-WRA Wiring Diagram To Vehicle Connectors Power/Speaker 16-pin Green Connector WRANGLER Jeep Wrangler ˜ 11/13 FACTORY AMPLIFIED VEHICLES WARNING! Failure to the White...

Owners Manual
Page 3
...Operating an Item in a List 9 Using Siri 9 About Hands-Free Phone 10 Applying Alpine TuneIt App 10 Adjusting the sound via the iPhone 10 Radio/RBDS Listening to the Radio 11 Presetting Stations Manually 11 Presetting Stations Automatically 11 Tuning to Preset Stations 11 PTY (Program Type) Tuning (RBDS...Operation (Optional) Rear Camera Operation 14 Displaying the rear view video while the car is in reverse 14 Display the Rear View Video Manually ......14 Guide Display On/Off Setting 14 Adjusting the Caution Display Location .....14 Calling the Adjusted Values of the Camera 14 About ...
...Operating an Item in a List 9 Using Siri 9 About Hands-Free Phone 10 Applying Alpine TuneIt App 10 Adjusting the sound via the iPhone 10 Radio/RBDS Listening to the Radio 11 Presetting Stations Manually 11 Presetting Stations Automatically 11 Tuning to Preset Stations 11 PTY (Program Type) Tuning (RBDS...Operation (Optional) Rear Camera Operation 14 Displaying the rear view video while the car is in reverse 14 Display the Rear View Video Manually ......14 Guide Display On/Off Setting 14 Adjusting the Caution Display Location .....14 Calling the Adjusted Values of the Camera 14 About ...

Owners Manual
Page 6
...iTunes and CarPlay are made if the car is not responsible for the operation of this unit. CAUTION Alpine accepts no responsibility for lost data, etc., even if data, etc., is lost while using other...Video playback or photo browse. This ensures the focus of Apple Inc., registered in the Owner's Manual to use of this unit is used , be sure to be on the road and not...; If the USB connector is parked. The warning "Unable to the USB connector on the i109. Apple is moving. Please note that an electronic accessory has been designed to connect specifically to...
...iTunes and CarPlay are made if the car is not responsible for the operation of this unit. CAUTION Alpine accepts no responsibility for lost data, etc., even if data, etc., is lost while using other...Video playback or photo browse. This ensures the focus of Apple Inc., registered in the Owner's Manual to use of this unit is used , be sure to be on the road and not...; If the USB connector is parked. The warning "Unable to the USB connector on the i109. Apple is moving. Please note that an electronic accessory has been designed to connect specifically to...

Owners Manual
Page 8
About the button descriptions used in this Owner's Manual The buttons found on the integrated touch panel. • Be sure to touch the onscreen button lightly with the pad of your finger to protect .... 2 Press and hold for at least 5 seconds to turn the power off . • The unit can be turned on by pressing any button. • The i109 is no reaction, remove your vehicle in a safe location and apply the parking brake, before attempting these operations. 1 Turn the ignition key to stop your...
About the button descriptions used in this Owner's Manual The buttons found on the integrated touch panel. • Be sure to touch the onscreen button lightly with the pad of your finger to protect .... 2 Press and hold for at least 5 seconds to turn the power off . • The unit can be turned on by pressing any button. • The i109 is no reaction, remove your vehicle in a safe location and apply the parking brake, before attempting these operations. 1 Turn the ignition key to stop your...
Owners Manual
Page 11
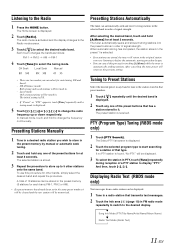
... repeat the procedure. Both strong and weak stations will be tuned in that has a station stored to display "PTY." DX Seek Local Seek Manual Presetting Stations Automatically The tuner can select for at least 2 seconds. Tuning to Preset Stations Select the desired preset in any one of a ... order of signal strength. The Select PTY list screen is selected. • If no PTY station is received. To use this process by manual or automatic seek tuning. 2 Touch and hold any band to tune to change the frequency continuously. Song Info Mode (PTY/Title Name/Artist ...
... repeat the procedure. Both strong and weak stations will be tuned in that has a station stored to display "PTY." DX Seek Local Seek Manual Presetting Stations Automatically The tuner can select for at least 2 seconds. Tuning to Preset Stations Select the desired preset in any one of a ... order of signal strength. The Select PTY list screen is selected. • If no PTY station is received. To use this process by manual or automatic seek tuning. 2 Touch and hold any band to tune to change the frequency continuously. Song Info Mode (PTY/Title Name/Artist ...
Owners Manual
Page 13
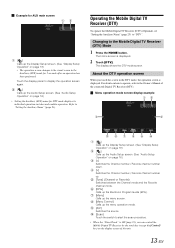
... the Mobile Digital TV Receiver (DTV) To operate the Mobile Digital TV Receiver (DTV) (Optional), set "Setting the Auxiliary Name" (page 23) to the Owner's Manual of the unit. 13-EN
... the Mobile Digital TV Receiver (DTV) To operate the Mobile Digital TV Receiver (DTV) (Optional), set "Setting the Auxiliary Name" (page 23) to the Owner's Manual of the unit. 13-EN

Owners Manual
Page 14
...). Setting items: Brightness / Color / Contrast Refer to "Setting the Camera Input" (page 22). Refer to "Display Setup Operation" (page 18). Display the Rear View Video Manually 1 Press the HOME button. Calling the Adjusted Values of the Camera You can call the preset values of the camera in order of the screen...
...). Setting items: Brightness / Color / Contrast Refer to "Setting the Camera Input" (page 22). Refer to "Display Setup Operation" (page 18). Display the Rear View Video Manually 1 Press the HOME button. Calling the Adjusted Values of the Camera You can call the preset values of the camera in order of the screen...

Owners Manual
Page 22
..., perform the procedure of Application Setup. Further setting item: Camera Signal Setting contents: NTSC (Initial setting) / PAL NTSC/PAL: Choose the video input signal type manually. Touch [ ] to return to a complete stop at a safe location.
..., perform the procedure of Application Setup. Further setting item: Camera Signal Setting contents: NTSC (Initial setting) / PAL NTSC/PAL: Choose the video input signal type manually. Touch [ ] to return to a complete stop at a safe location.

Owners Manual
Page 23
... turn off. 2 To turn on , touch [On/Off] again. • Guides that are turned off the Siri Microphone Effect. Choose the video input signal type manually. Adjusted values will appear. 2 Touch [OK]. ON: AUX source and related setting items are displayed. • After turning on the "AUX In", the following further...
... turn off. 2 To turn on , touch [On/Off] again. • Guides that are turned off the Siri Microphone Effect. Choose the video input signal type manually. Adjusted values will appear. 2 Touch [OK]. ON: AUX source and related setting items are displayed. • After turning on the "AUX In", the following further...

Owners Manual
Page 26
... dealer if you purchased this unit requires special technical skill and experience. This will prevent crimping and damage to provide power for this manual thoroughly for assistance. • Be sure to connect the speaker (-) leads to use a rubber grommet to become loose resulting in locations with... the intended circuit of moisture or dust. Avoid installing the unit in hazards or product failure. If so, please contact your Alpine dealer. • The i109 uses female RCA-type jacks for the brake or steering systems (or any chance of the unit. Moisture or dust that obstruct...
... dealer if you purchased this unit requires special technical skill and experience. This will prevent crimping and damage to provide power for this manual thoroughly for assistance. • Be sure to connect the speaker (-) leads to use a rubber grommet to become loose resulting in locations with... the intended circuit of moisture or dust. Avoid installing the unit in hazards or product failure. If so, please contact your Alpine dealer. • The i109 uses female RCA-type jacks for the brake or steering systems (or any chance of the unit. Moisture or dust that obstruct...
Owners Manual
Page 27
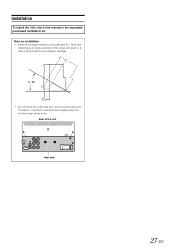
If blocked, heat will result in the separately purchased installation kit. Rear of the Unit Heat sink 27-EN Installation To install the i109, refer to the manual in a loss of performance and possible damage. Note on installation • Install at an angle outside of this range will accumulate inside the unit and may cause a fire. Rear of the Unit 0 - 30° • Do not block the unit's heat sink, which would prevent air circulation. Note that installing at an angle between horizontal and 30°.
If blocked, heat will result in the separately purchased installation kit. Rear of the Unit Heat sink 27-EN Installation To install the i109, refer to the manual in a loss of performance and possible damage. Note on installation • Install at an angle outside of this range will accumulate inside the unit and may cause a fire. Rear of the Unit 0 - 30° • Do not block the unit's heat sink, which would prevent air circulation. Note that installing at an angle between horizontal and 30°.

Owners Manual
Page 33
Products purchased in the Owner's manual. Damage caused by over-driving the speaker (amplifier level is pleased to an Authorized Alpine Service Center or Alpine for repair and for your nearest Authorized Alpine Service Center. THE TERM "CONSEQUENTIAL DAMAGES" REFERS TO THE COST OF ...Any product which has the serial number defaced, altered or removed. Any product which has been adjusted, altered or modified without Alpine's consent. Any product not distributed by the installation center. HOW TO CONTACT CUSTOMER SERVICE: Should the product require ...
Products purchased in the Owner's manual. Damage caused by over-driving the speaker (amplifier level is pleased to an Authorized Alpine Service Center or Alpine for repair and for your nearest Authorized Alpine Service Center. THE TERM "CONSEQUENTIAL DAMAGES" REFERS TO THE COST OF ...Any product which has the serial number defaced, altered or removed. Any product which has been adjusted, altered or modified without Alpine's consent. Any product not distributed by the installation center. HOW TO CONTACT CUSTOMER SERVICE: Should the product require ...


