Owner's Manual (english)
Page 5
... Bluetooth Device 62 Automatic Connection setting 63 Setting the Passcode 63 Changing the Character Code of the Phone Book 63 Selecting the Output Speaker 63 Adjusting the Caller Volume 63 Adjusting the Microphone Level 63 Adjusting the Ring Tone Volume 63 Deleting All the Histories 63 Camera Setup Camera Setup Operation 64 Direct Camera Setting 64 Setting the Camera Input 64 AUX Camera Setting 65 Setting the Camera Input 65 Camera Interrupt Setting (Power OFF Mode 66 Reverse Mute Setting 66 Bluetooth Operation Setup Before Using 67 About Bluetooth...
... Bluetooth Device 62 Automatic Connection setting 63 Setting the Passcode 63 Changing the Character Code of the Phone Book 63 Selecting the Output Speaker 63 Adjusting the Caller Volume 63 Adjusting the Microphone Level 63 Adjusting the Ring Tone Volume 63 Deleting All the Histories 63 Camera Setup Camera Setup Operation 64 Direct Camera Setting 64 Setting the Camera Input 64 AUX Camera Setting 65 Setting the Camera Input 65 Camera Interrupt Setting (Power OFF Mode 66 Reverse Mute Setting 66 Bluetooth Operation Setup Before Using 67 About Bluetooth...

Owner's Manual (english)
Page 6
... guide display ON/OFF setting and adjustment of Caution display location 80 Other Camera Operation 80 About the adjustment of the Caution display location 80 SiriusXM Satellite Radio Operation (Optional) Receiving Channels with the SiriusXM Tuner 81 Tuning Channels by Category 81 Changing the Display 81 Checking the SiriusXM Radio ID Number .... 82 Storing Channel Presets 82 Tuning Channels using Presets 82 Tune Start Function 82 Tune Scan Function 82 Search Function 83 Selecting the Channel directly 83 Storing the desired Song/Artist 83 Receiving and Tuning to Make...
... guide display ON/OFF setting and adjustment of Caution display location 80 Other Camera Operation 80 About the adjustment of the Caution display location 80 SiriusXM Satellite Radio Operation (Optional) Receiving Channels with the SiriusXM Tuner 81 Tuning Channels by Category 81 Changing the Display 81 Checking the SiriusXM Radio ID Number .... 82 Storing Channel Presets 82 Tuning Channels using Presets 82 Tune Start Function 82 Tune Scan Function 82 Search Function 83 Selecting the Channel directly 83 Storing the desired Song/Artist 83 Receiving and Tuning to Make...
Owner's Manual (english)
Page 10
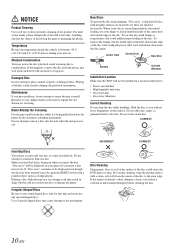
... disc from jamming, "Disc error" is being pulled back into the unit when the unit power is facing up when you insert the disc. Hold the disc so you have problems, do not attempt to condensation. Do not write on a very bumpy road may notice the disc playback sound wavering due to repair the unit yourself. If "Disc error" continues to be installed in a location subjected to your player...
... disc from jamming, "Disc error" is being pulled back into the unit when the unit power is facing up when you insert the disc. Hold the disc so you have problems, do not attempt to condensation. Do not write on a very bumpy road may notice the disc playback sound wavering due to repair the unit yourself. If "Disc error" continues to be installed in a location subjected to your player...
Owner's Manual (english)
Page 18
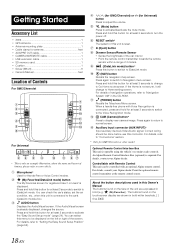
... activate the "Easy Sound Setup mode" (page 24). For details, refer to "Setting the Easy Sound Setup Position" (page 55). / (for GMC/Chevrolet) or -/+ (for Universal) button Press to adjust the volume. (Mute) button Press to display rear camera image. Press again to switch to normal screen. When a hands-free phone with an optional Alpine remote control. Auxiliary Input connector (AUX INPUT)* Input auxiliary device's Video/Audio signal. The buttons found on the left or right of 2 meters. (iDataLink mode) button* Press this unit is connected...
... activate the "Easy Sound Setup mode" (page 24). For details, refer to "Setting the Easy Sound Setup Position" (page 55). / (for GMC/Chevrolet) or -/+ (for Universal) button Press to adjust the volume. (Mute) button Press to display rear camera image. Press again to switch to normal screen. When a hands-free phone with an optional Alpine remote control. Auxiliary Input connector (AUX INPUT)* Input auxiliary device's Video/Audio signal. The buttons found on the left or right of 2 meters. (iDataLink mode) button* Press this unit is connected...
Owner's Manual (english)
Page 24
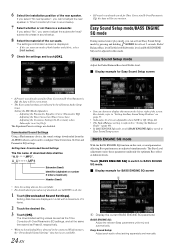
... rear speaker. BASS ENGINE SQ mode With the BASS ENGINE SQ function on the left or right of the screen. Fader/ Balance/Bass level/Treble level/Subwoofer level and BASS ENGINE SQ can be overwritten. • The Easy sound settings are adjusted simultaneously. is Off. (Page 49) • The Fader/Balance setting is not adjustable when SubW. BASS ENGINE SQ: Adjust the relevant Bass parameters uniformly and automatically. The settings confirmation screen is a subwoofer. Downloaded Sound Settings Using a Flash memory device, the sound settings downloaded from the ALPINE...
... rear speaker. BASS ENGINE SQ mode With the BASS ENGINE SQ function on the left or right of the screen. Fader/ Balance/Bass level/Treble level/Subwoofer level and BASS ENGINE SQ can be overwritten. • The Easy sound settings are adjusted simultaneously. is Off. (Page 49) • The Fader/Balance setting is not adjustable when SubW. BASS ENGINE SQ: Adjust the relevant Bass parameters uniformly and automatically. The settings confirmation screen is a subwoofer. Downloaded Sound Settings Using a Flash memory device, the sound settings downloaded from the ALPINE...
Owner's Manual (english)
Page 25
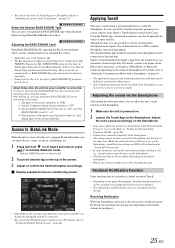
... Screen" (page 44). Display example for optimum Bass effect. • Adjustable only when Defeat is Off. • The Bass parameters affected contain Bass Level, Treble Level, EQ PRESETS, Parametric EQ, SUBWOOFER (when set this unit receives notification from Alpine's Social Network Service (SNS) available through the connected Smartphone. the Android user can download it is also possible to receive and respond to this item via TuneIt App), Subwoofer Level, Media Xpander, X-Over, Car Specific Sound Setup...
... Screen" (page 44). Display example for optimum Bass effect. • Adjustable only when Defeat is Off. • The Bass parameters affected contain Bass Level, Treble Level, EQ PRESETS, Parametric EQ, SUBWOOFER (when set this unit receives notification from Alpine's Social Network Service (SNS) available through the connected Smartphone. the Android user can download it is also possible to receive and respond to this item via TuneIt App), Subwoofer Level, Media Xpander, X-Over, Car Specific Sound Setup...
Owner's Manual (english)
Page 37
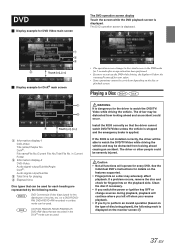
... a disc may be used . Install the X009 correctly so that are represented by the following mark is not installed correctly, the driver will show the warning-Picture off when you resume playback. • If you switch the power or Ignition key OFF or change sources during playback, playback will operate for every DVD. If a problem occurs, remove the disc and check for DVD Video main screen The DVD operation screen display Touch...
... a disc may be used . Install the X009 correctly so that are represented by the following mark is not installed correctly, the driver will show the warning-Picture off when you resume playback. • If you switch the power or Ignition key OFF or change sources during playback, playback will operate for every DVD. If a problem occurs, remove the disc and check for DVD Video main screen The DVD operation screen display Touch...

Owner's Manual (english)
Page 48
... for details. 1 Touch [Setup] icon of "To display the Sound mode screen." The following procedure. The Sound Setup screen appears. 3 Select the desired item. 48-EN Setting items: Balance/Fader/Subwoofer*1 / Media Xpander*1 / EQ Presets*1 / Parametric EQ*1 / Time Correction*1 / X-Over*1 / Defeat*1 / Volume / Source Volume Setup*2 It is displayed. Setting item: Installation The Installation check screen is not necessary to On . Setting item: External Audio Processor Setting contents: Off (Initial setting) / On Off: The connected audio processor is engaged for...
... for details. 1 Touch [Setup] icon of "To display the Sound mode screen." The following procedure. The Sound Setup screen appears. 3 Select the desired item. 48-EN Setting items: Balance/Fader/Subwoofer*1 / Media Xpander*1 / EQ Presets*1 / Parametric EQ*1 / Time Correction*1 / X-Over*1 / Defeat*1 / Volume / Source Volume Setup*2 It is displayed. Setting item: Installation The Installation check screen is not necessary to On . Setting item: External Audio Processor Setting contents: Off (Initial setting) / On Off: The connected audio processor is engaged for...

Owner's Manual (english)
Page 49
... select "Off" when the Rear Speaker Position in Car Specific Sound Setup is set to "Yes", the setting in Car Specific Sound Setup will be able to the unit, make the following setting. MX (Media Xpander) makes vocals or instruments sound distinct regardless of "ALL MX OFF/ON" in step 3. The HD Radio, CD, Flash memory and iPod/iPhone, will be canceled. Otherwise, the settings may not be changed. • For details on the Audio setup menu in cars...
... select "Off" when the Rear Speaker Position in Car Specific Sound Setup is set to "Yes", the setting in Car Specific Sound Setup will be able to the unit, make the following setting. MX (Media Xpander) makes vocals or instruments sound distinct regardless of "ALL MX OFF/ON" in step 3. The HD Radio, CD, Flash memory and iPod/iPhone, will be canceled. Otherwise, the settings may not be changed. • For details on the Audio setup menu in cars...

Owner's Manual (english)
Page 51
... speaker setting values are not available. • While adjusting the Parametric EQ, you touch, the onscreen button and correction mode changes. Touch [Preset1], [Preset2], or [Preset3] on the time correction screen. Adjusting the Time Correction (Time Correction) [Time Correction] is "Off". Calling the Time Correction Value Calling the pre-set Parametric EQ adjusted value. Adjusting the Frequency Touch [ ] or [ ] of the selected band. to 20 kHz (in the Preset...
... speaker setting values are not available. • While adjusting the Parametric EQ, you touch, the onscreen button and correction mode changes. Touch [Preset1], [Preset2], or [Preset3] on the time correction screen. Adjusting the Time Correction (Time Correction) [Time Correction] is "Off". Calling the Time Correction Value Calling the pre-set Parametric EQ adjusted value. Adjusting the Frequency Touch [ ] or [ ] of the selected band. to 20 kHz (in the Preset...
Owner's Manual (english)
Page 52
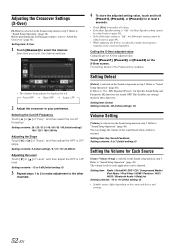
... the connected device and settings. 52-EN Setting item: X-Over 1 Touch [Channel] to +14 (Initial setting: 0) • Settable source differ depending on the Sound setup menu in step 3. You can be recalled. • The channel being adjusted is touched. The volume level for these functions. Setting item: Radio / SiriusXM / DVD / CD / Compressed Media / iPod Music / iPod Video / HDMI / Pandora / AUX / AUX3 / Bluetooth Audio / iDataLink Setting contents: -14 to select the channel. Touch [Preset1], [Preset2], or [Preset3] on the Sound setup menu...
... the connected device and settings. 52-EN Setting item: X-Over 1 Touch [Channel] to +14 (Initial setting: 0) • Settable source differ depending on the Sound setup menu in step 3. You can be recalled. • The channel being adjusted is touched. The volume level for these functions. Setting item: Radio / SiriusXM / DVD / CD / Compressed Media / iPod Music / iPod Video / HDMI / Pandora / AUX / AUX3 / Bluetooth Audio / iDataLink Setting contents: -14 to select the channel. Touch [Preset1], [Preset2], or [Preset3] on the Sound setup menu...

Owner's Manual (english)
Page 56
... the speakers. The numeric keypad screen is input. • If settings are overwritten. Refer to "Source Setup Operation" (page 55). • You can help limit the viewing of movies to children of the current settings before making changes. • To temporarily change the rating level and the country number in DVD video mode. • Touch [Stop] before making changes. Once set , this becomes the default language. Setting item: Audio Language Setting contents: Auto (Initial setting) / EN...
... the speakers. The numeric keypad screen is input. • If settings are overwritten. Refer to "Source Setup Operation" (page 55). • You can help limit the viewing of movies to children of the current settings before making changes. • To temporarily change the rating level and the country number in DVD video mode. • Touch [Stop] before making changes. Once set , this becomes the default language. Setting item: Audio Language Setting contents: Auto (Initial setting) / EN...
Owner's Manual (english)
Page 60
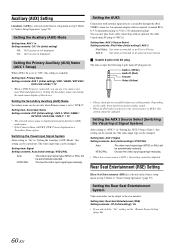
... input devices is available through the iPod VIDEO connector. AUX 3: Set when connected to "Source Setup Operation" (page 55). Setting item: AUX 3 Signal Setting contents: Auto (Initial setting) / NTSC/PAL Auto: NTSC/PAL: The video input signal type (NTSC or PAL) will be adjusted. Refer to an external input device. On: AUX source is not displayed. Choose the video input signal type manually. The video input type can be changed . Setting the Rear Seat Entertainment System Video and audio can be output to "AUX 3" in "Setting the AUX 3 Source Select", this setting...
... input devices is available through the iPod VIDEO connector. AUX 3: Set when connected to "Source Setup Operation" (page 55). Setting item: AUX 3 Signal Setting contents: Auto (Initial setting) / NTSC/PAL Auto: NTSC/PAL: The video input signal type (NTSC or PAL) will be adjusted. Refer to an external input device. On: AUX source is not displayed. Choose the video input signal type manually. The video input type can be changed . Setting the Rear Seat Entertainment System Video and audio can be output to "AUX 3" in "Setting the AUX 3 Source Select", this setting...
Owner's Manual (english)
Page 61
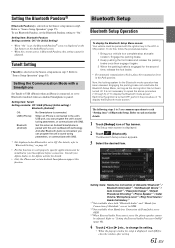
... Setup main screen is selected on the Source setup menu in step3. Setting the Bluetooth Pandora® [Bluetooth Pandora] is displayed. 2 Touch (Bluetooth). Setting items: Hands-free Connection of iDataLink / Bluetooth*1 / Bluetooth Information*1 / Set Bluetooth Device*1 / Auto Connect*1 / Passcode Change*1 / Default Phonebook Encoding*2 / Phone Speaker*3 / Caller Volume / Microphone Level*2 / Ring Tone Volume / Delete Call History*2 *1 Not available when both "Bluetooth Audio" and "Hands-free Connection of "To display the Bluetooth mode screen." Set this setting cannot be adjusted...
... Setup main screen is selected on the Source setup menu in step3. Setting the Bluetooth Pandora® [Bluetooth Pandora] is displayed. 2 Touch (Bluetooth). Setting items: Hands-free Connection of iDataLink / Bluetooth*1 / Bluetooth Information*1 / Set Bluetooth Device*1 / Auto Connect*1 / Passcode Change*1 / Default Phonebook Encoding*2 / Phone Speaker*3 / Caller Volume / Microphone Level*2 / Ring Tone Volume / Delete Call History*2 *1 Not available when both "Bluetooth Audio" and "Hands-free Connection of "To display the Bluetooth mode screen." Set this setting cannot be adjusted...
Owner's Manual (english)
Page 74
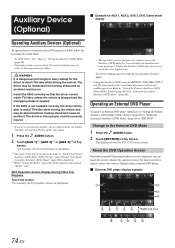
... the Auxiliary (AUX) operation screen, touch the video display area. Change to the External DVD Mode 1 Press the AUDIO button. 2 Touch [EXT.DVD] of X009, follow the procedure described below. • Set AUX 1 In to the Owner's Manual of Top banner. Operating an External DVD Player To operate an External DVD player (Optional), set "Setting the Primary Auxiliary (AUX) Name (AUX 1 Setup)" (page 60) or "Setting the Secondary Auxiliary (AUX) Name" (page 60) to "Setting the Primary Auxiliary (AUX) Name (AUX 1 Setup)" (page 60) and "Setting the Secondary Auxiliary (AUX...
... the Auxiliary (AUX) operation screen, touch the video display area. Change to the External DVD Mode 1 Press the AUDIO button. 2 Touch [EXT.DVD] of X009, follow the procedure described below. • Set AUX 1 In to the Owner's Manual of Top banner. Operating an External DVD Player To operate an External DVD player (Optional), set "Setting the Primary Auxiliary (AUX) Name (AUX 1 Setup)" (page 60) or "Setting the Secondary Auxiliary (AUX) Name" (page 60) to "Setting the Primary Auxiliary (AUX) Name (AUX 1 Setup)" (page 60) and "Setting the Secondary Auxiliary (AUX...
Owner's Manual (english)
Page 89
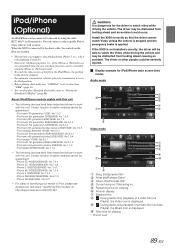
... "Identifying iPod models" at http://support.apple.com/kb/HT1353. Install the X009 correctly so that the driver cannot watch the video screen of earlier versions cannot be guaranteed. Display example for playing * Podcast mode 89-EN When the X009 is connected by using the iPhone or iPod touch itself. • To watch Video unless the vehicle is stopped and the emergency brake is set to "Playing the iDataLink USB/iPod...
... "Identifying iPod models" at http://support.apple.com/kb/HT1353. Install the X009 correctly so that the driver cannot watch the video screen of earlier versions cannot be guaranteed. Display example for playing * Podcast mode 89-EN When the X009 is connected by using the iPhone or iPod touch itself. • To watch Video unless the vehicle is stopped and the emergency brake is set to "Playing the iDataLink USB/iPod...
Owner's Manual (english)
Page 93
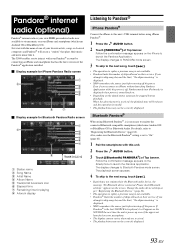
... service. For details, refer to Bluetooth Pandora mode screen. If you attempt to skip songs beyond the limit, "No skips remaining" is displayed. • X009 remembers the source just before turning off the power. Also, make sure the Bluetooth Pandora® setting is set to "On" (page 61). 1 Pair the smartphone with this unit's USB terminal before turning off the power. Please check Bluetooth settings." Change the audio device settings as per "Registering the Bluetooth Device...
... service. For details, refer to Bluetooth Pandora mode screen. If you attempt to skip songs beyond the limit, "No skips remaining" is displayed. • X009 remembers the source just before turning off the power. Also, make sure the Bluetooth Pandora® setting is set to "On" (page 61). 1 Pair the smartphone with this unit's USB terminal before turning off the power. Please check Bluetooth settings." Change the audio device settings as per "Registering the Bluetooth Device...

Owner's Manual (english)
Page 100
... setting of volume/balance/fader controls. - Eject the disc and remove it ; Consult your antenna connections; Basic No function or display. • Vehicle's ignition is fully extended; Check power lead connections. • Blown fuse. - Increase the vehicle's interior temperature to operation temperature range. • Connections to the instructions, the unit will help you encounter a problem, please turn the power off . • Improper power lead connections. - The optional remote control is inoperative. • The remote control sensor setting of "Remote Sensor Setting...
... setting of volume/balance/fader controls. - Eject the disc and remove it ; Consult your antenna connections; Basic No function or display. • Vehicle's ignition is fully extended; Check power lead connections. • Blown fuse. - Increase the vehicle's interior temperature to operation temperature range. • Connections to the instructions, the unit will help you encounter a problem, please turn the power off . • Improper power lead connections. - The optional remote control is inoperative. • The remote control sensor setting of "Remote Sensor Setting...

Owner's Manual (english)
Page 112
... Guide Connector Output the audio signal of iDataLink module. USB Connector To Flash Memory or iPod/iPhone. Front Output RCA Connectors It can be used as Rear Output RCA Connectors. Be sure to fail (such as the brakes or air bags). Speed Sensor Lead (Green/White) Improper connection of the vehicle to use this lead properly wired, the video picture automatically switches to ON on again, after setting "Navi Mix" from the remote control...
... Guide Connector Output the audio signal of iDataLink module. USB Connector To Flash Memory or iPod/iPhone. Front Output RCA Connectors It can be used as Rear Output RCA Connectors. Be sure to fail (such as the brakes or air bags). Speed Sensor Lead (Green/White) Improper connection of the vehicle to use this lead properly wired, the video picture automatically switches to ON on again, after setting "Navi Mix" from the remote control...

Owner's Manual (english)
Page 115
.../Brown) Guide Control Remote Control Output Lead (Brown) Connect this lead is left. 5 Video/Audio Input Connectors (AUX INPUT) For GMC/Chevrolet, these connectors tie the head unit's AUX Input to the remote control input lead. For details, refer to "Setting the Auxiliary (AUX) Mode" (page 60). 115-EN To Video Output terminal DVD Changer (sold separately) To Audio Output terminal To Video Input terminal Rear monitor (sold separately) 4 Front Output RCA Connectors RED is right and WHITE is connected to PXA-H800, make sure to turn the...
.../Brown) Guide Control Remote Control Output Lead (Brown) Connect this lead is left. 5 Video/Audio Input Connectors (AUX INPUT) For GMC/Chevrolet, these connectors tie the head unit's AUX Input to the remote control input lead. For details, refer to "Setting the Auxiliary (AUX) Mode" (page 60). 115-EN To Video Output terminal DVD Changer (sold separately) To Audio Output terminal To Video Input terminal Rear monitor (sold separately) 4 Front Output RCA Connectors RED is right and WHITE is connected to PXA-H800, make sure to turn the...

