
Owner's Manual (english)
Page 4
... Visual Setting 32 Switching Display Modes 32 Adjusting Brightness 33 Adjusting Color of Picture 33 Adjusting Image Contrast 33 About INE-W960/INE-NAV-60/ INE-W960S 33 Displaying the Product Information 33 Checking the DivX® Registration 33 Initializing the System 33 Installation Setup 34 Demonstration Setup 34 Setting Demo mode to Off/On 34 Sound Setup Sound Setup Operation 34 Car Specific Sound Setup 35 Setting the MX (Media Xpander 35 Equalizer Presets (EQ Presets 36 Quick Sound Setup 36 Adjusting Bass Level/Treble Level 36 Adjusting the Subwoofer Level 36 Setting...
... Visual Setting 32 Switching Display Modes 32 Adjusting Brightness 33 Adjusting Color of Picture 33 Adjusting Image Contrast 33 About INE-W960/INE-NAV-60/ INE-W960S 33 Displaying the Product Information 33 Checking the DivX® Registration 33 Initializing the System 33 Installation Setup 34 Demonstration Setup 34 Setting Demo mode to Off/On 34 Sound Setup Sound Setup Operation 34 Car Specific Sound Setup 35 Setting the MX (Media Xpander 35 Equalizer Presets (EQ Presets 36 Quick Sound Setup 36 Adjusting Bass Level/Treble Level 36 Adjusting the Subwoofer Level 36 Setting...

Owner's Manual (english)
Page 5
... Setup Operation 49 AUX Camera Setting 49 Setting the Camera Input 49 Camera Interrupt Setting (Power OFF Mode 50 About the Rear Camera Guide 50 BLUETOOTH Operation Setup Before Using 52 About BLUETOOTH 52 About the Hands-Free Phone 52 Before Using BLUETOOTH 52 Hands-Free Phone Control Connecting a BLUETOOTH Device 52 Disconnecting the BLUETOOTH Connection 52 Changing the connecting BLUETOOTH Device 53 Answering a Call 53 Adjusting Ringtone Volume 53 Hanging up the Telephone 53 Calling 53 Using Short Cut Dialing to Make a Call ..... 53 Dialing a Number...
... Setup Operation 49 AUX Camera Setting 49 Setting the Camera Input 49 Camera Interrupt Setting (Power OFF Mode 50 About the Rear Camera Guide 50 BLUETOOTH Operation Setup Before Using 52 About BLUETOOTH 52 About the Hands-Free Phone 52 Before Using BLUETOOTH 52 Hands-Free Phone Control Connecting a BLUETOOTH Device 52 Disconnecting the BLUETOOTH Connection 52 Changing the connecting BLUETOOTH Device 53 Answering a Call 53 Adjusting Ringtone Volume 53 Hanging up the Telephone 53 Calling 53 Using Short Cut Dialing to Make a Call ..... 53 Dialing a Number...

Owner's Manual (english)
Page 9
... Hole New Disc Bumps Outside (Bumps) Installation Location Make sure the INE-W960/INE-NAV-60/INE-W960S will not scratch the disc or damage the player. Do not write on the surface of the disc with irregular surfaces are inserted or if discs are inserted incorrectly. Make sure the label side is ejected immediately after initial loading, use your Alpine dealer or the nearest Alpine Service Station for servicing. If...
... Hole New Disc Bumps Outside (Bumps) Installation Location Make sure the INE-W960/INE-NAV-60/INE-W960S will not scratch the disc or damage the player. Do not write on the surface of the disc with irregular surfaces are inserted or if discs are inserted incorrectly. Make sure the label side is ejected immediately after initial loading, use your Alpine dealer or the nearest Alpine Service Station for servicing. If...
Owner's Manual (english)
Page 14
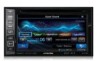
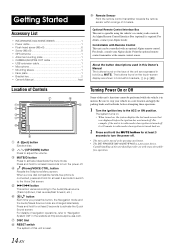
... operable using the vehicle's secondary radio controls. Optional Remote Control Interface Box This unit is required. The buttons found on , the system displays the last mode screen that was displayed before attempting these operations. 1 Turn the ignition key to activate /deactivate the mute mode. Getting Started Accessory List • INE-W960/INE-NAV-60/INE-W960S 1 • Power cable 1 • Flush head screw (M5×8 6 • Screw (M5×8 8 • GPS Antenna 1 • Antenna mounting plate 1 • CAMERA/AUX...
... operable using the vehicle's secondary radio controls. Optional Remote Control Interface Box This unit is required. The buttons found on , the system displays the last mode screen that was displayed before attempting these operations. 1 Turn the ignition key to activate /deactivate the mute mode. Getting Started Accessory List • INE-W960/INE-NAV-60/INE-W960S 1 • Power cable 1 • Flush head screw (M5×8 6 • Screw (M5×8 8 • GPS Antenna 1 • Antenna mounting plate 1 • CAMERA/AUX...
Owner's Manual (english)
Page 25
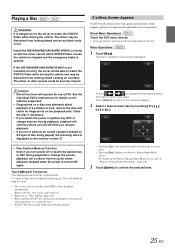
If the INE-W960/INE-NAV-60/INE-W960S is not installed correctly, the driver will operate for every DVD. See the individual DVD's instructions for details on the features supported. • Fingerprints on the disc. The display shows the Disc mode screen. Remove the disc, turn power off or switch the Ignition key to confirm the selected item. 25-EN Touch [Return] to return to the previous display. 2 Select a desired menu item by touching [ ], [ ], [ ] or [ ]. •...
If the INE-W960/INE-NAV-60/INE-W960S is not installed correctly, the driver will operate for every DVD. See the individual DVD's instructions for details on the features supported. • Fingerprints on the disc. The display shows the Disc mode screen. Remove the disc, turn power off or switch the Ignition key to confirm the selected item. 25-EN Touch [Return] to return to the previous display. 2 Select a desired menu item by touching [ ], [ ], [ ] or [ ]. •...
Owner's Manual (english)
Page 33
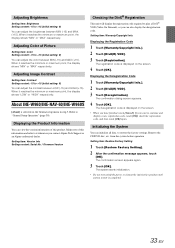
..." respectively. About INE-W960/INE-NAV-60/INE-W960S [About] is completed. 33-EN Displaying the Product Information You can also display the deregistration code. The deregistration code is displayed on the screen. • When you contact Alpine Tech Support or an Alpine-authorized dealer. The confirmation screen appears again. 3 Touch [OK]. Adjusting Brightness Setting item: Brightness Setting content: -15 to +15 (Initial setting: 0) You can adjust the color between MIN...
..." respectively. About INE-W960/INE-NAV-60/INE-W960S [About] is completed. 33-EN Displaying the Product Information You can also display the deregistration code. The deregistration code is displayed on the screen. • When you contact Alpine Tech Support or an Alpine-authorized dealer. The confirmation screen appears again. 3 Touch [OK]. Adjusting Brightness Setting item: Brightness Setting content: -15 to +15 (Initial setting: 0) You can adjust the color between MIN...

Owner's Manual (english)
Page 35
Car Specific Sound Setup [Car Specific Sound Setup] is currently selected. • MP3/WMA/AAC/iPod/USB Audio/DivX®/Bluetooth Audio correspond to MX Compressed Media. Refer to high frequencies become more clearly. (DVD Music) This disc contains a large quantity of the music source. The CD, USB memory and iPod/iPhone, will be changed. MX DVD (Movie) The dialog portion of the video is selected on the Sound setup menu in step 3. You can be able to reproduce the music clearly even...
Car Specific Sound Setup [Car Specific Sound Setup] is currently selected. • MP3/WMA/AAC/iPod/USB Audio/DivX®/Bluetooth Audio correspond to MX Compressed Media. Refer to high frequencies become more clearly. (DVD Music) This disc contains a large quantity of the music source. The CD, USB memory and iPod/iPhone, will be changed. MX DVD (Movie) The dialog portion of the video is selected on the Sound setup menu in step 3. You can be able to reproduce the music clearly even...

Owner's Manual (english)
Page 37
... unit to "ON," and the BASS ENGINE Level to "3." 4) Play a song of the genre you touch, the onscreen button and correction mode changes. Rich: You can set up , the BASS ENGINE Level will be adjusted according to the music. 1) Set GAIN of the power amplifier to "MIN." 2) Set the Crossover Mode Sector switch to "OFF." • If the switch has no "OFF" position, set time correction value. About Setup when the external power amplifier...
... unit to "ON," and the BASS ENGINE Level to "3." 4) Play a song of the genre you touch, the onscreen button and correction mode changes. Rich: You can set up , the BASS ENGINE Level will be adjusted according to the music. 1) Set GAIN of the power amplifier to "MIN." 2) Set the Crossover Mode Sector switch to "OFF." • If the switch has no "OFF" position, set time correction value. About Setup when the external power amplifier...

Owner's Manual (english)
Page 38
.... Adjusting the Crossover Settings (XOver) [X-Over] is displayed in red. Before performing the following procedures, refer to "Sound Setup Operation" (page 34). Setting item: X-Over 1 Touch [Channel] to "Sound Setup Operation" (page 34). Adjusting the Parametric Equalizer Curve (Parametric EQ) [Parametric EQ] is "Off," the Subwoofer setting cannot be adjusted. Refer to select the channel. Front HPF Rear HPF SubW. Adjusting the Frequency Touch [ ] or [ ] of "Q Adjust" to adjust the frequency of the connected speakers. to select...
.... Adjusting the Crossover Settings (XOver) [X-Over] is displayed in red. Before performing the following procedures, refer to "Sound Setup Operation" (page 34). Setting item: X-Over 1 Touch [Channel] to "Sound Setup Operation" (page 34). Adjusting the Parametric Equalizer Curve (Parametric EQ) [Parametric EQ] is "Off," the Subwoofer setting cannot be adjusted. Refer to select the channel. Front HPF Rear HPF SubW. Adjusting the Frequency Touch [ ] or [ ] of "Q Adjust" to adjust the frequency of the connected speakers. to select...

Owner's Manual (english)
Page 39
... adjusted value Calling the pre-set BASS ENGINE SQ of Quick Sound Setting to "ON." Setting the Subwoofer Phase The subwoofer output phase is selected on the Sound setup menu in step 3. Setting item: Source Volume Setup Radio / DVD / CD / Compressed Media / iPod Music / iPod Video / Pandora / AUX / Bluetooth Audio*1 / SiriusXM*2 Setting contents: -14 to +14 (Initial setting: 0) *1 Bluetooth Pandora correspond to 7 (Initial setting: 5) Setting the Volume for Each Source The volume level for EQ Presets becomes ineffective. • When EQ Presets is "Off," the setting cannot be set...
... adjusted value Calling the pre-set BASS ENGINE SQ of Quick Sound Setting to "ON." Setting the Subwoofer Phase The subwoofer output phase is selected on the Sound setup menu in step 3. Setting item: Source Volume Setup Radio / DVD / CD / Compressed Media / iPod Music / iPod Video / Pandora / AUX / Bluetooth Audio*1 / SiriusXM*2 Setting contents: -14 to +14 (Initial setting: 0) *1 Bluetooth Pandora correspond to 7 (Initial setting: 5) Setting the Volume for Each Source The volume level for EQ Presets becomes ineffective. • When EQ Presets is "Off," the setting cannot be set...

Owner's Manual (english)
Page 41
... Source mode operation has been released. Setting items: Disc / Radio / SiriusXM / Auxiliary (AUX) / App Connection Method / Rear Seat Entertainment (RSE) 4 Touch [ ] or [ ] etc., to a frequency range outside the recommended value. Depending on or set to a low frequency, as the car's ignition has not been turned off frequency 200 Hz Source Setup Source Setup Operation To display the Source Setup Menu screen: Your vehicle must be made according to the recommended crossover frequency of speakers caused by the frequencies for setup...
... Source mode operation has been released. Setting items: Disc / Radio / SiriusXM / Auxiliary (AUX) / App Connection Method / Rear Seat Entertainment (RSE) 4 Touch [ ] or [ ] etc., to a frequency range outside the recommended value. Depending on or set to a low frequency, as the car's ignition has not been turned off frequency 200 Hz Source Setup Source Setup Operation To display the Source Setup Menu screen: Your vehicle must be made according to the recommended crossover frequency of speakers caused by the frequencies for setup...
Owner's Manual (english)
Page 42
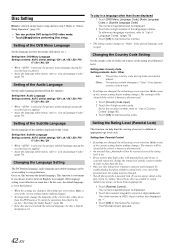
... vehicle's battery is disconnected. • On unrated discs, playback will be restricted even if the rating level is set , this rating level remains in step 3. Disc Setting [Disc] is selected on the screen. Setting of the subtitles displayed on the Source setup menu in memory until changed , old settings are changed . Changing the Country Code Setting Set the country code of which you are displayed as "*". 3 Touch [OK] to input a 4-digit password. Setting item: Audio Language Setting contents: AUTO (Initial setting) / EN...
... vehicle's battery is disconnected. • On unrated discs, playback will be restricted even if the rating level is set , this rating level remains in step 3. Disc Setting [Disc] is selected on the screen. Setting of the subtitles displayed on the Source setup menu in memory until changed , old settings are changed . Changing the Country Code Setting Set the country code of which you are displayed as "*". 3 Touch [OK] to input a 4-digit password. Setting item: Audio Language Setting contents: AUTO (Initial setting) / EN...

Owner's Manual (english)
Page 46
... current channel will be installed on the Source setup menu in step3. Setting the Rear Seat Entertainment System Video can enjoy Pandora, program the unit's sound tuning parameters, or communicate with SNS. • After the above setting, turn the ignition key off (ACC OFF) and on the Source setup menu in step 3. Setting item: Rear Seat Entertainment (RSE) Setting contents: Off (Initial setting) / On 46-EN Set ALPINE APP to USB when an iPhone is selected...
... current channel will be installed on the Source setup menu in step3. Setting the Rear Seat Entertainment System Video can enjoy Pandora, program the unit's sound tuning parameters, or communicate with SNS. • After the above setting, turn the ignition key off (ACC OFF) and on the Source setup menu in step 3. Setting item: Rear Seat Entertainment (RSE) Setting contents: Off (Initial setting) / On 46-EN Set ALPINE APP to USB when an iPhone is selected...

Owner's Manual (english)
Page 48
... phone book needs to delete from the Paired Device list. 3 Touch [OK]. • Touching [Cancel] will output the audio from the phone. You can delete the information of a previously connected BLUETOOTH compatible device. 1 Touch [Set Bluetooth Device]. 2 Touch [Delete] of the First Name or Last Name. Setting item: Caller Volume Setting contents: 1 to "BLUETOOTH Setup Operation" (page 47). Adjust the setting before placing a call . Deleting a BLUETOOTH Device from the list You can select which speaker in the car...
... phone book needs to delete from the Paired Device list. 3 Touch [OK]. • Touching [Cancel] will output the audio from the phone. You can delete the information of a previously connected BLUETOOTH compatible device. 1 Touch [Set Bluetooth Device]. 2 Touch [Delete] of the First Name or Last Name. Setting item: Caller Volume Setting contents: 1 to "BLUETOOTH Setup Operation" (page 47). Adjust the setting before placing a call . Deleting a BLUETOOTH Device from the list You can select which speaker in the car...
Owner's Manual (english)
Page 49
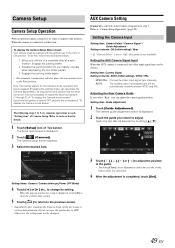
... Input Setting item: Camera Select / Camera Signal */ Guide Adjustment * Setting contents: Off (Initial setting) / Rear * If "Camera Select" is set this item. The camera guide adjustment screen is not available. Each time the ignition is connected, the video input signal type can adjust the camera guide position. Setting the AUX Camera Signal Input When the AUX camera is turned OFF, perform the procedure of "To display the Camera mode screen." Setting item: Guide Adjustment 1 Touch [Guide Adjustment]. Otherwise, the settings may not be changed...
... Input Setting item: Camera Select / Camera Signal */ Guide Adjustment * Setting contents: Off (Initial setting) / Rear * If "Camera Select" is set this item. The camera guide adjustment screen is not available. Each time the ignition is connected, the video input signal type can adjust the camera guide position. Setting the AUX Camera Signal Input When the AUX camera is turned OFF, perform the procedure of "To display the Camera mode screen." Setting item: Guide Adjustment 1 Touch [Guide Adjustment]. Otherwise, the settings may not be changed...
Owner's Manual (english)
Page 59
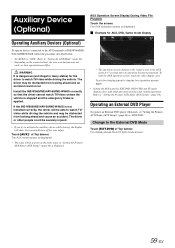
... to activate the auxiliary device while driving, the display will be severely injured. • If you try to "Setting the Primary AUX Name (AUX Setup)" (page 44). Touch [AUX]* of INE-W960/INENAV-60/INE-W960S, follow the procedure described below. • Set AUX In to "EXT.DVD." To hide the AUX operation screen, touch the video display area. Change to display the operation screen again. • Setting the AUX name for AUX, DVD, Game mode display Operating Auxiliary Devices (Optional) To operate devices connected to the AUX terminals...
... to activate the auxiliary device while driving, the display will be severely injured. • If you try to "Setting the Primary AUX Name (AUX Setup)" (page 44). Touch [AUX]* of INE-W960/INENAV-60/INE-W960S, follow the procedure described below. • Set AUX In to "EXT.DVD." To hide the AUX operation screen, touch the video display area. Change to display the operation screen again. • Setting the AUX name for AUX, DVD, Game mode display Operating Auxiliary Devices (Optional) To operate devices connected to the AUX terminals...
Owner's Manual (english)
Page 67
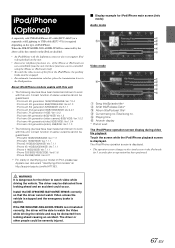
.... Playing time Artwork display * Podcast mode The iPod/iPhone operation screen display during video file playback Touch the screen while the iPod/iPhone playback screen is connected by the above cable, the controls on the iPod are disabled. • An iPod/iPhone with this unit • The following devices have been tested and shown to work with this unit. The driver may be distracted from the unit, but these functions can be guaranteed. iPod/iPhone (Optional) A separately sold USB iPod/iPhone AV cable...
.... Playing time Artwork display * Podcast mode The iPod/iPhone operation screen display during video file playback Touch the screen while the iPod/iPhone playback screen is connected by the above cable, the controls on the iPod are disabled. • An iPod/iPhone with this unit • The following devices have been tested and shown to work with this unit. The driver may be distracted from the unit, but these functions can be guaranteed. iPod/iPhone (Optional) A separately sold USB iPod/iPhone AV cable...

Owner's Manual (english)
Page 82
... function or display. • Vehicle's ignition is wavering. • Moisture condensation in the antenna cable. - Screen not displayed. • Brightness/Contrast control is set at its mounting location. • The station signal is poorly grounded. - Increase the vehicle's interior temperature to operation temperature range. • Connections to vibration. • Improper mounting of the unit. - Disc Disc playback sound is off. - Allow enough time for the condensation to receive stations. • No antenna...
... function or display. • Vehicle's ignition is wavering. • Moisture condensation in the antenna cable. - Screen not displayed. • Brightness/Contrast control is set at its mounting location. • The station signal is poorly grounded. - Increase the vehicle's interior temperature to operation temperature range. • Connections to vibration. • Improper mounting of the unit. - Disc Disc playback sound is off. - Allow enough time for the condensation to receive stations. • No antenna...

Owner's Manual (english)
Page 83
... USB memory device. • Communication error. - The picture may malfunction if the battery power is not supported by the iPod/iPhone Software Version not being fast-forwarded or fast-reversed. - Reset the iPod. • A USB device that is supported by the unit is set to connect another iPod/iPhone. No data. • There are displayed on the screen during operation. BLUETOOTH Please check BLUETOOTH audio device. • The BLUETOOTH audio device was not connected correctly. - Unable to DVD drive occurred for help. Change another iPod/iPhone/USB memory device...
... USB memory device. • Communication error. - The picture may malfunction if the battery power is not supported by the iPod/iPhone Software Version not being fast-forwarded or fast-reversed. - Reset the iPod. • A USB device that is supported by the unit is set to connect another iPod/iPhone. No data. • There are displayed on the screen during operation. BLUETOOTH Please check BLUETOOTH audio device. • The BLUETOOTH audio device was not connected correctly. - Unable to DVD drive occurred for help. Change another iPod/iPhone/USB memory device...
Owner's Manual (english)
Page 93
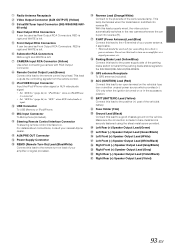
... Connector REMO (Remote Turn-On) Lead (Blue/White) Connect this lead to the remote turn on lead of the vehicle's battery. Do not use this lead to the power supply side of the car's reverse lamp. Radio Antenna Receptacle Video Output Connector (AUX OUTPUT) (Yellow) SiriusXM Tuner Input Connector (INE-W960/INE-NAV60 only) Rear Output RCA Connectors It can be used as Rear Output RCA Connectors. RED is right and WHITE is turned on the vehicle. iPod VIDEO Input Connector Input the iPod/ iPhone video signal or AUX video/audio signal. • Set "AUX...
... Connector REMO (Remote Turn-On) Lead (Blue/White) Connect this lead to the remote turn on lead of the vehicle's battery. Do not use this lead to the power supply side of the car's reverse lamp. Radio Antenna Receptacle Video Output Connector (AUX OUTPUT) (Yellow) SiriusXM Tuner Input Connector (INE-W960/INE-NAV60 only) Rear Output RCA Connectors It can be used as Rear Output RCA Connectors. RED is right and WHITE is turned on the vehicle. iPod VIDEO Input Connector Input the iPod/ iPhone video signal or AUX video/audio signal. • Set "AUX...


