
Owner's Manual (english)
Page 5
...57 Setting the AUX3 57 Setting the AUX3 Sel. (Switching the Visual Input Signal System 57 RSE Setting 57 Setting the Rear Seat Entertainment System 57 Setting the BLUETOOTH Pandora 57 BLUETOOTH Setup BLUETOOTH Setup Operation 58 BLUETOOTH Setting 58 Displaying BLUETOOTH Information ...Level 60 Adjusting the Caller Volume 60 Deleting All the Histories 60 Camera Setup Camera Setup Operation 61 Direct Camera Setting 61 Setting the Camera Input 61 AUX Camera Setting 62 Setting the Camera Input 62 Camera Interrupt Setting (Power OFF Mode 63 BLUETOOTH Operation Setup Before Using ...
...57 Setting the AUX3 57 Setting the AUX3 Sel. (Switching the Visual Input Signal System 57 RSE Setting 57 Setting the Rear Seat Entertainment System 57 Setting the BLUETOOTH Pandora 57 BLUETOOTH Setup BLUETOOTH Setup Operation 58 BLUETOOTH Setting 58 Displaying BLUETOOTH Information ...Level 60 Adjusting the Caller Volume 60 Deleting All the Histories 60 Camera Setup Camera Setup Operation 61 Direct Camera Setting 61 Setting the Camera Input 61 AUX Camera Setting 62 Setting the Camera Input 62 Camera Interrupt Setting (Power OFF Mode 63 BLUETOOTH Operation Setup Before Using ...
Owner's Manual (english)
Page 6
... Tuning to the TV mode 72 About the TV operation screen 72 Camera Operation (Optional) Rear Camera Operation 73 Displaying the rear view video while the car is in reverse 73 Switching the Image Pattern for the Rear Camera 73 Guide Display ON/OFF Setting 73 Adjusting the Caution Display Location... ..... 73 About the Rear Camera Guide 74 Front Camera Operation 75 Displaying the Front View Video Manually 75 Switching the Image Pattern ...
... Tuning to the TV mode 72 About the TV operation screen 72 Camera Operation (Optional) Rear Camera Operation 73 Displaying the rear view video while the car is in reverse 73 Switching the Image Pattern for the Rear Camera 73 Guide Display ON/OFF Setting 73 Adjusting the Caution Display Location... ..... 73 About the Rear Camera Guide 74 Front Camera Operation 75 Displaying the Front View Video Manually 75 Switching the Image Pattern ...
Owner's Manual (english)
Page 26
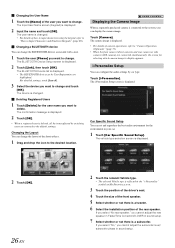
... Characters and Numbers (Keypad)" (page 28). The camera image is connected to the default settings. Displaying the Camera Image When a separately purchased camera is displayed. • For details of camera operations, refer to "Camera Operation (Optional)" (page 73). • When the front camera (direct camera) and rear camera or side camera (AUX camera) are returned to the system, you can change...
... Characters and Numbers (Keypad)" (page 28). The camera image is connected to the default settings. Displaying the Camera Image When a separately purchased camera is displayed. • For details of camera operations, refer to "Camera Operation (Optional)" (page 73). • When the front camera (direct camera) and rear camera or side camera (AUX camera) are returned to the system, you can change...
Owner's Manual (english)
Page 27
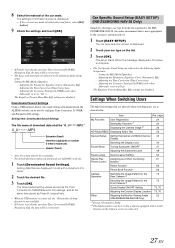
...Rear Camera*2 Switching the Image Pattern for Time Correction/X-OVER/ Parametric EQ, the data will be overwritten. Item Ref. Setting item: Downloaded Sound Settings The file name of 5 items. 2 Touch the desired file. 3 Touch [OK]. Car Specific Sound Setup (EASY SETUP) (INE-Z928HD/INE-NAV-38 Only) Simply by selecting a car type from the ALPINE... website can be "A_U*****.MP3." The car type selection screen is displayed. 2 Touch your car type on the Camera screen is complete. •...
...Rear Camera*2 Switching the Image Pattern for Time Correction/X-OVER/ Parametric EQ, the data will be overwritten. Item Ref. Setting item: Downloaded Sound Settings The file name of 5 items. 2 Touch the desired file. 3 Touch [OK]. Car Specific Sound Setup (EASY SETUP) (INE-Z928HD/INE-NAV-38 Only) Simply by selecting a car type from the ALPINE... website can be "A_U*****.MP3." The car type selection screen is displayed. 2 Touch your car type on the Camera screen is complete. •...

Owner's Manual (english)
Page 29
Switching the Dual Screen Display When you can switch sources by Volume UP/DOWN, Mute ON/ OFF or DISC Eject (INE-S920HD/INE-NAV-30 only). • Screen OFF mode is canceled when the power or ACC is turned off. • When the gear lever is shifted to... the screen before dragging and that cannot be selected. 29-EN Touch the screen and slide your finger to the reverse (R) position while the rear camera is connected, the rear camera image is displayed. • When a call is received while a BLUETOOTH device is connected, the incoming call screen is displayed. Touch operation You can...
Switching the Dual Screen Display When you can switch sources by Volume UP/DOWN, Mute ON/ OFF or DISC Eject (INE-S920HD/INE-NAV-30 only). • Screen OFF mode is canceled when the power or ACC is turned off. • When the gear lever is shifted to... the screen before dragging and that cannot be selected. 29-EN Touch the screen and slide your finger to the reverse (R) position while the rear camera is connected, the rear camera image is displayed. • When a call is received while a BLUETOOTH device is connected, the incoming call screen is displayed. Touch operation You can...
Owner's Manual (english)
Page 61
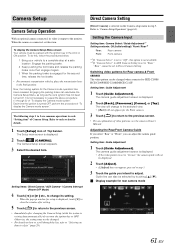
...procedure (1 through the list, refer to "Selecting an Item in the ACC or ON position. Switching video patterns for Rear camera & Front camera The video pattern can also be parked with the ignition key in a List" (page 29). Setting item: Guide...of "To display the Camera mode screen." Setting the Camera Input Setting item: Camera Select / Guide Adjustment*1 Setting contents: Off (Initial setting) / Front / Rear*2 Rear: Front: Rear camera Front camera *1 If "Camera Select" is set to "Off", this option is not available. *2 If "Camera Select" in AUX Camera Setting is set this...
...procedure (1 through the list, refer to "Selecting an Item in the ACC or ON position. Switching video patterns for Rear camera & Front camera The video pattern can also be parked with the ignition key in a List" (page 29). Setting item: Guide...of "To display the Camera mode screen." Setting the Camera Input Setting item: Camera Select / Guide Adjustment*1 Setting contents: Off (Initial setting) / Front / Rear*2 Rear: Front: Rear camera Front camera *1 If "Camera Select" is set to "Off", this option is not available. *2 If "Camera Select" in AUX Camera Setting is set this...

Owner's Manual (english)
Page 62
... Camera Input Setting item: Camera Select / Camera Signal*1/ Guide Adjustment*1 Setting contents: Off / Rear*2 (Initial setting) / OTHER Rear: Rear camera OTHER: Side camera, Room camera, etc. *1 If "Camera Select" is set to "Off", this option is not available. *2 If "Camera Select" in Direct Camera Setting is completed, touch [Set]. 62-EN Setting item: Camera Signal Setting contents: NTSC (Initial setting) / PAL Adjusting the Rear Camera...
... Camera Input Setting item: Camera Select / Camera Signal*1/ Guide Adjustment*1 Setting contents: Off / Rear*2 (Initial setting) / OTHER Rear: Rear camera OTHER: Side camera, Room camera, etc. *1 If "Camera Select" is set to "Off", this option is not available. *2 If "Camera Select" in Direct Camera Setting is completed, touch [Set]. 62-EN Setting item: Camera Signal Setting contents: NTSC (Initial setting) / PAL Adjusting the Rear Camera...
Owner's Manual (english)
Page 63
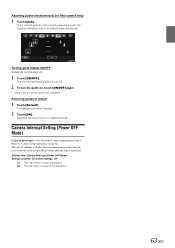
... A message window will return to default settings. You can set whether to display the rear camera image when the gear lever is turned off . 2 To turn the guide on the Camera setup menu in step 3. The 3 vertical guides of the currently-selected guide link together..., allowing them to "Camera Setup Operation" (page 61). Camera Interrupt Setting (Power OFF Mode) [Camera Interrupt] is not displayed 63-EN Setting item: Camera Interrupt (Power OFF Mode) Setting contents: On (Initial setting) / Off On: The rear camera image is displayed Off: The rear camera image is selected on ...
... A message window will return to default settings. You can set whether to display the rear camera image when the gear lever is turned off . 2 To turn the guide on the Camera setup menu in step 3. The 3 vertical guides of the currently-selected guide link together..., allowing them to "Camera Setup Operation" (page 61). Camera Interrupt Setting (Power OFF Mode) [Camera Interrupt] is not displayed 63-EN Setting item: Camera Interrupt (Power OFF Mode) Setting contents: On (Initial setting) / Off On: The rear camera image is displayed Off: The rear camera image is selected on ...

Owner's Manual (english)
Page 73
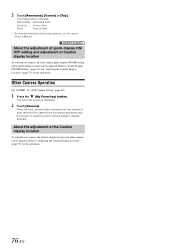
... switch changes to [Guide ON]. 3 Touch [Guide ON] to this unit. For details, refer to "Visual Setting" (page 44). Rear Camera Operation Set "Rear" for additional assistance. • This function is effective when the reverse wire is displayed. The operation screen is displayed on the screen. ...to a position other than reverse (R), the monitor returns to the top or bottom of this unit. Other camera: Set when connecting to a camera other than the Front camera or Rear camera, such as objects, people and other hazards, can be seen. Adjusting the Caution Display Location 1 Touch ...
... switch changes to [Guide ON]. 3 Touch [Guide ON] to this unit. For details, refer to "Visual Setting" (page 44). Rear Camera Operation Set "Rear" for additional assistance. • This function is effective when the reverse wire is displayed. The operation screen is displayed on the screen. ...to a position other than reverse (R), the monitor returns to the top or bottom of this unit. Other camera: Set when connecting to a camera other than the Front camera or Rear camera, such as objects, people and other hazards, can be seen. Adjusting the Caution Display Location 1 Touch ...
Owner's Manual (english)
Page 74
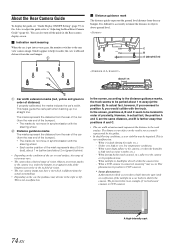
... visualize the car's width and distance from the rear end of -vision. • The rear camera image may deviate to CCD cameras. * Smear phenomenon: A phenomenon which is not accurately represented by the camera. Guides appear to the rear view camera image. Distance guidance mark The distance guides represent... car body) is connected, smearing* may be in the its peripheral area. - The distance to be located in the Rear camera display screen. When a CCD camera is shot by the guides. • In the following conditions, screen visibility may occur. Also, to adjust the guide, ...
... visualize the car's width and distance from the rear end of -vision. • The rear camera image may deviate to CCD cameras. * Smear phenomenon: A phenomenon which is not accurately represented by the camera. Guides appear to the rear view camera image. Distance guidance mark The distance guides represent... car body) is connected, smearing* may be in the its peripheral area. - The distance to be located in the Rear camera display screen. When a CCD camera is shot by the guides. • In the following conditions, screen visibility may occur. Also, to adjust the guide, ...
Owner's Manual (english)
Page 75
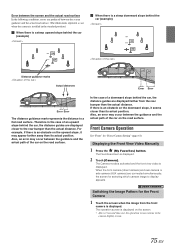
... guides are displayed closer to the rear bumper than the actual distance. Front Camera Operation Set "Front" for the Front Camera 1 Touch the screen when the image from the rear bumper than the actual distance. When the front camera (direct camera) and rear camera or side camera (AUX camera) are displayed farther from the front camera is displayed. The operation screen...
... guides are displayed closer to the rear bumper than the actual distance. Front Camera Operation Set "Front" for the Front Camera 1 Touch the screen when the image from the rear bumper than the actual distance. When the front camera (direct camera) and rear camera or side camera (AUX camera) are displayed farther from the front camera is displayed. The operation screen...
Owner's Manual (english)
Page 76
... display ON/OFF setting and Caution display location can be adjusted. Refer to display appears. When the front camera (direct camera) and rear camera or side camera (AUX camera) are connected simultaneously, the screen for selecting which camera image to "Guide Display ON/OFF Setting" (page 73) and "Adjusting the Caution Display Location" (page 73) for other...
... display ON/OFF setting and Caution display location can be adjusted. Refer to display appears. When the front camera (direct camera) and rear camera or side camera (AUX camera) are connected simultaneously, the screen for selecting which camera image to "Guide Display ON/OFF Setting" (page 73) and "Adjusting the Caution Display Location" (page 73) for other...
Owner's Manual (english)
Page 105
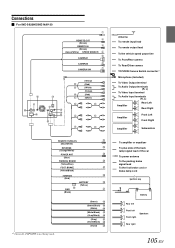
Connections For INE-S920HD/INE-NAV-30 REMOTE OUT (Brown) REMOTE IN (Brown) (Green/White) SPEED SENSOR CAMERA1 CAMERA2 CAMERA SW (Yellow) (Red) (White) (Yellow) (Red) (White) REMOTE TURN-ON (Blue/White) REVERSE (Orange/White) POWER ANT (Blue) PARKING BRAKE ... (Gray) (Violet/Black) (Violet) Antenna To remote input lead To remote output lead To the vehicle speed pause line To Front/Rear camera To Rear/Other camera TOPVIEW Camera Switch connector*1 Microphone (Included) To Video Output terminal To Audio Output terminals (R, L) To Video Input terminal To Audio Input terminals (R, L) ...
Connections For INE-S920HD/INE-NAV-30 REMOTE OUT (Brown) REMOTE IN (Brown) (Green/White) SPEED SENSOR CAMERA1 CAMERA2 CAMERA SW (Yellow) (Red) (White) (Yellow) (Red) (White) REMOTE TURN-ON (Blue/White) REVERSE (Orange/White) POWER ANT (Blue) PARKING BRAKE ... (Gray) (Violet/Black) (Violet) Antenna To remote input lead To remote output lead To the vehicle speed pause line To Front/Rear camera To Rear/Other camera TOPVIEW Camera Switch connector*1 Microphone (Included) To Video Output terminal To Audio Output terminals (R, L) To Video Input terminal To Audio Input terminals (R, L) ...

Owner's Manual (english)
Page 106
...and is connected. Make sure the connection is made to the rear camera whenever the car is shifted into reverse (R). Remote Control Input Lead (Brown) Connect the external Alpine product to the plus side of life. Rear Output RCA Connectors It can be used only for controlling the ... side of your power antenna, if applicable. • This lead should be performed by a trained, authorized Alpine dealer. Foot Brake Lead (Yellow/Black) Connect to the INE-S920HD/INE-NAV-30. Radio Antenna Receptacle Remote Control Output Lead (Brown) Connect this lead to the remote turn on ...
...and is connected. Make sure the connection is made to the rear camera whenever the car is shifted into reverse (R). Remote Control Input Lead (Brown) Connect the external Alpine product to the plus side of life. Rear Output RCA Connectors It can be used only for controlling the ... side of your power antenna, if applicable. • This lead should be performed by a trained, authorized Alpine dealer. Foot Brake Lead (Yellow/Black) Connect to the INE-S920HD/INE-NAV-30. Radio Antenna Receptacle Remote Control Output Lead (Brown) Connect this lead to the remote turn on ...
Owner's Manual (english)
Page 107
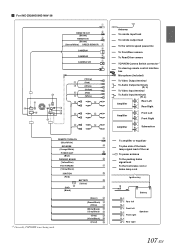
For INE-Z928HD/INE-NAV-38 REMOTE OUT (Brown) REMOTE IN (Brown) (Green/White) SPEED SENSOR CAMERA1 CAMERA2 CAMERA SW (Yellow) (Red) (White) (Yellow) (Red) (White) REMOTE TURN-ON (Blue/White) REVERSE (Orange/White) POWER ANT (Blue) PARKING BRAKE (Yellow/...Black) (Gray) (Violet/Black) (Violet) Antenna To remote input lead To remote output lead To the vehicle speed pause line To Front/Rear camera To Rear/Other camera TOPVIEW Camera Switch connector*1 To steering remote control interface box Microphone (Included) To Video Output terminal To Audio Output terminals (R, L) To Video Input ...
For INE-Z928HD/INE-NAV-38 REMOTE OUT (Brown) REMOTE IN (Brown) (Green/White) SPEED SENSOR CAMERA1 CAMERA2 CAMERA SW (Yellow) (Red) (White) (Yellow) (Red) (White) REMOTE TURN-ON (Blue/White) REVERSE (Orange/White) POWER ANT (Blue) PARKING BRAKE (Yellow/...Black) (Gray) (Violet/Black) (Violet) Antenna To remote input lead To remote output lead To the vehicle speed pause line To Front/Rear camera To Rear/Other camera TOPVIEW Camera Switch connector*1 To steering remote control interface box Microphone (Included) To Video Output terminal To Audio Output terminals (R, L) To Video Input ...
Owner's Manual (english)
Page 108
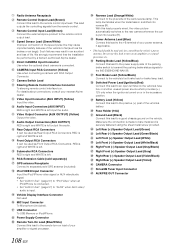
...bare metal and is put into reverse (R). Make sure the connection is made to the rear camera whenever the car is securely fastened using the sheet metal screw provided. Remote Control Input Lead (Brown) Connect the external Alpine product to a good chassis ground on or in an accident and loss of the parking... Connectors It can be used MIC Input Connector To Microphone (Included). Radio Antenna Receptacle Remote Control Output Lead (Brown) Connect this lead to the INE-Z928HD/INE-NAV-38. Parking Brake Lead (Yellow/Blue) Connect this lead to the power supply side of life.
...bare metal and is put into reverse (R). Make sure the connection is made to the rear camera whenever the car is securely fastened using the sheet metal screw provided. Remote Control Input Lead (Brown) Connect the external Alpine product to a good chassis ground on or in an accident and loss of the parking... Connectors It can be used MIC Input Connector To Microphone (Included). Radio Antenna Receptacle Remote Control Output Lead (Brown) Connect this lead to the INE-Z928HD/INE-NAV-38. Parking Brake Lead (Yellow/Blue) Connect this lead to the power supply side of life.
Owner's Manual (english)
Page 110
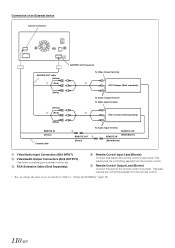
...signals from the remote control. • You can change the name of an External device Camera Connector AUX/PRE OUT cable (Yellow) (Red) (White) (Yellow) (Red) (White) REMOTE IN (Brown) Camera cable AUX/PRE OUT Connector To Video Output terminal DVD Changer (Sold separately) To Audio... Output terminal To Video Input terminal Rear monitor (Sold separately) REMOTE OUT (Brown) To Audio Input terminal REMOTE OUT (White/Brown...
...signals from the remote control. • You can change the name of an External device Camera Connector AUX/PRE OUT cable (Yellow) (Red) (White) (Yellow) (Red) (White) REMOTE IN (Brown) Camera cable AUX/PRE OUT Connector To Video Output terminal DVD Changer (Sold separately) To Audio... Output terminal To Video Input terminal Rear monitor (Sold separately) REMOTE OUT (Brown) To Audio Input terminal REMOTE OUT (White/Brown...
