Owners Manual
Page 5
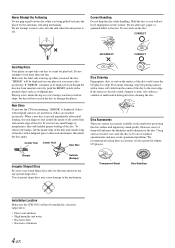
...dust, or soil on the market for protecting the disc surface and improving sound quality. If "ERROR" continues to be installed in Alpine CD players. Disc Accessories There are inserted incorrectly. Hold the disc so you feel around the inside edge of the hole and outside edge...of special shape discs may result in a solution of the disc to the mechanism. Transparent Sheet Disc Stabilizer Installation Location Make sure the CDE-9852 will not leave fingerprints on the disc. For routine cleaning, wipe the playing surface with a ballpoint pen or other such instrument...
...dust, or soil on the market for protecting the disc surface and improving sound quality. If "ERROR" continues to be installed in Alpine CD players. Disc Accessories There are inserted incorrectly. Hold the disc so you feel around the inside edge of the hole and outside edge...of special shape discs may result in a solution of the disc to the mechanism. Transparent Sheet Disc Stabilizer Installation Location Make sure the CDE-9852 will not leave fingerprints on the disc. For routine cleaning, wipe the playing surface with a ballpoint pen or other such instrument...
Owners Manual
Page 17
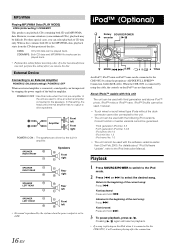
... connected to select the desired song. Fast forward: Press and hold . Amplifier Front left • No sound is produced by using the proprietary ALPINE FULL SPEED™ Connection Cable (KCE-422i). iPod™ (Optional) Rotary SOURCE/POWER encoder / MODE A.ME 45 6 TITLE An iPod™...Both CD data and MP3/WMA file tracks can be guranteed. Correct function of earlier versions cannot be played back. • Perform this unit The unit can be difficult. If a disc has already been inserted, perform the setting after the connection. 16-EN When the CDE-9852...
... connected to select the desired song. Fast forward: Press and hold . Amplifier Front left • No sound is produced by using the proprietary ALPINE FULL SPEED™ Connection Cable (KCE-422i). iPod™ (Optional) Rotary SOURCE/POWER encoder / MODE A.ME 45 6 TITLE An iPod™...Both CD data and MP3/WMA file tracks can be guranteed. Correct function of earlier versions cannot be played back. • Perform this unit The unit can be difficult. If a disc has already been inserted, perform the setting after the connection. 16-EN When the CDE-9852...

Owners Manual
Page 18
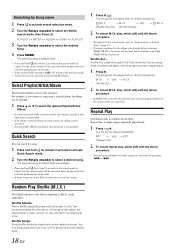
... during M.I .X. play back all artists is played back. • Press and hold for a song of the selected album 1 After selecting the album in playlists, the CDE-9852 can contain hundreds of the selected album. 2 Turn the Rotary encoder to select a song and press MODE.
... during M.I .X. play back all artists is played back. • Press and hold for a song of the selected album 1 After selecting the album in playlists, the CDE-9852 can contain hundreds of the selected album. 2 Turn the Rotary encoder to select a song and press MODE.
Owners Manual
Page 19
... 2 seconds in the iPod, it takes time to cancel. Any one song plays back just once until all songs in order, and so on the CDE-9852. The selected song is played back immediately. • Press and hold for at least 2 seconds in random sequence. The songs will not play , select...
... 2 seconds in the iPod, it takes time to cancel. Any one song plays back just once until all songs in order, and so on the CDE-9852. The selected song is played back immediately. • Press and hold for at least 2 seconds in random sequence. The songs will not play , select...
Owners Manual
Page 20
...power off, then on again. Check power lead and battery lead connections. • Blown fuse. - Radio Unable to scroll the tag information only once. • Only alphanumeric characters (ASCII) can display the ...for at its mounting location. 19-EN replace the antenna or cable if necessary. Check your authorized Alpine dealer. Broadcast is noisy. • The antenna is poorly grounded. - TRACK NO./ELAPSED TIME...; This guide will scroll automatically. Press TITLE. If the unit is not compatible with the CDE-9852. Check the fuse of your system is set to "SCROLL MANU," press and hold ...
...power off, then on again. Check power lead and battery lead connections. • Blown fuse. - Radio Unable to scroll the tag information only once. • Only alphanumeric characters (ASCII) can display the ...for at its mounting location. 19-EN replace the antenna or cable if necessary. Check your authorized Alpine dealer. Broadcast is noisy. • The antenna is poorly grounded. - TRACK NO./ELAPSED TIME...; This guide will scroll automatically. Press TITLE. If the unit is not compatible with the CDE-9852. Check the fuse of your system is set to "SCROLL MANU," press and hold ...
Owners Manual
Page 23
...in fire or electric shock. Use of other units (e.g. Route the cables and wiring away from the (-) battery post before installing your authorized Alpine dealer for installation, take such precautions may result in the chassis for assistance. • Be sure to connect the speaker (-) leads to do...may not securely install the unit in locations with the manual to prevent obstructions when driving. When in doubt, consult your Alpine dealer. • The CDE-9852 uses female RCA-type jacks for connection to other than designated parts may damage this unit internally or may result in...
...in fire or electric shock. Use of other units (e.g. Route the cables and wiring away from the (-) battery post before installing your authorized Alpine dealer for installation, take such precautions may result in the chassis for assistance. • Be sure to connect the speaker (-) leads to do...may not securely install the unit in locations with the manual to prevent obstructions when driving. When in doubt, consult your Alpine dealer. • The CDE-9852 uses female RCA-type jacks for connection to other than designated parts may damage this unit internally or may result in...
Owners Manual
Page 24
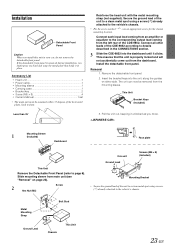
...not supplied). The unit can now be mounted within 35 degrees of the horizontal plane, back to front. Connect all other leads of the CDE-9852 according to details described in place. This Unit Bracket Keys (Included) 3. Pull the unit out, keeping it clicks. Secure the ground ...do not remove the detachable front panel. Remove the detachable front panel. 2. Removal 1. This ensures that holds it in the CONNECTlONS section. 3 Slide the CDE-9852 into the unit, along the guides on page 23). 2 Hex Nut (M5) Screw this unit in your car, do so. 1 Mounting Sleeve...
...not supplied). The unit can now be mounted within 35 degrees of the horizontal plane, back to front. Connect all other leads of the CDE-9852 according to details described in place. This Unit Bracket Keys (Included) 3. Pull the unit out, keeping it clicks. Secure the ground ...do not remove the detachable front panel. Remove the detachable front panel. 2. Removal 1. This ensures that holds it in the CONNECTlONS section. 3 Slide the CDE-9852 into the unit, along the guides on page 23). 2 Hex Nut (M5) Screw this unit in your car, do so. 1 Mounting Sleeve...


