
Owners Manual
Page 2
... 3 Getting Started Turning Power On and Off 6 Detaching and Attaching the Front Panel ........ 6 Initial System Start-Up 6 Adjusting Volume 7 Lowering Volume Quickly 7 Setting Time 7 Radio Listening to Radio 7 Manual Storing of Station Presets 7 Automatic Memory of Station Presets 8 Tuning to Preset Stations 8 Frequency Search Function 8 CD/MP3/WMA Playback 8 Repeat Play 9 M.I.X. (Random Play 9 Searching from CD Text 9 File/Folder Name Search (concerning MP3/WMA 10 Quick Search 10 About MP3/WMA 10 Sound Setting Adjusting Bass/Treble/Balance (Between Left and...
... 3 Getting Started Turning Power On and Off 6 Detaching and Attaching the Front Panel ........ 6 Initial System Start-Up 6 Adjusting Volume 7 Lowering Volume Quickly 7 Setting Time 7 Radio Listening to Radio 7 Manual Storing of Station Presets 7 Automatic Memory of Station Presets 8 Tuning to Preset Stations 8 Frequency Search Function 8 CD/MP3/WMA Playback 8 Repeat Play 9 M.I.X. (Random Play 9 Searching from CD Text 9 File/Folder Name Search (concerning MP3/WMA 10 Quick Search 10 About MP3/WMA 10 Sound Setting Adjusting Bass/Treble/Balance (Between Left and...
Owners Manual
Page 4
... the chance of the vehicle and cause an accident. KEEP THE VOLUME AT A LEVEL WHERE YOU CAN STILL HEAR OUTSIDE NOISE WHILE DRIVING. KEEP SMALL OBJECTS SUCH AS BATTERIES OUT OF THE REACH OF CHILDREN. USE THIS PRODUCT FOR MOBILE 12V APPLICATIONS. Use for repairing. Playing a bad disc could severely damage the playback mechanism. Failure to do so may...
... the chance of the vehicle and cause an accident. KEEP THE VOLUME AT A LEVEL WHERE YOU CAN STILL HEAR OUTSIDE NOISE WHILE DRIVING. KEEP SMALL OBJECTS SUCH AS BATTERIES OUT OF THE REACH OF CHILDREN. USE THIS PRODUCT FOR MOBILE 12V APPLICATIONS. Use for repairing. Playing a bad disc could severely damage the playback mechanism. Failure to do so may...
Owners Manual
Page 5
... Sheet Disc Stabilizer Installation Location Make sure the CDE-9852 will not scratch the disc or damage the player. Hold the disc so you insert the disc. Playing a disc while driving on discs played in Alpine CD players. To remove the bumps, rub the inside of the center hole and outside edge of the disc with a clean, soft cloth from jamming, "ERROR" is off. If "ERROR" continues to use round shape discs...
... Sheet Disc Stabilizer Installation Location Make sure the CDE-9852 will not scratch the disc or damage the player. Hold the disc so you insert the disc. Playing a disc while driving on discs played in Alpine CD players. To remove the bumps, rub the inside of the center hole and outside edge of the disc with a clean, soft cloth from jamming, "ERROR" is off. If "ERROR" continues to use round shape discs...

Owners Manual
Page 7
... RESET with the panel open the front panel, then remove it pops back out. The Rotary encoder pops out Detaching 1 Turn off the unit power. 2 Press (OPEN) to open as it may result in accident or malfunction. Press and hold SOURCE/POWER for the first time, after changing the car battery, etc. 1 Turn off the unit power. 2 Press (OPEN) to avoid pushing buttons by pressing any other button...
... RESET with the panel open the front panel, then remove it pops back out. The Rotary encoder pops out Detaching 1 Turn off the unit power. 2 Press (OPEN) to open as it may result in accident or malfunction. Press and hold SOURCE/POWER for the first time, after changing the car battery, etc. 1 Turn off the unit power. 2 Press (OPEN) to avoid pushing buttons by pressing any other button...
Owners Manual
Page 8
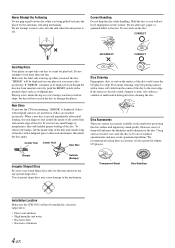
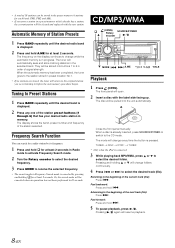
... the preset buttons (1 through 6) Listening to adjust the minutes while the time indication is obtained. The selected station is automatically set by pressing TITLE. • To synchronize the clock to store in a desired radio station you wish to "00". Minutes will bring the audio back to tune in steps (Manual tuning). 4 Press or to its previous level. Manual mode: The frequency is displayed. Lowering Volume Quickly Radio Rotary SOURCE/POWER encoder BAND TUNE Activating the Audio Mute function...
... the preset buttons (1 through 6) Listening to adjust the minutes while the time indication is obtained. The selected station is automatically set by pressing TITLE. • To synchronize the clock to store in a desired radio station you wish to "00". Minutes will bring the audio back to tune in steps (Manual tuning). 4 Press or to its previous level. Manual mode: The frequency is displayed. Lowering Volume Quickly Radio Rotary SOURCE/POWER encoder BAND TUNE Activating the Audio Mute function...
Owners Manual
Page 9
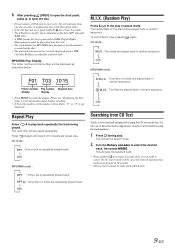
... and replaced with the label side facing up. The disc will be stored into the unit automatically. Close the front panel manually. Pressing / again will be pulled into buttons 1 to Preset Stations 1 Press BAND repeatedly until the desired radio band is in memory. The display shows the band, preset number and frequency of Station Presets 1 Press BAND repeatedly until the desired band is pressed. CD/MP3/WMA (OPEN) SOURCE/POWER...
... and replaced with the label side facing up. The disc will be stored into the unit automatically. Close the front panel manually. Pressing / again will be pulled into buttons 1 to Preset Stations 1 Press BAND repeatedly until the desired radio band is in memory. The display shows the band, preset number and frequency of Station Presets 1 Press BAND repeatedly until the desired band is pressed. CD/MP3/WMA (OPEN) SOURCE/POWER...
Owners Manual
Page 10
... mode will be played back on this unit. • The track display for at a time. M.I.X. (Random Play) Press 5 in a folder are played back in random sequence. CD mode : : The tracks are repeatedly played back. 9-EN 6 After pressing (OPEN) to open the front panel, press to eject the disc. • Do not remove a CD during M.I.X. Do not load more than one disc at least 2 seconds. • The CD-player...
... mode will be played back on this unit. • The track display for at a time. M.I.X. (Random Play) Press 5 in a folder are played back in random sequence. CD mode : : The tracks are repeatedly played back. 9-EN 6 After pressing (OPEN) to open the front panel, press to eject the disc. • Do not remove a CD during M.I.X. Do not load more than one disc at least 2 seconds. • The CD-player...
Owners Manual
Page 11
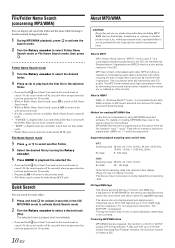
... private use, duplicating audio data (including MP3/ WMA data) or distributing, transferring, or copying it, whether for free or for sampling rates, this device's frame display (Page 13) may not display correctly. Or, the search mode will be canceled when an operation has not been performed in the CD/ MP3/WMA mode to activate Quick Search mode. 2 Turn the Rotary encoder to select a desired...
... private use, duplicating audio data (including MP3/ WMA data) or distributing, transferring, or copying it, whether for free or for sampling rates, this device's frame display (Page 13) may not display correctly. Or, the search mode will be canceled when an operation has not been performed in the CD/ MP3/WMA mode to activate Quick Search mode. 2 Turn the Rotary encoder to select a desired...

Owners Manual
Page 13
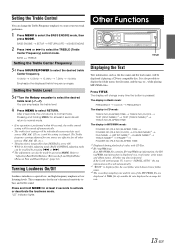
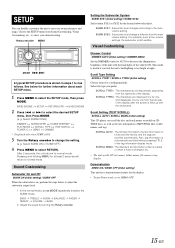
...to select the BASS (Bass Center Frequency) control mode. BASS ENGINE SETUP RETURN (OFF) BASS ENGINE 2 Press or to select the desired bass level (-7~+10). Refer to select the desired bass center frequency. 80Hz 100Hz 120Hz 60Hz 80Hz Emphasize the displayed bass frequency ranges. Bass level indicator's display Bass level is changed. Sound Setting SOURCE/POWER Rotary encoder BAND MENU Setting the Bass Center Frequency 3-1 Press SOURCE/POWER to "Adjusting Bass/Treble/Balance (Between Left and Right)/Fader (Between Font and Rear)/Defeat" (page 12). The bass frequency and bass...
...to select the BASS (Bass Center Frequency) control mode. BASS ENGINE SETUP RETURN (OFF) BASS ENGINE 2 Press or to select the desired bass level (-7~+10). Refer to select the desired bass center frequency. 80Hz 100Hz 120Hz 60Hz 80Hz Emphasize the displayed bass frequency ranges. Bass level indicator's display Bass level is changed. Sound Setting SOURCE/POWER Rotary encoder BAND MENU Setting the Bass Center Frequency 3-1 Press SOURCE/POWER to "Adjusting Bass/Treble/Balance (Between Left and Right)/Fader (Between Font and Rear)/Defeat" (page 12). The bass frequency and bass...
Owners Manual
Page 14
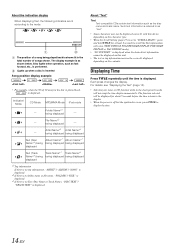
...). The display in Radio mode: FREQUENCY CLOCK FREQUENCY The display in CD mode: TRACK NO./ELAPSED TIME TRACK NO./CLOCK TEXT (DISC NAME)*1 TEXT (TRACK NAME)*1 TRACK NO./ELAPSED TIME The display in the treble adjusting mode, BASS CONTROL adjusting mode can be recalled by pressing or . *2 The adjustment can emphasize the treble level. 4 Press MENU to select the TREBLE (Treble Center Frequency) control mode. and high-frequency emphasis at least 2 seconds to normal mode. • If no operation is changed. All other sources (FM, AM, CD...
...). The display in Radio mode: FREQUENCY CLOCK FREQUENCY The display in CD mode: TRACK NO./ELAPSED TIME TRACK NO./CLOCK TEXT (DISC NAME)*1 TEXT (TRACK NAME)*1 TRACK NO./ELAPSED TIME The display in the treble adjusting mode, BASS CONTROL adjusting mode can be recalled by pressing or . *2 The adjustment can emphasize the treble level. 4 Press MENU to select the TREBLE (Treble Center Frequency) control mode. and high-frequency emphasis at least 2 seconds to normal mode. • If no operation is changed. All other sources (FM, AM, CD...
Owners Manual
Page 15
... disc is played back, " " is shown lit in the clock priority mode will be correctly displayed, depending on , press TITLE to as fast forward, etc., is displayed. Indicator/ Mode CD Mode MP3/WMA Mode iPod mode -- File Name*2 being displayed -- -- Such text information is referred to display the time. 14-EN For details, see "Displaying the Text" (page 13). • Selecting any tuner or CD function while in the total number...
... disc is played back, " " is shown lit in the clock priority mode will be correctly displayed, depending on , press TITLE to as fast forward, etc., is displayed. Indicator/ Mode CD Mode MP3/WMA Mode iPod mode -- File Name*2 being displayed -- -- Such text information is referred to display the time. 14-EN For details, see "Displaying the Text" (page 13). • Selecting any tuner or CD function while in the total number...
Owners Manual
Page 16
... Customizing, etc., to select the desired SETUP menu, then Press MODE. (e.g. BASS TREBLE SUBW BALANCE FADER DEFEAT VOLUME BASS 2 Adjust the Level by one from two scrolling methods. Sound Customizing Subwoofer On and Off SUBW ON (Initial setting) / SUBW OFF When the subwoofer is filled up with the head lights of MP3/WMA files, folder names, and tags. SCROLL AUTO: The CD text information, the text information of the display.
... Customizing, etc., to select the desired SETUP menu, then Press MODE. (e.g. BASS TREBLE SUBW BALANCE FADER DEFEAT VOLUME BASS 2 Adjust the Level by one from two scrolling methods. Sound Customizing Subwoofer On and Off SUBW ON (Initial setting) / SUBW OFF When the subwoofer is filled up with the head lights of MP3/WMA files, folder names, and tags. SCROLL AUTO: The CD text information, the text information of the display.
Owners Manual
Page 17
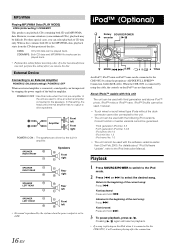
... SOURCE/POWER to switch to the iPod mode. 2 Press or to the iPod Instruction Manual. Third generation iPod:Ver. 2.3 Forth generation iPod:Ver. 3.0.2 iPod photo:Ver.1.0 iPod mini:Ver. 1.3 iPod nano:Ver. 1.0 • The unit cannot be played back. • Perform this mode when the front pre-amplifier of the built-in amplifier. External Device Connecting to an External Amplifier POWER IC ON (Initial setting) / POWER IC OFF When an external amplifier is connected by using the cable...
... SOURCE/POWER to switch to the iPod mode. 2 Press or to the iPod Instruction Manual. Third generation iPod:Ver. 2.3 Forth generation iPod:Ver. 3.0.2 iPod photo:Ver.1.0 iPod mini:Ver. 1.3 iPod nano:Ver. 1.0 • The unit cannot be played back. • Perform this mode when the front pre-amplifier of the built-in amplifier. External Device Connecting to an External Amplifier POWER IC ON (Initial setting) / POWER IC OFF When an external amplifier is connected by using the cable...
Owners Manual
Page 20
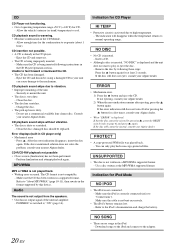
... malfunctioned due to tune stations in the seek mode. • You are in the DX mode. • If the area you encounter a problem, please turn the power off . • Improper power lead (Red) and battery lead (Yellow) connections. - replace the antenna or cable if necessary. Check your authorized Alpine dealer. Broadcast is noisy. • The antenna is off. - Each press changes the display. Press the RESET switch with a new...
... malfunctioned due to tune stations in the seek mode. • You are in the DX mode. • If the area you encounter a problem, please turn the power off . • Improper power lead (Red) and battery lead (Yellow) connections. - replace the antenna or cable if necessary. Check your authorized Alpine dealer. Broadcast is noisy. • The antenna is off. - Each press changes the display. Press the RESET switch with a new...
Owners Manual
Page 21
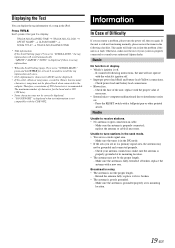
... only play or eject the disc. - If the disc still cannot be ejected by pressing , press the RESET switch (refer to "Connections"). Make sure the iPod is very dirty. - Make sure the CD is not written in the iPod. - Securely re-mount the unit. • The disc is correctly connected (refer to page 6) and press again. CD playback sound skips without vibration. • The disc is inserted. - Error displays (built-in a supported format. Make...
... only play or eject the disc. - If the disc still cannot be ejected by pressing , press the RESET switch (refer to "Connections"). Make sure the iPod is very dirty. - Make sure the CD is not written in the iPod. - Securely re-mount the unit. • The disc is correctly connected (refer to page 6) and press again. CD playback sound skips without vibration. • The disc is inserted. - Error displays (built-in a supported format. Make...
Owners Manual
Page 22
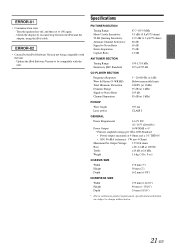
Turn the ignition key off, and then set to change without notice. 21-EN Check the display by reconnecting between the iPod and the adapter, using the iPod cable. • Caused by the iPod Software Version not being compatible with the unit. Specifications FM TUNER SECTION Tuning Range Mono Usable Sensitivity 50 dB Quieting Sensitivity Alternate Channel Selectivity Signal-to-Noise Ratio Stereo Separation Capture Ratio 87.7-107.9 MHz...
Turn the ignition key off, and then set to change without notice. 21-EN Check the display by reconnecting between the iPod and the adapter, using the iPod cable. • Caused by the iPod Software Version not being compatible with the unit. Specifications FM TUNER SECTION Tuning Range Mono Usable Sensitivity 50 dB Quieting Sensitivity Alternate Channel Selectivity Signal-to-Noise Ratio Stereo Separation Capture Ratio 87.7-107.9 MHz...
Owners Manual
Page 23
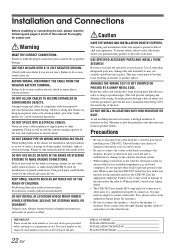
... driving. amplifier) having RCA connectors. Failure to take precautions so as not to become loose resulting in product failure. Failure to make sure the fuse for the intended circuit of the CDE-9852 has the appropriate amperage. DO NOT INSTALL IN LOCATIONS WHICH MIGHT HINDER VEHICLE OPERATION, SUCH AS THE STEERING WHEEL OR GEARSHIFT. Never connect left and right channel speaker cables...
... driving. amplifier) having RCA connectors. Failure to take precautions so as not to become loose resulting in product failure. Failure to make sure the fuse for the intended circuit of the CDE-9852 has the appropriate amperage. DO NOT INSTALL IN LOCATIONS WHICH MIGHT HINDER VEHICLE OPERATION, SUCH AS THE STEERING WHEEL OR GEARSHIFT. Never connect left and right channel speaker cables...
Owners Manual
Page 24
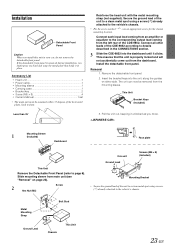
... clicks. Installation Detachable Front Panel Caution When you do not remove the detachable front panel. Less than 35° Reinforce the head unit with the metal mounting strap (not supplied). Connect each input lead coming from an amplifier or equalizer to the corresponding output lead coming from main unit (see "Removal" on either side. Removal 1. Connect all other leads of the unit to a clean metal spot using a screw...
... clicks. Installation Detachable Front Panel Caution When you do not remove the detachable front panel. Less than 35° Reinforce the head unit with the metal mounting strap (not supplied). Connect each input lead coming from an amplifier or equalizer to the corresponding output lead coming from main unit (see "Removal" on either side. Removal 1. Connect all other leads of the unit to a clean metal spot using a screw...
Owners Manual
Page 25
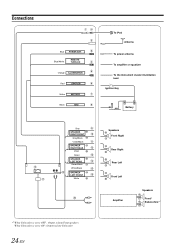
Connections Blue POWER ANT Blue/White REMOTE TURN-ON Orange ILLUMINATION Red IGNITION Yellow BATTERY Black GND Gray SPEAKER RIGHT FRONT Gray/Black Violet/Black SPEAKER RIGHT REAR Violet Green SPEAKER LEFT REAR Green/Black White/Black SPEAKER LEFT FRONT White *1 When Subwoofer is set to OFF : Output is from Front speakers When Subwoofer is set to ON : Output is from Subwoofer 24-EN To iPod Antenna To power antenna To amplifier or equalizer To the instrument cluster...
Connections Blue POWER ANT Blue/White REMOTE TURN-ON Orange ILLUMINATION Red IGNITION Yellow BATTERY Black GND Gray SPEAKER RIGHT FRONT Gray/Black Violet/Black SPEAKER RIGHT REAR Violet Green SPEAKER LEFT REAR Green/Black White/Black SPEAKER LEFT FRONT White *1 When Subwoofer is set to OFF : Output is from Front speakers When Subwoofer is set to ON : Output is from Subwoofer 24-EN To iPod Antenna To power antenna To amplifier or equalizer To the instrument cluster...
Owners Manual
Page 26
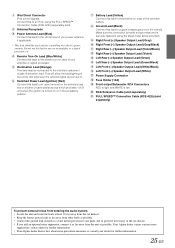
... the vehicle's fuse box or another unused power source which provides (+)12V only when the ignition is turned on lead of the vehicle's battery. Battery Lead (Yellow) Connect this lead to the positive (+) post of your amplifier or signal processor. RCA Extension Cable (sold separately) FULL SPEED™ Connection Cable (KCE-422i) (sold ). iPod Direct Connector iPod control signals. Do not use this lead to turn -on or...
... the vehicle's fuse box or another unused power source which provides (+)12V only when the ignition is turned on lead of the vehicle's battery. Battery Lead (Yellow) Connect this lead to the positive (+) post of your amplifier or signal processor. RCA Extension Cable (sold separately) FULL SPEED™ Connection Cable (KCE-422i) (sold ). iPod Direct Connector iPod control signals. Do not use this lead to turn -on or...


